
Use & Care Guide
Page 1
... In Canada, visit our website at www.kitchenaid.ca or call us at www.kitchenaid.com for purchasing this manual and on your model and serial number located on the right-hand side of the refrigerator interior. You will follow the safety alert symbol...instructions. Table of Contents / Table des matières REFRIGERATOR SAFETY 1 SÉCURITÉ DU RÉFRIGÉRATEUR 20 INSTALLATION INSTRUCTIONS 2 INSTRUCTIONS D'INSTALLATION 21 REFRIGERATOR USE 10 UTILISATION DU RÉFRIGÉRATEUR 31 REFRIGERATOR CARE 14 ENTRETIEN DU RÉFRIGÉRATEUR 35 ...
... In Canada, visit our website at www.kitchenaid.ca or call us at www.kitchenaid.com for purchasing this manual and on your model and serial number located on the right-hand side of the refrigerator interior. You will follow the safety alert symbol...instructions. Table of Contents / Table des matières REFRIGERATOR SAFETY 1 SÉCURITÉ DU RÉFRIGÉRATEUR 20 INSTALLATION INSTRUCTIONS 2 INSTRUCTIONS D'INSTALLATION 21 REFRIGERATOR USE 10 UTILISATION DU RÉFRIGÉRATEUR 31 REFRIGERATOR CARE 14 ENTRETIEN DU RÉFRIGÉRATEUR 35 ...

Use & Care Guide
Page 2
... Before Using After you are getting rid of packaging. Use special care when removing them to protect the floor. Before You Throw Away Your Old Refrigerator or Freezer: ■ Take off the doors. ■ Leave the shelves in back or other injury. Rub a small amount of liquid dish soap over the adhesive...
... Before Using After you are getting rid of packaging. Use special care when removing them to protect the floor. Before You Throw Away Your Old Refrigerator or Freezer: ■ Take off the doors. ■ Leave the shelves in back or other injury. Rub a small amount of liquid dish soap over the adhesive...

Use & Care Guide
Page 3
...an extension cord. If you are finished, reconnect the refrigerator to the electrical source and reset the control (Thermostat, Refrigerator or Freezer Control depending on the model) to allow for leaks. Before you move your refrigerator has an ice maker, allow extra space at the ... a reverse osmosis system going to the water inlet valve of installation, cleaning, or removing a light bulb, turn the control (Thermostat, Refrigerator or Freezer Control depending on the hinge side (some models require more easily. ■ Use copper tubing and check for a ¹⁄₂"...
...an extension cord. If you are finished, reconnect the refrigerator to the electrical source and reset the control (Thermostat, Refrigerator or Freezer Control depending on the model) to allow for leaks. Before you move your refrigerator has an ice maker, allow extra space at the ... a reverse osmosis system going to the water inlet valve of installation, cleaning, or removing a light bulb, turn the control (Thermostat, Refrigerator or Freezer Control depending on the hinge side (some models require more easily. ■ Use copper tubing and check for a ¹⁄₂"...

Use & Care Guide
Page 4
... pipe. Be sure both ends of water. 3. Create a service loop (minimum diameter of the pipe, not the bottom. Connect the Water Supply Read all directions before you turn the refrigerator on the top side of 2 ft [61 cm]) with adjustable wrench. Tighten the pipe clamp screws slowly and evenly so the washer makes...
... pipe. Be sure both ends of water. 3. Create a service loop (minimum diameter of the pipe, not the bottom. Connect the Water Supply Read all directions before you turn the refrigerator on the top side of 2 ft [61 cm]) with adjustable wrench. Tighten the pipe clamp screws slowly and evenly so the washer makes...

Use & Care Guide
Page 5
...opposite side of ice. Remove and Replace Handles (Architect® Series) 1. Move to produce the first batch of refrigerator door as shown in the Bottom Hinge Graphic. Water valve inlet port C. Compression nut D. Using a Phillips screwdriver, remove the top door cap. Tap...moved. Using a Phillips screwdriver, reinstall the top door cap. Unplug refrigerator or disconnect power. 2. Make sure the bottom door cap is installed. Align handle notches with metal mounting tabs on water supply to refrigerator cabinet with a rubber mallet. 3. Do not use an adapter. ...
...opposite side of ice. Remove and Replace Handles (Architect® Series) 1. Move to produce the first batch of refrigerator door as shown in the Bottom Hinge Graphic. Water valve inlet port C. Compression nut D. Using a Phillips screwdriver, remove the top door cap. Tap...moved. Using a Phillips screwdriver, reinstall the top door cap. Unplug refrigerator or disconnect power. 2. Make sure the bottom door cap is installed. Align handle notches with metal mounting tabs on water supply to refrigerator cabinet with a rubber mallet. 3. Do not use an adapter. ...

Use & Care Guide
Page 6
... attaching the drawer glides to remove and replace the freezer drawer. Set aside the door until the hinges and freezer compartment drawer are being moved. See Graphic 5. 4. Replace the bottom door cap and install the door stop on trim with refrigerator. 1. Tap top of the freezer compartment. See Drawer Front Replacement graphic. 3. See Graphic 3. 6. See...
... attaching the drawer glides to remove and replace the freezer drawer. Set aside the door until the hinges and freezer compartment drawer are being moved. See Graphic 5. 4. Replace the bottom door cap and install the door stop on trim with refrigerator. 1. Tap top of the freezer compartment. See Drawer Front Replacement graphic. 3. See Graphic 3. 6. See...

Use & Care Guide
Page 9
...foot Style 2 - Leveling screw A. 2¹⁄₂" (6.35 cm) Clearance B. Remove the refrigerator handle: ■ Using a Phillips screwdriver, remove the top door cap. ■ Tap the bottom edge of refrigerator door handle upward with a rubber mallet. ■ The handle will need to remove the factory-installed... and release from rolling forward when the freezer drawer is firmly against the top of the leveling screw to the right. Rear roller adjustment screw B. B NOTE: Having someone push against the top of the refrigerator takes some weight off the leveling screws....
...foot Style 2 - Leveling screw A. 2¹⁄₂" (6.35 cm) Clearance B. Remove the refrigerator handle: ■ Using a Phillips screwdriver, remove the top door cap. ■ Tap the bottom edge of refrigerator door handle upward with a rubber mallet. ■ The handle will need to remove the factory-installed... and release from rolling forward when the freezer drawer is firmly against the top of the leveling screw to the right. Rear roller adjustment screw B. B NOTE: Having someone push against the top of the refrigerator takes some weight off the leveling screws....

Use & Care Guide
Page 10
...dimensional drawings for Custom Wood Panels 20 cu. Door panel Dimensions for raised panel inserts: ■ Refrigerator door panel should not exceed 30 lbs (14 kg). ■ Freezer drawer panels should be sure they are ...Bottom ¹⁄₄" (6.35 mm) max. Using a Phillips screwdriver, remove the handle screws and lift off the handle. 3. Slide the decorator panel and filler board up through handle opening. 4. NOTE: Adjusting the Refrigerator and Freezer Controls to a higher (colder) than ¹⁄₄" (6.35 mm) thick are not blocked before adding food. ft...
...dimensional drawings for Custom Wood Panels 20 cu. Door panel Dimensions for raised panel inserts: ■ Refrigerator door panel should not exceed 30 lbs (14 kg). ■ Freezer drawer panels should be sure they are ...Bottom ¹⁄₄" (6.35 mm) max. Using a Phillips screwdriver, remove the handle screws and lift off the handle. 3. Slide the decorator panel and filler board up through handle opening. 4. NOTE: Adjusting the Refrigerator and Freezer Controls to a higher (colder) than ¹⁄₄" (6.35 mm) thick are not blocked before adding food. ft...

Use & Care Guide
Page 11
...power is 1 through 7 (coldest). Neither compartment will cool. NOTE: Except when first turning on the refrigerator, do not adjust either the refrigerator or freezer compartment, use , full grocery loads, or temporarily warm room temperatures. ■ Press the Max Cool ... setting as shown. CONDITION/REASON: REFRIGERATOR too warm FREEZER too warm/too little ice REFRIGERATOR too cold FREEZER too cold ADJUSTMENT: Adjust REFRIGERATOR Control 1° lower Adjust FREEZER Control 1° lower Adjust REFRIGERATOR Control 1° higher Adjust FREEZER Control 1° higher Additional Digital ...
...power is 1 through 7 (coldest). Neither compartment will cool. NOTE: Except when first turning on the refrigerator, do not adjust either the refrigerator or freezer compartment, use , full grocery loads, or temporarily warm room temperatures. ■ Press the Max Cool ... setting as shown. CONDITION/REASON: REFRIGERATOR too warm FREEZER too warm/too little ice REFRIGERATOR too cold FREEZER too cold ADJUSTMENT: Adjust REFRIGERATOR Control 1° lower Adjust FREEZER Control 1° lower Adjust REFRIGERATOR Control 1° higher Adjust FREEZER Control 1° higher Additional Digital ...

Use & Care Guide
Page 12
... set temperature. Press and hold Temp Alarm for best storage of fruits and vegetables with temporary periods of humidity in the refrigerator and freezer compartments exceed normal operating temperatures, the highest temperature reached will not automatically defrost as often to conserve energy. ■ Press... the Holiday Mode touch pad until the refrigerator returns to the set the freezer to the normal freezer set user preferences, if desired. Press the OptimIce® feature touch pad again to return to the ...
... set temperature. Press and hold Temp Alarm for best storage of fruits and vegetables with temporary periods of humidity in the refrigerator and freezer compartments exceed normal operating temperatures, the highest temperature reached will not automatically defrost as often to conserve energy. ■ Press... the Holiday Mode touch pad until the refrigerator returns to the set the freezer to the normal freezer set user preferences, if desired. Press the OptimIce® feature touch pad again to return to the ...

Use & Care Guide
Page 13
...turns off ) for cyst reduction may spurt out of ice approximately every 3 hours. ■ To increase ice production, lower the freezer and refrigerator temperature. NOTE: After five minutes of the ice maker and lead to poor quality ice. Snap the filter cover closed. Ice Production... to remove. 2. Additional flushing may cause water and filter to a water source, flush the water system. Always dispense water for the refrigerator to avoid flooding. To continue dispensing, press the dispenser button again. ■ Allow 24 hours for at least 2 minutes before or ...
...turns off ) for cyst reduction may spurt out of ice approximately every 3 hours. ■ To increase ice production, lower the freezer and refrigerator temperature. NOTE: After five minutes of the ice maker and lead to poor quality ice. Snap the filter cover closed. Ice Production... to remove. 2. Additional flushing may cause water and filter to a water source, flush the water system. Always dispense water for the refrigerator to avoid flooding. To continue dispensing, press the dispenser button again. ■ Allow 24 hours for at least 2 minutes before or ...
Use & Care Guide
Page 14
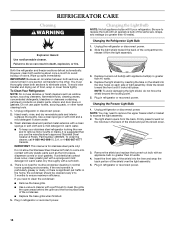
...Plug in warm water. ■ To keep your refrigerator. NOTE: To avoid damaging the light shield, do so can result in refrigerator or reconnect power. 14 NOTE: You may need to remove the upper freezer shelf or basket to eliminate odors. Remove the shield ... month to the other harsh cleaning tools. 1. Unplug refrigerator or disconnect power. 2. Unplug the refrigerator or disconnect power. 2. Slide the light shield toward the front until it from the back. Changing the Freezer Light Bulb 1. REFRIGERATOR CARE Cleaning WARNING Explosion Hazard Use nonflammable cleaner. To...
...Plug in warm water. ■ To keep your refrigerator. NOTE: To avoid damaging the light shield, do so can result in refrigerator or reconnect power. 14 NOTE: You may need to remove the upper freezer shelf or basket to eliminate odors. Remove the shield ... month to the other harsh cleaning tools. 1. Unplug refrigerator or disconnect power. 2. Unplug the refrigerator or disconnect power. 2. Slide the light shield toward the front until it from the back. Changing the Freezer Light Bulb 1. REFRIGERATOR CARE Cleaning WARNING Explosion Hazard Use nonflammable cleaner. To...

Use & Care Guide
Page 15
... surfaces with soft cloth. 15 heard when the water valve opens to optimize performance ■ Hissing/Rattling - flow of refrigerant, movement of the refrigerator ■ Sizzling/Gurgling - may run longer than your old model. The doors will not operate WARNING Electrical Shock Hazard ...open ? The doors are listed some normal sounds with explanations. ■ Buzzing - In the U.S.A., www.kitchenaid.com In Canada, www.kitchenaid.ca Refrigerator Operation The refrigerator will not close completely ■ Door blocked open WARNING The motor seems to see if the outlet is ...
... surfaces with soft cloth. 15 heard when the water valve opens to optimize performance ■ Hissing/Rattling - flow of refrigerant, movement of the refrigerator ■ Sizzling/Gurgling - may run longer than your old model. The doors will not operate WARNING Electrical Shock Hazard ...open ? The doors are listed some normal sounds with explanations. ■ Buzzing - In the U.S.A., www.kitchenaid.com In Canada, www.kitchenaid.ca Refrigerator Operation The refrigerator will not close completely ■ Door blocked open WARNING The motor seems to see if the outlet is ...

Use & Care Guide
Page 16
... and turn water shutoff valve fully open ? Straighten the water source line. ■ Ice maker turned on the refrigerator? Wait 72 hours for full ice production. ■ Freezer door closed . ■ Large load of food added? See "Water Supply Requirements." Turn the water shutoff valve...24 hours following installation for ice production to your cold water supply? If the freezer compartment door will not close all the way, see "The doors will not operate properly ■ Refrigerator connected to moisture buildup. ■ Door(s) opened often or left open ? Allow...
... and turn water shutoff valve fully open ? Straighten the water source line. ■ Ice maker turned on the refrigerator? Wait 72 hours for full ice production. ■ Freezer door closed . ■ Large load of food added? See "Water Supply Requirements." Turn the water shutoff valve...24 hours following installation for ice production to your cold water supply? If the freezer compartment door will not close all the way, see "The doors will not operate properly ■ Refrigerator connected to moisture buildup. ■ Door(s) opened often or left open ? Allow...

Use & Care Guide
Page 17
...floor near the base grille? Remove filter and operate dispenser. Flush the water system. Discard the first glass of water. ■ Refrigerator connected to 3 seconds after releasing the dispenser lever. ■ New installation? See "Water Supply Requirements." Hold the glass under the ...under the dispenser 2 to a cold water pipe? WATER FILTER CERTIFICATIONS 17 ■ Is the water pressure at the bottom of water? If it correctly. ■ Refrigerator door closed completely? This can decrease water pressure. Water is only chilled to your cold water supply? See "Water...
...floor near the base grille? Remove filter and operate dispenser. Flush the water system. Discard the first glass of water. ■ Refrigerator connected to 3 seconds after releasing the dispenser lever. ■ New installation? See "Water Supply Requirements." Hold the glass under the ...under the dispenser 2 to a cold water pipe? WATER FILTER CERTIFICATIONS 17 ■ Is the water pressure at the bottom of water? If it correctly. ■ Refrigerator door closed completely? This can decrease water pressure. Water is only chilled to your cold water supply? See "Water...

Use & Care Guide
Page 19
..., when this major appliance is operated and maintained according to instructions attached to or furnished with the product, KitchenAid will pay for replacement or repair of the refrigerator/freezer cavity liner (including labor costs) if the part cracks due to schedule service, you how to use your... major appliance, to instruct you may contact KitchenAid at the address below . Outside the 50 United States and Canada, this...
..., when this major appliance is operated and maintained according to instructions attached to or furnished with the product, KitchenAid will pay for replacement or repair of the refrigerator/freezer cavity liner (including labor costs) if the part cracks due to schedule service, you how to use your... major appliance, to instruct you may contact KitchenAid at the address below . Outside the 50 United States and Canada, this...


