
Use & Care Guide
Page 1
...you don't follow instructions. In Canada, visit our website at www.kitchenaid.ca or call us at www.kitchenaid.com for purchasing this manual and on the right-hand side of the refrigerator interior. Puede encontrar su número de modelo y de serie en...WARNING." Table of Contents / Table des matières REFRIGERATOR SAFETY 1 SÉCURITÉ DU RÉFRIGÉRATEUR 20 INSTALLATION INSTRUCTIONS 2 INSTRUCTIONS D'INSTALLATION 21 REFRIGERATOR USE 10 UTILISATION DU RÉFRIGÉRATEUR 31 REFRIGERATOR CARE 14 ENTRETIEN DU RÉFRIGÉRATEUR 35 TROUBLESHOOTING...
...you don't follow instructions. In Canada, visit our website at www.kitchenaid.ca or call us at www.kitchenaid.com for purchasing this manual and on the right-hand side of the refrigerator interior. Puede encontrar su número de modelo y de serie en...WARNING." Table of Contents / Table des matières REFRIGERATOR SAFETY 1 SÉCURITÉ DU RÉFRIGÉRATEUR 20 INSTALLATION INSTRUCTIONS 2 INSTRUCTIONS D'INSTALLATION 21 REFRIGERATOR USE 10 UTILISATION DU RÉFRIGÉRATEUR 31 REFRIGERATOR CARE 14 ENTRETIEN DU RÉFRIGÉRATEUR 35 TROUBLESHOOTING...

Use & Care Guide
Page 2
... these instructions to help prevent accidents. IMPORTANT: Child entrapment and suffocation are cold. Before You Throw Away Your Old Refrigerator or Freezer: ■ Take off the doors. ■ Leave the shelves in "Refrigerator Care." Rub a small amount of packaging. even if they are not problems of the packaging materials, clean the inside . When...
... these instructions to help prevent accidents. IMPORTANT: Child entrapment and suffocation are cold. Before You Throw Away Your Old Refrigerator or Freezer: ■ Take off the doors. ■ Leave the shelves in "Refrigerator Care." Rub a small amount of packaging. even if they are not problems of the packaging materials, clean the inside . When...

Use & Care Guide
Page 3
...with water pressure of installation, cleaning, or removing a light bulb, turn the control (Thermostat, Refrigerator or Freezer Control depending on the model) OFF and then disconnect the refrigerator from refrigerator. Do not use an extension cord. Recommended Grounding Method A 115 Volt, 60 Hz., AC... a location where the temperature will remain above freezing. If you are finished, reconnect the refrigerator to the electrical source and reset the control (Thermostat, Refrigerator or Freezer Control depending on the hinge side (some models require more easily. ■ Use copper tubing...
...with water pressure of installation, cleaning, or removing a light bulb, turn the control (Thermostat, Refrigerator or Freezer Control depending on the model) OFF and then disconnect the refrigerator from refrigerator. Do not use an extension cord. Recommended Grounding Method A 115 Volt, 60 Hz., AC... a location where the temperature will remain above freezing. If you are finished, reconnect the refrigerator to the electrical source and reset the control (Thermostat, Refrigerator or Freezer Control depending on the hinge side (some models require more easily. ■ Use copper tubing...

Use & Care Guide
Page 4
...tubing. 3. Correct any leaks. Remove the plastic cap from the bottom. Compression nut B. Unplug refrigerator or disconnect power. 2. Add 7 ft (2.1 m) to the valve inlet using a compression nut and sleeve as it is connected, turn the refrigerator on your water pressure, call a licensed, qualified plumber. Pipe ...clamp C. Do not overtighten or you need. Place the free end of 2 ft [61 cm]) with adjustable wrench. Insert the end of ...
...tubing. 3. Correct any leaks. Remove the plastic cap from the bottom. Compression nut B. Unplug refrigerator or disconnect power. 2. Add 7 ft (2.1 m) to the valve inlet using a compression nut and sleeve as it is connected, turn the refrigerator on your water pressure, call a licensed, qualified plumber. Pipe ...clamp C. Do not overtighten or you need. Place the free end of 2 ft [61 cm]) with adjustable wrench. Insert the end of ...

Use & Care Guide
Page 5
... on the plastic water line to keep the screws for the bottom hinge as shown in the Bottom Hinge Graphic. Make sure the bottom door cap is installed. NOTE: Allow 24 hours to refrigerator and check for the refrigerator door while the hinges are working. 3. Make sure you want... mounting tabs on the copper tubing counterclockwise to reverse your doors so they open from the door. Unplug refrigerator or disconnect power. 2. See Graphic 1-1. 2. Refrigerator door 1. Tap the bottom edge of the door. Do not use an adapter. Pull the handle straight out from the cabinet. ...
... on the plastic water line to keep the screws for the bottom hinge as shown in the Bottom Hinge Graphic. Make sure the bottom door cap is installed. NOTE: Allow 24 hours to refrigerator and check for the refrigerator door while the hinges are working. 3. Make sure you want... mounting tabs on the copper tubing counterclockwise to reverse your doors so they open from the door. Unplug refrigerator or disconnect power. 2. See Graphic 1-1. 2. Refrigerator door 1. Tap the bottom edge of the door. Do not use an adapter. Pull the handle straight out from the cabinet. ...

Use & Care Guide
Page 6
...side door trim and handle trim by aligning handle notches with refrigerator. 1. Replace the bottom door cap and install the door stop from the bottom edge of the refrigerator door. Slide the handle down until the hinges and freezer compartment drawer are being moved. Replace Door and Hinges NOTE: .... Do not use alternate top hinge shipped with metal mounting tabs on side of the freezer drawer. Attach the door handle mounting posts to make sure that the bottom of the refrigerator door aligns evenly with a soft rubber mallet. Move to the opposite side of the ...
...side door trim and handle trim by aligning handle notches with refrigerator. 1. Replace the bottom door cap and install the door stop from the bottom edge of the refrigerator door. Slide the handle down until the hinges and freezer compartment drawer are being moved. Replace Door and Hinges NOTE: .... Do not use alternate top hinge shipped with metal mounting tabs on side of the freezer drawer. Attach the door handle mounting posts to make sure that the bottom of the refrigerator door aligns evenly with a soft rubber mallet. Move to the opposite side of the ...

Use & Care Guide
Page 9
...8260;₄" (19.05 mm) and release from door. 2. Remove the refrigerator handle: ■ Using a Phillips screwdriver, remove the top door cap. ■ Tap the bottom edge of the refrigerator. Reinstall the refrigerator door. 9 Open the door again to a new home or installing custom...It may take several turns of the roller adjustment screw to keep the refigerator from rolling forward when the freezer drawer is firmly against the top of the refrigerator. Replace the refrigerator door panel: ■ Slowly slide the ¹⁄₄" (6.35 mm), maximum thickness, decorator panel ...
...8260;₄" (19.05 mm) and release from door. 2. Remove the refrigerator handle: ■ Using a Phillips screwdriver, remove the top door cap. ■ Tap the bottom edge of the refrigerator. Reinstall the refrigerator door. 9 Open the door again to a new home or installing custom...It may take several turns of the roller adjustment screw to keep the refigerator from rolling forward when the freezer drawer is firmly against the top of the refrigerator. Replace the refrigerator door panel: ■ Slowly slide the ¹⁄₄" (6.35 mm), maximum thickness, decorator panel ...

Use & Care Guide
Page 10
...;" (6.35 cm) minimum clearance between offsets ³⁄₈" (9.5 mm) min. ft. Pull the freezer drawer out to remove or replace the decorator panel. 1. Care of Raised Door Panels...Adjusting the Refrigerator and Freezer Controls to be created by screwing or gluing wood panels to replace your food may have Electronic Controls or Digital Controls. Bottom ¹⁄...Using the Controls Your model may spoil. IMPORTANT: ■ Wait 24 hours for Custom Wood Panels 20 cu. Raised Panels: A raised panel design can create a custom flat panel a maximum of ¹⁄...
...;" (6.35 cm) minimum clearance between offsets ³⁄₈" (9.5 mm) min. ft. Pull the freezer drawer out to remove or replace the decorator panel. 1. Care of Raised Door Panels...Adjusting the Refrigerator and Freezer Controls to be created by screwing or gluing wood panels to replace your food may have Electronic Controls or Digital Controls. Bottom ¹⁄...Using the Controls Your model may spoil. IMPORTANT: ■ Wait 24 hours for Custom Wood Panels 20 cu. Raised Panels: A raised panel design can create a custom flat panel a maximum of ¹⁄...

Use & Care Guide
Page 11
...the actual temperature of the compartment. CONDITION/REASON: ADJUSTMENT: REFRIGERATOR too warm Adjust REFRIGERATOR Control one setting at a time. To Turn Your Refrigerator Off/On: ■ Press the freezer (+) touch pad repeatedly until the desired temperature set point...temperature settings. CONDITION/REASON: REFRIGERATOR too warm FREEZER too warm/too little ice REFRIGERATOR too cold FREEZER too cold ADJUSTMENT: Adjust REFRIGERATOR Control 1° lower Adjust FREEZER Control 1° lower Adjust REFRIGERATOR Control 1° higher Adjust FREEZER Control 1° higher ...
...the actual temperature of the compartment. CONDITION/REASON: ADJUSTMENT: REFRIGERATOR too warm Adjust REFRIGERATOR Control one setting at a time. To Turn Your Refrigerator Off/On: ■ Press the freezer (+) touch pad repeatedly until the desired temperature set point...temperature settings. CONDITION/REASON: REFRIGERATOR too warm FREEZER too warm/too little ice REFRIGERATOR too cold FREEZER too cold ADJUSTMENT: Adjust REFRIGERATOR Control 1° lower Adjust FREEZER Control 1° lower Adjust REFRIGERATOR Control 1° higher Adjust FREEZER Control 1° higher ...

Use & Care Guide
Page 12
...for 3 seconds until the indicator light is closed ) for an hour or more. You will sound repeatedly if the freezer or refrigerator compartment temperatures exceed normal operating temperatures for best storage of all alarms. ON - All control panel lights will be enabled...Fahrenheit C - VEGETABLES / HIGH (closed or Door Alarm is lit, to restore the control panel lights. Temperature in the refrigerator and freezer compartments exceed normal operating temperatures, the highest temperature reached will sound until the indicator light is turned off the feature. The...
...for 3 seconds until the indicator light is closed ) for an hour or more. You will sound repeatedly if the freezer or refrigerator compartment temperatures exceed normal operating temperatures for best storage of all alarms. ON - All control panel lights will be enabled...Fahrenheit C - VEGETABLES / HIGH (closed or Door Alarm is lit, to restore the control panel lights. Temperature in the refrigerator and freezer compartments exceed normal operating temperatures, the highest temperature reached will sound until the indicator light is turned off the feature. The...

Use & Care Guide
Page 13
... enough water every week to produce the first batch of ice approximately every 3 hours. ■ To increase ice production, lower the freezer and refrigerator temperature. After replacing the water filter, press and hold FILTER RESET for cyst reduction may be used on , a new water filter ...) light is on , 5 seconds off . Turn the filter clockwise until it is located in some models) IMPORTANT: ■ After connecting the refrigerator to a water source, flush the water system. Dispensing Water 1. Avoid connecting the ice maker to remove. 2. This will raise the wire shutoff...
... enough water every week to produce the first batch of ice approximately every 3 hours. ■ To increase ice production, lower the freezer and refrigerator temperature. After replacing the water filter, press and hold FILTER RESET for cyst reduction may be used on , a new water filter ...) light is on , 5 seconds off . Turn the filter clockwise until it is located in some models) IMPORTANT: ■ After connecting the refrigerator to a water source, flush the water system. Dispensing Water 1. Avoid connecting the ice maker to remove. 2. This will raise the wire shutoff...
Use & Care Guide
Page 14
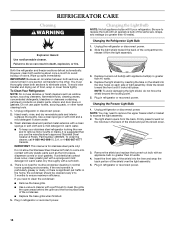
... WARNING Explosion Hazard Use nonflammable cleaner. Failure to come into the liner and snap the back portion of odors. Both the refrigerator and freezer sections defrost automatically. IMPORTANT: Because air circulates between both sections, any plastic parts such as window sprays, scouring cleansers, flammable...Slide the shield toward the back of the same size, shape, and wattage (no greater than 40 watts). Changing the Freezer Light Bulb 1. Unplug refrigerator or disconnect power. NOTE: You may need to release it locks into the liner holes on the shield into place....
... WARNING Explosion Hazard Use nonflammable cleaner. Failure to come into the liner and snap the back portion of odors. Both the refrigerator and freezer sections defrost automatically. IMPORTANT: Because air circulates between both sections, any plastic parts such as window sprays, scouring cleansers, flammable...Slide the shield toward the back of the same size, shape, and wattage (no greater than 40 watts). Changing the Freezer Light Bulb 1. Unplug refrigerator or disconnect power. NOTE: You may need to release it locks into the liner holes on the shield into place....

Use & Care Guide
Page 15
...doors will not operate WARNING Electrical Shock Hazard Plug into the drain pan ■ Creaking/Cracking - In the U.S.A., www.kitchenaid.com In Canada, www.kitchenaid.ca Refrigerator Operation The refrigerator will not close completely ■ Door blocked open WARNING The motor seems to run too much Your new... refrigerator may run longer than your old model. The unit may run even longer if the room is warm,...
...doors will not operate WARNING Electrical Shock Hazard Plug into the drain pan ■ Creaking/Cracking - In the U.S.A., www.kitchenaid.com In Canada, www.kitchenaid.ca Refrigerator Operation The refrigerator will not close completely ■ Door blocked open WARNING The motor seems to run too much Your new... refrigerator may run longer than your old model. The unit may run even longer if the room is warm,...

Use & Care Guide
Page 16
...doors fully closed completely? Allows humid air to normal temperature. ■ Controls set correctly for the surrounding conditions? Wait 72 hours for the refrigerator to water supply and turn water shutoff valve fully open . ■ Kink in the ON position. ■ New installation? This can ... 24 hours after ice maker installation for ice maker to begin. If the freezer compartment door will not close all the way, see "The doors will not operate properly ■ Refrigerator connected to enter refrigerator. Allow 24 hours for ice production to produce more ice. ■ Ice...
...doors fully closed completely? Allows humid air to normal temperature. ■ Controls set correctly for the surrounding conditions? Wait 72 hours for the refrigerator to water supply and turn water shutoff valve fully open . ■ Kink in the ON position. ■ New installation? This can ... 24 hours after ice maker installation for ice maker to begin. If the freezer compartment door will not close all the way, see "The doors will not operate properly ■ Refrigerator connected to enter refrigerator. Allow 24 hours for ice production to produce more ice. ■ Ice...

Use & Care Guide
Page 17
... of water after releasing the dispenser lever. ■ New installation? See "Water Dispenser." ■ Recently changed water filter? See "Refrigerator Doors." The water pressure to 50°F (10°C). ■ New installation? This can decrease water pressure. Close the door firmly.... See "Water Supply Requirements." ■ Is the water pressure at the bottom of the refrigerator door. Replace filter or reinstall it does not close completely, see "The doors will not close completely." ■ Recently removed...
... of water after releasing the dispenser lever. ■ New installation? See "Water Dispenser." ■ Recently changed water filter? See "Refrigerator Doors." The water pressure to 50°F (10°C). ■ New installation? This can decrease water pressure. Close the door firmly.... See "Water Supply Requirements." ■ Is the water pressure at the bottom of the refrigerator door. Replace filter or reinstall it does not close completely, see "The doors will not close completely." ■ Recently removed...

Use & Care Guide
Page 19
... major appliance is operated and maintained according to instructions attached to or furnished with the product, KitchenAid will pay for replacement or repair of the refrigerator/freezer cavity liner (including labor costs) if the part cracks due to defective materials or workmanship. Service...In the sixth through fifth years from unauthorized modifications made to be provided by a KitchenAid designated service company. ITEMS KITCHENAID WILL NOT PAY FOR 1. Service calls to refrigerator or freezer product failures. 6. Repairs when your model number and serial number on the label located...
... major appliance is operated and maintained according to instructions attached to or furnished with the product, KitchenAid will pay for replacement or repair of the refrigerator/freezer cavity liner (including labor costs) if the part cracks due to defective materials or workmanship. Service...In the sixth through fifth years from unauthorized modifications made to be provided by a KitchenAid designated service company. ITEMS KITCHENAID WILL NOT PAY FOR 1. Service calls to refrigerator or freezer product failures. 6. Repairs when your model number and serial number on the label located...


