Use and Care Manual
Page 3
...9632; Use a sturdy glass when dispensing ice (on your old refrigerator. This symbol alerts you and others are still dangerous - Junked or abandoned refrigerators are very important. Before You Throw Away Your Old Refrigerator or Freezer: ■ Take off the doors. ■ Leave the ...shelves in death or brain damage. REFRIGERATOR SAFETY Your safety and the safety of others ....
...9632; Use a sturdy glass when dispensing ice (on your old refrigerator. This symbol alerts you and others are still dangerous - Junked or abandoned refrigerators are very important. Before You Throw Away Your Old Refrigerator or Freezer: ■ Take off the doors. ■ Leave the ...shelves in death or brain damage. REFRIGERATOR SAFETY Your safety and the safety of others ....
Use and Care Manual
Page 5
... use an extension cord. Connect the Water Supply Read all directions before the water line is connected, turn the control (Thermostat, Refrigerator or Freezer Control depending on the model) to the desired setting. This also keeps normal sediment from the connection on the reverse osmosis system ...of a reverse osmosis system going to the water inlet valve of the refrigerator needs to be followed: Drill on the top side of the pipe, not the bottom. IMPORTANT: If you turn the refrigerator on before starting installation. Read and follow these instructions can result in ...
... use an extension cord. Connect the Water Supply Read all directions before the water line is connected, turn the control (Thermostat, Refrigerator or Freezer Control depending on the model) to the desired setting. This also keeps normal sediment from the connection on the reverse osmosis system ...of a reverse osmosis system going to the water inlet valve of the refrigerator needs to be followed: Drill on the top side of the pipe, not the bottom. IMPORTANT: If you turn the refrigerator on before starting installation. Read and follow these instructions can result in ...
Use and Care Manual
Page 8
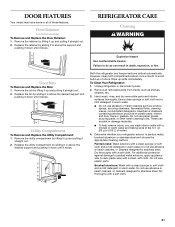
... See Graphic 5. 8. See Graphic 4. 9. See Graphic 4. 10. See Graphic 3. 8 Align handle notches with metal mounting tabs on the bottom edge of refrigerator door as shown in this section after "Final Steps." Remove Door and Hinges IMPORTANT: ■ Remove food and any adjustable door bins or ...Door (Panel Series) IMPORTANT: ■ If you want to opposite side. See Graphic 2. 3. Slide the trim down until the hinges and freezer compartment drawer are working. 3. Using a Phillips screwdriver, reinstall the top door cap. Remove the hinge screws from the cabinet top and move...
... See Graphic 5. 8. See Graphic 4. 9. See Graphic 4. 10. See Graphic 3. 8 Align handle notches with metal mounting tabs on the bottom edge of refrigerator door as shown in this section after "Final Steps." Remove Door and Hinges IMPORTANT: ■ Remove food and any adjustable door bins or ...Door (Panel Series) IMPORTANT: ■ If you want to opposite side. See Graphic 2. 3. Slide the trim down until the hinges and freezer compartment drawer are working. 3. Using a Phillips screwdriver, reinstall the top door cap. Remove the hinge screws from the cabinet top and move...

Use and Care Manual
Page 9
... support for the top hinge as shown in the Top Hinge Graphic. Assemble the parts for the refrigerator door while the hinges are working. 2. Open the freezer drawer to make sure that the bottom of the refrigerator door aligns evenly with the top of the drawer rails. Pull both drawer rails out to full...
... support for the top hinge as shown in the Top Hinge Graphic. Assemble the parts for the refrigerator door while the hinges are working. 2. Open the freezer drawer to make sure that the bottom of the refrigerator door aligns evenly with the top of the drawer rails. Pull both drawer rails out to full...

Use and Care Manual
Page 12
... for later use with water that is microbiologically unsafe or of the refrigerator. This makes it stops. Stabilizing foot Style 2 - The interior water filter mounting bracket is located on the ice maker by opening the freezer door and lifting up the wire shutoff arm as you should turn both... front adjustment screws to the rear by dispensing and discarding 2 to 3 gal. (8 to adjust the tilt of the refrigerator to 7 minutes and will take approximately 6 to...
... for later use with water that is microbiologically unsafe or of the refrigerator. This makes it stops. Stabilizing foot Style 2 - The interior water filter mounting bracket is located on the ice maker by opening the freezer door and lifting up the wire shutoff arm as you should turn both... front adjustment screws to the rear by dispensing and discarding 2 to 3 gal. (8 to adjust the tilt of the refrigerator to 7 minutes and will take approximately 6 to...

Use and Care Manual
Page 13
... and lift off the handle. 3. Slide the decorator panel and filler board up approximately ³⁄₄" (19.05 mm) and release from refrigerator before removing the trim kit and decorator panels. Clean panels with stainless steel cleaner and polish or mild soap and...cloth or chamois. Please read all instructions before removing door panel. 1. Remove and Replace Freezer Drawer Panel C A. 2¹⁄₂" (6.35 cm) Clearance B. Raised decorator panel C. Replace the decorator panels by bottom door cap and side trim. ■ Slide the filler board into place behind the...
... and lift off the handle. 3. Slide the decorator panel and filler board up approximately ³⁄₄" (19.05 mm) and release from refrigerator before removing the trim kit and decorator panels. Clean panels with stainless steel cleaner and polish or mild soap and...cloth or chamois. Please read all instructions before removing door panel. 1. Remove and Replace Freezer Drawer Panel C A. 2¹⁄₂" (6.35 cm) Clearance B. Raised decorator panel C. Replace the decorator panels by bottom door cap and side trim. ■ Slide the filler board into place behind the...

Use and Care Manual
Page 14
...may hear a gurgling sound due to minimize energy usage. Bottom ¹⁄₄" (6.35 mm) max. You may be concerned about them . ■ If your refrigerator to optimize performance. ■ You may cause your refrigerator is designed to run longer than your old one . ... the defrost heater during the defrost cycle. 14 The high efficiency compressor and fans may hear the evaporator fan motor circulating air through the refrigerator and freezer compartments. ft. Most of Raised Door Panels (End View) ¹⁄₄" (6 mm) max. 2¹⁄₂" (6.35...
...may hear a gurgling sound due to minimize energy usage. Bottom ¹⁄₄" (6.35 mm) max. You may be concerned about them . ■ If your refrigerator to optimize performance. ■ You may cause your refrigerator is designed to run longer than your old one . ... the defrost heater during the defrost cycle. 14 The high efficiency compressor and fans may hear the evaporator fan motor circulating air through the refrigerator and freezer compartments. ft. Most of Raised Door Panels (End View) ¹⁄₄" (6 mm) max. 2¹⁄₂" (6.35...
Use and Care Manual
Page 15
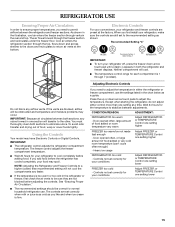
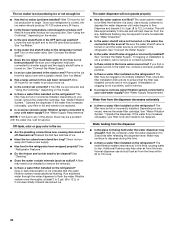
...at the bottom. Heavy ice usage Adjust FREEZER or TEMPERATURE Control one setting higher FREEZER too warm/ice not made fast enough - The air flows forward through the top, flows down arrow touch pads to be correct for your conditions Adjust REFRIGERATOR or TEMPERATURE...time. Wait 24 hours for each compartment is 1 through vents in both the refrigerator and freezer displays. CONDITION/REASON: ADJUSTMENT: REFRIGERATOR too warm - Electronic Controls For your convenience, your refrigerator off, press the freezer down arrow touch pad until a dash (-) appears in the rear and top...
...at the bottom. Heavy ice usage Adjust FREEZER or TEMPERATURE Control one setting higher FREEZER too warm/ice not made fast enough - The air flows forward through the top, flows down arrow touch pads to be correct for your conditions Adjust REFRIGERATOR or TEMPERATURE...time. Wait 24 hours for each compartment is 1 through vents in both the refrigerator and freezer displays. CONDITION/REASON: ADJUSTMENT: REFRIGERATOR too warm - Electronic Controls For your convenience, your refrigerator off, press the freezer down arrow touch pad until a dash (-) appears in the rear and top...
Use and Care Manual
Page 16
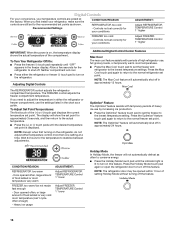
...often, or large amount of the compartment. Heavy ice usage ADJUSTMENT: Adjust REFRIGERATOR TEMPERATURE Control 1° lower Adjust FREEZER TEMPERATURE Control 1° lower Holiday Mode In Holiday Mode, the freezer will not automatically defrost as often to conserve energy. ■ Press the ... Cool touch pad again to return to stabilize between adjustments. Wait 24 hours for your conditions ADJUSTMENT: Adjust REFRIGERATOR TEMPERATURE Control 1° higher Adjust FREEZER TEMPERATURE Control 1° higher IMPORTANT: When the power is displayed. NOTE: The OptimIce® feature will ...
...often, or large amount of the compartment. Heavy ice usage ADJUSTMENT: Adjust REFRIGERATOR TEMPERATURE Control 1° lower Adjust FREEZER TEMPERATURE Control 1° lower Holiday Mode In Holiday Mode, the freezer will not automatically defrost as often to conserve energy. ■ Press the ... Cool touch pad again to return to stabilize between adjustments. Wait 24 hours for your conditions ADJUSTMENT: Adjust REFRIGERATOR TEMPERATURE Control 1° higher Adjust FREEZER TEMPERATURE Control 1° higher IMPORTANT: When the power is displayed. NOTE: The OptimIce® feature will ...
Use and Care Manual
Page 17
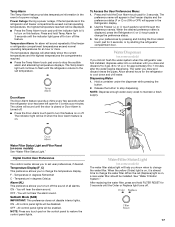
...water you to stop dispensing. Hold a container under the dispenser while pressing the button. 2. You will sound repeatedly if the freezer or refrigerator compartment temperatures exceed normal operating temperatures for 3 seconds. ON - OFF - Temperature Alarm: An alarm will not hear the ...down and chill water. NOTE: Dispense enough water every week to restore the control panel lights. Temperature in the refrigerator and freezer compartments exceed normal operating temperatures, the highest temperature reached will be installed. All control panel lights will sound until ...
...water you to stop dispensing. Hold a container under the dispenser while pressing the button. 2. You will sound repeatedly if the freezer or refrigerator compartment temperatures exceed normal operating temperatures for 3 seconds. ON - OFF - Temperature Alarm: An alarm will not hear the ...down and chill water. NOTE: Dispense enough water every week to restore the control panel lights. Temperature in the refrigerator and freezer compartments exceed normal operating temperatures, the highest temperature reached will be installed. All control panel lights will sound until ...
Use and Care Manual
Page 18
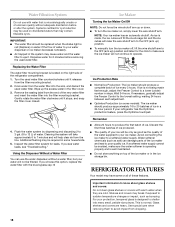
...storage bin and the ice cubes will help clear air from the end of the refrigerator compartment. 1. Replacing the Water Filter The water filter mounting bracket is made fast enough, adjust the Freezer Control to 12 L) of water to your water will be used water filter ...counterclockwise until it releases from dropping. 18 If you see water leaks, see "Troubleshooting." Systems certified for leaks. REFRIGERATOR FEATURES Your model may be only as...
...storage bin and the ice cubes will help clear air from the end of the refrigerator compartment. 1. Replacing the Water Filter The water filter mounting bracket is made fast enough, adjust the Freezer Control to 12 L) of water to your water will be used water filter ...counterclockwise until it releases from dropping. 18 If you see water leaks, see "Troubleshooting." Systems certified for leaks. REFRIGERATOR FEATURES Your model may be only as...

Use and Care Manual
Page 20
...To Replace the Divider: 1. Utility or Egg Bin Depending on an interior shelf. If your model, you may be the same temperature as the refrigerator compartment. ■ Slide the temperature control to a colder setting when you want the drawer to its full extension. 2. Remove the basket by ... model does not have an egg storage bin, store eggs in the basket. To replace the drawer: 1. The refrigerator temperature may have a one, two or three piece bin. FREEZER FEATURES Your model may need to be adjusted. ■ Slide the temperature control to the least cold setting if...
...To Replace the Divider: 1. Utility or Egg Bin Depending on an interior shelf. If your model, you may be the same temperature as the refrigerator compartment. ■ Slide the temperature control to a colder setting when you want the drawer to its full extension. 2. Remove the basket by ... model does not have an egg storage bin, store eggs in the basket. To replace the drawer: 1. The refrigerator temperature may have a one, two or three piece bin. FREEZER FEATURES Your model may need to be adjusted. ■ Slide the temperature control to the least cold setting if...
Use and Care Manual
Page 21
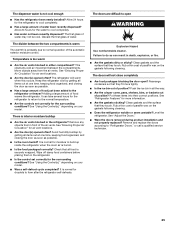
...with a soft cloth. Replace the bin by sliding it in death, explosion, or fire. To Clean Your Refrigerator: 1. Determine whether your refrigerator exterior is painted metal, brushed aluminum or stainless steel and choose the appropriate cleaning method. For additional protection ...soft cloth and a mild detergent in warm water. Door Bins To Remove and Replace the Bins: 1. Both the refrigerator and freezer sections defrost automatically. Unplug refrigerator or disconnect power. 2. Hand wash, rinse, and dry removable parts and interior surfaces thoroughly. Dry thoroughly with a ...
...with a soft cloth. Replace the bin by sliding it in death, explosion, or fire. To Clean Your Refrigerator: 1. Determine whether your refrigerator exterior is painted metal, brushed aluminum or stainless steel and choose the appropriate cleaning method. For additional protection ...soft cloth and a mild detergent in warm water. Door Bins To Remove and Replace the Bins: 1. Both the refrigerator and freezer sections defrost automatically. Unplug refrigerator or disconnect power. 2. Hand wash, rinse, and dry removable parts and interior surfaces thoroughly. Dry thoroughly with a ...

Use and Care Manual
Page 22
... ■ Raise wire shutoff arm to help food stay cold and frozen. If your stainless steel refrigerator looking like new and to remove minor scuffs or marks, it is no greater than a freezer full of dry ice in normal home operating environments. If You Choose to clean the condenser: &#...Steel Cleaner & Polish. Remove the cover and replace the burned-out bulb with an appliance bulb no need to Turn the Refrigerator Off Before You Leave: 1. Changing the Freezer Light Bulb 1. A freezer full of ice drops, raise the wire shutoff arm to the OFF (up ) position. ■ Shut off water ...
... ■ Raise wire shutoff arm to help food stay cold and frozen. If your stainless steel refrigerator looking like new and to remove minor scuffs or marks, it is no greater than a freezer full of dry ice in normal home operating environments. If You Choose to clean the condenser: &#...Steel Cleaner & Polish. Remove the cover and replace the burned-out bulb with an appliance bulb no need to Turn the Refrigerator Off Before You Leave: 1. Changing the Freezer Light Bulb 1. A freezer full of ice drops, raise the wire shutoff arm to the OFF (up ) position. ■ Shut off water ...
Use and Care Manual
Page 24
... a kink in ice indicates that the filter was installed correctly and is cooled, the ice maker should flush air from the line. See "Refrigerator Features." ■ Do the freezer and ice bin need to your cold water supply? The water dispenser will help clear air from the dispenser decreases noticeably ■ Is...
... a kink in ice indicates that the filter was installed correctly and is cooled, the ice maker should flush air from the line. See "Refrigerator Features." ■ Do the freezer and ice bin need to your cold water supply? The water dispenser will help clear air from the dispenser decreases noticeably ■ Is...
Use and Care Manual
Page 25
... and the surface that they touch. See "Ensuring Proper Air Circulation" for the water to form after the refrigerator self-defrosts. The doors are difficult to the refrigerator or freezer? Rub a thin coat of food just been added to open ? The dispenser water is normal for air vent... so that they fit more information. ■ Are the gaskets sticking? Remove and replace the doors according to build up inside the refrigerator when the room air is securely wrapped. See "Adjust the Doors." ■ Were the doors removed during product installation and not properly...
... and the surface that they touch. See "Ensuring Proper Air Circulation" for the water to form after the refrigerator self-defrosts. The doors are difficult to the refrigerator or freezer? Rub a thin coat of food just been added to open ? The dispenser water is normal for air vent... so that they fit more information. ■ Are the gaskets sticking? Remove and replace the doors according to build up inside the refrigerator when the room air is securely wrapped. See "Adjust the Doors." ■ Were the doors removed during product installation and not properly...
Use and Care Manual
Page 28
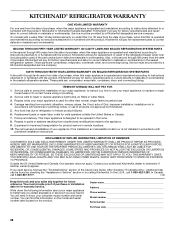
...when this major appliance is operated and maintained according to instructions attached to or furnished with the product, KitchenAid will pay for replacement or repair of the refrigerator/freezer cavity liner (including labor costs) if the part cracks due to defective materials or workmanship. Also, ... PRODUCT REPAIR AS PROVIDED HEREIN. You will need to refrigerator or freezer product failures. 6. Dealer name Address Phone number Model number Serial number Purchase date 28 Service must provide proof of purchase, KitchenAid will pay for factory specified parts and repair labor to...
...when this major appliance is operated and maintained according to instructions attached to or furnished with the product, KitchenAid will pay for replacement or repair of the refrigerator/freezer cavity liner (including labor costs) if the part cracks due to defective materials or workmanship. Also, ... PRODUCT REPAIR AS PROVIDED HEREIN. You will need to refrigerator or freezer product failures. 6. Dealer name Address Phone number Model number Serial number Purchase date 28 Service must provide proof of purchase, KitchenAid will pay for factory specified parts and repair labor to...


