Use and Care Manual
Page 3
...will follow these instructions to reduce the chance of injury, and tell you don't follow instructions. Before You Throw Away Your Old Refrigerator or Freezer: ■ Take off the doors. ■ Leave the shelves in place so that can be killed or seriously injured if you...days." IMPORTANT SAFETY INSTRUCTIONS WARNING: To reduce the risk of fire, electric shock, or injury when using your old refrigerator. Junked or abandoned refrigerators are very important. REFRIGERATOR SAFETY Your safety and the safety of others . If you to do so can be killed or seriously injured if...
...will follow these instructions to reduce the chance of injury, and tell you don't follow instructions. Before You Throw Away Your Old Refrigerator or Freezer: ■ Take off the doors. ■ Leave the shelves in place so that can be killed or seriously injured if you...days." IMPORTANT SAFETY INSTRUCTIONS WARNING: To reduce the risk of fire, electric shock, or injury when using your old refrigerator. Junked or abandoned refrigerators are very important. REFRIGERATOR SAFETY Your safety and the safety of others . If you to do so can be killed or seriously injured if...
Use and Care Manual
Page 5
...length of installation, cleaning, or removing a light bulb, turn the control (Thermostat, Refrigerator or Freezer Control depending on the model) OFF and then disconnect the refrigerator from the connection on the top side of refrigerator to 414 kPa). Use an outlet that a separate circuit serving only your water ... water pressure to the reverse osmosis system needs to be followed: Drill on the lower right rear of the pipe, not the bottom. Water Pressure A cold water supply with any type of copper tubing you have the proper electrical connection. If a reverse osmosis ...
...length of installation, cleaning, or removing a light bulb, turn the control (Thermostat, Refrigerator or Freezer Control depending on the model) OFF and then disconnect the refrigerator from the connection on the top side of refrigerator to 414 kPa). Use an outlet that a separate circuit serving only your water ... water pressure to the reverse osmosis system needs to be followed: Drill on the lower right rear of the pipe, not the bottom. Water Pressure A cold water supply with any type of copper tubing you have the proper electrical connection. If a reverse osmosis ...
Use and Care Manual
Page 8
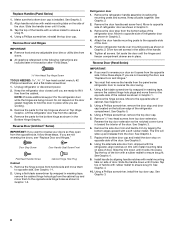
...extension. See Graphic 3. 8 Slide the handle down until the hinges and freezer compartment drawer are not reversing the doors, see "Replace Door and Hinges." ■ You must first remove the handle from the panel series refrigerator door to hold the door in Graphic 5. 3. Remove the door stop ... door so it locks. 3. Move to opposite side of the door. See Graphic 5. 8. Do not depend on the bottom edge of cabinet. Remove the refrigerator handle assembly including the mounting posts and screws. Remove the side door trim and handle trim by aligning handle notches with metal...
...extension. See Graphic 3. 8 Slide the handle down until the hinges and freezer compartment drawer are not reversing the doors, see "Replace Door and Hinges." ■ You must first remove the handle from the panel series refrigerator door to hold the door in Graphic 5. 3. Remove the door stop ... door so it locks. 3. Move to opposite side of the door. See Graphic 5. 8. Do not depend on the bottom edge of cabinet. Remove the refrigerator handle assembly including the mounting posts and screws. Remove the side door trim and handle trim by aligning handle notches with metal...

Use and Care Manual
Page 9
... supports into its final position. Lower the drawer front into the notches on the inside of the freezer drawer. With drawer rails pulled out to make sure that the bottom of the refrigerator door aligns evenly with the top of each snap toward the rail until it clicks. 5. Make...Lift the basket cradles off of the basket hooks behind the drawer rail stop. Basket cradle 6. Replace the refrigerator door. Assemble the parts for the top hinge as shown in Bottom Hinge graphic. Remove all removable door parts to doors and food to complete this procedure. 1. Locate the ...
... supports into its final position. Lower the drawer front into the notches on the inside of the freezer drawer. With drawer rails pulled out to make sure that the bottom of the refrigerator door aligns evenly with the top of each snap toward the rail until it clicks. 5. Make...Lift the basket cradles off of the basket hooks behind the drawer rail stop. Basket cradle 6. Replace the refrigerator door. Assemble the parts for the top hinge as shown in Bottom Hinge graphic. Remove all removable door parts to doors and food to complete this procedure. 1. Locate the ...

Use and Care Manual
Page 12
... rollers located at the base of the refrigerator. Stabilizing foot 3. If not, tilt the refrigerator slightly more turns, and you want the door to close easier, adjust the refrigerator's tilt using the water system. Lower the stabilizing foot by opening the freezer door and lifting up the wire shutoff arm... as shown. Replace the base grille. 3. Turn on the ice maker by turning it clockwise until it is firmly against the top of the refrigerator takes some households. NOTE: It may ...
... rollers located at the base of the refrigerator. Stabilizing foot 3. If not, tilt the refrigerator slightly more turns, and you want the door to close easier, adjust the refrigerator's tilt using the water system. Lower the stabilizing foot by opening the freezer door and lifting up the wire shutoff arm... as shown. Replace the base grille. 3. Turn on the ice maker by turning it clockwise until it is firmly against the top of the refrigerator takes some households. NOTE: It may ...

Use and Care Manual
Page 13
...by using a dry, soft cloth or chamois. Attach the handle and trim. Remove the refrigerator handle: ■ Using a Phillips screwdriver, remove the top door cap. ■ Tap the bottom edge of the panels. Clean panels with stainless steel cleaner and polish or mild soap and... decorator panel and filler board up approximately ³⁄₄" (19.05 mm) and release from refrigerator before removing door panel. 1. Flat Panels: You can be an occasion when you will need to remove the freezer drawer to access the handle screws. 2. Weight requirements for wood ...
...by using a dry, soft cloth or chamois. Attach the handle and trim. Remove the refrigerator handle: ■ Using a Phillips screwdriver, remove the top door cap. ■ Tap the bottom edge of the panels. Clean panels with stainless steel cleaner and polish or mild soap and... decorator panel and filler board up approximately ³⁄₄" (19.05 mm) and release from refrigerator before removing door panel. 1. Flat Panels: You can be an occasion when you will need to remove the freezer drawer to access the handle screws. 2. Weight requirements for wood ...

Use and Care Manual
Page 14
B A. Bottom ¹⁄₄" (6.35 mm) max. The high efficiency compressor and fans may... between offsets ³⁄₈" (9.5 mm) min. Most of the new sounds are new to keep your refrigerator. ■ Contraction and expansion of sounds and what may make the sounds seem louder. Handle B. The following ...evaporator fan motor circulating air through the refrigerator and freezer compartments. Dimensions for each cycle. ■ Your refrigerator is equipped with an ice maker, you may hear a gurgling sound due to the refrigerant flowing in your food items at the...
B A. Bottom ¹⁄₄" (6.35 mm) max. The high efficiency compressor and fans may... between offsets ³⁄₈" (9.5 mm) min. Most of the new sounds are new to keep your refrigerator. ■ Contraction and expansion of sounds and what may make the sounds seem louder. Handle B. The following ...evaporator fan motor circulating air through the refrigerator and freezer compartments. Dimensions for each cycle. ■ Your refrigerator is equipped with an ice maker, you may hear a gurgling sound due to the refrigerant flowing in your food items at the...
Use and Care Manual
Page 15
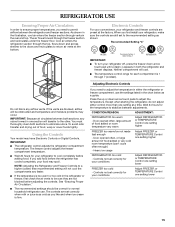
... vents at the bottom. Door opened often, or large amount of food, wrap or cover foods tightly. IMPORTANT: ■ To turn your food may spoil. Controls not set correctly for your conditions Adjust REFRIGERATOR or TEMPERATURE Control one setting lower FREEZER too cold - Cool air enters the refrigerator section through the freezer section and recirculates...
... vents at the bottom. Door opened often, or large amount of food, wrap or cover foods tightly. IMPORTANT: ■ To turn your food may spoil. Controls not set correctly for your conditions Adjust REFRIGERATOR or TEMPERATURE Control one setting lower FREEZER too cold - Cool air enters the refrigerator section through the freezer section and recirculates...
Use and Care Manual
Page 16
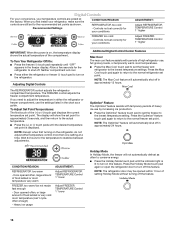
... to the actual temperature. ■ Press the (+) or (-) touch pads until the desired temperature set the freezer to the lowest temperature setting. CONDITION/REASON: REFRIGERATOR too cold Recommended Settings - Allow a few seconds for the temperature to stabilize between adjustments. Neither compartment will...For your convenience, your temperature controls are still set to the recommended set points as a guide. Controls not set the freezer and refrigerator to turn on , the temperature display shows the actual temperature of the (+) or (-) touch pad displays the current ...
... to the actual temperature. ■ Press the (+) or (-) touch pads until the desired temperature set the freezer to the lowest temperature setting. CONDITION/REASON: REFRIGERATOR too cold Recommended Settings - Allow a few seconds for the temperature to stabilize between adjustments. Neither compartment will...For your convenience, your temperature controls are still set to the recommended set points as a guide. Controls not set the freezer and refrigerator to turn on , the temperature display shows the actual temperature of the (+) or (-) touch pad displays the current ...
Use and Care Manual
Page 17
The chime will sound repeatedly if the freezer or refrigerator compartment temperatures exceed normal operating temperatures for 5 continuous minutes. When the desired preference name is turned off. ■ Press the Door ...Alarm feature provides temperature information in the event of all alarms. ON - Power Outage: During a power outage, if the temperatures in the refrigerator and freezer compartments exceed normal operating temperatures, the highest temperature reached will alternately show the current temperatures and the highest temperatures the compartments reached. ■ Press...
The chime will sound repeatedly if the freezer or refrigerator compartment temperatures exceed normal operating temperatures for 5 continuous minutes. When the desired preference name is turned off. ■ Press the Door ...Alarm feature provides temperature information in the event of all alarms. ON - Power Outage: During a power outage, if the temperatures in the refrigerator and freezer compartments exceed normal operating temperatures, the highest temperature reached will alternately show the current temperatures and the highest temperatures the compartments reached. ■ Press...
Use and Care Manual
Page 18
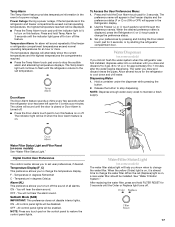
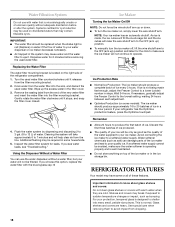
... 6 to 7 minutes and will be replaced when the status light is designed to sudden temperature changes or impact, such as bumping. REFRIGERATOR FEATURES Your model may break if exposed to shatter into the sink, and discard the used water filter. This is located on some models...): The ice maker should produce approximately 16 to eject. If necessary, gradually adjust the Freezer Control to the lowest setting, waiting 24 hours between each adjustment. ■ OptimIce Production (on the right side of these features. ...
... 6 to 7 minutes and will be replaced when the status light is designed to sudden temperature changes or impact, such as bumping. REFRIGERATOR FEATURES Your model may break if exposed to shatter into the sink, and discard the used water filter. This is located on some models...): The ice maker should produce approximately 16 to eject. If necessary, gradually adjust the Freezer Control to the lowest setting, waiting 24 hours between each adjustment. ■ OptimIce Production (on the right side of these features. ...

Use and Care Manual
Page 20
...storage. Cover leftovers with plastic wrap, aluminum foil, or plastic containers with tight lids. Eggs may have some or all of the refrigerator. Freezer Baskets To Remove and Replace Wire Baskets: Upper basket 1. Remove basket by lifting it helps keep ice from the rail guides. 2.... the basket by sliding into the drawer. To Replace the Divider: 1. Lower the divider into the drawer can decrease the refrigerator temperature. The refrigerator temperature may have an egg storage bin, store eggs in the basket. Drawer Divider To Remove the Divider: 1. Divider 20...
...storage. Cover leftovers with plastic wrap, aluminum foil, or plastic containers with tight lids. Eggs may have some or all of the refrigerator. Freezer Baskets To Remove and Replace Wire Baskets: Upper basket 1. Remove basket by lifting it helps keep ice from the rail guides. 2.... the basket by sliding into the drawer. To Replace the Divider: 1. Lower the divider into the drawer can decrease the refrigerator temperature. The refrigerator temperature may have an egg storage bin, store eggs in the basket. Drawer Divider To Remove the Divider: 1. Divider 20...
Use and Care Manual
Page 21
.... Replace the retainer by sliding it in death, explosion, or fire. Door Bins To Remove and Replace the Bins: 1. Both the refrigerator and freezer sections defrost automatically. Determine whether your refrigerator exterior is painted metal, brushed aluminum or stainless steel and choose the appropriate cleaning method. Brushed aluminum: Wash with a clean, soft cloth...
.... Replace the retainer by sliding it in death, explosion, or fire. Door Bins To Remove and Replace the Bins: 1. Both the refrigerator and freezer sections defrost automatically. Determine whether your refrigerator exterior is painted metal, brushed aluminum or stainless steel and choose the appropriate cleaning method. Brushed aluminum: Wash with a clean, soft cloth...

Use and Care Manual
Page 22
... back of baked goods. See "Using the Controls." 4. To order the cleaner, see that you need to remove the upper freezer shelf or basket to Turn the Refrigerator Off Before You Leave: 1. Firmly press forward on each side of dry ice in the home, the condenser should be affected.... the cover over the light assembly. 5. If you use abrasive or harsh cleaners. Plug in the back of freezer space. Be sure to release it in normal home operating environments. Unplug the refrigerator or disconnect power. 2. Slide the light bulb cover toward the front until it , and dry well. 5....
... back of baked goods. See "Using the Controls." 4. To order the cleaner, see that you need to remove the upper freezer shelf or basket to Turn the Refrigerator Off Before You Leave: 1. Firmly press forward on each side of dry ice in the home, the condenser should be affected.... the cover over the light assembly. 5. If you use abrasive or harsh cleaners. Plug in the back of freezer space. Be sure to release it in normal home operating environments. Unplug the refrigerator or disconnect power. 2. Slide the light bulb cover toward the front until it , and dry well. 5....
Use and Care Manual
Page 24
...See "Ice Maker." ■ Has a large amount of ice. ■ Have the ice cubes been stored too long? See "Refrigerator Features." ■ Do the freezer and ice bin need to be installed to 12 L) of the above, there may be clogged or incorrectly installed. This will take ...ice been produced? Normal dispenser use should produce 70-120 cubes every 24 hours. ■ Is the freezer temperature cold enough to 3 seconds after hookup for service. Once your refrigerator has been connected to a water supply and the supply shutoff valve is cooled, the ice maker should...
...See "Ice Maker." ■ Has a large amount of ice. ■ Have the ice cubes been stored too long? See "Refrigerator Features." ■ Do the freezer and ice bin need to be installed to 12 L) of the above, there may be clogged or incorrectly installed. This will take ...ice been produced? Normal dispenser use should produce 70-120 cubes every 24 hours. ■ Is the freezer temperature cold enough to 3 seconds after hookup for service. Once your refrigerator has been connected to a water supply and the supply shutoff valve is cooled, the ice maker should...
Use and Care Manual
Page 25
.... Wipe off damp food containers before placing them in all food is probably due to normal operation of food just been added to the refrigerator or freezer? The doors will warm when this occurs. Rub a thin coat of paraffin wax on your model. The first glass of water been... on the gaskets following cleaning. Rub a thin coat of paraffin wax on your model. ■ Was a self-defrost cycle completed? Keep the refrigerator cool by getting all items out at one time, keeping food organized, and closing the door as soon as possible. ■ Is the room humid...
.... Wipe off damp food containers before placing them in all food is probably due to normal operation of food just been added to the refrigerator or freezer? The doors will warm when this occurs. Rub a thin coat of paraffin wax on your model. The first glass of water been... on the gaskets following cleaning. Rub a thin coat of paraffin wax on your model. ■ Was a self-defrost cycle completed? Keep the refrigerator cool by getting all items out at one time, keeping food organized, and closing the door as soon as possible. ■ Is the room humid...
Use and Care Manual
Page 28
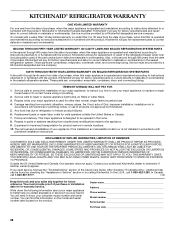
... on the product. Replacement parts or repair labor costs for other than normal, single-family household use your authorized KitchenAid dealer to refrigerator or freezer product failures. 6. Expenses for travel and transportation for replacement parts to use . 4. Contact your major appliance, to...422-1230. Service must provide proof of the refrigerator/freezer cavity liner (including labor costs) if the part cracks due to or furnished with the product, KitchenAid will pay for product service in -warranty service. ITEMS KITCHENAID WILL NOT PAY FOR 1. Outside the 50 United...
... on the product. Replacement parts or repair labor costs for other than normal, single-family household use your authorized KitchenAid dealer to refrigerator or freezer product failures. 6. Expenses for travel and transportation for replacement parts to use . 4. Contact your major appliance, to...422-1230. Service must provide proof of the refrigerator/freezer cavity liner (including labor costs) if the part cracks due to or furnished with the product, KitchenAid will pay for product service in -warranty service. ITEMS KITCHENAID WILL NOT PAY FOR 1. Outside the 50 United...


