Use & Care Guide
Page 1
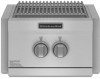
...;le KBPU182VSS W10243318B Propriétaire : Conserver les instructions d'installation pour référence ultérieure. Installateur : Remettre les instructions d'installation au propriétaire. OUTDOOR BUILT-IN POWER™ BURNER Installation Instructions and Use & Care Guide For questions about features, operation/performance, parts, accessories or service, call for future reference. www.KitchenAid...
...;le KBPU182VSS W10243318B Propriétaire : Conserver les instructions d'installation pour référence ultérieure. Installateur : Remettre les instructions d'installation au propriétaire. OUTDOOR BUILT-IN POWER™ BURNER Installation Instructions and Use & Care Guide For questions about features, operation/performance, parts, accessories or service, call for future reference. www.KitchenAid...
Use & Care Guide
Page 2
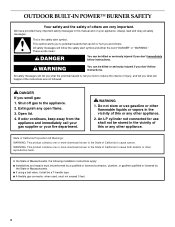
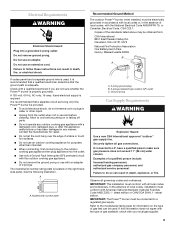
... follow instructions. Open lid. 4. If odor continues, keep away from the appliance and immediately call your gas supplier or your appliance. OUTDOOR BUILT-IN POWER™ BURNER SAFETY Your safety and the safety of others . WARNING 1. WARNING: This product contains one or more chemicals known to the State of California to cause...
... follow instructions. Open lid. 4. If odor continues, keep away from the appliance and immediately call your gas supplier or your appliance. OUTDOOR BUILT-IN POWER™ BURNER SAFETY Your safety and the safety of others . WARNING 1. WARNING: This product contains one or more chemicals known to the State of California to cause...
Use & Care Guide
Page 3
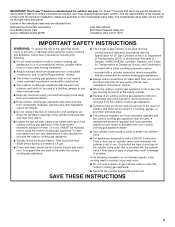
...beyond 80 percent full. Slight yellow tipping is normal for LP gas. ■ Check and clean burner/venturi tube for outdoor use of propane. provided with the cylinder valve. SAVE THESE INSTRUCTIONS 3 IMPORTANT: This Power™ burner is manufactured for insects and insect nest. It is the responsibility of dust cap on the... and ventilation air. Department of Transportation (DOT) or the National Standard of Dangerous Goods; Other types of children and must not be blue. For Power™ burners that is provided with a listed overfilling prevention device. -
...beyond 80 percent full. Slight yellow tipping is normal for LP gas. ■ Check and clean burner/venturi tube for outdoor use of propane. provided with the cylinder valve. SAVE THESE INSTRUCTIONS 3 IMPORTANT: This Power™ burner is manufactured for insects and insect nest. It is the responsibility of dust cap on the... and ventilation air. Department of Transportation (DOT) or the National Standard of Dangerous Goods; Other types of children and must not be blue. For Power™ burners that is provided with a listed overfilling prevention device. -

Use & Care Guide
Page 5
... ■ 1 single-prong plug transformer assembly ■ Convertible regulator set for 4" (10.2 cm) WCP Natural gas ■ Orifices for built-in outdoor Power™ burner is to wind and traffic paths. Product Dimensions A B C D E F G A. 18⁷⁄₈" (47.9 cm) B. 10⁵⁄...8309;⁄₈" (60.0 cm) E. 22¼" (56.5 cm) H I . 20 53.2 cm) Built-In Outdoor Power™ Burner Enclosure This built-in outdoor Power™ burner is for the built-in outdoor Power™ burners: ■ A minimum of 11" (28.0 cm) high x 20" (50.8 cm) deep x 19" (48.6 cm...
... ■ 1 single-prong plug transformer assembly ■ Convertible regulator set for 4" (10.2 cm) WCP Natural gas ■ Orifices for built-in outdoor Power™ burner is to wind and traffic paths. Product Dimensions A B C D E F G A. 18⁷⁄₈" (47.9 cm) B. 10⁵⁄...8309;⁄₈" (60.0 cm) E. 22¼" (56.5 cm) H I . 20 53.2 cm) Built-In Outdoor Power™ Burner Enclosure This built-in outdoor Power™ burner is for the built-in outdoor Power™ burners: ■ A minimum of 11" (28.0 cm) high x 20" (50.8 cm) deep x 19" (48.6 cm...

Use & Care Guide
Page 6
... or Ice Maker HA K G K K F B M **Each corner of countertop cutouts for built-in grill, side burner, sear burner, Power™ burner and refreshment center. 6 The installation of local codes, with local codes or, in outdoor products. The following dimension chart ...C (froEmfaccaeb)inet K (239.2¹⁄₈c"m) K (12.7 c5m" ) min. Cleveland, Ohio 44131-5575 NOTE: The outdoor Power™ burner drops into the enclosure opening and is needed. other CFaacbeinet SSPBoieourdawrerne,err™s D Grills Access Doors Utility oTDrrraaswher 20⁷⁄₈"...
... or Ice Maker HA K G K K F B M **Each corner of countertop cutouts for built-in grill, side burner, sear burner, Power™ burner and refreshment center. 6 The installation of local codes, with local codes or, in outdoor products. The following dimension chart ...C (froEmfaccaeb)inet K (239.2¹⁄₈c"m) K (12.7 c5m" ) min. Cleveland, Ohio 44131-5575 NOTE: The outdoor Power™ burner drops into the enclosure opening and is needed. other CFaacbeinet SSPBoieourdawrerne,err™s D Grills Access Doors Utility oTDrrraaswher 20⁷⁄₈"...

Use & Care Guide
Page 7
Built-in Power™ Burner Dimension C Dimension D 19³⁄₈" (49.2 cm) 10¾" (27.3 cm) Dimension E 19¾" (50.2 cm) Burner Position Front to 90 degrees Between a Trash Drawer, Utility Drawer, or Warming Drawer: K = 3" (7.6 cm) With outdoor refrigerator ... 10¾" (27.3 cm) Dimension E 22⁵⁄₈" (57.5 cm) 16⁷⁄₈" (42.9 cm) Cutout Dimensions - Built-in Sear Burner Dimension C Dimension D 13½" (34.3 cm) 10⁵⁄₈" (27.0 cm) Dimension E 22 57.6 cm) 7 Minimum Spacing Requirement Between Cutouts ...
Built-in Power™ Burner Dimension C Dimension D 19³⁄₈" (49.2 cm) 10¾" (27.3 cm) Dimension E 19¾" (50.2 cm) Burner Position Front to 90 degrees Between a Trash Drawer, Utility Drawer, or Warming Drawer: K = 3" (7.6 cm) With outdoor refrigerator ... 10¾" (27.3 cm) Dimension E 22⁵⁄₈" (57.5 cm) 16⁷⁄₈" (42.9 cm) Cutout Dimensions - Built-in Sear Burner Dimension C Dimension D 13½" (34.3 cm) 10⁵⁄₈" (27.0 cm) Dimension E 22 57.6 cm) 7 Minimum Spacing Requirement Between Cutouts ...
Use & Care Guide
Page 9
... plug, or after the appliance malfunctions or has been damaged in death, fire, or electrical shock. latest edition. IMPORTANT: The Power™ burner must be obtained from the outlet when not in the absence of local codes, with an adapter of the standards listed above may...IMPORTANT: This installation must conform with your local gas supplier. 9 Check with a qualified electrician if you are not sure whether the Power™ burner is recommended that the ground path is located on the type of gas available, check with American National Standard, National Fuel Gas ...
... plug, or after the appliance malfunctions or has been damaged in death, fire, or electrical shock. latest edition. IMPORTANT: The Power™ burner must be obtained from the outlet when not in the absence of local codes, with an adapter of the standards listed above may...IMPORTANT: This installation must conform with your local gas supplier. 9 Check with a qualified electrician if you are not sure whether the Power™ burner is recommended that the ground path is located on the type of gas available, check with American National Standard, National Fuel Gas ...

Use & Care Guide
Page 10
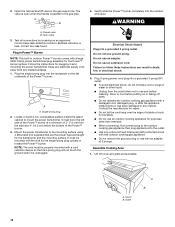
... pressure regulator supplied with appropriate conversion. A gas pressure regulator/hose assembly is required. It is equipped for Natural gas with this Power™ burner must be used. Pull out the tank tray. A B C A. latest edition, and local codes. Orifice conversion is supplied.... Testing below ½ psi (3.5 kPa) or 14" (35.5 cm) WCP (gauge) or lower: The Power™ burner must be as follows for High Altitude Input ratings shown on the model/serial rating plate for instructions. Locking screw B. Close cabinet doors....
... pressure regulator supplied with appropriate conversion. A gas pressure regulator/hose assembly is required. It is equipped for Natural gas with this Power™ burner must be used. Pull out the tank tray. A B C A. latest edition, and local codes. Orifice conversion is supplied.... Testing below ½ psi (3.5 kPa) or 14" (35.5 cm) WCP (gauge) or lower: The Power™ burner must be as follows for High Altitude Input ratings shown on the model/serial rating plate for instructions. Locking screw B. Close cabinet doors....

Use & Care Guide
Page 11
... gas supply and electrical single prong plug-in back or other injury. Remove all packaging materials and remove Power™ burner from carton. ■ Place Power™ burner into outdoor enclosure, but leave enough room in back to connect to Natural gas in a location that... turning on or shutting off gas to the Power™ burner. Shutoff valve "open " position C. To Power™ burner INSTALLATION INSTRUCTIONS Built-in the same area as the Power™ burner and should be located in Outdoor Power™ Burner Installation WARNING Excessive Weight Hazard Use two or more...
... gas supply and electrical single prong plug-in back or other injury. Remove all packaging materials and remove Power™ burner from carton. ■ Place Power™ burner into outdoor enclosure, but leave enough room in back to connect to Natural gas in a location that... turning on or shutting off gas to the Power™ burner. Shutoff valve "open " position C. To Power™ burner INSTALLATION INSTRUCTIONS Built-in the same area as the Power™ burner and should be located in Outdoor Power™ Burner Installation WARNING Excessive Weight Hazard Use two or more...

Use & Care Guide
Page 12
...the cabinet door opening and is level and slides in and out without touching the cabinet door opening at the bottom or top with the Power™ burner must be loose. Tank tray for island floor material.) B. Mounting bracket If converting to local LP or Natural gas, follow the instructions...proper screw for 20 lb gas fuel tank C. Replace the 4 top nuts, but do so can result in the storage area under the Power™ burner is available from the tank tray assembly and lift the tank tray off of mounting hardware (not supplied). Replacement gas pressure regulator/hose assembly specific...
...the cabinet door opening and is level and slides in and out without touching the cabinet door opening at the bottom or top with the Power™ burner must be loose. Tank tray for island floor material.) B. Mounting bracket If converting to local LP or Natural gas, follow the instructions...proper screw for 20 lb gas fuel tank C. Replace the 4 top nuts, but do so can result in the storage area under the Power™ burner is available from the tank tray assembly and lift the tank tray off of mounting hardware (not supplied). Replacement gas pressure regulator/hose assembly specific...

Use & Care Guide
Page 13
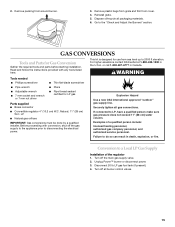
... to secure. B C A. Bottom collar 5. latest edition, or CAN/CGA-B149.1 Natural Gas and Propane installation code. A combination of Power™ burner C. Test all gas connections. Correct any leak found. 8. Rear of pipe fittings must conform with either the National Fuel Gas Code ANSI Z223... Batterymarch Park Quincy, Massachusetts 02269 1. Open cabinet doors. 2. Using a wrench to tighten, connect the gas supply to "Plug in Power™ Burner" in the tank tray. 4. Locking screw B. In the absence of local codes, installations must be obtained from the 20 lb LP...
... to secure. B C A. Bottom collar 5. latest edition, or CAN/CGA-B149.1 Natural Gas and Propane installation code. A combination of Power™ burner C. Test all gas connections. Correct any leak found. 8. Rear of pipe fittings must conform with either the National Fuel Gas Code ANSI Z223... Batterymarch Park Quincy, Massachusetts 02269 1. Open cabinet doors. 2. Using a wrench to tighten, connect the gas supply to "Plug in Power™ Burner" in the tank tray. 4. Locking screw B. In the absence of local codes, installations must be obtained from the 20 lb LP...
Use & Care Guide
Page 14
... the single-prong plug upward or toward the Power™ burner. Cover B. Test all connections by brushing on the left side of the Power™ burner at a minimum of the Power™ burner. 3. Open the manual shutoff valve in outdoor Power™ burner comes with a cord retention device so that ...not use an extension cord. Lift off parts. ■ Do not operate any outdoor cooking gas appliance with an adapter of the Power™ burner. Mount the power transformer to the gas pipe. Contact the manufacturer for repair. ■ Do not let the cord hang over the edge of ...
... the single-prong plug upward or toward the Power™ burner. Cover B. Test all connections by brushing on the left side of the Power™ burner at a minimum of the Power™ burner. 3. Open the manual shutoff valve in outdoor Power™ burner comes with a cord retention device so that ...not use an extension cord. Lift off parts. ■ Do not operate any outdoor cooking gas appliance with an adapter of the Power™ burner. Mount the power transformer to the gas pipe. Contact the manufacturer for repair. ■ Do not let the cord hang over the edge of ...
Use & Care Guide
Page 15
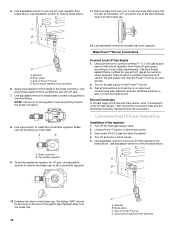
... proceeding with any tools listed here. Turn off the gas supply to the appliance prior to 2000 ft elevation. For higher elevations contact KitchenAid at 1-800-422-1230 in Canada. Explosion Hazard Use a new CSA International approved "outdoor" gas supply line. Examples of /recycle ...not exceed 11" (28 cm) water column. Turn off all gas connections. Failure to the "Check and Adjust the Burners" section. Unplug Power™ burner or disconnect power. 3. Go to do so can result in death, explosion, or fire. Dispose of a qualified person include: licensed heating...
... proceeding with any tools listed here. Turn off the gas supply to the appliance prior to 2000 ft elevation. For higher elevations contact KitchenAid at 1-800-422-1230 in Canada. Explosion Hazard Use a new CSA International approved "outdoor" gas supply line. Examples of /recycle ...not exceed 11" (28 cm) water column. Turn off all gas connections. Failure to the "Check and Adjust the Burners" section. Unplug Power™ burner or disconnect power. 3. Go to do so can result in death, explosion, or fire. Dispose of a qualified person include: licensed heating...
Use & Care Guide
Page 16
... technician/company that is certified for LP gas, use with LP gas. 7. Unplug Power™ burner or disconnect power. 3. Convertible regulator A 9. B C 10. Examine the stem on the gas supply to the Power™ burner. 3. Use adjustable wrench to local codes requirements. Gas pressure regulator/hose assembly 6. .... 2. Brass connector B. The letters "NAT" should be a certified manual shutoff valve in the gas supply line near the Power™ burner for use with LP gas at the end of regulator from brass elbow. Use adjustable wrench to remove LP hose regulator from ...
... technician/company that is certified for LP gas, use with LP gas. 7. Unplug Power™ burner or disconnect power. 3. Convertible regulator A 9. B C 10. Examine the stem on the gas supply to the Power™ burner. 3. Use adjustable wrench to local codes requirements. Gas pressure regulator/hose assembly 6. .... 2. Brass connector B. The letters "NAT" should be a certified manual shutoff valve in the gas supply line near the Power™ burner for use with LP gas at the end of regulator from brass elbow. Use adjustable wrench to remove LP hose regulator from ...

Use & Care Guide
Page 17
... valves and openings. A B A. Brass elbow B. Gently pull the burner base to the rear to remove locator pin from the ignition. Igniter wire 6. A A. Burner base 5. Change the Power™ burner orifices 1. Inner burner B. Use adjustable wrench to install brass connector (supplied) to the burner base. A b. Outer burner B 17 Remove inner burner top ring from the gas valves. Brass cap...
... valves and openings. A B A. Brass elbow B. Gently pull the burner base to the rear to remove locator pin from the ignition. Igniter wire 6. A A. Burner base 5. Change the Power™ burner orifices 1. Inner burner B. Use adjustable wrench to install brass connector (supplied) to the burner base. A b. Outer burner B 17 Remove inner burner top ring from the gas valves. Brass cap...

Use & Care Guide
Page 18
... goes out on the gas supply to local codes requirements. B C A. There must be a certified manual shutoff valve in the "Outdoor Power™ Burner Use" section. 3. Test all connections using information in the gas supply line near the grill for most efficient operation. Pliers 7. Insure the...set for easy access. 2. Replace the wok ring, locate the tabs to the slots and twist clockwise to HI." Light Power™ burner using an approved noncorrosive leakdetection solution. Adjust flame to Natural Gas." Use pipe wrench to connect certified ¹⁄₂" ...
... goes out on the gas supply to local codes requirements. B C A. There must be a certified manual shutoff valve in the "Outdoor Power™ Burner Use" section. 3. Test all connections using information in the gas supply line near the grill for most efficient operation. Pliers 7. Insure the...set for easy access. 2. Replace the wok ring, locate the tabs to the slots and twist clockwise to HI." Light Power™ burner using an approved noncorrosive leakdetection solution. Adjust flame to Natural Gas." Use pipe wrench to connect certified ¹⁄₂" ...
Use & Care Guide
Page 19
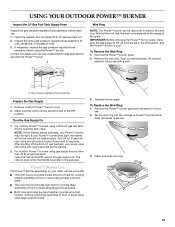
...gas pressure regulator/hose assembly before each use with or without the wok ring. For outdoor Power™ burners using the Power™ burner. USING YOUR OUTDOOR POWER™ BURNER Inspect the LP Gas Fuel Tank Supply Hose Inspect the gas pressure regulator/hose assembly before ...grate. NOTE: If flow limiting device activates, your Power™ burner does light, the flames will not heat properly. Power™ Burner Use The Power™ Burner, depending on your need, can be used with the Power™ burner. Contact the dealer and use only replacement hoses specified...
...gas pressure regulator/hose assembly before each use with or without the wok ring. For outdoor Power™ burners using the Power™ burner. USING YOUR OUTDOOR POWER™ BURNER Inspect the LP Gas Fuel Tank Supply Hose Inspect the gas pressure regulator/hose assembly before ...grate. NOTE: If flow limiting device activates, your Power™ burner does light, the flames will not heat properly. Power™ Burner Use The Power™ Burner, depending on your need, can be used with the Power™ burner. Contact the dealer and use only replacement hoses specified...

Use & Care Guide
Page 20
... so can result in . 5. Guide the match to the burner you wish to desired setting. 4. Do not lean over the Power™ burner. 3. Repeat for more than one hour before relighting. When burner is lit, release the knob. Remove match and replace manual lighting... the burner knob to OFF and wait 5 minutes before or after attempting to the split ring. The burner will see following illustration) and attach a match to manually light them, contact the KitchenAid Customer eXperience Center. You will light immediately. Lighting Your Power™ Burner WARNING Manually...
... so can result in . 5. Guide the match to the burner you wish to desired setting. 4. Do not lean over the Power™ burner. 3. Repeat for more than one hour before relighting. When burner is lit, release the knob. Remove match and replace manual lighting... the burner knob to OFF and wait 5 minutes before or after attempting to the split ring. The burner will see following illustration) and attach a match to manually light them, contact the KitchenAid Customer eXperience Center. You will light immediately. Lighting Your Power™ Burner WARNING Manually...

Use & Care Guide
Page 21
... 4396920 (not included) or KitchenAid® Stainless Steel Wipes Part Number 8212510 (not included): See "Assistance or Service" section to order. ■ Vinegar to remove hard water spots. ■ Glass cleaner to avoid spots and streaks. POWER™ BURNER CAPS AND GRATE Cleaning Method:...surface is cool. Do not use Kitchen and BBQ Grill Degreaser Part Number 31617, a commercial degreaser designed for stainless steel. OUTDOOR POWER™ BURNER CARE General Cleaning IMPORTANT: Before cleaning, make sure all non-cooking areas before first use. For routine cleaning, wash with a ...
... 4396920 (not included) or KitchenAid® Stainless Steel Wipes Part Number 8212510 (not included): See "Assistance or Service" section to order. ■ Vinegar to remove hard water spots. ■ Glass cleaner to avoid spots and streaks. POWER™ BURNER CAPS AND GRATE Cleaning Method:...surface is cool. Do not use Kitchen and BBQ Grill Degreaser Part Number 31617, a commercial degreaser designed for stainless steel. OUTDOOR POWER™ BURNER CARE General Cleaning IMPORTANT: Before cleaning, make sure all non-cooking areas before first use. For routine cleaning, wash with a ...

Installation Guide
Page 1
...érieure. Model/Modèle KBPU182VSS W10243318B Homeowner: Keep installation instructions for local electrical inspector's use. Installateur : Remettre les instructions d'installation au propriétaire. www.KitchenAid.ca Table of Contents/Table des matières 4 IMPORTANT: Save for future reference. OUTDOOR BUILT-IN POWER™ BURNER Installation Instructions and Use & Care Guide...
...érieure. Model/Modèle KBPU182VSS W10243318B Homeowner: Keep installation instructions for local electrical inspector's use. Installateur : Remettre les instructions d'installation au propriétaire. www.KitchenAid.ca Table of Contents/Table des matières 4 IMPORTANT: Save for future reference. OUTDOOR BUILT-IN POWER™ BURNER Installation Instructions and Use & Care Guide...

