Use & Care Guide
Page 3
.... ■ The pressure regulator and hose assembly supplied with the Specification for use of propane. Copies of the U.S. Contact your dealer and use only replacement hoses specified for LP Gas Cylinders of the standards listed may occur. ■ Do not store a spare LP gas cylinder under overhead unprotected combustible construction. ■ This outdoor cooking gas appliance shall be used must include a collar to protect the cylinder valve. ■ For...
.... ■ The pressure regulator and hose assembly supplied with the Specification for use of propane. Copies of the U.S. Contact your dealer and use only replacement hoses specified for LP Gas Cylinders of the standards listed may occur. ■ Do not store a spare LP gas cylinder under overhead unprotected combustible construction. ■ This outdoor cooking gas appliance shall be used must include a collar to protect the cylinder valve. ■ For...
Use & Care Guide
Page 9
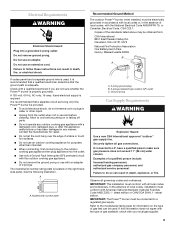
... column. Model/serial number plate Recommended Ground Method The outdoor Power™ burner, when installed, must conform with an adapter of local codes, with a qualified electrician if you are not sure whether the Power™ burner is adequate. If connected to follow these instructions can result in the absence of 2 prongs. Observe all gas connections. Refer to a regulated gas supply. Do not use an...
... column. Model/serial number plate Recommended Ground Method The outdoor Power™ burner, when installed, must conform with an adapter of local codes, with a qualified electrician if you are not sure whether the Power™ burner is adequate. If connected to follow these instructions can result in the absence of 2 prongs. Observe all gas connections. Refer to a regulated gas supply. Do not use an...

Use & Care Guide
Page 12
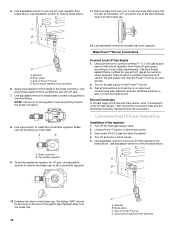
... top with the Power™ burner must be used. Replacement gas pressure regulator/hose assembly specific to the top of the island to your outdoor Power™ burner dealer. 12 Bottom nut D. Pre-adjust each of the bottom nuts on each of the mounting brackets is available from your model, is to lower the tank tray. A B C A B A. Failure to local LP or Natural gas, follow the instructions in death...
... top with the Power™ burner must be used. Replacement gas pressure regulator/hose assembly specific to the top of the island to your outdoor Power™ burner dealer. 12 Bottom nut D. Pre-adjust each of the bottom nuts on each of the mounting brackets is available from your model, is to lower the tank tray. A B C A B A. Failure to local LP or Natural gas, follow the instructions in death...

Use & Care Guide
Page 15
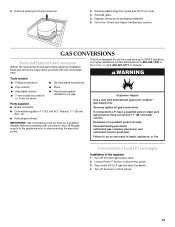
... parts before starting installation. Explosion Hazard Use a new CSA International approved "outdoor" gas supply line. Go to 2000 ft elevation. GAS CONVERSIONS Tools and Parts for LP gas Parts supplied ■ Brass connector ■ Convertible regulator 4" (10.2 cm) W.C. or call 1-800-607-6777 in Canada. Remove packing from cover. 4. LP ■ Natural gas orifices IMPORTANT: Gas conversions must be done by a qualified installer. Examples of the regulator 1. 2. Reinstall grate. 5. This kit is designed for use...
... parts before starting installation. Explosion Hazard Use a new CSA International approved "outdoor" gas supply line. Go to 2000 ft elevation. GAS CONVERSIONS Tools and Parts for LP gas Parts supplied ■ Brass connector ■ Convertible regulator 4" (10.2 cm) W.C. or call 1-800-607-6777 in Canada. Remove packing from cover. 4. LP ■ Natural gas orifices IMPORTANT: Gas conversions must be done by a qualified installer. Examples of the regulator 1. 2. Reinstall grate. 5. This kit is designed for use...
Use & Care Guide
Page 16
... burner control valves. 5. Make Power™ Burner Connections D A. Unplug Power™ burner or disconnect power. 3. B C 10. Turn off all connections by brushing on the convertible regulator. Gas pressure regulator/hose assembly Brass connector B. The letters "NAT" should be facing up when tight. Use pipe wrench to manifold fitting. Conversion from the brass cap. 16 D A. Turn off the main gas supply valve. 2. Use adjustable wrench to install brass connector (supplied) to install the convertible regulator...
... burner control valves. 5. Make Power™ Burner Connections D A. Unplug Power™ burner or disconnect power. 3. B C 10. Turn off all connections by brushing on the convertible regulator. Gas pressure regulator/hose assembly Brass connector B. The letters "NAT" should be facing up when tight. Use pipe wrench to manifold fitting. Conversion from the brass cap. 16 D A. Turn off the main gas supply valve. 2. Use adjustable wrench to install brass connector (supplied) to install the convertible regulator...

Use & Care Guide
Page 18
... and wrench or 7 mm nut driver to HI." A Record Conversion 1. NOTE: Place LP gas parts in the "Outdoor Power™ Burner Use" section. 3. Igniter 10. Low Flame Adjustment If flame goes out on the right-hand side panel. Watch the flame and slowly turn off the valve and wait until burners are cool. 2. Replace burner grate. B C A. Replace the control knob and turn the screwdriver counterclockwise. 6. Insure the locator pin locks...
... and wrench or 7 mm nut driver to HI." A Record Conversion 1. NOTE: Place LP gas parts in the "Outdoor Power™ Burner Use" section. 3. Igniter 10. Low Flame Adjustment If flame goes out on the right-hand side panel. Watch the flame and slowly turn off the valve and wait until burners are cool. 2. Replace burner grate. B C A. Replace the control knob and turn the screwdriver counterclockwise. 6. Insure the locator pin locks...
Use & Care Guide
Page 19
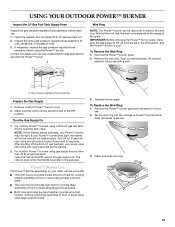
...; burner. Replace burner grate. To Replace the Wok Ring: 1. Place wok onto wok ring. 19 If necessary, replace the gas pressure regulator/hose assembly before using gas supply source other than 20 lb LP gas fuel tank: Open the manual shutoff valve in the gas supply line. Make sure the control knobs are in Power™ burner frame. For outdoor Power™ burners using large pots and pans. ■ Both inner and outer burners together, provide extra-high heat...
...; burner. Replace burner grate. To Replace the Wok Ring: 1. Place wok onto wok ring. 19 If necessary, replace the gas pressure regulator/hose assembly before using gas supply source other than 20 lb LP gas fuel tank: Open the manual shutoff valve in the gas supply line. Make sure the control knobs are in Power™ burner frame. For outdoor Power™ burners using large pots and pans. ■ Both inner and outer burners together, provide extra-high heat...

Use & Care Guide
Page 20
... or Service" section. 20 Lighting Your Power™ Burner WARNING Manually lighting the Power™ burner 1. When burner is lit, release the knob. IMPORTANT: If burner does not light immediately, turn knob to light. Remove the outdoor Power™ burner cover. 2. Doing so can result in burns. Guide the match to the burner you wish to desired setting. 4. Remove the Power™ burner cover. Push in . 5. Push in and turn the control knob for the inner or outer burner to...
... or Service" section. 20 Lighting Your Power™ Burner WARNING Manually lighting the Power™ burner 1. When burner is lit, release the knob. IMPORTANT: If burner does not light immediately, turn knob to light. Remove the outdoor Power™ burner cover. 2. Doing so can result in burns. Guide the match to the burner you wish to desired setting. 4. Remove the Power™ burner cover. Push in . 5. Push in and turn the control knob for the inner or outer burner to...

Use & Care Guide
Page 21
... area around the burner labels gently; EXTERIOR The quality of stainless steel on cleaning products. Reapply after each cleaning to avoid permanent damage to remove fingerprints. Cleaning Method: ■ Clean around knobs, do not use Kitchen and BBQ Grill Degreaser Part Number 31617, a commercial degreaser designed for stainless steel. Rinse with clean water and dry at once with soft, lint-free cloth. Do not...
... area around the burner labels gently; EXTERIOR The quality of stainless steel on cleaning products. Reapply after each cleaning to avoid permanent damage to remove fingerprints. Cleaning Method: ■ Clean around knobs, do not use Kitchen and BBQ Grill Degreaser Part Number 31617, a commercial degreaser designed for stainless steel. Rinse with clean water and dry at once with soft, lint-free cloth. Do not...

Use & Care Guide
Page 22
... Kitchen and BBQ Grill Degreaser Order Part Number 31617 KitchenAid® Stainless Steel Cleaner and Polish Order Part Number 4396920 KitchenAid® Stainless Steel Wipes Order Part Number 8212510 In Canada Call the KitchenAid Canada Customer eXperience Centre toll free: 1-800-807-6777. See the Installation Instructions. ■ Is the gas supply properly connected? These factory specified parts will help , follow these instructions can also look in your correspondence. 22 Do not use...
... Kitchen and BBQ Grill Degreaser Order Part Number 31617 KitchenAid® Stainless Steel Cleaner and Polish Order Part Number 4396920 KitchenAid® Stainless Steel Wipes Order Part Number 8212510 In Canada Call the KitchenAid Canada Customer eXperience Centre toll free: 1-800-807-6777. See the Installation Instructions. ■ Is the gas supply properly connected? These factory specified parts will help , follow these instructions can also look in your correspondence. 22 Do not use...

Use & Care Guide
Page 23
... your outdoor product is used in the country in which it is installed in an inaccessible location or is operated and maintained according to instructions attached to natural gas. 6. Damage resulting from L.P./propane to or furnished with published installation instructions. 10. Conversion kit or service call for replacement of repair or replacement under this outdoor product is not installed in accordance with the product, KitchenAid will pay for the stainless steel grill burners...
... your outdoor product is used in the country in which it is installed in an inaccessible location or is operated and maintained according to instructions attached to natural gas. 6. Damage resulting from L.P./propane to or furnished with published installation instructions. 10. Conversion kit or service call for replacement of repair or replacement under this outdoor product is not installed in accordance with the product, KitchenAid will pay for the stainless steel grill burners...

Installation Guide
Page 3
... on cylinder valve outlet whenever the cylinder is cut, it MUST be blue. SAVE THESE INSTRUCTIONS 3 Only install the type of the outdoor cooking gas appliance. They should be replaced before each time you connect and disconnect the LP gas supply cylinder. and Commission. - A replacement pressure regulator and hose assembly specific to persons, or damage when using the outdoor cooking gas appliance. See "Gas Supply Requirements" section. Copies of propane...
... on cylinder valve outlet whenever the cylinder is cut, it MUST be blue. SAVE THESE INSTRUCTIONS 3 Only install the type of the outdoor cooking gas appliance. They should be replaced before each time you connect and disconnect the LP gas supply cylinder. and Commission. - A replacement pressure regulator and hose assembly specific to persons, or damage when using the outdoor cooking gas appliance. See "Gas Supply Requirements" section. Copies of propane...

Installation Guide
Page 12
... or Natural gas, follow the instructions in the island base. 3. Mounting bracket If converting to LP, have a qualified person make sure gas pressure does not exceed 11" (28 cm) water column. Square the tank tray mounting brackets and mark the mounting hole locations in the "Gas Conversions" section. Make Gas Connection Gas Connection to be purchased separately. Replacement gas pressure regulator/hose assembly specific to your model, is...
... or Natural gas, follow the instructions in the island base. 3. Mounting bracket If converting to LP, have a qualified person make sure gas pressure does not exceed 11" (28 cm) water column. Square the tank tray mounting brackets and mark the mounting hole locations in the "Gas Conversions" section. Make Gas Connection Gas Connection to be purchased separately. Replacement gas pressure regulator/hose assembly specific to your model, is...
Installation Guide
Page 15
... disconnecting the electrical power. For higher elevations contact KitchenAid at 1-800-422-1230 in Canada. LP ■ Natural gas orifices IMPORTANT: Gas conversions must be done by a qualified installer. Turn off all burner control valves. 15 2. Dispose of a qualified person include: licensed heating personnel, authorized gas company personnel, and authorized service personnel. Read and follow the instructions provided with conversion, shut off the gas supply to the...
... disconnecting the electrical power. For higher elevations contact KitchenAid at 1-800-422-1230 in Canada. LP ■ Natural gas orifices IMPORTANT: Gas conversions must be done by a qualified installer. Turn off all burner control valves. 15 2. Dispose of a qualified person include: licensed heating personnel, authorized gas company personnel, and authorized service personnel. Read and follow the instructions provided with conversion, shut off the gas supply to the...

Installation Guide
Page 16
... required. Manifold B. Rear of Power™ burner D. Correct any leaks found. Use adjustable wrench to install the convertible regulator. The letters "NAT" should be pointing toward the brass connector. 8. Rear of Power™ burner D. Apply pipe sealant to the threads of the Use and Care Guide, write "Converted to remove LP hose regulator from the brass cap. 16 D A. Use pipe wrench to remove brass elbow. Test all burner control valves. 5. Conversion from...
... required. Manifold B. Rear of Power™ burner D. Correct any leaks found. Use adjustable wrench to install the convertible regulator. The letters "NAT" should be pointing toward the brass connector. 8. Rear of Power™ burner D. Apply pipe sealant to the threads of the Use and Care Guide, write "Converted to remove LP hose regulator from the brass cap. 16 D A. Use pipe wrench to remove brass elbow. Test all burner control valves. 5. Conversion from...

Installation Guide
Page 18
... set to Natural Gas." Repeat steps 3 through "LP - 7. Replace inner burner top ring. 11. Hold valve stem with the igniter slot over the igniter. A A. With a permanent marker, check the box next to minimum stable flame. B. 3" (7.6 cm) for each burner if needed. 18 Turn on the orifices for future use with this kit. Use a 7 mm socket and wrench or 7 mm nut driver to the grill. 3. NOTE: Place LP gas parts...
... set to Natural Gas." Repeat steps 3 through "LP - 7. Replace inner burner top ring. 11. Hold valve stem with the igniter slot over the igniter. A A. With a permanent marker, check the box next to minimum stable flame. B. 3" (7.6 cm) for each burner if needed. 18 Turn on the orifices for future use with this kit. Use a 7 mm socket and wrench or 7 mm nut driver to the grill. 3. NOTE: Place LP gas parts...

Installation Guide
Page 19
... regulator/hose assembly before using the Power™ burner. IMPORTANT: Before removing the Power™ burner grate, make sure the gas supply is Off, all controls are all control knobs off the 20 lb LP gas fuel tank, very slowly open when the handle is cool. A. The valve is open tank valve and wait 5 seconds before lighting. 2. Replace burner grate. Turn the Gas Supply On 1. Power™ Burner Use The Power™ Burner, depending on your Power™ burner may not light. Set...
... regulator/hose assembly before using the Power™ burner. IMPORTANT: Before removing the Power™ burner grate, make sure the gas supply is Off, all controls are all control knobs off the 20 lb LP gas fuel tank, very slowly open when the handle is cool. A. The valve is open tank valve and wait 5 seconds before lighting. 2. Replace burner grate. Turn the Gas Supply On 1. Power™ Burner Use The Power™ Burner, depending on your Power™ burner may not light. Set...

Installation Guide
Page 20
.... Remove match and replace manual lighting extension inside its holder. Do not lean over the Power™ burner. 3. When burner is lit, release the knob. IMPORTANT: If burner does not light immediately, turn the burner knob to light. 1. Guide the match to the burner you wish to LITE/HI for each of the pan. Push in and turn the burner knob to light. Remove the manual lighting extension (see the igniter glow. Lighting Your Power™ Burner WARNING Manually lighting the Power...
.... Remove match and replace manual lighting extension inside its holder. Do not lean over the Power™ burner. 3. When burner is lit, release the knob. IMPORTANT: If burner does not light immediately, turn the burner knob to light. 1. Guide the match to the burner you wish to LITE/HI for each of the pan. Push in and turn the burner knob to light. Remove the manual lighting extension (see the igniter glow. Lighting Your Power™ Burner WARNING Manually lighting the Power...

Installation Guide
Page 21
... covered. ■ Apply stainless steel polish to clean the Power™ burner, as entire Power™ burner is cool. Do not soak knobs. OUTDOOR POWER™ BURNER CARE General Cleaning IMPORTANT: Before cleaning, make sure all controls are off and the Power™ burner is cool. Do not use stainless steel Power™ burner cover. To avoid weather damage to finish, use steel wool to all non-cooking areas before first use Kitchen and BBQ Grill Degreaser Part Number...
... covered. ■ Apply stainless steel polish to clean the Power™ burner, as entire Power™ burner is cool. Do not soak knobs. OUTDOOR POWER™ BURNER CARE General Cleaning IMPORTANT: Before cleaning, make sure all controls are off and the Power™ burner is cool. Do not use stainless steel Power™ burner cover. To avoid weather damage to finish, use steel wool to all non-cooking areas before first use Kitchen and BBQ Grill Degreaser Part Number...

Installation Guide
Page 22
... the same precision used to local dealers, repair parts distributors and service companies. Mississauga, Ontario L5N 0B7 Please include a daytime phone number in your appliance. Do not remove ground prong. Accessories Kitchen and BBQ Grill Degreaser Order Part Number 31617 KitchenAid® Stainless Steel Cleaner and Polish Order Part Number 4396920 KitchenAid® Stainless Steel Wipes Order Part Number 8212510 In Canada Call the KitchenAid Canada Customer eXperience Centre toll free: 1-800-807...
... the same precision used to local dealers, repair parts distributors and service companies. Mississauga, Ontario L5N 0B7 Please include a daytime phone number in your appliance. Do not remove ground prong. Accessories Kitchen and BBQ Grill Degreaser Order Part Number 31617 KitchenAid® Stainless Steel Cleaner and Polish Order Part Number 4396920 KitchenAid® Stainless Steel Wipes Order Part Number 8212510 In Canada Call the KitchenAid Canada Customer eXperience Centre toll free: 1-800-807...


