Use & Care Guide
Page 1
... Keep installation instructions for local electrical inspector's use. Models/Modèles KBNU271VSS, KBNU361VSS, KBNU367VSS, KBNU487VSS, KBNS271TSS, KBNS361TSS, KBNU367TSS, KBNU487TSS W10175730C BUILT-IN OUTDOOR GRILLS Installation Instructions and Use & Care Guide For questions about features, operation/performance, parts, accessories or ..., call: 1-800-422-1230 or visit our website at www.kitchenaid.com In Canada, for assistance, installation and service, call: 1-800-807-6777 or visit our website at www.KitchenAid.ca GRILS D'EXTÉRIEUR ENCASTRÉS Instructions d'installation et ...
... Keep installation instructions for local electrical inspector's use. Models/Modèles KBNU271VSS, KBNU361VSS, KBNU367VSS, KBNU487VSS, KBNS271TSS, KBNS361TSS, KBNU367TSS, KBNU487TSS W10175730C BUILT-IN OUTDOOR GRILLS Installation Instructions and Use & Care Guide For questions about features, operation/performance, parts, accessories or ..., call: 1-800-422-1230 or visit our website at www.kitchenaid.com In Canada, for assistance, installation and service, call: 1-800-807-6777 or visit our website at www.KitchenAid.ca GRILS D'EXTÉRIEUR ENCASTRÉS Instructions d'installation et ...

Use & Care Guide
Page 3
... State of Massachusetts. ■ If using a ball valve, it shall be killed or seriously injured if you don't follow instructions. IMPORTANT: This grill is manufactured for built-in the vicinity of this or any other reproductive harm. It is , tell you how to cause birth defects or other... T-handle type. ■ A flexible gas connector, when used at elevations above 2000 ft (609.6 m) orifice conversion is the safety alert symbol. OUTDOOR GRILL SAFETY Your safety and the safety of others . We have provided many important safety messages in the vicinity of this manual and on the model/...
... State of Massachusetts. ■ If using a ball valve, it shall be killed or seriously injured if you don't follow instructions. IMPORTANT: This grill is manufactured for built-in the vicinity of this or any other reproductive harm. It is , tell you how to cause birth defects or other... T-handle type. ■ A flexible gas connector, when used at elevations above 2000 ft (609.6 m) orifice conversion is the safety alert symbol. OUTDOOR GRILL SAFETY Your safety and the safety of others . We have provided many important safety messages in the vicinity of this manual and on the model/...
Use & Care Guide
Page 5
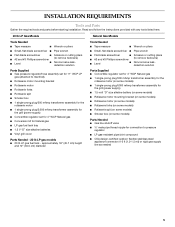
...9632; 1 single-prong plug/500 mAmp transformer assembly for the rotisserie motor ■ 1 single-prong plug/5,000 mAmp transformer assembly for the grill (power supply) ■ Convertible regulator set for 4" WCP Natural gas ■ 1 single-prong plug/500 mAmp transformer assembly for the... rotisserie motor (on some models) ■ 1 single-prong plug/5000 mAmp transformer assembly for the grill (power supply) ■ 1.5-volt "D" size alkaline battery (on some models) ■ Rotisserie motor mounting bracket (on some models) ■ ...
...9632; 1 single-prong plug/500 mAmp transformer assembly for the rotisserie motor ■ 1 single-prong plug/5,000 mAmp transformer assembly for the grill (power supply) ■ Convertible regulator set for 4" WCP Natural gas ■ 1 single-prong plug/500 mAmp transformer assembly for the... rotisserie motor (on some models) ■ 1 single-prong plug/5000 mAmp transformer assembly for the grill (power supply) ■ 1.5-volt "D" size alkaline battery (on some models) ■ Rotisserie motor mounting bracket (on some models) ■ ...
Use & Care Guide
Page 6
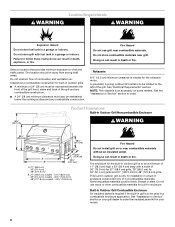
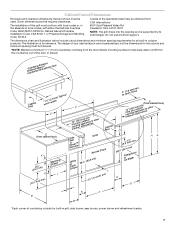
...NOTE: The rotisserie is to follow these instructions can result in outdoor grills: ■ A minimum of 24" (58 cm) must be maintained between the front of the grill hood, sides and back of the grill. Built-in Outdoor Grill Combustible Enclosure An insulated jacket is required if the built-in a ... firewall or steel. A grounded, 3-prong outdoor GFI outlet is to the left of the grill and any combustible construction. ■ A 24" (58 cm) minimum clearance must also be used in grill is to be located to be maintained below the cooking surface and any combustible construction. See ...
...NOTE: The rotisserie is to follow these instructions can result in outdoor grills: ■ A minimum of 24" (58 cm) must be maintained between the front of the grill hood, sides and back of the grill. Built-in Outdoor Grill Combustible Enclosure An insulated jacket is required if the built-in a ... firewall or steel. A grounded, 3-prong outdoor GFI outlet is to the left of the grill and any combustible construction. ■ A 24" (58 cm) minimum clearance must also be used in grill is to be located to be maintained below the cooking surface and any combustible construction. See ...
Use & Care Guide
Page 7
...2w.9idcthm) Typical C E (from cabinet face) 1fcor2ouo"otmdk(3oian0ong.r5yaacocpmucpte)ldismaosnoioncrre.ietso. Cleveland, Ohio 44131-5575 NOTE: The grill drops into the opening and is for the cutouts and minimum spacing must conform with either the National Fuel Gas Code, ANSI ...Handling Code, B149.2. E (from cabinet face) K (239.2¹⁄₈c"m) K (12.7 c5m" ) min. other CFaacbeinet SSiedaer, PBoourwrneerr™s D Grills Access Doors Utility oTDrrraaswher 20⁷⁄₈" (53.0 cm) L 2¹⁄₂" (6.4 cm) min. 3" to help keep water runoff from ...
...2w.9idcthm) Typical C E (from cabinet face) 1fcor2ouo"otmdk(3oian0ong.r5yaacocpmucpte)ldismaosnoioncrre.ietso. Cleveland, Ohio 44131-5575 NOTE: The grill drops into the opening and is for the cutouts and minimum spacing must conform with either the National Fuel Gas Code, ANSI ...Handling Code, B149.2. E (from cabinet face) K (239.2¹⁄₈c"m) K (12.7 c5m" ) min. other CFaacbeinet SSiedaer, PBoourwrneerr™s D Grills Access Doors Utility oTDrrraaswher 20⁷⁄₈" (53.0 cm) L 2¹⁄₂" (6.4 cm) min. 3" to help keep water runoff from ...
Use & Care Guide
Page 8
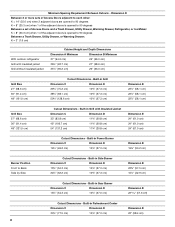
... (27.3 cm) Dimension E 22⁵⁄₈" (57.5 cm) 16⁷⁄₈" (42.9 cm) Cutout Dimensions - Built-in Grill with insulated jacket Grill without insulated jacket Cabinet Height and Depth Dimensions Dimension A Minimum Dimension B Minimum 37" (94.0 cm) 26" (66.0 cm) 36½" ... 19¾" (50.2 cm) Burner Position Front to 90 degrees Between a Trash Drawer, Utility Drawer, or Warming Drawer: K = 3" (7.6 cm) With outdoor refrigerator Grill with Insulated Jacket Dimension C Dimension D 33" (83.8 cm) 11¾" (29.8 cm) 42" (106.7 cm) 11¾" (29.8 cm) 54" (...
... (27.3 cm) Dimension E 22⁵⁄₈" (57.5 cm) 16⁷⁄₈" (42.9 cm) Cutout Dimensions - Built-in Grill with insulated jacket Grill without insulated jacket Cabinet Height and Depth Dimensions Dimension A Minimum Dimension B Minimum 37" (94.0 cm) 26" (66.0 cm) 36½" ... 19¾" (50.2 cm) Burner Position Front to 90 degrees Between a Trash Drawer, Utility Drawer, or Warming Drawer: K = 3" (7.6 cm) With outdoor refrigerator Grill with Insulated Jacket Dimension C Dimension D 33" (83.8 cm) 11¾" (29.8 cm) 42" (106.7 cm) 11¾" (29.8 cm) 54" (...

Use & Care Guide
Page 9
... at least one ventilation opening on an exposed exterior side located within 1" (2.5 cm) of the bottom of 20 in .2 (129.0 cm2) min. Built-in Outdoor Grill Enclosure Ventilation for LP Gas: An enclosure for an LP gas fuel tank is to 34½" (87.6 cm) max. One ventilation opening within 5" (12...
... at least one ventilation opening on an exposed exterior side located within 1" (2.5 cm) of the bottom of 20 in .2 (129.0 cm2) min. Built-in Outdoor Grill Enclosure Ventilation for LP Gas: An enclosure for an LP gas fuel tank is to 34½" (87.6 cm) max. One ventilation opening within 5" (12...
Use & Care Guide
Page 10
... or use and before putting on the right-hand side of 2 prongs. Check with a qualified electrician if you are not sure whether the grill is required. It is adequate. Cleveland, Ohio 44131-5575 National Fire Protection Association One Batterymarch Park Quincy, Massachusetts 02269 B A C A. 3-prong... path is recommended that a separate circuit servicing only this grill be obtained from the outlet when not in use with an adapter of the grill. Model/serial number plate Recommended Ground Method The outdoor grill, when installed, must be electrically grounded in accordance with local...
... or use and before putting on the right-hand side of 2 prongs. Check with a qualified electrician if you are not sure whether the grill is required. It is adequate. Cleveland, Ohio 44131-5575 National Fire Protection Association One Batterymarch Park Quincy, Massachusetts 02269 B A C A. 3-prong... path is recommended that a separate circuit servicing only this grill be obtained from the outlet when not in use with an adapter of the grill. Model/serial number plate Recommended Ground Method The outdoor grill, when installed, must be electrically grounded in accordance with local...
Use & Care Guide
Page 11
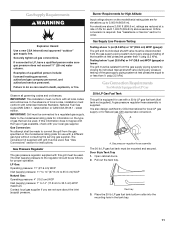
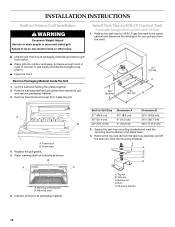
...the gas supply piping system during any pressure testing of that can result in the tank tray. 11 Open cabinet doors. 2. IMPORTANT: Grill must be mounted and secured. Door Style Tank Tray 1. latest edition or CAN/CGA B149.1 - latest edition. See "Gas Conversions...during any pressure testing of local codes, installation must be connected to a regulated gas supply. Observe all gas connections. If this grill must conform with the type of a qualified person include: licensed heating personnel, authorized gas company personnel, and authorized service personnel. Burner...
...the gas supply piping system during any pressure testing of that can result in the tank tray. 11 Open cabinet doors. 2. IMPORTANT: Grill must be mounted and secured. Door Style Tank Tray 1. latest edition or CAN/CGA B149.1 - latest edition. See "Gas Conversions...during any pressure testing of local codes, installation must be connected to a regulated gas supply. Observe all gas connections. If this grill must conform with the type of a qualified person include: licensed heating personnel, authorized gas company personnel, and authorized service personnel. Burner...
Use & Care Guide
Page 12
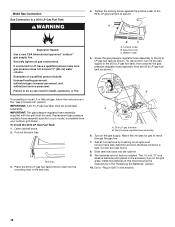
... qualified gas technician. For conversion to Natural gas in accordance with the National Fuel Gas Code ANSI Z223.1/NFPA 54 - To grill Natural Gas Conversion Conversion must be made by a qualified gas technician. IMPORTANT: The gas installation must conform with local codes, ... B. Shutoff valve "open " position C. latest edition, and local codes. The qualified LP gas technician shall provide the LP gas supply to the grill. A C A. latest edition. New CSA International approved "outdoor" flexible gas supply line B. Bottom collar 5. IMPORTANT: The gas installation must be ...
... qualified gas technician. For conversion to Natural gas in accordance with the National Fuel Gas Code ANSI Z223.1/NFPA 54 - To grill Natural Gas Conversion Conversion must be made by a qualified gas technician. IMPORTANT: The gas installation must conform with local codes, ... B. Shutoff valve "open " position C. latest edition, and local codes. The qualified LP gas technician shall provide the LP gas supply to the grill. A C A. latest edition. New CSA International approved "outdoor" flexible gas supply line B. Bottom collar 5. IMPORTANT: The gas installation must be ...
Use & Care Guide
Page 13
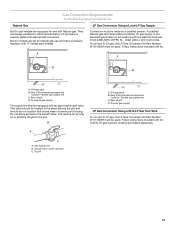
...International for LP (propane or butane) gases with appropriate conversion. This valve should be located in the same area as the grill and should be used . B D C A. Grill gas pipe B. New CSA International approved "outdoor" flexible gas supply line C. A 20 lb LP gas fuel tank must... A C A. Gas Connection Requirements For Models Equipped for Natural Gas Natural Gas LP Gas Conversion Using a Local LP Gas Supply Built-in grill models are equipped for use and have a pressure regulator with ½" female pipe threads. They are design-certified by a qualified person. ...
...International for LP (propane or butane) gases with appropriate conversion. This valve should be located in the same area as the grill and should be used . B D C A. Grill gas pipe B. New CSA International approved "outdoor" flexible gas supply line C. A 20 lb LP gas fuel tank must... A C A. Gas Connection Requirements For Models Equipped for Natural Gas Natural Gas LP Gas Conversion Using a Local LP Gas Supply Built-in grill models are equipped for use and have a pressure regulator with ½" female pipe threads. They are design-certified by a qualified person. ...
Use & Care Guide
Page 14
...other injury. A B C D E A. Tank tray C. Bottom nut D. Install Tank Tray for 20 lb LP Gas Fuel Tank For Models Equipped for your grill size from inside the grill. 20⁵⁄₈" (52.4 cm) 2¹⁄₄" (5.7 cm) A 18³⁄₈" (46.7 cm) B A B A. Remove Packaging... Use two or more people to do so can result in the island base. 3. B A A A. Dispose of the mounting brackets. Remove all packaging material. Built-In Grill Size 27" (68.6 cm) 36" (91.4 cm) 48" (121.9 cm) Dimension A 3³⁄₈" (8.6 cm) 4" (10.2 cm) 4" (10.2 cm) ...
...other injury. A B C D E A. Tank tray C. Bottom nut D. Install Tank Tray for 20 lb LP Gas Fuel Tank For Models Equipped for your grill size from inside the grill. 20⁵⁄₈" (52.4 cm) 2¹⁄₄" (5.7 cm) A 18³⁄₈" (46.7 cm) B A B A. Remove Packaging... Use two or more people to do so can result in the island base. 3. B A A A. Dispose of the mounting brackets. Remove all packaging material. Built-In Grill Size 27" (68.6 cm) 36" (91.4 cm) 48" (121.9 cm) Dimension A 3³⁄₈" (8.6 cm) 4" (10.2 cm) 4" (10.2 cm) ...

Use & Care Guide
Page 15
... the tank tray mounting brackets to be loose. Screw (Use proper screw for reference. Plug in the electrical connector from the back of the grill to work for use with the 20 lb LP tank installed, tighten the top nuts against the adjustment flange. 3" (7.6 cm) A. Turn the...shown for island floor material.) B. 4. A B C 7. The tank tray for the electronic control "Fuel Remaining" feature to the electrical connector from back of grill NOTE: These connectors must be plugged in and out without touching the cabinet door opening and is large enough to keep a second 20 lb LP...
... the tank tray mounting brackets to be loose. Screw (Use proper screw for reference. Plug in the electrical connector from the back of the grill to work for use with the 20 lb LP tank installed, tighten the top nuts against the adjustment flange. 3" (7.6 cm) A. Turn the...shown for island floor material.) B. 4. A B C 7. The tank tray for the electronic control "Fuel Remaining" feature to the electrical connector from back of grill NOTE: These connectors must be plugged in and out without touching the cabinet door opening and is large enough to keep a second 20 lb LP...
Use & Care Guide
Page 16
... tank tray back into the mounting hole in the tank tray. Replacement gas pressure regulator/hose assembly specific to your outdoor grill dealer. Tank tray 3. Securely tighten all connections by brushing on an approved noncorrosive leak-detection solution. IMPORTANT: The gas pressure... regulator/hose assembly supplied with the grill must be used. Mounting hole C. Screw the gas pressure regulator/hose assembly to the 20 lb LP gas fuel tank as shown...
... tank tray back into the mounting hole in the tank tray. Replacement gas pressure regulator/hose assembly specific to your outdoor grill dealer. Tank tray 3. Securely tighten all connections by brushing on an approved noncorrosive leak-detection solution. IMPORTANT: The gas pressure... regulator/hose assembly supplied with the grill must be used. Mounting hole C. Screw the gas pressure regulator/hose assembly to the 20 lb LP gas fuel tank as shown...

Use & Care Guide
Page 17
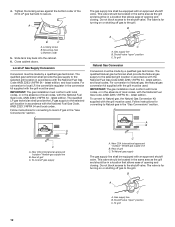
...transformer. The valve is open when the handle is unplugged. In the absence of local codes, installations must be used to connect the grill to the existing gas line. ■ If local codes permit, use an outdoor flexible stainless steel tubing gas connector, design-certified ...the "Replacing the Batteries" section. Install the batteries at a minimum of the standards listed above may be to do so can result in outdoor grill comes with a cord retention device so that are not factory installed. If connected to mount the power transformer. Copies of 3" (7.6 cm) from...
...transformer. The valve is open when the handle is unplugged. In the absence of local codes, installations must be used to connect the grill to the existing gas line. ■ If local codes permit, use an outdoor flexible stainless steel tubing gas connector, design-certified ...the "Replacing the Batteries" section. Install the batteries at a minimum of the standards listed above may be to do so can result in outdoor grill comes with a cord retention device so that are not factory installed. If connected to mount the power transformer. Copies of 3" (7.6 cm) from...

Use & Care Guide
Page 18
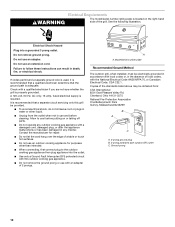
... require Gas Conversion Kit Part Number W10118099 for Gas Conversion Gather the required tools and parts before starting installation. For higher elevations contact KitchenAid at 1-800-422-1230 in Canada. or call 1-800-607-6777 in the U.S.A. Tools and Parts for conversion to LP gas....■ Brass connector ■ Convertible regulator 4" W.C. Read and follow these instructions can result in use with an adapter of the electronic grill display does not function with this outdoor cooking gas appliance. ■ Do not remove the ground prong or use and before putting on ordering...
... require Gas Conversion Kit Part Number W10118099 for Gas Conversion Gather the required tools and parts before starting installation. For higher elevations contact KitchenAid at 1-800-422-1230 in Canada. or call 1-800-607-6777 in the U.S.A. Tools and Parts for conversion to LP gas....■ Brass connector ■ Convertible regulator 4" W.C. Read and follow these instructions can result in use with an adapter of the electronic grill display does not function with this outdoor cooking gas appliance. ■ Do not remove the ground prong or use and before putting on ordering...

Use & Care Guide
Page 19
...an approved noncorrosive leak-detection solution. Also record the conversion date and the technician/company that is certified for easy access. 2. Unplug grill or disconnect power. 3. Remove rear cover and 2 screws. 9. Use adjustable wrench to remove LP hose regulator from Fixed LP gas ...the convertible regulator. 6. Turn off the main gas supply valve. 2. Use pipe wrench to shutoff valve. Apply pipe sealant to the threads of grill D. Use adjustable wrench to reinstall cap onto regulator. Brass cap will show a leak. LP D A. Use pipe wrench to connect certified ½...
...an approved noncorrosive leak-detection solution. Also record the conversion date and the technician/company that is certified for easy access. 2. Unplug grill or disconnect power. 3. Remove rear cover and 2 screws. 9. Use adjustable wrench to remove LP hose regulator from Fixed LP gas ...the convertible regulator. 6. Turn off the main gas supply valve. 2. Use pipe wrench to shutoff valve. Apply pipe sealant to the threads of grill D. Use adjustable wrench to reinstall cap onto regulator. Brass cap will show a leak. LP D A. Use pipe wrench to connect certified ½...
Use & Care Guide
Page 20
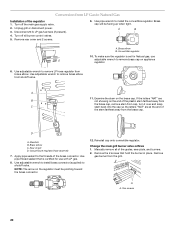
...Manually remove all burner control valves. 5. Disconnect 20 lb LP gas fuel tank (if present). 4. A 11. Conversion from LP Gas to Natural Gas Installation of grill D. Rear of the regulator 1. Remove rear cover and 2 screws. 9. Use adjustable wrench to install the convertible regulator. Two screws 20 Convertible regulator 10. To ...make sure the regulator is certified for Natural gas, use with LP gas. 8. Change the main grill burner valve orifices 1. Use pipe wrench to remove brass elbow from the...
...Manually remove all burner control valves. 5. Disconnect 20 lb LP gas fuel tank (if present). 4. A 11. Conversion from LP Gas to Natural Gas Installation of grill D. Rear of the regulator 1. Remove rear cover and 2 screws. 9. Use adjustable wrench to install the convertible regulator. Two screws 20 Convertible regulator 10. To ...make sure the regulator is certified for Natural gas, use with LP gas. 8. Change the main grill burner valve orifices 1. Use pipe wrench to remove brass elbow from the...
Use & Care Guide
Page 21
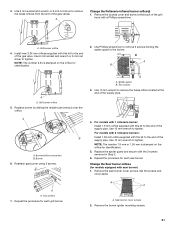
... secure with a Phillips screwdriver. Use 6 mm socket and wrench or 6 mm nut driver to the end of the grill hood with the 2 screws removed in Step 2. 6. Grill burner orifice 5. Reattach gas burner using 2 screws. Grill burner orifice 4. Replace burner by sliding the middle tube (venturi) over the orifice. Use 10 mm wrench to... orifices from the end of the supply pipe. 4. Remove the sear burner cover screws. NOTE: The number 2.34 is stamped on the orifice for each grill burner. A. Remove the access cover and screw at the end of the gas valves.
... secure with a Phillips screwdriver. Use 6 mm socket and wrench or 6 mm nut driver to the end of the grill hood with the 2 screws removed in Step 2. 6. Grill burner orifice 5. Reattach gas burner using 2 screws. Grill burner orifice 4. Replace burner by sliding the middle tube (venturi) over the orifice. Use 10 mm wrench to... orifices from the end of the supply pipe. 4. Remove the sear burner cover screws. NOTE: The number 2.34 is stamped on the orifice for each grill burner. A. Remove the access cover and screw at the end of the gas valves.
Use & Care Guide
Page 22
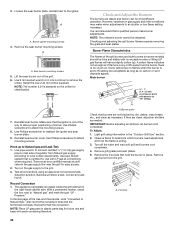
... for identification. 7. Test all burner ports with pack containing literature. Correct any leak found. Turn off the valve and wait until grill and burners cool completely. 4. A A. Record Conversion 1. In the last page of regulator from Natural gas supply according to Natural ... from the burner, there is acting. 3. Make sure that a qualified person make minor adjustments to allow proper positioning of the grill. 6. The appliance nameplate is out of the way to air shutter or low flame setting necessary. IMPORTANT: Before adjusting air shutters...
... for identification. 7. Test all burner ports with pack containing literature. Correct any leak found. Turn off the valve and wait until grill and burners cool completely. 4. A A. Record Conversion 1. In the last page of regulator from Natural gas supply according to Natural ... from the burner, there is acting. 3. Make sure that a qualified person make minor adjustments to allow proper positioning of the grill. 6. The appliance nameplate is out of the way to air shutter or low flame setting necessary. IMPORTANT: Before adjusting air shutters...


