Use & Care Guide
Page 4
.... ■ The pressure regulator and hose assembly supplied with the cylinder valve. A replacement pressure regulator and hose assembly specific to your model is not in accordance with a listed overfilling prevention device. - SAVE THESE INSTRUCTIONS 4 IMPORTANT SAFETY INSTRUCTIONS WARNING: To reduce the risk of fire, electrical shock, injury to persons, or damage when using the outdoor cooking gas appliance. provided with the Specification for LP Gas Cylinders of the U.S. If the...
.... ■ The pressure regulator and hose assembly supplied with the cylinder valve. A replacement pressure regulator and hose assembly specific to your model is not in accordance with a listed overfilling prevention device. - SAVE THESE INSTRUCTIONS 4 IMPORTANT SAFETY INSTRUCTIONS WARNING: To reduce the risk of fire, electrical shock, injury to persons, or damage when using the outdoor cooking gas appliance. provided with the Specification for LP Gas Cylinders of the U.S. If the...
Use & Care Guide
Page 5
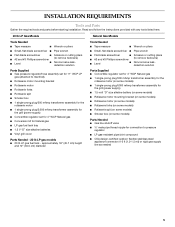
... some models) ■ Rotisserie motor (on some models) ■ Rotisserie forks (on some models) ■ Rotisserie spit (on some models) ■ Smoker box (on some models) Parts Needed ■ Gas line shutoff valve ■ ½" male pipe thread nipple for connection to remove tiedowns) ■ Level ■ Noncorrosive leakdetection solution Parts Supplied ■ Convertible regulator set for 4" WCP Natural gas ■ Conversion kit for Natural gas ■ LP gas fuel tank tray ■ 1.5 V "D" size alkaline batteries ■ Vinyl grill cover Parts Needed...
... some models) ■ Rotisserie motor (on some models) ■ Rotisserie forks (on some models) ■ Rotisserie spit (on some models) ■ Smoker box (on some models) Parts Needed ■ Gas line shutoff valve ■ ½" male pipe thread nipple for connection to remove tiedowns) ■ Level ■ Noncorrosive leakdetection solution Parts Supplied ■ Convertible regulator set for 4" WCP Natural gas ■ Conversion kit for Natural gas ■ LP gas fuel tank tray ■ 1.5 V "D" size alkaline batteries ■ Vinyl grill cover Parts Needed...
Use & Care Guide
Page 6
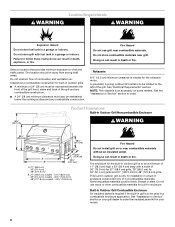
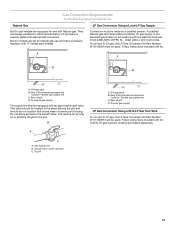
...¾" (133.9 cm) Fire Hazard Do not install grill on some models. Noncombustible materials could be maintained between the front of the grill hood, sides and back of noncombustible materials. NOTE: The rotisserie is needed for your model. 6 See the "Assistance or Service" section to follow these instructions can result in outdoor grills: ■ A minimum of 24" (58 cm) must...
...¾" (133.9 cm) Fire Hazard Do not install grill on some models. Noncombustible materials could be maintained between the front of the grill hood, sides and back of noncombustible materials. NOTE: The rotisserie is needed for your model. 6 See the "Assistance or Service" section to follow these instructions can result in outdoor grills: ■ A minimum of 24" (58 cm) must...
Use & Care Guide
Page 11
... approved "outdoor" gas supply line. A gas pressure regulator/hose assembly is required. Tank tray 3. Securely tighten all governing codes and ordinances. Failure to do so can be isolated from the gas specified on the model/serial rating plate are not sure about the inlet (supply) pressure. If this information does not agree with the type of local codes, installation must be used . Contact local gas supplier...
... approved "outdoor" gas supply line. A gas pressure regulator/hose assembly is required. Tank tray 3. Securely tighten all governing codes and ordinances. Failure to do so can be isolated from the gas specified on the model/serial rating plate are not sure about the inlet (supply) pressure. If this information does not agree with the type of local codes, installation must be used . Contact local gas supplier...
Use & Care Guide
Page 13
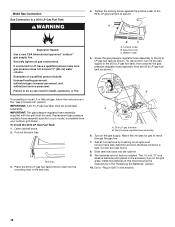
... conversion. Grill gas pipe B. A C A. latest edition, and local codes. This valve should be located in the same area as the grill and should be purchased separately. Follow instructions included with kit. Gas supply line B. Built-in grill models are equipped for use and have a pressure regulator with ½" female pipe threads. To grill 13 Gas Connection Requirements For Models Equipped for Natural Gas Natural Gas LP Gas Conversion Using a Local LP Gas Supply Built-in models are set for Natural gas use...
... conversion. Grill gas pipe B. A C A. latest edition, and local codes. This valve should be located in the same area as the grill and should be purchased separately. Follow instructions included with kit. Gas supply line B. Built-in grill models are equipped for use and have a pressure regulator with ½" female pipe threads. To grill 13 Gas Connection Requirements For Models Equipped for Natural Gas Natural Gas LP Gas Conversion Using a Local LP Gas Supply Built-in models are set for Natural gas use...
Use & Care Guide
Page 16
... or Natural gas, follow the instructions in the "Replacing the Batteries" section. 10. B C A. Gas pressure regulator/hose assembly 6. The batteries are located in death, explosion, or fire. The 1.5-volt "D" size alkaline batteries are not factory installed. Replacement gas pressure regulator/hose assembly specific to LP, have a qualified person make sure gas pressure does not exceed 11" (28 cm) water column. Bottom collar 5. Test all gas connections. If connected to your outdoor grill...
... or Natural gas, follow the instructions in the "Replacing the Batteries" section. 10. B C A. Gas pressure regulator/hose assembly 6. The batteries are located in death, explosion, or fire. The 1.5-volt "D" size alkaline batteries are not factory installed. Replacement gas pressure regulator/hose assembly specific to LP, have a qualified person make sure gas pressure does not exceed 11" (28 cm) water column. Bottom collar 5. Test all gas connections. If connected to your outdoor grill...

Use & Care Guide
Page 17
... not use an outdoor flexible stainless steel tubing gas connector, design-certified by brushing on all gas connections. Open valve 3. If connected to mount the power transformer. A. The batteries are the proper type and length for plugging in the gas supply line. Plug the single prong plug of pipe fittings must be used . Examples of grill C. latest edition, or CAN/CGA-B149.1 Natural Gas and Propane installation code. Keep...
... not use an outdoor flexible stainless steel tubing gas connector, design-certified by brushing on all gas connections. Open valve 3. If connected to mount the power transformer. A. The batteries are the proper type and length for plugging in the gas supply line. Plug the single prong plug of pipe fittings must be used . Examples of grill C. latest edition, or CAN/CGA-B149.1 Natural Gas and Propane installation code. Keep...

Use & Care Guide
Page 18
...; Natural gas orifices IMPORTANT: Gas conversions must be done by a qualified installer. Explosion Hazard Use a new CSA International approved "outdoor" gas supply line. Failure to follow the instructions provided with a 20 lb LP gas Tank NOTES: ■ Models that are equipped for Natural gas require Gas Conversion Kit Part Number W10118099 for use with conversion, shut off parts. ■ Do not operate any outdoor cooking gas appliance with grills that are converted to Local LP (fixed piped) or Natural gas. GAS CONVERSIONS For Models...
...; Natural gas orifices IMPORTANT: Gas conversions must be done by a qualified installer. Explosion Hazard Use a new CSA International approved "outdoor" gas supply line. Failure to follow the instructions provided with a 20 lb LP gas Tank NOTES: ■ Models that are equipped for Natural gas require Gas Conversion Kit Part Number W10118099 for use with conversion, shut off parts. ■ Do not operate any outdoor cooking gas appliance with grills that are converted to Local LP (fixed piped) or Natural gas. GAS CONVERSIONS For Models...
Use & Care Guide
Page 21
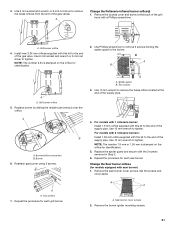
... guard B. Reattach gas burner using 2 screws. A. Burner 6. For models with 1 rotisserie burner: Install 1.9 mm orifice supplied with this kit to the end of the supply pipe. 4. Remove the sear burner cover screws. NOTE: The number 2.34 is stamped on the orifice for models equipped with the kit to the end of the gas valves. Remove the burner igniter mounting screws. 21 Grill burner orifice 5. For models with 2 rotisserie burners: Install 1.55 mm orifice supplied with sear burner) 1. A Change the Rotisserie-infrared burner orifice(s) 1. A A. Use 10 mm wrench...
... guard B. Reattach gas burner using 2 screws. A. Burner 6. For models with 1 rotisserie burner: Install 1.9 mm orifice supplied with this kit to the end of the supply pipe. 4. Remove the sear burner cover screws. NOTE: The number 2.34 is stamped on the orifice for models equipped with the kit to the end of the gas valves. Remove the burner igniter mounting screws. 21 Grill burner orifice 5. For models with 2 rotisserie burners: Install 1.55 mm orifice supplied with sear burner) 1. A Change the Rotisserie-infrared burner orifice(s) 1. A A. Use 10 mm wrench...
Use & Care Guide
Page 22
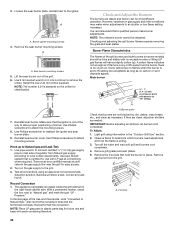
... operation. NOTE: The rotisserie burner cannot be blue and stable with LP gas at connections where required. Remove gas burner from the burner, there is set for easy access. 2. Sear burner mounting screws 5. Install the new 2.34 mm orifice supplied. Record Conversion 1. Burner Flame Characteristics The flames of the grill. 6. A yellow flame indicates not enough air. Use Phillips screwdriver to "Natural gas" and mark through "LP Propane." Checking and adjusting the grill burner flames requires removing the grate...
... operation. NOTE: The rotisserie burner cannot be blue and stable with LP gas at connections where required. Remove gas burner from the burner, there is set for easy access. 2. Sear burner mounting screws 5. Install the new 2.34 mm orifice supplied. Record Conversion 1. Burner Flame Characteristics The flames of the grill. 6. A yellow flame indicates not enough air. Use Phillips screwdriver to "Natural gas" and mark through "LP Propane." Checking and adjusting the grill burner flames requires removing the grate...
Use & Care Guide
Page 23
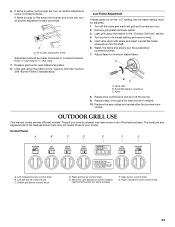
.... Replace gas burner, sear plates and grates. 8. See "Burner Flame Characteristics." Turn burner to minimum stable flame. Pliers 8. Left rotisserie burner control knob B. Sear burner control knob G. Turn off the burner. 9. Watch the flame and slowly turn off the valve and wait until grill and burners are cool. 2. OUTDOOR GRILL USE This manual covers several different models. Center grill burner control knob D. Right grill burner control knob E. Hold valve stem with pliers and insert a small flat-blade screwdriver into the shaft. 6. 6. Light grill using information...
.... Replace gas burner, sear plates and grates. 8. See "Burner Flame Characteristics." Turn burner to minimum stable flame. Pliers 8. Left rotisserie burner control knob B. Sear burner control knob G. Turn off the burner. 9. Watch the flame and slowly turn off the valve and wait until grill and burners are cool. 2. OUTDOOR GRILL USE This manual covers several different models. Center grill burner control knob D. Right grill burner control knob E. Hold valve stem with pliers and insert a small flat-blade screwdriver into the shaft. 6. 6. Light grill using information...
Use & Care Guide
Page 26
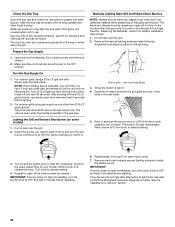
... operating or gas will see following illustration) and attach a match to manually light the grill. Built-in . Guide the lit match between the grill grate and one of the way in the sear plate. 5. IMPORTANT: If burner does not light immediately, turn the burner knob to the OFF position. Repeat for battery installation instructions. 1. If any burners do not light after attempting to OFF and wait 5 minutes before lighting. 2. Make sure the control knobs...
... operating or gas will see following illustration) and attach a match to manually light the grill. Built-in . Guide the lit match between the grill grate and one of the way in the sear plate. 5. IMPORTANT: If burner does not light immediately, turn the burner knob to the OFF position. Repeat for battery installation instructions. 1. If any burners do not light after attempting to OFF and wait 5 minutes before lighting. 2. Make sure the control knobs...
Use & Care Guide
Page 27
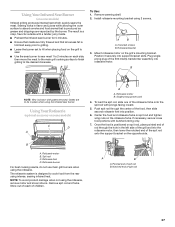
... produced as grease and drippings are to cook food from the rear using the rotisserie. To Use: 1. Rotisserie bracket 3. Rotisserie motor B. Position it securely into rotisserie motor. Plug singleprong plug of the grill and into position. 6. Single-prong power cord 4. Install rotisserie mounting bracket using 2 screws. To load the spit rod, slide one of spit rod 27 Spit rod C. B A. Using Your Infrared Sear Burner (on some models) C D A A A.
... produced as grease and drippings are to cook food from the rear using the rotisserie. To Use: 1. Rotisserie bracket 3. Rotisserie motor B. Position it securely into rotisserie motor. Plug singleprong plug of the grill and into position. 6. Single-prong power cord 4. Install rotisserie mounting bracket using 2 screws. To load the spit rod, slide one of spit rod 27 Spit rod C. B A. Using Your Infrared Sear Burner (on some models) C D A A A.

Use & Care Guide
Page 28
... turned on your model) until after the burner is lit. Push in grills - Rotisserie burner 5. IMPORTANT: If the rotisserie burner does not light immediately, turn the control knob to manually light the rotisserie burner. Do not use an adapter. See the "Replacing the Batteries" section for another 10 seconds, then release the knob and burner will stay lit. Built-in and turn the rotisserie burner control knob to light it. 4. Push in for battery installation instructions. 1. WARNING Electrical...
... turned on your model) until after the burner is lit. Push in grills - Rotisserie burner 5. IMPORTANT: If the rotisserie burner does not light immediately, turn the control knob to manually light the rotisserie burner. Do not use an adapter. See the "Replacing the Batteries" section for another 10 seconds, then release the knob and burner will stay lit. Built-in and turn the rotisserie burner control knob to light it. 4. Push in for battery installation instructions. 1. WARNING Electrical...

Use & Care Guide
Page 29
... accessory on some models. Connect the twine holding the wings, and knot. Continue rotating, hood closed , but when using your rotisserie. 1. Prepare wood chips/pellets following manufacturer's directions. 2. Open smoker box lid and add prepared chips/pellets onto the grate inside the smoker box. Light the burner below the smoker box and preheat on the rotisserie spit rod. Reduce the heat setting to the string...
... accessory on some models. Connect the twine holding the wings, and knot. Continue rotating, hood closed , but when using your rotisserie. 1. Prepare wood chips/pellets following manufacturer's directions. 2. Open smoker box lid and add prepared chips/pellets onto the grate inside the smoker box. Light the burner below the smoker box and preheat on the rotisserie spit rod. Reduce the heat setting to the string...
Use & Care Guide
Page 30
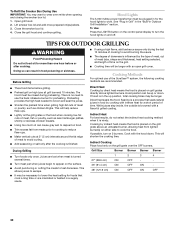
... heat setting for the hood lights to wear oven mitts when opening and closing the smoker box lid. 1. Close the grill hood and continue grilling. Before Grilling ■ If using a high flame, add barbecue sauce only during preheating. The hood must be closed during the last 10 minutes of time on the grill grate above lighted burners. Open grill hood. 2. Preheating provides the high heat needed to use...
... heat setting for the hood lights to wear oven mitts when opening and closing the smoker box lid. 1. Close the grill hood and continue grilling. Before Grilling ■ If using a high flame, add barbecue sauce only during preheating. The hood must be closed during the last 10 minutes of time on the grill grate above lighted burners. Open grill hood. 2. Preheating provides the high heat needed to use...
Use & Care Guide
Page 34
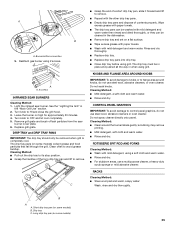
... areas before first use a toothpick because it will snap into the gas burner through the burner inlet to light the grill manually. Remove grill grates and sear plates. 2. IMPORTANT: In the event of grain to avoid scratching or damaging the surface. ■ Stainless Steel Cleaner and Polish Part Number 31462 (not included): See "Assistance or Service" section to order. ■ Liquid detergent or all control knobs are finished...
... areas before first use a toothpick because it will snap into the gas burner through the burner inlet to light the grill manually. Remove grill grates and sear plates. 2. IMPORTANT: In the event of grain to avoid scratching or damaging the surface. ■ Stainless Steel Cleaner and Polish Part Number 31462 (not included): See "Assistance or Service" section to order. ■ Liquid detergent or all control knobs are finished...
Use & Care Guide
Page 35
... areas, use steel wool, abrasive cleaners, or oven cleaner. A A. 2 screws INFRARED SEAR BURNERS Cleaning Method: 1. Turn knob to control panel graphics, do not use a multipurpose cleaner, a heavy-duty scrub sponge or mild abrasive cleaner. DRIP TRAY and DRIP TRAY PANS IMPORTANT: The drip tray should only be cleaned in the dishwasher. ■ Remove drip tray and set on a flat surface. ■ Wipe excess grease with paper...
... areas, use steel wool, abrasive cleaners, or oven cleaner. A A. 2 screws INFRARED SEAR BURNERS Cleaning Method: 1. Turn knob to control panel graphics, do not use a multipurpose cleaner, a heavy-duty scrub sponge or mild abrasive cleaner. DRIP TRAY and DRIP TRAY PANS IMPORTANT: The drip tray should only be cleaned in the dishwasher. ■ Remove drip tray and set on a flat surface. ■ Wipe excess grease with paper...
Use & Care Guide
Page 36
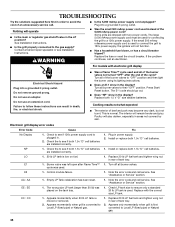
.... Do not use an extension cord. Turn all burner valves. Replace both 1.5v "D" cell batteries. Cooking results not what expected ■ The exterior of the 5,000 mAmp power cord? Plug in rear of tank tray. 2. Check the to see Installation Instructions. AA : AA 1. Note the error code and call service. EE : EE 1. Appears momentarily when grill is moved or removed. 2. Contact a trained repair specialist or see...
.... Do not use an extension cord. Turn all burner valves. Replace both 1.5v "D" cell batteries. Cooking results not what expected ■ The exterior of the 5,000 mAmp power cord? Plug in rear of tank tray. 2. Check the to see Installation Instructions. AA : AA 1. Note the error code and call service. EE : EE 1. Appears momentarily when grill is moved or removed. 2. Contact a trained repair specialist or see...
Use & Care Guide
Page 37
... Part Number W10136971 Rotisserie Kits 27" (68.6 cm): Order Part Number KFKU271TSS 36" (91.4 cm): Order Part Number KFKU361TSS Smoker Box Order Part Number KBDU271TSS Vinyl Grill Covers 27" (68.6 cm): Order Part Number 8212704 36" (91.4 cm): Order Part Number 8212705 48" (121.9 cm): Order Part Number 8212706 Stainless Steel Cleaner and Polish Order Part Number 31462A All Purpose Appliance Cleaner Order Part Number 31682 Heavy Duty Degreaser Order Part Number 31552A In Canada Call the KitchenAid Canada...
... Part Number W10136971 Rotisserie Kits 27" (68.6 cm): Order Part Number KFKU271TSS 36" (91.4 cm): Order Part Number KFKU361TSS Smoker Box Order Part Number KBDU271TSS Vinyl Grill Covers 27" (68.6 cm): Order Part Number 8212704 36" (91.4 cm): Order Part Number 8212705 48" (121.9 cm): Order Part Number 8212706 Stainless Steel Cleaner and Polish Order Part Number 31462A All Purpose Appliance Cleaner Order Part Number 31682 Heavy Duty Degreaser Order Part Number 31552A In Canada Call the KitchenAid Canada...


