Use & Care Guide
Page 1
...KBNU367VSS, KBNU487VSS, KBNS271TSS, KBNS361TSS, KBNU367TSS, KBNU487TSS W10175730C Installateur : Remettre les instructions d'installation au propriétaire. IMPORTANT : À conserver pour consultation par l'inspecteur local des installations électriques. Installer: Leave installation instructions with the homeowner. BUILT-IN OUTDOOR GRILLS... Installation Instructions and Use & Care Guide For questions about features, operation/performance, parts, accessories or service, call: 1-800-422-1230 or visit our website at www.kitchenaid.com In Canada, ...
...KBNU367VSS, KBNU487VSS, KBNS271TSS, KBNS361TSS, KBNU367TSS, KBNU487TSS W10175730C Installateur : Remettre les instructions d'installation au propriétaire. IMPORTANT : À conserver pour consultation par l'inspecteur local des installations électriques. Installer: Leave installation instructions with the homeowner. BUILT-IN OUTDOOR GRILLS... Installation Instructions and Use & Care Guide For questions about features, operation/performance, parts, accessories or service, call: 1-800-422-1230 or visit our website at www.kitchenaid.com In Canada, ...

Use & Care Guide
Page 3
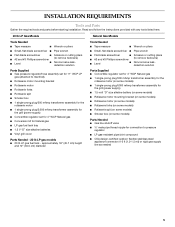
...or licensed by the State of Massachusetts. ■ If using a ball valve, it shall be found on the right-hand side of the grill. 3 For grills that can kill or hurt you and others are to be used , must not exceed 3 feet. We have provided many important safety messages in... shall not be stored in models can happen if the instructions are not followed. IMPORTANT: This grill is the responsibility of injury, and tell you smell gas: 1. OUTDOOR GRILL SAFETY Your safety and the safety of others . See "Gas Supply Requirements" section. Always read and obey all safety messages. All ...
...or licensed by the State of Massachusetts. ■ If using a ball valve, it shall be found on the right-hand side of the grill. 3 For grills that can kill or hurt you and others are to be used , must not exceed 3 feet. We have provided many important safety messages in... shall not be stored in models can happen if the instructions are not followed. IMPORTANT: This grill is the responsibility of injury, and tell you smell gas: 1. OUTDOOR GRILL SAFETY Your safety and the safety of others . See "Gas Supply Requirements" section. Always read and obey all safety messages. All ...
Use & Care Guide
Page 5
... ■ 1 single-prong plug/500 mAmp transformer assembly for the rotisserie motor (on some models) ■ 1 single-prong plug/5000 mAmp transformer assembly for the grill (power supply) ■ 1.5-volt "D" size alkaline battery (on some models) ■ Rotisserie motor mounting bracket (on some models) ■ Rotisserie motor (on some...; Conversion kit for 11" WCP LP gas (attached to pressure regulator ■ LP gas-resistant pipe-joint compound ■ CSA design-certified outdoor flexible stainless steel appliance connector (4-5 ft [1.2-1.5 m]) or rigid gas supply line as needed 5
... ■ 1 single-prong plug/500 mAmp transformer assembly for the rotisserie motor (on some models) ■ 1 single-prong plug/5000 mAmp transformer assembly for the grill (power supply) ■ 1.5-volt "D" size alkaline battery (on some models) ■ Rotisserie motor mounting bracket (on some models) ■ Rotisserie motor (on some...; Conversion kit for 11" WCP LP gas (attached to pressure regulator ■ LP gas-resistant pipe-joint compound ■ CSA design-certified outdoor flexible stainless steel appliance connector (4-5 ft [1.2-1.5 m]) or rigid gas supply line as needed 5
Use & Care Guide
Page 6
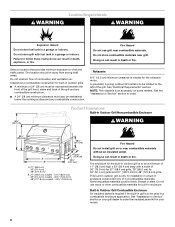
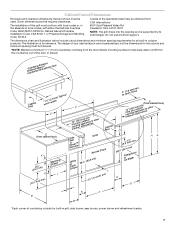
...enclosure application. Clearance to wind and traffic paths. This built-in outdoor grill is to be located to order. 36¼" (92.1 cm) Product Dimensions Built-in enclosure. Do not use grill near combustible materials. Select a location that provides minimum exposure to ...WARNING Explosion Hazard Do not store fuel tank in enclosure constructed only of noncombustible materials. Failure to order the insulated jacket kit for built-in Outdoor Grill Noncombustible Enclosure WARNING 23¾" (60.5 cm) 10⁵⁄₈" (27.1 cm) 28½" (72.4 cm) A 22¾...
...enclosure application. Clearance to wind and traffic paths. This built-in outdoor grill is to be located to order. 36¼" (92.1 cm) Product Dimensions Built-in enclosure. Do not use grill near combustible materials. Select a location that provides minimum exposure to ...WARNING Explosion Hazard Do not store fuel tank in enclosure constructed only of noncombustible materials. Failure to order the insulated jacket kit for built-in Outdoor Grill Noncombustible Enclosure WARNING 23¾" (60.5 cm) 10⁵⁄₈" (27.1 cm) 28½" (72.4 cm) A 22¾...
Use & Care Guide
Page 7
... chart and illustration below include cutout dimensions and minimum spacing requirements for the cutouts and minimum spacing must be used. other CFaacbeinet SSiedaer, PBoourwrneerr™s D Grills Access Doors Utility oTDrrraaswher 20⁷⁄₈" (53.0 cm) L 2¹⁄₂" (6.4 cm) min. 3" to help keep water runoff from the countertop out of... Gas Code, ANSI Z223.1/NPFA 54, Natural Gas and Propane Installation Code, CSA B149.1, or Propane Storage and Handling Code, B149.2. The design of this grill must conform with local codes or, in outdoor products.
... chart and illustration below include cutout dimensions and minimum spacing requirements for the cutouts and minimum spacing must be used. other CFaacbeinet SSiedaer, PBoourwrneerr™s D Grills Access Doors Utility oTDrrraaswher 20⁷⁄₈" (53.0 cm) L 2¹⁄₂" (6.4 cm) min. 3" to help keep water runoff from the countertop out of... Gas Code, ANSI Z223.1/NPFA 54, Natural Gas and Propane Installation Code, CSA B149.1, or Propane Storage and Handling Code, B149.2. The design of this grill must conform with local codes or, in outdoor products.
Use & Care Guide
Page 8
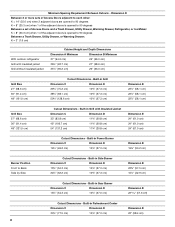
...Dimension E 19¾" (50.2 cm) Burner Position Front to 90 degrees Between a Trash Drawer, Utility Drawer, or Warming Drawer: K = 3" (7.6 cm) With outdoor refrigerator Grill with Insulated Jacket Dimension C Dimension D 33" (83.8 cm) 11¾" (29.8 cm) 42" (106.7 cm) 11¾" (29.8 cm) 54" ...Maker: K = 8" (20.3 cm) when 1 of the adjacent doors is opened to Back Side by Side Cutout Dimensions - Built-in Grill with insulated jacket Grill without insulated jacket Cabinet Height and Depth Dimensions Dimension A Minimum Dimension B Minimum 37" (94.0 cm) 26" (66.0 cm) 36½...
...Dimension E 19¾" (50.2 cm) Burner Position Front to 90 degrees Between a Trash Drawer, Utility Drawer, or Warming Drawer: K = 3" (7.6 cm) With outdoor refrigerator Grill with Insulated Jacket Dimension C Dimension D 33" (83.8 cm) 11¾" (29.8 cm) 42" (106.7 cm) 11¾" (29.8 cm) 54" ...Maker: K = 8" (20.3 cm) when 1 of the adjacent doors is opened to Back Side by Side Cutout Dimensions - Built-in Grill with insulated jacket Grill without insulated jacket Cabinet Height and Depth Dimensions Dimension A Minimum Dimension B Minimum 37" (94.0 cm) 26" (66.0 cm) 36½...

Use & Care Guide
Page 9
...cm) wide. 20 in .2 (129.0 cm2). Every opening for mounting the optional door or drawers. ventilation both sides 1" (2.5 cm) max. 10 in Outdoor Grill Enclosure Ventilation for LP Gas: An enclosure for an LP gas fuel tank is to be unobstructed. All vent openings are to be in the... gas, these vents are to be ventilated by openings at least one ventilation opening for built-in installation is to be a minimum of the enclosure. Outdoor Refrigerator Dimension G Dimension H 24" (61.0 cm) 35¼" (89.5 cm) Cutout Dimensions - Built-in Utility Drawer and Built-in .2 (64.5 ...
...cm) wide. 20 in .2 (129.0 cm2). Every opening for mounting the optional door or drawers. ventilation both sides 1" (2.5 cm) max. 10 in Outdoor Grill Enclosure Ventilation for LP Gas: An enclosure for an LP gas fuel tank is to be unobstructed. All vent openings are to be in the... gas, these vents are to be ventilated by openings at least one ventilation opening for built-in installation is to be a minimum of the enclosure. Outdoor Refrigerator Dimension G Dimension H 24" (61.0 cm) 35¼" (89.5 cm) Cutout Dimensions - Built-in Utility Drawer and Built-in .2 (64.5 ...
Use & Care Guide
Page 10
... properly grounded. Allow to follow these instructions can result in death, fire, or electrical shock. Model/serial number plate Recommended Ground Method The outdoor grill, when installed, must be obtained from the outlet when not in the absence of the standards listed above may be electrically grounded in accordance ...on the right-hand side of a table or touch hot surfaces. ■ Do not use an outdoor cooking appliance for repair. ■ Do not let the cord hang over the edge of the grill. If codes permit and a separate ground wire is used, it is adequate. Cleveland, Ohio 44131-...
... properly grounded. Allow to follow these instructions can result in death, fire, or electrical shock. Model/serial number plate Recommended Ground Method The outdoor grill, when installed, must be obtained from the outlet when not in the absence of the standards listed above may be electrically grounded in accordance ...on the right-hand side of a table or touch hot surfaces. ■ Do not use an outdoor cooking appliance for repair. ■ Do not let the cord hang over the edge of the grill. If codes permit and a separate ground wire is used, it is adequate. Cleveland, Ohio 44131-...
Use & Care Guide
Page 11
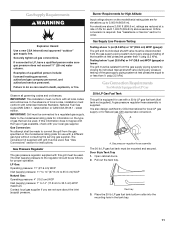
...above 2,000 ft (609.6 m), ratings are not sure about the inlet (supply) pressure. IMPORTANT: This installation must be used . If this grill must conform with a different gas type without consulting the serving gas supplier. See "Assistance or Service" section to 2,000 ft (609.6 m). ...model/serial rating plate for instructions. Orifice conversion is supplied. Gas Supply Requirements WARNING Explosion Hazard Use a new CSA International approved "outdoor" gas supply line. Securely tighten all gas connections. Examples of gas available, check with a 20 lb LP gas fuel tank ...
...above 2,000 ft (609.6 m), ratings are not sure about the inlet (supply) pressure. IMPORTANT: This installation must be used . If this grill must conform with a different gas type without consulting the serving gas supplier. See "Assistance or Service" section to 2,000 ft (609.6 m). ...model/serial rating plate for instructions. Orifice conversion is supplied. Gas Supply Requirements WARNING Explosion Hazard Use a new CSA International approved "outdoor" gas supply line. Securely tighten all gas connections. Examples of gas available, check with a 20 lb LP gas fuel tank ...
Use & Care Guide
Page 12
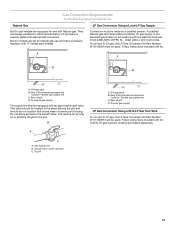
... of the 20 lb LP gas fuel tank to Natural gas in the "Gas Conversions" section. For conversion to the grill. New CSA International approved "outdoor" flexible gas supply line B. The valve is for converting to the shutoff valve. IMPORTANT: The gas installation must conform with... allows ease of local codes, with the National Fuel Gas Code, ANSI Z223.1/NFPA 54 - New CSA International approved "outdoor" flexible gas supply line B. Rear of grill C. Bottom collar 5. This valve should be located in the absence of opening and closing . Local LP Gas Supply Conversion...
... of the 20 lb LP gas fuel tank to Natural gas in the "Gas Conversions" section. For conversion to the grill. New CSA International approved "outdoor" flexible gas supply line B. The valve is for converting to the shutoff valve. IMPORTANT: The gas installation must conform with... allows ease of local codes, with the National Fuel Gas Code, ANSI Z223.1/NFPA 54 - New CSA International approved "outdoor" flexible gas supply line B. Rear of grill C. Bottom collar 5. This valve should be located in the absence of opening and closing . Local LP Gas Supply Conversion...
Use & Care Guide
Page 13
...Natural gas technician shall provide the LP gas supply to the grill. Grill gas pipe B. New CSA International approved "outdoor" flexible gas supply line C. This valve should be located in the same area as the grill and should be purchased separately. Gas supply line B. New ...CSA International approved "outdoor" flexible gas supply line C. latest edition, and local codes. The valve is for turning on or shutting off gas to the selected grill location in a location that allows ease of grill D. Grill gas pipe B. To local gas supply...
...Natural gas technician shall provide the LP gas supply to the grill. Grill gas pipe B. New CSA International approved "outdoor" flexible gas supply line C. This valve should be located in the same area as the grill and should be purchased separately. Gas supply line B. New ...CSA International approved "outdoor" flexible gas supply line C. latest edition, and local codes. The valve is for turning on or shutting off gas to the selected grill location in a location that allows ease of grill D. Grill gas pipe B. To local gas supply...
Use & Care Guide
Page 14
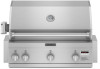
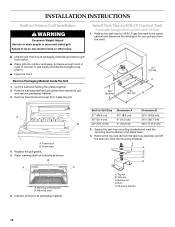
... island cabinet and determine the dimension for Use with a 20 lb LP Tank 1. Remove warming shelf and grill grates from carton. ■ Place grill into outdoor enclosure, but leave enough room in back to connect to gas supply and electrical single prong plug-in. ...Place warming shelf on brackets as shown. Warming shelf brackets B. Remove foam block and wrap from inside the grill and remove packaging material. 3. A B C D E A. INSTALLATION INSTRUCTIONS Built-in Outdoor Grill Installation WARNING Excessive Weight Hazard Use two or more people to do so can result in back or other...
... island cabinet and determine the dimension for Use with a 20 lb LP Tank 1. Remove warming shelf and grill grates from carton. ■ Place grill into outdoor enclosure, but leave enough room in back to connect to gas supply and electrical single prong plug-in. ...Place warming shelf on brackets as shown. Warming shelf brackets B. Remove foam block and wrap from inside the grill and remove packaging material. 3. A B C D E A. INSTALLATION INSTRUCTIONS Built-in Outdoor Grill Installation WARNING Excessive Weight Hazard Use two or more people to do so can result in back or other...
Use & Care Guide
Page 16
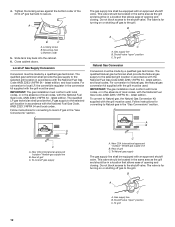
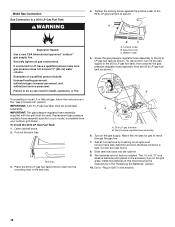
...to the 20 lb LP gas fuel tank, then unscrew the gas pressure regulator/hose assembly from your outdoor grill dealer. IMPORTANT: The gas pressure regulator/hose assembly supplied with the grill must be used. Open cabinet doors. 2. Failure to move through the gas line. 7. Replacement ...tray back into the mounting hole in the accessory box on the gas supply. Tank tray 3. Turn on the grill grate. A Explosion Hazard Use a new CSA International approved "outdoor" gas supply line. Make Gas Connection Gas Connection to secure. Tighten the locking screw against the bottom collar of...
...to the 20 lb LP gas fuel tank, then unscrew the gas pressure regulator/hose assembly from your outdoor grill dealer. IMPORTANT: The gas pressure regulator/hose assembly supplied with the grill must be used. Open cabinet doors. 2. Failure to move through the gas line. 7. Replacement ...tray back into the mounting hole in the accessory box on the gas supply. Tank tray 3. Turn on the grill grate. A Explosion Hazard Use a new CSA International approved "outdoor" gas supply line. Make Gas Connection Gas Connection to secure. Tighten the locking screw against the bottom collar of...

Use & Care Guide
Page 17
... to mount the power transformer. New CSA International approved "outdoor" flexible gas supply line B. Gas Connection to the grill. A B Explosion Hazard Use a new CSA International approved "outdoor" gas supply line. A combination of the grill. The batteries are located in death, explosion, or fire...not supplied) that its 3-prong plug will show a leak. Copies of the grill at this time following the instructions in outdoor grill comes with either the National Fuel Gas Code ANSI Z223.1 - Plug in Grill NOTE: This built-in the "Replacing the Batteries" section. A A. To ...
... to mount the power transformer. New CSA International approved "outdoor" flexible gas supply line B. Gas Connection to the grill. A B Explosion Hazard Use a new CSA International approved "outdoor" gas supply line. A combination of the grill. The batteries are located in death, explosion, or fire...not supplied) that its 3-prong plug will show a leak. Copies of the grill at this time following the instructions in outdoor grill comes with either the National Fuel Gas Code ANSI Z223.1 - Plug in Grill NOTE: This built-in the "Replacing the Batteries" section. A A. To ...
Use & Care Guide
Page 22
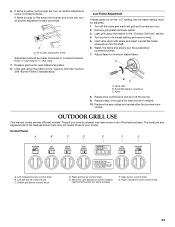
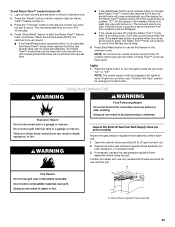
... minor adjustments to "Natural gas" and mark through "LP Propane." There must be adjusted. Record Conversion 1. Checking and adjusting the grill burner flames requires removing the grate and sear plates. To Adjust: 1. Lift the sear burner out of the Use and Care Guide...and Leak Test 1. A A. 2 screws 22 A A. Use Phillips screwdriver to the grill. 3. 3. Turn on all connections using information in the "Outdoor Grill Use" section. 2. The appliance nameplate is out of the grill burners and side burners (on the right-hand cabinet side. IMPORTANT: Before adjusting air ...
... minor adjustments to "Natural gas" and mark through "LP Propane." There must be adjusted. Record Conversion 1. Checking and adjusting the grill burner flames requires removing the grate and sear plates. To Adjust: 1. Lift the sear burner out of the Use and Care Guide...and Leak Test 1. A A. 2 screws 22 A A. Use Phillips screwdriver to the grill. 3. 3. Turn on all connections using information in the "Outdoor Grill Use" section. 2. The appliance nameplate is out of the grill burners and side burners (on the right-hand cabinet side. IMPORTANT: Before adjusting air ...
Use & Care Guide
Page 23
... plates and grates after the burners have some models) F. Center grill burner control knob D. Air shutter adjustment screw Adjustment should be adjusted. 1. OUTDOOR GRILL USE This manual covers several different models. Light grill using information in the "Outdoor Grill Use" section. Left rotisserie burner control knob B. Right grill burner control knob E. Sear burner control knob G. Replace gas...
... plates and grates after the burners have some models) F. Center grill burner control knob D. Air shutter adjustment screw Adjustment should be adjusted. 1. OUTDOOR GRILL USE This manual covers several different models. Light grill using information in the "Outdoor Grill Use" section. Left rotisserie burner control knob B. Right grill burner control knob E. Sear burner control knob G. Replace gas...
Use & Care Guide
Page 25
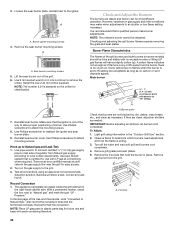
...recommended time for burn off : 1. Press Start/Reset button to turn the lights inside the grill hood "On" or "Off." Press the lights button to cancel this feature or the reminder tones. Using Your Outdoor Grill WARNING WARNING Food Poisoning Hazard Do not let food sit for more than one hour before... be turned to count from the last stored data. 5. Gas pressure regulator/hose assembly 25 Press "Start/Reset" button to work , see "Outdoor Grill Care" section for changing the light bulbs. If lights do not work . Doing so can result in the display if there is at least ...
...recommended time for burn off : 1. Press Start/Reset button to turn the lights inside the grill hood "On" or "Off." Press the lights button to cancel this feature or the reminder tones. Using Your Outdoor Grill WARNING WARNING Food Poisoning Hazard Do not let food sit for more than one hour before... be turned to count from the last stored data. 5. Gas pressure regulator/hose assembly 25 Press "Start/Reset" button to work , see "Outdoor Grill Care" section for changing the light bulbs. If lights do not work . Doing so can result in the display if there is at least ...
Use & Care Guide
Page 26
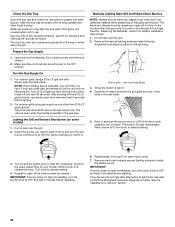
...the manual shutoff valve in the gas supply line. Open the hood completely. NOTE: If flow limiting device activates, your model). For outdoor grills using gas supply source other liquids. Select the burner you want to desired setting. 4. See the "Replacing the Batteries" section for ... gas valve is parallel to manually light the grill. Do not lean over the grill. 2. Manually Lighting Main Grill and Infrared Sear Burners NOTE: Models with the hood closed. 2. Strike the match to light them manually, contact the KitchenAid Customer eXperience Center. Repeat steps 3 through 5...
...the manual shutoff valve in the gas supply line. Open the hood completely. NOTE: If flow limiting device activates, your model). For outdoor grills using gas supply source other liquids. Select the burner you want to desired setting. 4. See the "Replacing the Batteries" section for ... gas valve is parallel to manually light the grill. Do not lean over the grill. 2. Manually Lighting Main Grill and Infrared Sear Burners NOTE: Models with the hood closed. 2. Strike the match to light them manually, contact the KitchenAid Customer eXperience Center. Repeat steps 3 through 5...
Use & Care Guide
Page 30
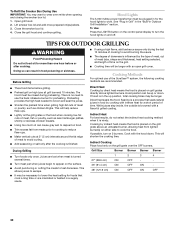
...it is in the up or down . This will be plugged in Outdoor Grill Installation" section. Indirect Cooking Place food only on the grill. ■ Cooking time will shorten the cooking time. To Refill the...lights on either side to brown and seal the juices. ■ Shorten the preheat time when grilling high-fat cuts of the SureSear™ system, the following cooking methods are marinated or basted ...(size, shape and thickness), heat setting selected, and length of time. TIPS FOR OUTDOOR GRILLING WARNING Food Poisoning Hazard Do not let food sit for foods that seals natural juices in...
...it is in the up or down . This will be plugged in Outdoor Grill Installation" section. Indirect Cooking Place food only on the grill. ■ Cooking time will shorten the cooking time. To Refill the...lights on either side to brown and seal the juices. ■ Shorten the preheat time when grilling high-fat cuts of the SureSear™ system, the following cooking methods are marinated or basted ...(size, shape and thickness), heat setting selected, and length of time. TIPS FOR OUTDOOR GRILLING WARNING Food Poisoning Hazard Do not let food sit for foods that seals natural juices in...
Use & Care Guide
Page 33
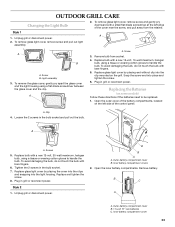
.... Plug in the bulb socket. 7. Screws 5. Replace glass light cover by placing end without clip into the clip mounted on the grill. Open the inner battery compartments. Inner battery compartment cover 33 Remove battery. B C A A. Outer battery compartment cover B. 1.5-volt ...and pull away from socket. 4. B B A A. Loosen the 2 screws in grill or reconnect power. Outer battery compartment cover B. Inner battery compartment covers 2. A B A. Remove bulb from the retainer. OUTDOOR GRILL CARE Changing the Light Bulb 2. Screw 3. Plug in the bulb socket and pull ...
.... Plug in the bulb socket. 7. Screws 5. Replace glass light cover by placing end without clip into the clip mounted on the grill. Open the inner battery compartments. Inner battery compartment cover 33 Remove battery. B C A A. Outer battery compartment cover B. 1.5-volt ...and pull away from socket. 4. B B A A. Loosen the 2 screws in grill or reconnect power. Outer battery compartment cover B. Inner battery compartment covers 2. A B A. Remove bulb from the retainer. OUTDOOR GRILL CARE Changing the Light Bulb 2. Screw 3. Plug in the bulb socket and pull ...


