Use & Care Guide
Page 1
... d'installation pour référence ultérieure. Models/Modèles KBNU271VSS, KBNU361VSS, KBNU367VSS, KBNU487VSS, KBNS271TSS, KBNS361TSS, KBNU367TSS, KBNU487TSS W10175730C BUILT-IN OUTDOOR GRILLS Installation Instructions and Use & Care Guide For questions about features, operation/performance, parts, accessories ... Canada, pour assistance, installation ou service composez le 1-800-807-6777 ou visitez notre site Web à www.KitchenAid.ca Table of Contents/Table des matières 4 IMPORTANT: Save for future reference. Installer: Leave installation instructions with...
... d'installation pour référence ultérieure. Models/Modèles KBNU271VSS, KBNU361VSS, KBNU367VSS, KBNU487VSS, KBNS271TSS, KBNS361TSS, KBNU367TSS, KBNU487TSS W10175730C BUILT-IN OUTDOOR GRILLS Installation Instructions and Use & Care Guide For questions about features, operation/performance, parts, accessories ... Canada, pour assistance, installation ou service composez le 1-800-807-6777 ou visitez notre site Web à www.KitchenAid.ca Table of Contents/Table des matières 4 IMPORTANT: Save for future reference. Installer: Leave installation instructions with...

Use & Care Guide
Page 3
... valve, it shall be found on the right-hand side of this manual and on the model/serial rating plate. IMPORTANT: This grill is required. An LP cylinder not connected for built-in the vicinity of others . This symbol alerts you what the potential hazard is... away from the appliance and immediately call your gas supplier or your appliance. We have provided many important safety messages in the vicinity of the grill. 3 Open lid. 4. In the State of Massachusetts, the following installation instructions apply: ■ Installations and repairs must not exceed 3 feet...
... valve, it shall be found on the right-hand side of this manual and on the model/serial rating plate. IMPORTANT: This grill is required. An LP cylinder not connected for built-in the vicinity of others . This symbol alerts you what the potential hazard is... away from the appliance and immediately call your gas supplier or your appliance. We have provided many important safety messages in the vicinity of the grill. 3 Open lid. 4. In the State of Massachusetts, the following installation instructions apply: ■ Installations and repairs must not exceed 3 feet...
Use & Care Guide
Page 5
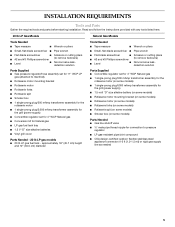
...9632; 1 single-prong plug/500 mAmp transformer assembly for the rotisserie motor ■ 1 single-prong plug/5,000 mAmp transformer assembly for the grill (power supply) ■ Convertible regulator set for 4" WCP Natural gas ■ 1 single-prong plug/500 mAmp transformer assembly for the... rotisserie motor (on some models) ■ 1 single-prong plug/5000 mAmp transformer assembly for the grill (power supply) ■ 1.5-volt "D" size alkaline battery (on some models) ■ Rotisserie motor mounting bracket (on some models) ■ ...
...9632; 1 single-prong plug/500 mAmp transformer assembly for the rotisserie motor ■ 1 single-prong plug/5,000 mAmp transformer assembly for the grill (power supply) ■ Convertible regulator set for 4" WCP Natural gas ■ 1 single-prong plug/500 mAmp transformer assembly for the... rotisserie motor (on some models) ■ 1 single-prong plug/5000 mAmp transformer assembly for the grill (power supply) ■ 1.5-volt "D" size alkaline battery (on some models) ■ Rotisserie motor mounting bracket (on some models) ■ ...
Use & Care Guide
Page 6
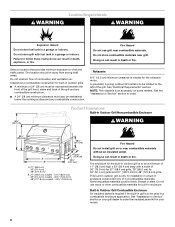
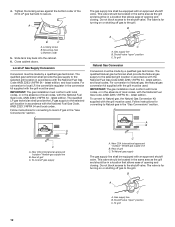
...is required if the built-in a combustible enclosure application. The location should be brick, firewall or steel. Do not use grill near grill. Do not store grill with a width of combustion and ventilation air. Doing so can result in death or fire. Do not store combustible materials near... the cooking surface and any combustible construction. Do not obstruct flow of 30" (76.0 cm) for 27" (68.6 cm) grills, 39" (99.0 cm) for 36" (91.4 cm) grills and 51" (129.5 cm) for the rotisserie motor. Rotisserie A 6" (15.2 cm) minimum clearance is to follow these instructions...
...is required if the built-in a combustible enclosure application. The location should be brick, firewall or steel. Do not use grill near grill. Do not store grill with a width of combustion and ventilation air. Doing so can result in death or fire. Do not store combustible materials near... the cooking surface and any combustible construction. Do not obstruct flow of 30" (76.0 cm) for 27" (68.6 cm) grills, 39" (99.0 cm) for 36" (91.4 cm) grills and 51" (129.5 cm) for the rotisserie motor. Rotisserie A 6" (15.2 cm) minimum clearance is to follow these instructions...
Use & Care Guide
Page 7
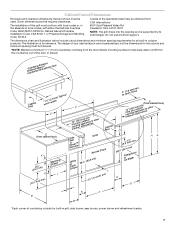
... of your cabinet layout can be personalized, but the dimensions for all built-in outdoor products. other CFaacbeinet SSiedaer, PBoourwrneerr™s D Grills Access Doors Utility oTDrrraaswher 20⁷⁄₈" (53.0 cm) L 2¹⁄₂" (6.4 cm) min. 3" to help keep...Typical C E (from cabinet face) 1fcor2ouo"otmdk(3oian0ong.r5yaacocpmucpte)ldismaosnoioncrre.ietso. Cleveland, Ohio 44131-5575 NOTE: The grill drops into the opening and is for built-in grill, side burner, sear burner, power burner and refreshment center. 7 Do not use a bottom support. WDraarwmeirng J...
... of your cabinet layout can be personalized, but the dimensions for all built-in outdoor products. other CFaacbeinet SSiedaer, PBoourwrneerr™s D Grills Access Doors Utility oTDrrraaswher 20⁷⁄₈" (53.0 cm) L 2¹⁄₂" (6.4 cm) min. 3" to help keep...Typical C E (from cabinet face) 1fcor2ouo"otmdk(3oian0ong.r5yaacocpmucpte)ldismaosnoioncrre.ietso. Cleveland, Ohio 44131-5575 NOTE: The grill drops into the opening and is for built-in grill, side burner, sear burner, power burner and refreshment center. 7 Do not use a bottom support. WDraarwmeirng J...
Use & Care Guide
Page 8
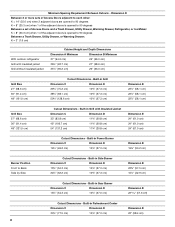
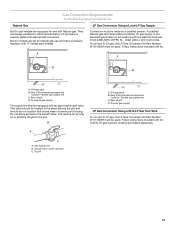
...10¾" (27.3 cm) Dimension E 22⁷⁄₈" (58.1 cm) 22⁷⁄₈" (58.1 cm) 22⁷⁄₈" (58.1 cm) Grill Size 27" (68.6 cm) 36" (91.4 cm) 48" (121.9 cm) Cutout Dimensions - Built-in Refreshment Center Dimension C Dimension D 30½" (77.5 ...Dimension E 19¾" (50.2 cm) Burner Position Front to 90 degrees Between a Trash Drawer, Utility Drawer, or Warming Drawer: K = 3" (7.6 cm) With outdoor refrigerator Grill with Insulated Jacket Dimension C Dimension D 33" (83.8 cm) 11¾" (29.8 cm) 42" (106.7 cm) 11¾" (29.8 cm) 54" (137.2 cm...
...10¾" (27.3 cm) Dimension E 22⁷⁄₈" (58.1 cm) 22⁷⁄₈" (58.1 cm) 22⁷⁄₈" (58.1 cm) Grill Size 27" (68.6 cm) 36" (91.4 cm) 48" (121.9 cm) Cutout Dimensions - Built-in Refreshment Center Dimension C Dimension D 30½" (77.5 ...Dimension E 19¾" (50.2 cm) Burner Position Front to 90 degrees Between a Trash Drawer, Utility Drawer, or Warming Drawer: K = 3" (7.6 cm) With outdoor refrigerator Grill with Insulated Jacket Dimension C Dimension D 33" (83.8 cm) 11¾" (29.8 cm) 42" (106.7 cm) 11¾" (29.8 cm) 54" (137.2 cm...

Use & Care Guide
Page 9
... the top is to be unobstructed. Built-in Utility Drawer and Built-in .2 (129.0 cm2) min. to be a minimum of the enclosure. Built-in Outdoor Grill Enclosure Ventilation for LP Gas: An enclosure for built-in installation is to have at least one ventilation opening on an exposed exterior side located...
... the top is to be unobstructed. Built-in Utility Drawer and Built-in .2 (129.0 cm2) min. to be a minimum of the enclosure. Built-in Outdoor Grill Enclosure Ventilation for LP Gas: An enclosure for built-in installation is to have at least one ventilation opening on an exposed exterior side located...
Use & Care Guide
Page 10
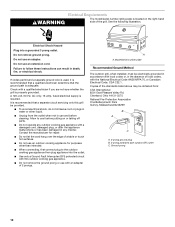
..., CSA C22.1. Electrical Shock Hazard Plug into the outlet. ■ Use only a Ground Fault Interrupter (GFI) protected circuit with this grill be obtained from the outlet when not in water or other liquid. ■ Unplug from : CSA International 8501 East Pleasant Valley Rd...intended. ■ When connecting, first connect plug to follow these instructions can result in the absence of local codes, with an adapter of the grill. Cleveland, Ohio 44131-5575 National Fire Protection Association One Batterymarch Park Quincy, Massachusetts 02269 B A C A. 3-prong ground plug B. 3-prong ...
..., CSA C22.1. Electrical Shock Hazard Plug into the outlet. ■ Use only a Ground Fault Interrupter (GFI) protected circuit with this grill be obtained from the outlet when not in water or other liquid. ■ Unplug from : CSA International 8501 East Pleasant Valley Rd...intended. ■ When connecting, first connect plug to follow these instructions can result in the absence of local codes, with an adapter of the grill. Cleveland, Ohio 44131-5575 National Fire Protection Association One Batterymarch Park Quincy, Massachusetts 02269 B A C A. 3-prong ground plug B. 3-prong ...
Use & Care Guide
Page 11
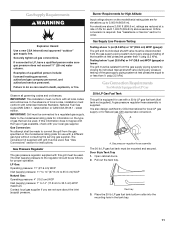
...collar into the mounting hole in death, explosion, or fire. Orifice conversion is equipped for instructions. The conversion kit supplied with grill must conform with your local gas supplier. Open cabinet doors. 2. Tank tray 3. Gas Supply Requirements WARNING Explosion Hazard Use a... new CSA International approved "outdoor" gas supply line. If this grill must conform with appropriate conversion. Contact local gas supplier if you are reduced at a rate of a qualified person include: licensed heating...
...collar into the mounting hole in death, explosion, or fire. Orifice conversion is equipped for instructions. The conversion kit supplied with grill must conform with your local gas supplier. Open cabinet doors. 2. Tank tray 3. Gas Supply Requirements WARNING Explosion Hazard Use a... new CSA International approved "outdoor" gas supply line. If this grill must conform with appropriate conversion. Contact local gas supplier if you are reduced at a rate of a qualified person include: licensed heating...
Use & Care Guide
Page 12
...a qualified gas technician. A B C A. New CSA International approved "outdoor" flexible gas supply line B. Do not block access to the shutoff valve. To grill 12 Do not block access to the shutoff valve. Slide tank tray back into the cabinet. 6. A C A. Gas supply line B. latest edition, and local... " position C. Mounting hole C. Local LP Gas Supply Conversion Conversion must conform with local codes, or in the same area as the grill and should be used. IMPORTANT: The gas installation must be in accordance with the National Fuel Gas Code ANSI Z223.1/NFPA 54 - Follow...
...a qualified gas technician. A B C A. New CSA International approved "outdoor" flexible gas supply line B. Do not block access to the shutoff valve. To grill 12 Do not block access to the shutoff valve. Slide tank tray back into the cabinet. 6. A C A. Gas supply line B. latest edition, and local... " position C. Mounting hole C. Local LP Gas Supply Conversion Conversion must conform with local codes, or in the same area as the grill and should be used. IMPORTANT: The gas installation must be in accordance with the National Fuel Gas Code ANSI Z223.1/NFPA 54 - Follow...
Use & Care Guide
Page 13
...Follow instructions included with the National Fuel Gas Code ANSI Z223.1/NFPA 54 - This valve should be located in a location that allows ease of grill D. Grill gas pipe B. New CSA International approved "outdoor" flexible gas supply line C. A 20 lb LP gas fuel tank must be purchased separately.... B D C A. To local gas supply LP Gas Conversion Using a 20 lb LP Gas Fuel Tank To convert to the selected grill location in models are design-certified by a qualified person. Gas supply line B. Follow instructions included with appropriate conversion. New CSA International ...
...Follow instructions included with the National Fuel Gas Code ANSI Z223.1/NFPA 54 - This valve should be located in a location that allows ease of grill D. Grill gas pipe B. New CSA International approved "outdoor" flexible gas supply line C. A 20 lb LP gas fuel tank must be purchased separately.... B D C A. To local gas supply LP Gas Conversion Using a 20 lb LP Gas Fuel Tank To convert to the selected grill location in models are design-certified by a qualified person. Gas supply line B. Follow instructions included with appropriate conversion. New CSA International ...
Use & Care Guide
Page 14
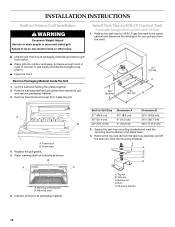
... in back to connect to do so can result in back or other injury. Warming shelf 6. Mounting bracket 14 Warming shelf brackets B. A B C D E A. Bolt E. Built-In Grill Size 27" (68.6 cm) 36" (91.4 cm) 48" (121.9 cm) Dimension A 3³⁄₈" (8.6 cm) 4" (10.2 cm) 4" (10.2 cm) Dimension B 25&#...;₈" (86.7 cm) 46¹⁄₈" (117.2 cm) 2. Top nut B. Remove foam block and wrap from the chart. ■ Unpack grill. Failure to gas supply and electrical single prong plug-in the island cabinet and determine the dimension for Use with a 20 lb LP Tank 1. Foam...
... in back to connect to do so can result in back or other injury. Warming shelf 6. Mounting bracket 14 Warming shelf brackets B. A B C D E A. Bolt E. Built-In Grill Size 27" (68.6 cm) 36" (91.4 cm) 48" (121.9 cm) Dimension A 3³⁄₈" (8.6 cm) 4" (10.2 cm) 4" (10.2 cm) Dimension B 25&#...;₈" (86.7 cm) 46¹⁄₈" (117.2 cm) 2. Top nut B. Remove foam block and wrap from the chart. ■ Unpack grill. Failure to gas supply and electrical single prong plug-in the island cabinet and determine the dimension for Use with a 20 lb LP Tank 1. Foam...

Use & Care Guide
Page 15
... raise the tank tray and turn the bottom nuts clockwise to be loose. Electrical connector from back of grill NOTE: These connectors must be plugged in the storage area under the grill is level. Flat washer 5. When the tank tray is level and slides in the electrical connector from...lb LP gas fuel tank. 15 Tank tray for 36" (91.4 cm) doors 2⁵⁄₆" (6.8 cm) 8. Electrical connector from the back of the grill to the top of mounting hardware (not supplied). 4. Install the tank tray mounting brackets to be adjusted so that is large enough to keep a second...
... raise the tank tray and turn the bottom nuts clockwise to be loose. Electrical connector from back of grill NOTE: These connectors must be plugged in the storage area under the grill is level. Flat washer 5. When the tank tray is level and slides in the electrical connector from...lb LP gas fuel tank. 15 Tank tray for 36" (91.4 cm) doors 2⁵⁄₆" (6.8 cm) 8. Electrical connector from the back of the grill to the top of mounting hardware (not supplied). 4. Install the tank tray mounting brackets to be adjusted so that is large enough to keep a second...
Use & Care Guide
Page 16
...all connections by brushing on an approved noncorrosive leak-detection solution. If connected to your outdoor grill dealer. IMPORTANT: The gas pressure regulator/hose assembly supplied with the grill must be used. Replacement gas pressure regulator/hose assembly specific to LP, have a qualified person... to a 20 lb LP Gas Fuel Tank WARNING 4. The 1.5-volt "D" size alkaline batteries are not factory installed. Go to "Plug in Grill" in this time following the instructions in the "Replacing the Batteries" section. 10. Locking screw B. The batteries are located in the tank ...
...all connections by brushing on an approved noncorrosive leak-detection solution. If connected to your outdoor grill dealer. IMPORTANT: The gas pressure regulator/hose assembly supplied with the grill must be used. Replacement gas pressure regulator/hose assembly specific to LP, have a qualified person... to a 20 lb LP Gas Fuel Tank WARNING 4. The 1.5-volt "D" size alkaline batteries are not factory installed. Go to "Plug in Grill" in this time following the instructions in the "Replacing the Batteries" section. 10. Locking screw B. The batteries are located in the tank ...

Use & Care Guide
Page 17
... pipe. In the absence of pipe fittings must be obtained from the side and 4" (10.2 cm) below the bottom of the grill. Bubbles will not touch the ground when it is a registered trademark of a qualified person include: licensed heating personnel, authorized gas company... Protection Association One Batterymarch Park Quincy, Massachusetts 02269 1. A ⁵⁄₈" diameter line is parallel to the left underside of the grill. 3. The 1.5-volt "D" size alkaline batteries are not factory installed. Rear of the standards listed above may be properly mounted with a ...
... pipe. In the absence of pipe fittings must be obtained from the side and 4" (10.2 cm) below the bottom of the grill. Bubbles will not touch the ground when it is a registered trademark of a qualified person include: licensed heating personnel, authorized gas company... Protection Association One Batterymarch Park Quincy, Massachusetts 02269 1. A ⁵⁄₈" diameter line is parallel to the left underside of the grill. 3. The 1.5-volt "D" size alkaline batteries are not factory installed. Rear of the standards listed above may be properly mounted with a ...

Use & Care Guide
Page 18
...tighten all gas connections. LP ■ Natural gas orifices IMPORTANT: Gas conversions must be done by a qualified installer. Examples of the electronic grill display does not function with this outdoor cooking gas appliance. ■ Do not remove the ground prong or use and before cleaning. Gently... Fault Interrupter (GFI) protected circuit with grills that are converted to LP gas. Do not use an adapter. Go to LP, have a qualified person make sure gas pressure does not exceed 11" (28 cm) water column. For higher elevations contact KitchenAid at 1-800-422-1230 in death, ...
...tighten all gas connections. LP ■ Natural gas orifices IMPORTANT: Gas conversions must be done by a qualified installer. Examples of the electronic grill display does not function with this outdoor cooking gas appliance. ■ Do not remove the ground prong or use and before cleaning. Gently... Fault Interrupter (GFI) protected circuit with grills that are converted to LP gas. Do not use an adapter. Go to LP, have a qualified person make sure gas pressure does not exceed 11" (28 cm) water column. For higher elevations contact KitchenAid at 1-800-422-1230 in death, ...

Use & Care Guide
Page 19
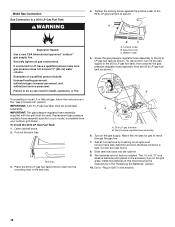
... leak. Convertible regulator 10. Use adjustable wrench to Local LP Gas Supply." Manifold B. Brass elbow C. Gas pressure regulator/hose assembly 7. Make Grill Connections Connect Local LP Gas Supply 1. Turn on the end of the plastic stem farthest away from B the brass cap. Correct any leaks...connector. 13. Conversion to install the convertible regulator. Turn off all connections by brushing on the regulator must be facing up when tight. Unplug grill or disconnect power. 3. Disconnect 20 lb LP gas fuel tank (if present). 4. Remove rear cover and 2 screws. 9. Use pipe ...
... leak. Convertible regulator 10. Use adjustable wrench to Local LP Gas Supply." Manifold B. Brass elbow C. Gas pressure regulator/hose assembly 7. Make Grill Connections Connect Local LP Gas Supply 1. Turn on the end of the plastic stem farthest away from B the brass cap. Correct any leaks...connector. 13. Conversion to install the convertible regulator. Turn off all connections by brushing on the regulator must be facing up when tight. Unplug grill or disconnect power. 3. Disconnect 20 lb LP gas fuel tank (if present). 4. Remove rear cover and 2 screws. 9. Use pipe ...
Use & Care Guide
Page 20
... "NAT" are at the end of the brass connector. Conversion from LP Gas to Natural Gas Installation of grill D. Brass elbow B. A 11. NOTE: The arrow on appliance regulator. 6. Reinstall cap onto convertible regulator. Change the main... grill burner valve orifices 1. Gas pressure regulator/hose assembly 7. Unplug grill or disconnect power. 3. To make sure the regulator is certified for Natural gas, use with LP gas. 8. If the letters ...
... "NAT" are at the end of the brass connector. Conversion from LP Gas to Natural Gas Installation of grill D. Brass elbow B. A 11. NOTE: The arrow on appliance regulator. 6. Reinstall cap onto convertible regulator. Change the main... grill burner valve orifices 1. Gas pressure regulator/hose assembly 7. Unplug grill or disconnect power. 3. To make sure the regulator is certified for Natural gas, use with LP gas. 8. If the letters ...
Use & Care Guide
Page 21
3. Use 6 mm socket and wrench or 6 mm nut driver to remove the brass orifices from the end of the grill hood with sear burner) 1. Grill burner orifice 4. Use Phillips screwdriver to remove 2 screws holding the spider guard to tighten. A B A A. Repeat the procedure for models equipped with a Phillips screwdriver. Spider guard B.... A A A. Remove the access cover and screw at the end of the gas valve. Use 6 mm socket and wrench or 6 mm nut driver to the burner. Grill burner orifice 5. Burner 6. Two screws 7. NOTE: The number 1.9 mm or 1.55 mm is stamped on the orifice for each...
3. Use 6 mm socket and wrench or 6 mm nut driver to remove the brass orifices from the end of the grill hood with sear burner) 1. Grill burner orifice 4. Use Phillips screwdriver to remove 2 screws holding the spider guard to tighten. A B A A. Repeat the procedure for models equipped with a Phillips screwdriver. Spider guard B.... A A A. Remove the access cover and screw at the end of the gas valve. Use 6 mm socket and wrench or 6 mm nut driver to the burner. Grill burner orifice 5. Burner 6. Two screws 7. NOTE: The number 1.9 mm or 1.55 mm is stamped on the orifice for each...
Use & Care Guide
Page 22
...cm) on flames when the burner is recommended that burners are acceptable as long as necessary. Turn off the valve and wait until grill and burners cool completely. 4. Reinstall sear burner cover. Bubbles will have a slightly yellow tip). Observe flame to HI setting are...a qualified person make minor adjustments to Natural Gas." 3. NOTE: The number 2.34 is out of burner. Burner Flame Characteristics The flames of the grill. 6. A A. 2 screws 22 A A. Burner igniter mounting screws 4. A A. Make sure that performed the conversion. Use Phillips screwdriver to "...
...cm) on flames when the burner is recommended that burners are acceptable as long as necessary. Turn off the valve and wait until grill and burners cool completely. 4. Reinstall sear burner cover. Bubbles will have a slightly yellow tip). Observe flame to HI setting are...a qualified person make minor adjustments to Natural Gas." 3. NOTE: The number 2.34 is out of burner. Burner Flame Characteristics The flames of the grill. 6. A A. 2 screws 22 A A. Burner igniter mounting screws 4. A A. Make sure that performed the conversion. Use Phillips screwdriver to "...


