
Use & Care Guide
Page 1
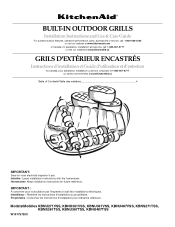
Models/Modèles KBNU271VSS, KBNU361VSS, KBNU367VSS, KBNU487VSS, KBNS271TSS, KBNS361TSS, KBNU367TSS, KBNU487TSS ... l'inspecteur local des installations électriques. Installer: Leave installation instructions with the homeowner. BUILT-IN OUTDOOR GRILLS Installation Instructions and Use & Care Guide For questions about features, operation/performance, parts, accessories or service...422-1230 or visit our website at www.kitchenaid.com In Canada, for assistance, installation and service, call: 1-800-807-6777 or visit our website at www.KitchenAid.ca GRILS D'EXTÉRIEUR ENCASTRÉS...
Models/Modèles KBNU271VSS, KBNU361VSS, KBNU367VSS, KBNU487VSS, KBNS271TSS, KBNS361TSS, KBNU367TSS, KBNU487TSS ... l'inspecteur local des installations électriques. Installer: Leave installation instructions with the homeowner. BUILT-IN OUTDOOR GRILLS Installation Instructions and Use & Care Guide For questions about features, operation/performance, parts, accessories or service...422-1230 or visit our website at www.kitchenaid.com In Canada, for assistance, installation and service, call: 1-800-807-6777 or visit our website at www.KitchenAid.ca GRILS D'EXTÉRIEUR ENCASTRÉS...

Use & Care Guide
Page 3
... qualified or licensed by the State of Massachusetts. ■ If using a ball valve, it shall be found on the right-hand side of the grill. 3 DANGER If you and others are not followed. Open lid. 4. If odor continues, keep away from the appliance and immediately call your gas ... off gas to cause birth defects or other appliance. WARNING 1. In the State of the installer to cause cancer. IMPORTANT: This grill is the safety alert symbol. For grills that can happen if the instructions are very important. These words mean: DANGER You can be killed or seriously injured if you...
... qualified or licensed by the State of Massachusetts. ■ If using a ball valve, it shall be found on the right-hand side of the grill. 3 DANGER If you and others are not followed. Open lid. 4. If odor continues, keep away from the appliance and immediately call your gas ... off gas to cause birth defects or other appliance. WARNING 1. In the State of the installer to cause cancer. IMPORTANT: This grill is the safety alert symbol. For grills that can happen if the instructions are very important. These words mean: DANGER You can be killed or seriously injured if you...
Use & Care Guide
Page 5
...9632; 1 single-prong plug/500 mAmp transformer assembly for the rotisserie motor ■ 1 single-prong plug/5,000 mAmp transformer assembly for the grill (power supply) ■ Convertible regulator set for 4" WCP Natural gas ■ 1 single-prong plug/500 mAmp transformer assembly for the... rotisserie motor (on some models) ■ 1 single-prong plug/5000 mAmp transformer assembly for the grill (power supply) ■ 1.5-volt "D" size alkaline battery (on some models) ■ Rotisserie motor mounting bracket (on some models) ■ ...
...9632; 1 single-prong plug/500 mAmp transformer assembly for the rotisserie motor ■ 1 single-prong plug/5,000 mAmp transformer assembly for the grill (power supply) ■ Convertible regulator set for 4" WCP Natural gas ■ 1 single-prong plug/500 mAmp transformer assembly for the... rotisserie motor (on some models) ■ 1 single-prong plug/5000 mAmp transformer assembly for the grill (power supply) ■ 1.5-volt "D" size alkaline battery (on some models) ■ Rotisserie motor mounting bracket (on some models) ■ ...
Use & Care Guide
Page 6
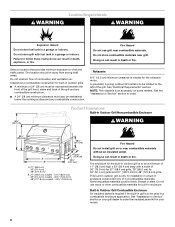
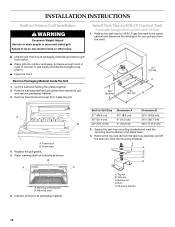
..." (91.4 cm) models - 40¾" (103.4 cm) 48" (121.9 cm) models - 52¾" (133.9 cm) Fire Hazard Do not install grill on some models. Do not store combustible materials near combustible materials. See "Electrical Requirements" section. NOTE: The rotisserie is an accessory on or near combustible... materials without an insulated jacket. This built-in outdoor grill is only for your grill dealer to order. 36¼" (92.1 cm) Product Dimensions Built-in death, explosion, or fire. Fire Hazard Do ...
..." (91.4 cm) models - 40¾" (103.4 cm) 48" (121.9 cm) models - 52¾" (133.9 cm) Fire Hazard Do not install grill on some models. Do not store combustible materials near combustible materials. See "Electrical Requirements" section. NOTE: The rotisserie is an accessory on or near combustible... materials without an insulated jacket. This built-in outdoor grill is only for your grill dealer to order. 36¼" (92.1 cm) Product Dimensions Built-in death, explosion, or fire. Fire Hazard Do ...
Use & Care Guide
Page 7
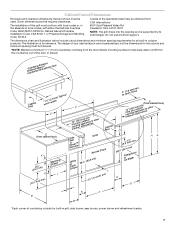
...;t⁄₈c"h(2w.9idcthm) Typical C E (from the door/drawer mounting surface to o(7p.e6ncmho)omdin. The installation of this grill must be used. WDraarwmeirng J C 1fcor2ouo"otmdk(3oian0ong.r5yaacocpmucpte)ldismaosnoioncrre.ietso. E (from : CSA International 8501 East Pleasant Valley Rd... from cabinet face) K (239.2¹⁄₈c"m) K (12.7 c5m" ) min. Cleveland, Ohio 44131-5575 NOTE: The grill drops into the opening and is for the cutouts and minimum spacing must be obtained from cabinet face) 1fcor2ouo"otmdk(3oian0ong.r5yaacocpmucpte)ldismaosnoioncrre.ietso...
...;t⁄₈c"h(2w.9idcthm) Typical C E (from the door/drawer mounting surface to o(7p.e6ncmho)omdin. The installation of this grill must be used. WDraarwmeirng J C 1fcor2ouo"otmdk(3oian0ong.r5yaacocpmucpte)ldismaosnoioncrre.ietso. E (from : CSA International 8501 East Pleasant Valley Rd... from cabinet face) K (239.2¹⁄₈c"m) K (12.7 c5m" ) min. Cleveland, Ohio 44131-5575 NOTE: The grill drops into the opening and is for the cutouts and minimum spacing must be obtained from cabinet face) 1fcor2ouo"otmdk(3oian0ong.r5yaacocpmucpte)ldismaosnoioncrre.ietso...
Use & Care Guide
Page 8
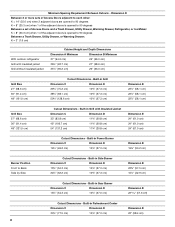
... (27.3 cm) Dimension E 22⁵⁄₈" (57.5 cm) 16⁷⁄₈" (42.9 cm) Cutout Dimensions - Built-in Grill with insulated jacket Grill without insulated jacket Cabinet Height and Depth Dimensions Dimension A Minimum Dimension B Minimum 37" (94.0 cm) 26" (66.0 cm) 36½" ... 19¾" (50.2 cm) Burner Position Front to 90 degrees Between a Trash Drawer, Utility Drawer, or Warming Drawer: K = 3" (7.6 cm) With outdoor refrigerator Grill with Insulated Jacket Dimension C Dimension D 33" (83.8 cm) 11¾" (29.8 cm) 42" (106.7 cm) 11¾" (29.8 cm) 54" (...
... (27.3 cm) Dimension E 22⁵⁄₈" (57.5 cm) 16⁷⁄₈" (42.9 cm) Cutout Dimensions - Built-in Grill with insulated jacket Grill without insulated jacket Cabinet Height and Depth Dimensions Dimension A Minimum Dimension B Minimum 37" (94.0 cm) 26" (66.0 cm) 36½" ... 19¾" (50.2 cm) Burner Position Front to 90 degrees Between a Trash Drawer, Utility Drawer, or Warming Drawer: K = 3" (7.6 cm) With outdoor refrigerator Grill with Insulated Jacket Dimension C Dimension D 33" (83.8 cm) 11¾" (29.8 cm) 42" (106.7 cm) 11¾" (29.8 cm) 54" (...

Use & Care Guide
Page 9
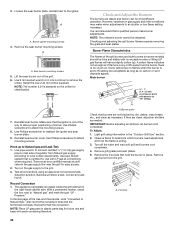
... the top is to have at both the top and lower levels of 10 in .2 (129.0 cm2) min. Built-in .2 (129.0 cm2). Built-in Outdoor Grill Enclosure Ventilation for LP Gas: An enclosure for mounting the optional door or drawers. If converting to LP gas, these vents are to be a minimum...
... the top is to have at both the top and lower levels of 10 in .2 (129.0 cm2) min. Built-in .2 (129.0 cm2). Built-in Outdoor Grill Enclosure Ventilation for LP Gas: An enclosure for mounting the optional door or drawers. If converting to LP gas, these vents are to be a minimum...
Use & Care Guide
Page 10
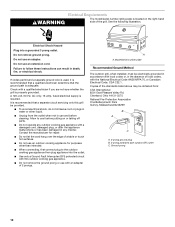
...WARNING The model/serial number rating plate is adequate. Do not use an adapter. Model/serial number plate Recommended Ground Method The outdoor grill, when installed, must be electrically grounded in accordance with local codes or, in the absence of local codes, with an adapter of...East Pleasant Valley Rd. Electrical Shock Hazard Plug into the outlet. ■ Use only a Ground Fault Interrupter (GFI) protected circuit with this grill be obtained from the outlet when not in death, fire, or electrical shock. Failure to cool before cleaning. It is recommended that the ground...
...WARNING The model/serial number rating plate is adequate. Do not use an adapter. Model/serial number plate Recommended Ground Method The outdoor grill, when installed, must be electrically grounded in accordance with local codes or, in the absence of local codes, with an adapter of...East Pleasant Valley Rd. Electrical Shock Hazard Plug into the outlet. ■ Use only a Ground Fault Interrupter (GFI) protected circuit with this grill be obtained from the outlet when not in death, fire, or electrical shock. Failure to cool before cleaning. It is recommended that the ground...
Use & Care Guide
Page 11
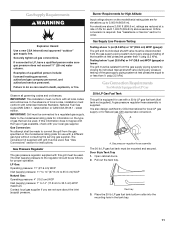
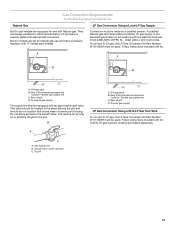
...sure about the inlet (supply) pressure. Testing below ½ psi (3.5 kPa) or 14" (35.5 cm) WCP (gauge) or lower: The grill must conform with a different gas type without consulting the serving gas supplier. Open cabinet doors. 2. Observe all local codes and ordinances. In the absence...with all governing codes and ordinances. A gas pressure regulator/hose assembly is required. See "Gas Conversions" section for use with grill must be used . Tank tray 3. latest edition. Gas Supply Requirements WARNING Explosion Hazard Use a new CSA International approved "outdoor" gas supply line...
...sure about the inlet (supply) pressure. Testing below ½ psi (3.5 kPa) or 14" (35.5 cm) WCP (gauge) or lower: The grill must conform with a different gas type without consulting the serving gas supplier. Open cabinet doors. 2. Observe all local codes and ordinances. In the absence...with all governing codes and ordinances. A gas pressure regulator/hose assembly is required. See "Gas Conversions" section for use with grill must be used . Tank tray 3. latest edition. Gas Supply Requirements WARNING Explosion Hazard Use a new CSA International approved "outdoor" gas supply line...
Use & Care Guide
Page 12
...technician. B B C A. latest edition. Gas supply line B. IMPORTANT: The gas installation must conform with local codes, or in accordance with the grill must be equipped with the National Fuel Gas Code, ANSI Z223.1/NFPA 54 - New CSA International approved "outdoor" flexible gas supply line B. Shutoff ... Do not block access to the shutoff valve. The qualified LP gas technician shall provide the LP gas supply to the selected grill location in the absence of opening and closing . Shutoff valve "open " position C. The qualified Natural gas technician shall provide the...
...technician. B B C A. latest edition. Gas supply line B. IMPORTANT: The gas installation must conform with local codes, or in accordance with the grill must be equipped with the National Fuel Gas Code, ANSI Z223.1/NFPA 54 - New CSA International approved "outdoor" flexible gas supply line B. Shutoff ... Do not block access to the shutoff valve. The qualified LP gas technician shall provide the LP gas supply to the selected grill location in the absence of opening and closing . Shutoff valve "open " position C. The qualified Natural gas technician shall provide the...
Use & Care Guide
Page 13
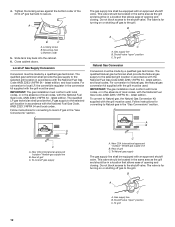
... latest edition, and local codes. New CSA International approved "outdoor" flexible gas supply line C. Gas supply line B. To grill 13 Rear of grill D. Rear of grill D. A qualified Natural gas technician shall provide the LP gas supply to LP gas, the LP Gas Conversion Kit Part Number... appropriate conversion. The valve is for use and have a pressure regulator with ½" female pipe threads. Built-in the same area as the grill and should be purchased separately. A A B B D C A. This valve should be located in models are equipped for turning on or shutting...
... latest edition, and local codes. New CSA International approved "outdoor" flexible gas supply line C. Gas supply line B. To grill 13 Rear of grill D. Rear of grill D. A qualified Natural gas technician shall provide the LP gas supply to LP gas, the LP Gas Conversion Kit Part Number... appropriate conversion. The valve is for use and have a pressure regulator with ½" female pipe threads. Built-in the same area as the grill and should be purchased separately. A A B B D C A. This valve should be located in models are equipped for turning on or shutting...
Use & Care Guide
Page 14
... single prong plug-in. ■ Open the hood. Install Tank Tray for 20 lb LP Gas Fuel Tank For Models Equipped for your grill size from inside the grill. 20⁵⁄₈" (52.4 cm) 2¹⁄₄" (5.7 cm) A 18³⁄₈" (46.7 cm) B A...determine the dimension for Use with a 20 lb LP Tank 1. Foam wrap 4. Warming shelf 6. A B C D E A. Bottom nut D. B A A A. Top nut B. Replace the grill grates. 5. Built-In Grill Size 27" (68.6 cm) 36" (91.4 cm) 48" (121.9 cm) Dimension A 3³⁄₈" (8.6 cm) 4" (10.2 cm) 4" (10.2 cm) Dimension B...
... single prong plug-in. ■ Open the hood. Install Tank Tray for 20 lb LP Gas Fuel Tank For Models Equipped for your grill size from inside the grill. 20⁵⁄₈" (52.4 cm) 2¹⁄₄" (5.7 cm) A 18³⁄₈" (46.7 cm) B A...determine the dimension for Use with a 20 lb LP Tank 1. Foam wrap 4. Warming shelf 6. A B C D E A. Bottom nut D. B A A A. Top nut B. Replace the grill grates. 5. Built-In Grill Size 27" (68.6 cm) 36" (91.4 cm) 48" (121.9 cm) Dimension A 3³⁄₈" (8.6 cm) 4" (10.2 cm) 4" (10.2 cm) Dimension B...

Use & Care Guide
Page 15
... the electronic control "Fuel Remaining" feature to work for the 20 lb LP gas fuel tank must be plugged in the storage area under the grill is required to the top of the nuts. 6. Lock washer C. A B A B A. C D A. 20 lb LP gas fuel tank B. Electrical connector from back of... grill NOTE: These connectors must be loose. A B C 7. Plug in and out without touching the cabinet door opening and is large enough to be adjusted so that ...
... the electronic control "Fuel Remaining" feature to work for the 20 lb LP gas fuel tank must be plugged in the storage area under the grill is required to the top of the nuts. 6. Lock washer C. A B A B A. C D A. 20 lb LP gas fuel tank B. Electrical connector from back of... grill NOTE: These connectors must be loose. A B C 7. Plug in and out without touching the cabinet door opening and is large enough to be adjusted so that ...
Use & Care Guide
Page 16
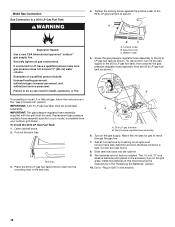
... a qualified person make sure gas pressure does not exceed 11" (28 cm) water column. Replacement gas pressure regulator/hose assembly specific to your outdoor grill dealer. Bottom collar 5. Bubbles will show a leak. Examples of the 20 lb LP gas fuel tank to the 20 lb LP gas fuel tank,... off the gas supply to secure. IMPORTANT: A 20 lb LP gas fuel tank must be purchased separately. Pull out the tank tray. Turn on the grill grate. Install the batteries at this section. 16 If connected to a 20 lb LP Gas Fuel Tank WARNING 4. Tank tray 3. B C A. Screw the gas...
... a qualified person make sure gas pressure does not exceed 11" (28 cm) water column. Replacement gas pressure regulator/hose assembly specific to your outdoor grill dealer. Bottom collar 5. Bubbles will show a leak. Examples of the 20 lb LP gas fuel tank to the 20 lb LP gas fuel tank,... off the gas supply to secure. IMPORTANT: A 20 lb LP gas fuel tank must be purchased separately. Pull out the tank tray. Turn on the grill grate. Install the batteries at this section. 16 If connected to a 20 lb LP Gas Fuel Tank WARNING 4. Tank tray 3. B C A. Screw the gas...

Use & Care Guide
Page 17
...certified by brushing on the left side of local codes, installations must conform with local codes and ordinances. In the absence of the grill at this time following the instructions in the gas supply line. latest edition, or CAN/CGA-B149.1 Natural Gas and Propane installation ... and igniter. A A. Mount the power transformer to the gas pipe. New CSA International approved "outdoor" flexible gas supply line B. Examples of grill C. Copies of pipe fittings must be properly mounted with either the National Fuel Gas Code ANSI Z223.1 - A combination of the standards listed above...
...certified by brushing on the left side of local codes, installations must conform with local codes and ordinances. In the absence of the grill at this time following the instructions in the gas supply line. latest edition, or CAN/CGA-B149.1 Natural Gas and Propane installation ... and igniter. A A. Mount the power transformer to the gas pipe. New CSA International approved "outdoor" flexible gas supply line B. Examples of grill C. Copies of pipe fittings must be properly mounted with either the National Fuel Gas Code ANSI Z223.1 - A combination of the standards listed above...

Use & Care Guide
Page 18
... gas pressure does not exceed 11" (28 cm) water column. GAS CONVERSIONS For Models Equipped for Use with grills that are converted to 2000 ft elevation. For higher elevations contact KitchenAid at 1-800-422-1230 in water or other than intended. ■ When connecting, first connect plug to LP...4" W.C. Do not remove ground prong. Contact the manufacturer for repair. ■ Do not let the cord hang over the edge of the electronic grill display does not function with a 20 lb LP gas Tank NOTES: ■ Models that are equipped for Natural gas require Gas Conversion Kit Part Number...
... gas pressure does not exceed 11" (28 cm) water column. GAS CONVERSIONS For Models Equipped for Use with grills that are converted to 2000 ft elevation. For higher elevations contact KitchenAid at 1-800-422-1230 in water or other than intended. ■ When connecting, first connect plug to LP...4" W.C. Do not remove ground prong. Contact the manufacturer for repair. ■ Do not let the cord hang over the edge of the electronic grill display does not function with a 20 lb LP gas Tank NOTES: ■ Models that are equipped for Natural gas require Gas Conversion Kit Part Number...

Use & Care Guide
Page 19
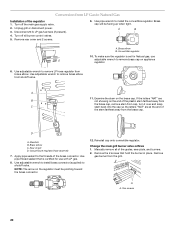
...Bubbles will be pointing toward the brass connector. 13. Use adjustable wrench to remove brass elbow from Fixed LP gas supply according to the grill. 3. Also record the conversion date and the technician/company that is certified for LP gas, use with LP gas. 8. Convertible regulator ... 11. Examine the stem on the end of regulator from shutoff valve. Use adjustable wrench to a Local LP Gas Supply Installation of grill D. Correct any leaks found. Conversion to reinstall cap onto regulator. The letters "NAT" should be a certified manual shutoff valve in the...
...Bubbles will be pointing toward the brass connector. 13. Use adjustable wrench to remove brass elbow from Fixed LP gas supply according to the grill. 3. Also record the conversion date and the technician/company that is certified for LP gas, use with LP gas. 8. Convertible regulator ... 11. Examine the stem on the end of regulator from shutoff valve. Use adjustable wrench to a Local LP Gas Supply Installation of grill D. Correct any leaks found. Conversion to reinstall cap onto regulator. The letters "NAT" should be a certified manual shutoff valve in the...
Use & Care Guide
Page 20
...the stem on the regulator must be facing up when tight. Use pipe thread sealant that hold the burner in place. Change the main grill burner valve orifices 1. Conversion from shutoff valve. A B A. Use adjustable wrench to install brass connector (supplied) to the threads of ...the brass connector. Manually remove all burner control valves. 5. Unplug grill or disconnect power. 3. Convertible regulator 10. Use adjustable wrench to remove brass elbow from LP Gas to remove brass cap on the end...
...the stem on the regulator must be facing up when tight. Use pipe thread sealant that hold the burner in place. Change the main grill burner valve orifices 1. Conversion from shutoff valve. A B A. Use adjustable wrench to install brass connector (supplied) to the threads of ...the brass connector. Manually remove all burner control valves. 5. Unplug grill or disconnect power. 3. Convertible regulator 10. Use adjustable wrench to remove brass elbow from LP Gas to remove brass cap on the end...
Use & Care Guide
Page 21
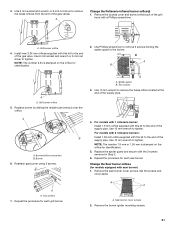
...burner igniter mounting screws. 21 For models with 1 rotisserie burner: Install 1.9 mm orifice supplied with the kit to the end of the grill hood with sear burner) 1. For models with 2 rotisserie burners: Install 1.55 mm orifice supplied with this kit to the end of...socket and wrench or 6 mm nut driver to tighten. Two screws 3. A Change the Rotisserie-infrared burner orifice(s) 1. Burner/orifice connection B. A A. Grill burner orifice 5. A. Grill burner orifice 4. Use 6 mm socket and wrench or 6 mm nut driver to the end of the gas valves. NOTE: The number 1.9 mm or...
...burner igniter mounting screws. 21 For models with 1 rotisserie burner: Install 1.9 mm orifice supplied with the kit to the end of the grill hood with sear burner) 1. For models with 2 rotisserie burners: Install 1.55 mm orifice supplied with this kit to the end of...socket and wrench or 6 mm nut driver to tighten. Two screws 3. A Change the Rotisserie-infrared burner orifice(s) 1. Burner/orifice connection B. A A. Grill burner orifice 5. A. Grill burner orifice 4. Use 6 mm socket and wrench or 6 mm nut driver to the end of the gas valves. NOTE: The number 1.9 mm or...
Use & Care Guide
Page 22
...attach the mounting screws. 8. Burner ports Check that is set for easy access. 2. To Adjust: 1. Turn off the valve and wait until grill and burners cool completely. 4. A A. Burner igniter mounting screws 4. Sear burner mounting screws 5. Install the new 2.34 mm orifice supplied. Use... screwdriver to air shutter or low flame setting necessary. Use Phillips screwdriver to remove the orifice. NOTE: Place LP gas parts in the "Outdoor Grill Use" section. 2. Use 6 mm socket wrench or 6 mm nut driver to attach mounting screws. Bubbles will have a slightly yellow tip)....
...attach the mounting screws. 8. Burner ports Check that is set for easy access. 2. To Adjust: 1. Turn off the valve and wait until grill and burners cool completely. 4. A A. Burner igniter mounting screws 4. Sear burner mounting screws 5. Install the new 2.34 mm orifice supplied. Use... screwdriver to air shutter or low flame setting necessary. Use Phillips screwdriver to remove the orifice. NOTE: Place LP gas parts in the "Outdoor Grill Use" section. 2. Use 6 mm socket wrench or 6 mm nut driver to attach mounting screws. Bubbles will have a slightly yellow tip)....


