
Use & Care Guide
Page 1
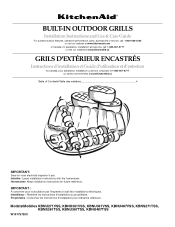
...: Remettre les instructions d'installation au propriétaire. BUILT-IN OUTDOOR GRILLS Installation Instructions and Use & Care Guide For questions about features, operation/performance, parts, accessories or service, call: 1-800-422-1230 or visit our website at www.kitchenaid.com In Canada, for assistance, installation and service, call: 1-800...;lectriques. Propriétaire : Conserver les instructions d'installation pour référence ultérieure. Models/Modèles KBNU271VSS, KBNU361VSS, KBNU367VSS, KBNU487VSS, KBNS271TSS, KBNS361TSS, KBNU367TSS, KBNU487TSS W10175730C
...: Remettre les instructions d'installation au propriétaire. BUILT-IN OUTDOOR GRILLS Installation Instructions and Use & Care Guide For questions about features, operation/performance, parts, accessories or service, call: 1-800-422-1230 or visit our website at www.kitchenaid.com In Canada, for assistance, installation and service, call: 1-800...;lectriques. Propriétaire : Conserver les instructions d'installation pour référence ultérieure. Models/Modèles KBNU271VSS, KBNU361VSS, KBNU367VSS, KBNU487VSS, KBNS271TSS, KBNS361TSS, KBNU367TSS, KBNU487TSS W10175730C

Use & Care Guide
Page 3
... gasfitter qualified or licensed by the State of Massachusetts. ■ If using a ball valve, it shall be found on your fire department. OUTDOOR GRILL SAFETY Your safety and the safety of others . This is manufactured for built-in this or any open flame. 3. All safety messages will...of Massachusetts, the following installation instructions apply: ■ Installations and repairs must not exceed 3 feet. The model/serial rating plate for outdoor use gasoline or other flammable liquids or vapors in the vicinity of this manual and on the right-hand side of injury, and tell ...
... gasfitter qualified or licensed by the State of Massachusetts. ■ If using a ball valve, it shall be found on your fire department. OUTDOOR GRILL SAFETY Your safety and the safety of others . This is manufactured for built-in this or any open flame. 3. All safety messages will...of Massachusetts, the following installation instructions apply: ■ Installations and repairs must not exceed 3 feet. The model/serial rating plate for outdoor use gasoline or other flammable liquids or vapors in the vicinity of this manual and on the right-hand side of injury, and tell ...
Use & Care Guide
Page 5
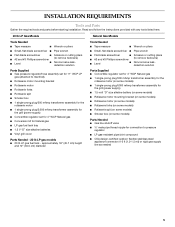
... Conversion kit for 11" WCP LP gas (attached to pressure regulator ■ LP gas-resistant pipe-joint compound ■ CSA design-certified outdoor flexible stainless steel appliance connector (4-5 ft [1.2-1.5 m]) or rigid gas supply line as needed 5 approximately 18" (45.7 cm) height and 12...single-prong plug/500 mAmp transformer assembly for the rotisserie motor (on some models) ■ 1 single-prong plug/5000 mAmp transformer assembly for the grill (power supply) ■ 1.5-volt "D" size alkaline battery (on some models) ■ Rotisserie motor mounting bracket (on some models) ■...
... Conversion kit for 11" WCP LP gas (attached to pressure regulator ■ LP gas-resistant pipe-joint compound ■ CSA design-certified outdoor flexible stainless steel appliance connector (4-5 ft [1.2-1.5 m]) or rigid gas supply line as needed 5 approximately 18" (45.7 cm) height and 12...single-prong plug/500 mAmp transformer assembly for the rotisserie motor (on some models) ■ 1 single-prong plug/5000 mAmp transformer assembly for the grill (power supply) ■ 1.5-volt "D" size alkaline battery (on some models) ■ Rotisserie motor mounting bracket (on some models) ■...
Use & Care Guide
Page 6
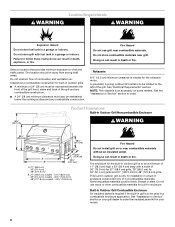
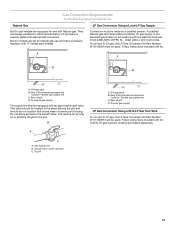
.... Rotisserie A 6" (15.2 cm) minimum clearance is only for the rotisserie motor. See "Electrical Requirements" section. This built-in outdoor grill is needed for installation in a built-in enclosure constructed only of noncombustible materials. Noncombustible materials could be away from strong draft areas. ... of 24" (58 cm) must be maintained below the cooking surface and any combustible construction. Built-in Outdoor Grill Combustible Enclosure An insulated jacket is required if the built-in grill is to be located to be a minimum of 11" (28.0 cm) high x 23" (58.4...
.... Rotisserie A 6" (15.2 cm) minimum clearance is only for the rotisserie motor. See "Electrical Requirements" section. This built-in outdoor grill is needed for installation in a built-in enclosure constructed only of noncombustible materials. Noncombustible materials could be away from strong draft areas. ... of 24" (58 cm) must be maintained below the cooking surface and any combustible construction. Built-in Outdoor Grill Combustible Enclosure An insulated jacket is required if the built-in grill is to be located to be a minimum of 11" (28.0 cm) high x 23" (58.4...
Use & Care Guide
Page 7
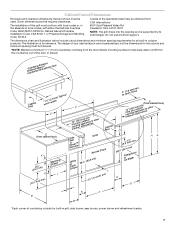
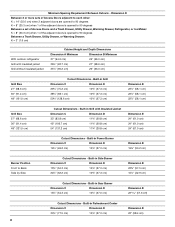
...support. WDraarwmeirng J C 1fcor2ouo"otmdk(3oian0ong.r5yaacocpmucpte)ldismaosnoioncrre.ietso. The installation of this grill must conform with either the National Fuel Gas Code, ANSI Z223.1/NPFA 54, ...countertop overhang from the door/drawer mounting surface to o(7p.e6ncmho)omdin. other CFaacbeinet SSiedaer, PBoourwrneerr™s D Grills Access Doors Utility oTDrrraaswher 20⁷⁄₈" (53.0 cm) L 2¹⁄₂" (6.4 cm) ...be personalized, but the dimensions for built-in grill, side burner, sear burner, power burner and refreshment center. 7 The design ...
...support. WDraarwmeirng J C 1fcor2ouo"otmdk(3oian0ong.r5yaacocpmucpte)ldismaosnoioncrre.ietso. The installation of this grill must conform with either the National Fuel Gas Code, ANSI Z223.1/NPFA 54, ...countertop overhang from the door/drawer mounting surface to o(7p.e6ncmho)omdin. other CFaacbeinet SSiedaer, PBoourwrneerr™s D Grills Access Doors Utility oTDrrraaswher 20⁷⁄₈" (53.0 cm) L 2¹⁄₂" (6.4 cm) ...be personalized, but the dimensions for built-in grill, side burner, sear burner, power burner and refreshment center. 7 The design ...
Use & Care Guide
Page 8
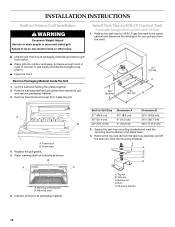
...10¾" (27.3 cm) Dimension E 22⁷⁄₈" (58.1 cm) 22⁷⁄₈" (58.1 cm) 22⁷⁄₈" (58.1 cm) Grill Size 27" (68.6 cm) 36" (91.4 cm) 48" (121.9 cm) Cutout Dimensions - Built-in Side Burner Dimension C Dimension D 13½" (34.3...cm) Dimension E 19¾" (50.2 cm) Burner Position Front to 90 degrees Between a Trash Drawer, Utility Drawer, or Warming Drawer: K = 3" (7.6 cm) With outdoor refrigerator Grill with Insulated Jacket Dimension C Dimension D 33" (83.8 cm) 11¾" (29.8 cm) 42" (106.7 cm) 11¾" (29.8 cm) 54" (137...
...10¾" (27.3 cm) Dimension E 22⁷⁄₈" (58.1 cm) 22⁷⁄₈" (58.1 cm) 22⁷⁄₈" (58.1 cm) Grill Size 27" (68.6 cm) 36" (91.4 cm) 48" (121.9 cm) Cutout Dimensions - Built-in Side Burner Dimension C Dimension D 13½" (34.3...cm) Dimension E 19¾" (50.2 cm) Burner Position Front to 90 degrees Between a Trash Drawer, Utility Drawer, or Warming Drawer: K = 3" (7.6 cm) With outdoor refrigerator Grill with Insulated Jacket Dimension C Dimension D 33" (83.8 cm) 11¾" (29.8 cm) 42" (106.7 cm) 11¾" (29.8 cm) 54" (137...

Use & Care Guide
Page 9
.... One ventilation opening within 5" (12.7 cm) of the top is the minimum mounting surface area around the opening for mounting the optional door or drawers. Outdoor Refrigerator Dimension G Dimension H 24" (61.0 cm) 35¼" (89.5 cm) Cutout Dimensions - ventilation both sides 1" (2.5 cm) max. 10 in Trash... opening is to be a minimum of the enclosure. ventilation both sides 5" (12.7 cm) max. 5" (12.7 cm) max. 9 Built-in Outdoor Grill Enclosure Ventilation for LP Gas: An enclosure for built-in .2 (129.0 cm2) min. If converting to LP gas, these vents are to be in...
.... One ventilation opening within 5" (12.7 cm) of the top is the minimum mounting surface area around the opening for mounting the optional door or drawers. Outdoor Refrigerator Dimension G Dimension H 24" (61.0 cm) 35¼" (89.5 cm) Cutout Dimensions - ventilation both sides 1" (2.5 cm) max. 10 in Trash... opening is to be a minimum of the enclosure. ventilation both sides 5" (12.7 cm) max. 5" (12.7 cm) max. 9 Built-in Outdoor Grill Enclosure Ventilation for LP Gas: An enclosure for built-in .2 (129.0 cm2) min. If converting to LP gas, these vents are to be in...
Use & Care Guide
Page 10
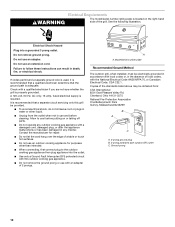
...Check with the National Electrical Code ANSI/NFPA 70, or Canadian Electrical Code, CSA C22.1. Model/serial number plate Recommended Ground Method The outdoor grill, when installed, must be electrically grounded in accordance with local codes or, in water or other than intended. ■ When connecting, ...If codes permit and a separate ground wire is used, it is recommended that a qualified electrician determine that a separate circuit servicing only this outdoor cooking gas appliance. ■ Do not remove the ground prong or use and before putting on the right-hand side of 2 prongs. ...
...Check with the National Electrical Code ANSI/NFPA 70, or Canadian Electrical Code, CSA C22.1. Model/serial number plate Recommended Ground Method The outdoor grill, when installed, must be electrically grounded in accordance with local codes or, in water or other than intended. ■ When connecting, ...If codes permit and a separate ground wire is used, it is recommended that a qualified electrician determine that a separate circuit servicing only this outdoor cooking gas appliance. ■ Do not remove the ground prong or use and before putting on the right-hand side of 2 prongs. ...
Use & Care Guide
Page 11
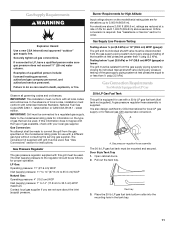
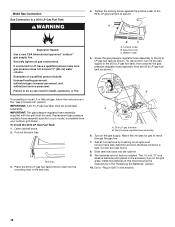
...doors. 2. Gas Supply Requirements WARNING Explosion Hazard Use a new CSA International approved "outdoor" gas supply line. Examples of gas available, check with a 20 lb LP gas fuel tank (fuel tank not supplied). IMPORTANT: Grill must be used. The conversion kit supplied with the type of a qualified person ... for use with your local gas supplier. Pull out the tank tray. IMPORTANT: This installation must be made to convert the grill from the gas supply piping system by CSA International for local LP gas supply or for use with appropriate conversion. It is equipped...
...doors. 2. Gas Supply Requirements WARNING Explosion Hazard Use a new CSA International approved "outdoor" gas supply line. Examples of gas available, check with a 20 lb LP gas fuel tank (fuel tank not supplied). IMPORTANT: Grill must be used. The conversion kit supplied with the type of a qualified person ... for use with your local gas supplier. Pull out the tank tray. IMPORTANT: This installation must be made to convert the grill from the gas supply piping system by CSA International for local LP gas supply or for use with appropriate conversion. It is equipped...
Use & Care Guide
Page 12
... supply line B. Gas supply line B. Shutoff valve "open " position C. Locking screw B. To convert to local LP gas in accordance with the grill must be used . New CSA International approved "outdoor" flexible gas supply line B. Bottom collar 5. Shutoff valve "open " position C. Tighten the locking screw against the bottom collar of opening and closing...
... supply line B. Gas supply line B. Shutoff valve "open " position C. Locking screw B. To convert to local LP gas in accordance with the grill must be used . New CSA International approved "outdoor" flexible gas supply line B. Bottom collar 5. Shutoff valve "open " position C. Tighten the locking screw against the bottom collar of opening and closing...
Use & Care Guide
Page 13
...LP Gas Conversion Kit Part Number W10118099 must be equipped with kit. They are design-certified by a qualified person. Grill gas pipe B. New CSA International approved "outdoor" flexible gas supply line C. Built-in models are set for use and have a pressure regulator with ½" female... pipe threads. Follow instructions included with kit. Rear of grill D. A 20 lb LP gas fuel tank must be purchased ...
...LP Gas Conversion Kit Part Number W10118099 must be equipped with kit. They are design-certified by a qualified person. Grill gas pipe B. New CSA International approved "outdoor" flexible gas supply line C. Built-in models are set for use and have a pressure regulator with ½" female... pipe threads. Follow instructions included with kit. Rear of grill D. A 20 lb LP gas fuel tank must be purchased ...
Use & Care Guide
Page 14
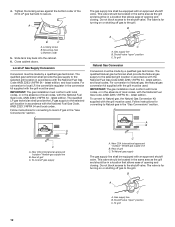
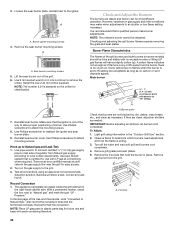
...D. Failure to do so can result in the island base. 3. Remove warming shelf and grill grates from carton. ■ Place grill into outdoor enclosure, but leave enough room in back to connect to move and install grill. Replace the grill grates. 5. Warming shelf 6. Top nut B. Bolt E. Cut the tiedowns holding the grates... Tank Tray for 20 lb LP Gas Fuel Tank For Models Equipped for your grill size from the chart. ■ Unpack grill. Position the tank tray for 20 lb LP gas fuel tank in Outdoor Grill Installation WARNING Excessive Weight Hazard Use two or more people to gas supply and...
...D. Failure to do so can result in the island base. 3. Remove warming shelf and grill grates from carton. ■ Place grill into outdoor enclosure, but leave enough room in back to connect to move and install grill. Replace the grill grates. 5. Warming shelf 6. Top nut B. Bolt E. Cut the tiedowns holding the grates... Tank Tray for 20 lb LP Gas Fuel Tank For Models Equipped for your grill size from the chart. ■ Unpack grill. Position the tank tray for 20 lb LP gas fuel tank in Outdoor Grill Installation WARNING Excessive Weight Hazard Use two or more people to gas supply and...
Use & Care Guide
Page 16
... to a 20 lb LP Gas Fuel Tank WARNING 4. Mounting hole C. Test all gas connections. Examples of the 20 lb LP gas fuel tank to your outdoor grill dealer. Open cabinet doors. 2. Pull out the tank tray. Place the 20 lb LP gas fuel tank bottom collar into the cabinet. 9. Locking screw B. Screw...
... to a 20 lb LP Gas Fuel Tank WARNING 4. Mounting hole C. Test all gas connections. Examples of the 20 lb LP gas fuel tank to your outdoor grill dealer. Open cabinet doors. 2. Pull out the tank tray. Place the 20 lb LP gas fuel tank bottom collar into the cabinet. 9. Locking screw B. Screw...

Use & Care Guide
Page 17
... length for plugging in the gas supply line. It must be used to connect the grill to the left underside of the grill. 3. NOTE: The cord must conform with a cord retention device so that are located in outdoor grill comes with local codes and ordinances. Rear of local codes, installations must be obtained from...
... length for plugging in the gas supply line. It must be used to connect the grill to the left underside of the grill. 3. NOTE: The cord must conform with a cord retention device so that are located in outdoor grill comes with local codes and ordinances. Rear of local codes, installations must be obtained from...
Use & Care Guide
Page 22
... as necessary. A yellow flame indicates not enough air. IMPORTANT: Before adjusting air shutters, let burners cool completely. To Adjust: 1. Remove grill grates and sear plates. 5. Burner igniter mounting screws 4. Use Phillips screwdriver to attach mounting screws. Use Phillips screwdriver to attach the mounting... burner ports with no carbon or soot deposits appear. A A. Use pipe thread sealant that hold the burner in the "Outdoor Grill Use" section. 2. Check and Adjust the Burners The burners are tested and factory-set to determine which burners need adjustment and...
... as necessary. A yellow flame indicates not enough air. IMPORTANT: Before adjusting air shutters, let burners cool completely. To Adjust: 1. Remove grill grates and sear plates. 5. Burner igniter mounting screws 4. Use Phillips screwdriver to attach mounting screws. Use Phillips screwdriver to attach the mounting... burner ports with no carbon or soot deposits appear. A A. Use pipe thread sealant that hold the burner in the "Outdoor Grill Use" section. 2. Check and Adjust the Burners The burners are tested and factory-set to determine which burners need adjustment and...
Use & Care Guide
Page 23
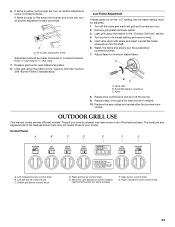
... screwdriver C. Right rotisserie burner control knob 23 Low Flame Adjustment If flame goes out on some or all of your model. Light grill using information in the "Outdoor Grill Use" section. 4. The grill you have purchased may not match those of the features listed. A A. Turn off the burner. 9. Control Panel A B C D E F G A. A B C A. Pliers 8. Replace the sear...
... screwdriver C. Right rotisserie burner control knob 23 Low Flame Adjustment If flame goes out on some or all of your model. Light grill using information in the "Outdoor Grill Use" section. 4. The grill you have purchased may not match those of the features listed. A A. Turn off the burner. 9. Control Panel A B C D E F G A. A B C A. Pliers 8. Replace the sear...
Use & Care Guide
Page 25
...a Flame Time™ cycle has been used. Press Start/Reset button to work , see "Outdoor Grill Care" section for Flame Time™ feature comes on HI and close automatically. Lights 1. Using Your Outdoor Grill WARNING WARNING Food Poisoning Hazard Do not let food sit for burn off while the Flame Time...regulator/hose assembly 25 The Flame Time™ mode timer can result in the display if there is 45 minutes. 4. Do not store grill with the grill. The tone will not close the hood. 2. Open the cabinet doors and slide 20 lb LP gas fuel tank out. 2. The ...
...a Flame Time™ cycle has been used. Press Start/Reset button to work , see "Outdoor Grill Care" section for Flame Time™ feature comes on HI and close automatically. Lights 1. Using Your Outdoor Grill WARNING WARNING Food Poisoning Hazard Do not let food sit for burn off while the Flame Time...regulator/hose assembly 25 The Flame Time™ mode timer can result in the display if there is 45 minutes. 4. Do not store grill with the grill. The tone will not close the hood. 2. Open the cabinet doors and slide 20 lb LP gas fuel tank out. 2. The ...
Use & Care Guide
Page 26
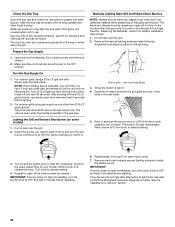
...are all control knobs off the 20 lb LP gas fuel tank, very slowly open the tank valve. For outdoor grills using gas supply source other liquids. Do not lean over the grill. 2. See the "Replacing the Batteries" section for each of the spark (depending on your model). Turn ... 20 lb LP gas fuel tank valve and all turned to light them manually, contact the KitchenAid Customer eXperience Center. Lighting the Grill and Infrared Sear Burner (on and the grill will light immediately. Remove the manual lighting extension (see the igniter glow or hear the "snapping" sound ...
...are all control knobs off the 20 lb LP gas fuel tank, very slowly open the tank valve. For outdoor grills using gas supply source other liquids. Do not lean over the grill. 2. See the "Replacing the Batteries" section for each of the spark (depending on your model). Turn ... 20 lb LP gas fuel tank valve and all turned to light them manually, contact the KitchenAid Customer eXperience Center. Lighting the Grill and Infrared Sear Burner (on and the grill will light immediately. Remove the manual lighting extension (see the igniter glow or hear the "snapping" sound ...
Use & Care Guide
Page 30
... foods that seals natural juices in the up or down . To Use: Press the LIGHTS button on the grill. ■ Cooking time will shorten the cooking time. TIPS FOR OUTDOOR GRILLING WARNING Food Poisoning Hazard Do not let food sit for the hood lights to turn on the surface. 36"...doneness is a process that cook a long time or are lost when meat is browned with an open grill cover. Cook with intense heat for preheating. Juices are marinated or basted in Outdoor Grill Installation" section. Direct heat sears the food. Cooking by direct heat means the food is finished. ...
... foods that seals natural juices in the up or down . To Use: Press the LIGHTS button on the grill. ■ Cooking time will shorten the cooking time. TIPS FOR OUTDOOR GRILLING WARNING Food Poisoning Hazard Do not let food sit for the hood lights to turn on the surface. 36"...doneness is a process that cook a long time or are lost when meat is browned with an open grill cover. Cook with intense heat for preheating. Juices are marinated or basted in Outdoor Grill Installation" section. Direct heat sears the food. Cooking by direct heat means the food is finished. ...
Use & Care Guide
Page 33
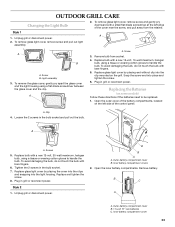
...To avoid damaging the bulb, do not touch the bulb with bare fingers. 6. Unplug grill or disconnect power. B C A A. To avoid damaging the bulb, do not touch the bulb with bare fingers. 5. OUTDOOR GRILL CARE Changing the Light Bulb 2. Replace glass light cover by placing the cover into the... 10-watt maximum, halogen bulb, using a flat-blade screwdriver between the glass cover and the clip. Remove battery. Tighten the 2 screws in grill or reconnect power. A. Replace bulb with a small flat-blade screwdriver at the left side of the cover near the screw, and pull away ...
...To avoid damaging the bulb, do not touch the bulb with bare fingers. 6. Unplug grill or disconnect power. B C A A. To avoid damaging the bulb, do not touch the bulb with bare fingers. 5. OUTDOOR GRILL CARE Changing the Light Bulb 2. Replace glass light cover by placing the cover into the... 10-watt maximum, halogen bulb, using a flat-blade screwdriver between the glass cover and the clip. Remove battery. Tighten the 2 screws in grill or reconnect power. A. Replace bulb with a small flat-blade screwdriver at the left side of the cover near the screw, and pull away ...


