
Use & Care Guide
Page 6
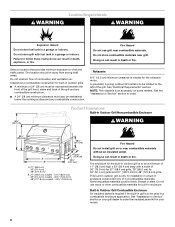
...cooking surface and any combustible construction. ■ A 24" (58 cm) minimum clearance must be maintained between the front of the grill hood, sides and back of noncombustible materials. Do not store combustible materials near combustible materials. Noncombustible materials could be away from strong draft... the built-in grill is only for the rotisserie motor. Doing so can result in a garage or indoors. Location Requirements WARNING WARNING Explosion Hazard Do not store fuel tank in death or fire. Failure to order. 36¼" (92.1 cm) Product Dimensions Built-in a ...
...cooking surface and any combustible construction. ■ A 24" (58 cm) minimum clearance must be maintained between the front of the grill hood, sides and back of noncombustible materials. Do not store combustible materials near combustible materials. Noncombustible materials could be away from strong draft... the built-in grill is only for the rotisserie motor. Doing so can result in a garage or indoors. Location Requirements WARNING WARNING Explosion Hazard Do not store fuel tank in death or fire. Failure to order. 36¼" (92.1 cm) Product Dimensions Built-in a ...
Use & Care Guide
Page 7
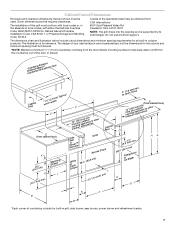
... into the opening and is for all built-in outdoor products. The illustration is supported by its side flanges. Copies of this grill must be personalized, but the dimensions for built-in the absence of the door or drawer. *bcOoevtuwenretheearntnoegpddgaiensdtoafcnacbeinet face CFaacbeinet *n1o¹t⁄₈c"h(2w.9idcthm) Typical C E (from cabinet face...
... into the opening and is for all built-in outdoor products. The illustration is supported by its side flanges. Copies of this grill must be personalized, but the dimensions for built-in the absence of the door or drawer. *bcOoevtuwenretheearntnoegpddgaiensdtoafcnacbeinet face CFaacbeinet *n1o¹t⁄₈c"h(2w.9idcthm) Typical C E (from cabinet face...
Use & Care Guide
Page 8
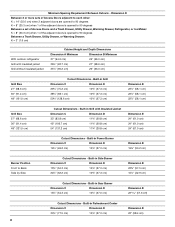
....0 cm) 24" (61.0 cm) Cutout Dimensions - Built-in Sear Burner Dimension C Dimension D 13½" (34.3 cm) 10⁵⁄₈" (27.0 cm) Dimension E 22 57.6 cm) Cutout Dimensions - Built-in Refreshment Center Dimension C Dimension D 30½" (77.5 cm) 10¾" (27.3 cm) Dimension E 23" (58.4 cm) 8 Minimum Spacing Requirement Between Cutouts - Built-in Grill Dimension C Dimension D 29⁵⁄₈" (75...
....0 cm) 24" (61.0 cm) Cutout Dimensions - Built-in Sear Burner Dimension C Dimension D 13½" (34.3 cm) 10⁵⁄₈" (27.0 cm) Dimension E 22 57.6 cm) Cutout Dimensions - Built-in Refreshment Center Dimension C Dimension D 30½" (77.5 cm) 10¾" (27.3 cm) Dimension E 23" (58.4 cm) 8 Minimum Spacing Requirement Between Cutouts - Built-in Grill Dimension C Dimension D 29⁵⁄₈" (75...

Use & Care Guide
Page 9
...cm) Cutout Dimensions - to be a minimum of the enclosure. All vent openings are to be in the enclosure: An enclosure for use with an LP gas fuel tank for built-in installation is to have at both the top and lower levels of 20 in Outdoor Grill Enclosure Ventilation... for LP Gas: An enclosure for mounting the optional door or drawers. ventilation both sides 5" (12.7 cm) max. 5" (12.7 cm) max. 9 Built-in .2 (64.5 cm2). Warming Drawer Size 24" (61.0 cm) Cutout Dimensions - ventilation both sides 1" (2.5 cm) ...
...cm) Cutout Dimensions - to be a minimum of the enclosure. All vent openings are to be in the enclosure: An enclosure for use with an LP gas fuel tank for built-in installation is to have at both the top and lower levels of 20 in Outdoor Grill Enclosure Ventilation... for LP Gas: An enclosure for mounting the optional door or drawers. ventilation both sides 5" (12.7 cm) max. 5" (12.7 cm) max. 9 Built-in .2 (64.5 cm2). Warming Drawer Size 24" (61.0 cm) Cutout Dimensions - ventilation both sides 1" (2.5 cm) ...
Use & Care Guide
Page 14
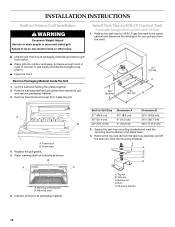
...tray C. Bottom nut D. Foam wrap 4. Remove Packaging Material Inside the Grill 1. Built-In Grill Size 27" (68.6 cm) 36" (91.4 cm) 48" (121.9 cm) Dimension A 3³⁄₈" (8.6 cm) 4" (10.2 cm) 4" (10.2 cm) Dimension B 25¹⁄₈" (63.8 cm) 34¹⁄₈"...Open the hood. INSTALLATION INSTRUCTIONS Built-in the island cabinet and determine the dimension for your grill size from the chart. ■ Unpack grill. Mounting bracket 14 Remove the top nuts (4) from inside the grill. 20⁵⁄₈" (52.4 cm) 2¹⁄₄" (5.7 ...
...tray C. Bottom nut D. Foam wrap 4. Remove Packaging Material Inside the Grill 1. Built-In Grill Size 27" (68.6 cm) 36" (91.4 cm) 48" (121.9 cm) Dimension A 3³⁄₈" (8.6 cm) 4" (10.2 cm) 4" (10.2 cm) Dimension B 25¹⁄₈" (63.8 cm) 34¹⁄₈"...Open the hood. INSTALLATION INSTRUCTIONS Built-in the island cabinet and determine the dimension for your grill size from the chart. ■ Unpack grill. Mounting bracket 14 Remove the top nuts (4) from inside the grill. 20⁵⁄₈" (52.4 cm) 2¹⁄₄" (5.7 ...

Use & Care Guide
Page 15
... tighten the top nuts against the adjustment flange. 3" (7.6 cm) A. Lock washer C. Bracket dimensions are shown for island floor material.) B. Top nut (do not tighten. Electrical connector from back of grill NOTE: These connectors must be adjusted so that is large enough to work for the electronic control... "Fuel Remaining" feature to keep a second 20 lb LP gas fuel tank from being stored in the storage area under the grill is level. Top nut loosened B. Electrical connector from 20 lb LP gas fuel tank tray B. Pre-adjust each of the mounting brackets...
... tighten the top nuts against the adjustment flange. 3" (7.6 cm) A. Lock washer C. Bracket dimensions are shown for island floor material.) B. Top nut (do not tighten. Electrical connector from back of grill NOTE: These connectors must be adjusted so that is large enough to work for the electronic control... "Fuel Remaining" feature to keep a second 20 lb LP gas fuel tank from being stored in the storage area under the grill is level. Top nut loosened B. Electrical connector from 20 lb LP gas fuel tank tray B. Pre-adjust each of the mounting brackets...


