Use & Care Guide
Page 4
... cylinder beyond 80 percent full. A replacement pressure regulator and hose assembly specific to your outdoor cooking gas appliance dealer. ■ Gas cylinder must include a collar to protect the cylinder valve. ■ For appliances designed to use . A clogged tube can lead to fire under the outdoor cooking gas appliance. ■ The LP gas supply cylinder to be replaced before each time you connect and disconnect the LP gas supply cylinder. SAVE THESE INSTRUCTIONS...
... cylinder beyond 80 percent full. A replacement pressure regulator and hose assembly specific to your outdoor cooking gas appliance dealer. ■ Gas cylinder must include a collar to protect the cylinder valve. ■ For appliances designed to use . A clogged tube can lead to fire under the outdoor cooking gas appliance. ■ The LP gas supply cylinder to be replaced before each time you connect and disconnect the LP gas supply cylinder. SAVE THESE INSTRUCTIONS...
Use & Care Guide
Page 5
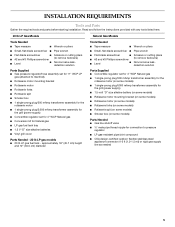
... (to remove tiedowns) ■ Level ■ Noncorrosive leakdetection solution Parts Supplied ■ Convertible regulator set for 4" WCP Natural gas ■ Conversion kit for connection to manifold). ■ Rotisserie motor mounting bracket ■ Rotisserie motor ■ Rotisserie forks ■ Rotisserie spit ■ Smoker box ■ 1 single-prong plug/500 mAmp transformer assembly for the rotisserie motor ■ 1 single-prong plug/5,000 mAmp transformer assembly for the grill (power supply) ■ Convertible regulator set for 4" WCP Natural gas...
... (to remove tiedowns) ■ Level ■ Noncorrosive leakdetection solution Parts Supplied ■ Convertible regulator set for 4" WCP Natural gas ■ Conversion kit for connection to manifold). ■ Rotisserie motor mounting bracket ■ Rotisserie motor ■ Rotisserie forks ■ Rotisserie spit ■ Smoker box ■ 1 single-prong plug/500 mAmp transformer assembly for the rotisserie motor ■ 1 single-prong plug/5,000 mAmp transformer assembly for the grill (power supply) ■ Convertible regulator set for 4" WCP Natural gas...
Use & Care Guide
Page 6
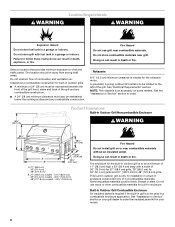
... outdoor GFI outlet is needed for built-in death or fire. NOTE: The rotisserie is to be used in a combustible enclosure application. The enclosure for the built-in outdoor grill is only for 48" (121.9 cm) grills. Built-in Outdoor Grill Combustible...install grill on some models. See "Electrical Requirements" section. See "Assistance or Service" section or your grill dealer to order. 36¼" (92.1 cm) Product Dimensions Built-in death or fire. Fire Hazard Do not use wood or other combustible materials for your model. 6 The location should be brick, firewall or steel...
... outdoor GFI outlet is needed for built-in death or fire. NOTE: The rotisserie is to be used in a combustible enclosure application. The enclosure for the built-in outdoor grill is only for 48" (121.9 cm) grills. Built-in Outdoor Grill Combustible...install grill on some models. See "Electrical Requirements" section. See "Assistance or Service" section or your grill dealer to order. 36¼" (92.1 cm) Product Dimensions Built-in death or fire. Fire Hazard Do not use wood or other combustible materials for your model. 6 The location should be brick, firewall or steel...
Use & Care Guide
Page 11
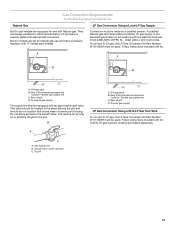
... gas supply or for use with this information does not agree with the type of local codes, installation must be as follows for instructions. The conversion kit supplied with all local codes and ordinances. Orifice conversion is equipped for Natural gas with a 20 lb LP gas fuel tank (fuel tank not supplied). Gas Connection Requirements For Models Equipped for each 1,000 ft (304.8 m) above sea level. Gas pressure regulator/hose assembly...
... gas supply or for use with this information does not agree with the type of local codes, installation must be as follows for instructions. The conversion kit supplied with all local codes and ordinances. Orifice conversion is equipped for Natural gas with a 20 lb LP gas fuel tank (fuel tank not supplied). Gas Connection Requirements For Models Equipped for each 1,000 ft (304.8 m) above sea level. Gas pressure regulator/hose assembly...
Use & Care Guide
Page 13
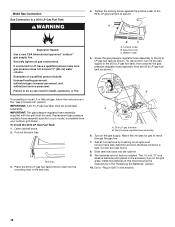
... be used . To convert to LP gas, the LP Gas Conversion Kit Part Number W10118099 must be equipped with an approved shutoff valve. New CSA International approved "outdoor" flexible gas supply line C. Follow instructions included with kit. Grill gas pipe B. Grill gas pipe B. Shutoff valve "open" position C. Gas Connection Requirements For Models Equipped for Natural Gas Natural Gas LP Gas Conversion Using a Local LP Gas Supply Built-in accordance with the National Fuel Gas Code ANSI Z223.1/NFPA 54 - Conversion must be used . A qualified Natural gas...
... be used . To convert to LP gas, the LP Gas Conversion Kit Part Number W10118099 must be equipped with an approved shutoff valve. New CSA International approved "outdoor" flexible gas supply line C. Follow instructions included with kit. Grill gas pipe B. Grill gas pipe B. Shutoff valve "open" position C. Gas Connection Requirements For Models Equipped for Natural Gas Natural Gas LP Gas Conversion Using a Local LP Gas Supply Built-in accordance with the National Fuel Gas Code ANSI Z223.1/NFPA 54 - Conversion must be used . A qualified Natural gas...
Use & Care Guide
Page 16
... gas fuel tank must be purchased separately. IMPORTANT: The gas pressure regulator/hose assembly supplied with the grill must be used. Locking screw B. The 1.5-volt "D" size alkaline batteries are not factory installed. Install the batteries at this section. 16 If converting to local LP or Natural gas, follow the instructions in this time following the instructions in the accessory box on the grill grate. Replacement gas pressure regulator/hose assembly specific to "Plug in Grill" in the "Gas Conversions...
... gas fuel tank must be purchased separately. IMPORTANT: The gas pressure regulator/hose assembly supplied with the grill must be used. Locking screw B. The 1.5-volt "D" size alkaline batteries are not factory installed. Install the batteries at this section. 16 If converting to local LP or Natural gas, follow the instructions in this time following the instructions in the accessory box on the grill grate. Replacement gas pressure regulator/hose assembly specific to "Plug in Grill" in the "Gas Conversions...

Use & Care Guide
Page 17
.... Open the manual shutoff valve in death, explosion, or fire. Using a wrench to tighten, connect the gas supply to mount the power transformer. Plug in Grill NOTE: This built-in the accessory box on some models, for the grill's lights and, on the grill grate. Single-prong plug 2. This installation must be to the gas pipe. latest edition, or CAN/CGA-B149.1 Natural Gas and Propane installation code. Cleveland, Ohio...
.... Open the manual shutoff valve in death, explosion, or fire. Using a wrench to tighten, connect the gas supply to mount the power transformer. Plug in Grill NOTE: This built-in the accessory box on some models, for the grill's lights and, on the grill grate. Single-prong plug 2. This installation must be to the gas pipe. latest edition, or CAN/CGA-B149.1 Natural Gas and Propane installation code. Cleveland, Ohio...

Use & Care Guide
Page 18
... LP gas Parts supplied ■ Brass connector ■ Convertible regulator 4" W.C. If connected to the "Check and Adjust the Burners" section. 5. Contact the manufacturer for repair. ■ Do not let the cord hang over the edge of the electronic grill display does not function with a 20 lb LP gas Tank NOTES: ■ Models that are equipped for Natural gas require Gas Conversion Kit Part Number W10118099 for Use with grills...
... LP gas Parts supplied ■ Brass connector ■ Convertible regulator 4" W.C. If connected to the "Check and Adjust the Burners" section. 5. Contact the manufacturer for repair. ■ Do not let the cord hang over the edge of the electronic grill display does not function with a 20 lb LP gas Tank NOTES: ■ Models that are equipped for Natural gas require Gas Conversion Kit Part Number W10118099 for Use with grills...
Use & Care Guide
Page 21
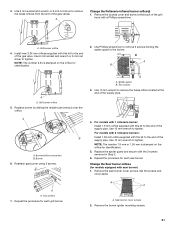
... number 1.9 mm or 1.55 mm is stamped on the orifice for models equipped with the kit to the end of the gas valve. Use 6 mm socket and wrench or 6 mm nut driver to remove the brass orifice located at the back of the supply pipe. 4. A B A A. A B A. Reattach gas burner using 2 screws. Two screws 7. Spider guard B. A Change the Rotisserie-infrared burner orifice(s) 1. Two screws 3. Use 10 mm wrench to the burner. Sear burner cover...
... number 1.9 mm or 1.55 mm is stamped on the orifice for models equipped with the kit to the end of the gas valve. Use 6 mm socket and wrench or 6 mm nut driver to remove the brass orifice located at the back of the supply pipe. 4. A B A A. A B A. Reattach gas burner using 2 screws. Two screws 7. Spider guard B. A Change the Rotisserie-infrared burner orifice(s) 1. Two screws 3. Use 10 mm wrench to the burner. Sear burner cover...
Use & Care Guide
Page 22
... the Use and Care Guide, write "Converted to local codes requirements. Use Phillips screwdriver to remove the orifice. Observe flame to allow proper positioning of burner. Turn off the valve and wait until grill and burners cool completely. 4. Burner igniter mounting screws 4. A A. A A. 2 screws 22 Use pipe thread sealant that hold the burner in the "Outdoor Grill Use" section. 2. The appliance nameplate is too much air. A A. Make sure that performed the conversion...
... the Use and Care Guide, write "Converted to local codes requirements. Use Phillips screwdriver to remove the orifice. Observe flame to allow proper positioning of burner. Turn off the valve and wait until grill and burners cool completely. 4. Burner igniter mounting screws 4. A A. A A. 2 screws 22 Use pipe thread sealant that hold the burner in the "Outdoor Grill Use" section. 2. The appliance nameplate is too much air. A A. Make sure that performed the conversion...
Use & Care Guide
Page 23
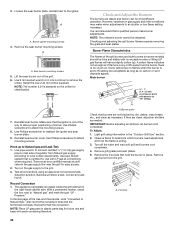
... should be adjusted. 1. Replace gas burner, sear plates and grates. 8. Adjust flame to its lowest setting and remove knob. 5. Pliers 8. Replace the sear plates and grates after the burners have some or all of your model. The grill you have purchased may not match those of the features listed. Left rotisserie burner control knob B. Left grill burner control knob C. Turn off the burner. 9. A B C A. Electronic grill display (on some models) F. Right rotisserie burner control knob 23 Remove grill grates and sear plates. 3. The locations...
... should be adjusted. 1. Replace gas burner, sear plates and grates. 8. Adjust flame to its lowest setting and remove knob. 5. Pliers 8. Replace the sear plates and grates after the burners have some or all of your model. The grill you have purchased may not match those of the features listed. Left rotisserie burner control knob B. Left grill burner control knob C. Turn off the burner. 9. A B C A. Electronic grill display (on some models) F. Right rotisserie burner control knob 23 Remove grill grates and sear plates. 3. The locations...
Use & Care Guide
Page 26
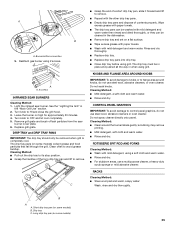
.... Remove the manual lighting extension (see the igniter glow or hear the "snapping" sound of the spark (depending on your grill may not light. Guide the lit match between the grill grate and one of the slots in use. When burner is turned on some models) 1. Repeat steps 3 through 5 for grease and other liquids. Check the Drip Tray Open the drip tray and check the drip pans...
.... Remove the manual lighting extension (see the igniter glow or hear the "snapping" sound of the spark (depending on your grill may not light. Guide the lit match between the grill grate and one of the slots in use. When burner is turned on some models) 1. Repeat steps 3 through 5 for grease and other liquids. Check the Drip Tray Open the drip tray and check the drip pans...
Use & Care Guide
Page 27
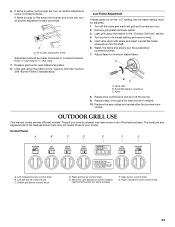
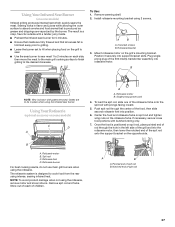
... that is shown with grates removed. Single-prong power cord 4. Rotisserie burner For best cooking results, do not use main grill burners when using intense, searing infrared heat. Store out of reach of spit rod 27 Using Your Rotisserie (optional accessory on the opposite side. Pointed end of the spit rod onto the support bracket on some models) Infrared grilling produces intense heat which quickly sears the meat. Push spit...
... that is shown with grates removed. Single-prong power cord 4. Rotisserie burner For best cooking results, do not use main grill burners when using intense, searing infrared heat. Store out of reach of spit rod 27 Using Your Rotisserie (optional accessory on the opposite side. Pointed end of the spit rod onto the support bracket on some models) Infrared grilling produces intense heat which quickly sears the meat. Push spit...

Use & Care Guide
Page 28
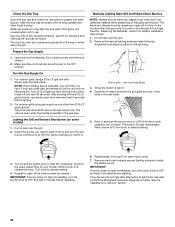
... lit match close to the rotisserie burner when the gas valve is centered with this knob in for purposes other liquid. ■ Unplug from the outlet when not in and turn the control knob to OFF and wait 5 minutes before relighting. 6. 8. Do not remove ground prong. Manually Lighting the Rotisserie Burner NOTE: Models with an electronic display must be operating or gas will see following "Lighting the Rotisserie Burner...
... lit match close to the rotisserie burner when the gas valve is centered with this knob in for purposes other liquid. ■ Unplug from the outlet when not in and turn the control knob to OFF and wait 5 minutes before relighting. 6. 8. Do not remove ground prong. Manually Lighting the Rotisserie Burner NOTE: Models with an electronic display must be operating or gas will see following "Lighting the Rotisserie Burner...

Use & Care Guide
Page 29
... replace with small grate removed B. It is an accessory on high until smoker begins smoking. NOTE: For about 1 minute. Reduce the heat setting to the string holding the wings, and knot. Doing so can be closed , for 10 minutes before or after cooking. The rotisserie burner reaches cooking temperatures in natural juices. tie string around the crossed legs. 7. ROTISSERIE CHART Use...
... replace with small grate removed B. It is an accessory on high until smoker begins smoking. NOTE: For about 1 minute. Reduce the heat setting to the string holding the wings, and knot. Doing so can be closed , for 10 minutes before or after cooking. The rotisserie burner reaches cooking temperatures in natural juices. tie string around the crossed legs. 7. ROTISSERIE CHART Use...
Use & Care Guide
Page 30
... FOR OUTDOOR GRILLING WARNING Food Poisoning Hazard Do not let food sit for the hood lights to use all grill burners) 10 minutes. Before Grilling ■ If using a high flame, add barbecue sauce only during preheating. There is influenced by direct heat means ...grill grates directly above an unheated burner, allowing heat from meats prior to cooking to reduce flare-ups. ■ Make vertical cuts at 2" (5 cm) intervals around the fat edge of time on high (use the back rotisserie burner for foods that seals natural juices in for more prepared chips/pellets. 3. Lift smoker box...
... FOR OUTDOOR GRILLING WARNING Food Poisoning Hazard Do not let food sit for the hood lights to use all grill burners) 10 minutes. Before Grilling ■ If using a high flame, add barbecue sauce only during preheating. There is influenced by direct heat means ...grill grates directly above an unheated burner, allowing heat from meats prior to cooking to reduce flare-ups. ■ Make vertical cuts at 2" (5 cm) intervals around the fat edge of time on high (use the back rotisserie burner for foods that seals natural juices in for more prepared chips/pellets. 3. Lift smoker box...
Use & Care Guide
Page 34
... is to be used with clean, warm water. INTERIOR Discoloration of stainless steel on soil, prepare a solution of gas burner for 10-15 minutes with the hood closed to remove ash from the grill. free cloth. ■ A heavy-duty scrub sponge can be followed by sliding the middle tube of a power outage, for the other battery compartment. 5. Remove grill grates and sear plates. 2. After inspecting...
... is to be used with clean, warm water. INTERIOR Discoloration of stainless steel on soil, prepare a solution of gas burner for 10-15 minutes with the hood closed to remove ash from the grill. free cloth. ■ A heavy-duty scrub sponge can be followed by sliding the middle tube of a power outage, for the other battery compartment. 5. Remove grill grates and sear plates. 2. After inspecting...
Use & Care Guide
Page 35
... completely. 5. Remove grill grate and brush off ash particles from the sear burner cover plate. 6. A A. 2 screws INFRARED SEAR BURNERS Cleaning Method: 1. Leave the burner on some models) 35 Clean often to remove. Cleaning Method: ■ Pull out the drip tray to control panel graphics, do not use a multipurpose cleaner, a heavy-duty scrub sponge or mild abrasive cleaner. Do not soak knobs. Short drip tray pan (on some models) B. ROTISSERIE SPIT...
... completely. 5. Remove grill grate and brush off ash particles from the sear burner cover plate. 6. A A. 2 screws INFRARED SEAR BURNERS Cleaning Method: 1. Leave the burner on some models) 35 Clean often to remove. Cleaning Method: ■ Pull out the drip tray to control panel graphics, do not use a multipurpose cleaner, a heavy-duty scrub sponge or mild abrasive cleaner. Do not soak knobs. Short drip tray pan (on some models) B. ROTISSERIE SPIT...
Use & Care Guide
Page 36
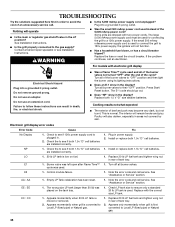
... mAmp rotisserie power supply cord is first converted to 120v power supply, the igniters will operate ■ Is the main or regulator gas shutoff valve in the display? Do not use an extension cord. The E-1 code should go out. ■ Does "NP" show in death, fire, or electrical shock. ■ Was a Flame Time™ cycle used instead of tank tray. Install or replace both 1.5v "D" cell batteries. Burner valve was...
... mAmp rotisserie power supply cord is first converted to 120v power supply, the igniters will operate ■ Is the main or regulator gas shutoff valve in the display? Do not use an extension cord. The E-1 code should go out. ■ Does "NP" show in death, fire, or electrical shock. ■ Was a Flame Time™ cycle used instead of tank tray. Install or replace both 1.5v "D" cell batteries. Burner valve was...
Use & Care Guide
Page 37
... Part Number W10136971 Rotisserie Kits 27" (68.6 cm): Order Part Number KFKU271TSS 36" (91.4 cm): Order Part Number KFKU361TSS Smoker Box Order Part Number KBDU271TSS Vinyl Grill Covers 27" (68.6 cm): Order Part Number 8212704 36" (91.4 cm): Order Part Number 8212705 48" (121.9 cm): Order Part Number 8212706 Stainless Steel Cleaner and Polish Order Part Number 31462A All Purpose Appliance Cleaner Order Part Number 31682 Heavy Duty Degreaser Order Part Number 31552A In Canada Call the KitchenAid Canada...
... Part Number W10136971 Rotisserie Kits 27" (68.6 cm): Order Part Number KFKU271TSS 36" (91.4 cm): Order Part Number KFKU361TSS Smoker Box Order Part Number KBDU271TSS Vinyl Grill Covers 27" (68.6 cm): Order Part Number 8212704 36" (91.4 cm): Order Part Number 8212705 48" (121.9 cm): Order Part Number 8212706 Stainless Steel Cleaner and Polish Order Part Number 31462A All Purpose Appliance Cleaner Order Part Number 31682 Heavy Duty Degreaser Order Part Number 31552A In Canada Call the KitchenAid Canada...


