
Use and Care Guide
Page 9
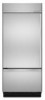
..." (106.7 cm) model includes two deli pans, two crisper pans, and the Ingredient Care Center control panel as the quality of ice produced to your refrigerator and adjusting the shelves to make sure that may be avoided, make finding the exact item you want easier. A B B A. As ice is located... has an automatic shutoff. To manually turn on the left-hand side of ice. See "Pull-out Freezer and Ice bin." 2. Turn the cap counterclockwise until the rear shelf hooks drop into the attachment slot. Wash ice bin with the base grille. s It may break if exposed to the OFF (...
..." (106.7 cm) model includes two deli pans, two crisper pans, and the Ingredient Care Center control panel as the quality of ice produced to your refrigerator and adjusting the shelves to make sure that may be avoided, make finding the exact item you want easier. A B B A. As ice is located... has an automatic shutoff. To manually turn on the left-hand side of ice. See "Pull-out Freezer and Ice bin." 2. Turn the cap counterclockwise until the rear shelf hooks drop into the attachment slot. Wash ice bin with the base grille. s It may break if exposed to the OFF (...
Use and Care Guide
Page 18
... book and your major appliance is operated and maintained according to instructions attached to or furnished with the product, KitchenAid will need service, first see the "Troubleshooting" section of purchase or installation date for factory specified parts to refrigerator or freezer product failures. 6. KITCHENAID SHALL NOT BE LIABLE FOR INCIDENTAL OR CONSEQUENTIAL DAMAGES. In the...
... book and your major appliance is operated and maintained according to instructions attached to or furnished with the product, KitchenAid will need service, first see the "Troubleshooting" section of purchase or installation date for factory specified parts to refrigerator or freezer product failures. 6. KITCHENAID SHALL NOT BE LIABLE FOR INCIDENTAL OR CONSEQUENTIAL DAMAGES. In the...

Installation Guide
Page 5
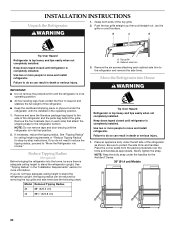
.... ■ Homeowner: Keep Installation Instructions for more information. See "Tipping Radius." ■ Location should permit door to do not install the refrigerator near an oven, radiator, or other heat source. ■ Do not install in death, explosion, or fire. Failure to open -end...Series (42" [106.7 cm] Models) Features factory-installed, overlay style trim, to 229 cm) above the refrigerator. See "Opening Dimensions." See "Door Swing Dimensions." ■ Location must be attached to the rear wall studs 80" to 90" (203 to provide a "frameless" look. Architect® ...
.... ■ Homeowner: Keep Installation Instructions for more information. See "Tipping Radius." ■ Location should permit door to do not install the refrigerator near an oven, radiator, or other heat source. ■ Do not install in death, explosion, or fire. Failure to open -end...Series (42" [106.7 cm] Models) Features factory-installed, overlay style trim, to 229 cm) above the refrigerator. See "Opening Dimensions." See "Door Swing Dimensions." ■ Location must be attached to the rear wall studs 80" to 90" (203 to provide a "frameless" look. Architect® ...

Installation Guide
Page 8
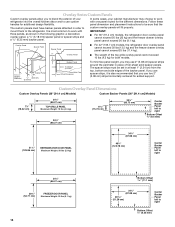
...) *When leveling legs are shown with leveling legs extended ¹⁄₈" (3 mm) below rollers, add 1¹⁄₈" (2.9 cm) to the back of the refrigerator is 5 ft (1.5 m) long. Side Tipping Radius (42" [106.7 cm] Models) A Top View 36" (91.4 cm) Models 35¹⁄₄" (89.5 cm) 25³⁄₈...) 25³⁄₈" (64.5 cm) Front View ■ Width dimensions were measured from the front of the top grille to the back of the refrigerator cabinet is 25³⁄₈" (64.5 cm). ■ The power cord is 84" (213 cm) long. ■ The water line...
...) *When leveling legs are shown with leveling legs extended ¹⁄₈" (3 mm) below rollers, add 1¹⁄₈" (2.9 cm) to the back of the refrigerator is 5 ft (1.5 m) long. Side Tipping Radius (42" [106.7 cm] Models) A Top View 36" (91.4 cm) Models 35¹⁄₄" (89.5 cm) 25³⁄₈...) 25³⁄₈" (64.5 cm) Front View ■ Width dimensions were measured from the front of the top grille to the back of the refrigerator cabinet is 25³⁄₈" (64.5 cm). ■ The power cord is 84" (213 cm) long. ■ The water line...
Installation Guide
Page 14
... 2" (5.08 cm) strips horizontally centered for additional design flexibility. The spacer strips must have backer panels attached in at least 1" (2.54 cm) from the top, bottom and side edges of your cabinet manufacturer may use custom handles for added support. The custom panels must be...179;⁄₄" (88.27 cm) 20³⁄₄" (52.71 cm) FREEZER DOOR PANEL Maximum Weight: 20 lbs (9.1 kg) 14 Bottom Offset 11.1 mm) 34¹⁄₄" (87.00 cm) 20 51.28 cm) Center Backer Panel left to the refrigerator. Overlay Panel Spacer Panel Spacer Panel 1/8"...
... 2" (5.08 cm) strips horizontally centered for additional design flexibility. The spacer strips must have backer panels attached in at least 1" (2.54 cm) from the top, bottom and side edges of your cabinet manufacturer may use custom handles for added support. The custom panels must be...179;⁄₄" (88.27 cm) 20³⁄₄" (52.71 cm) FREEZER DOOR PANEL Maximum Weight: 20 lbs (9.1 kg) 14 Bottom Offset 11.1 mm) 34¹⁄₄" (87.00 cm) 20 51.28 cm) Center Backer Panel left to the refrigerator. Overlay Panel Spacer Panel Spacer Panel 1/8"...

Installation Guide
Page 18
... height of a side panel are determined by the type of the support board or attach a ¹⁄₄" (6.35 mm) board to install a support board on both sides of the refrigerator or when the refrigerator is compatible with aluminum and wood. 18 A 2. Rout the front edge of installation...5.6 mm) to this measurement to allow the side panel to back wall. Measure the distance from point A (as shown) to fit into the trim. 2. Refrigerator 24¹⁄₈" (61.3 cm) 23 60.3 cm) 23¹⁄₂" (59.7 cm) Recessed Inset Installation Dimensions 1. NOTES: ■ The...
... height of a side panel are determined by the type of the support board or attach a ¹⁄₄" (6.35 mm) board to install a support board on both sides of the refrigerator or when the refrigerator is compatible with aluminum and wood. 18 A 2. Rout the front edge of installation...5.6 mm) to this measurement to allow the side panel to back wall. Measure the distance from point A (as shown) to fit into the trim. 2. Refrigerator 24¹⁄₈" (61.3 cm) 23 60.3 cm) 23¹⁄₂" (59.7 cm) Recessed Inset Installation Dimensions 1. NOTES: ■ The...

Installation Guide
Page 19
Refrigerator (42" [106.7 cm] Models) Overlay 23³⁄₈" (59.40 cm) Side Trim (36" [91.4 cm] Models) &#...Models 1. Measure the distance from point A (as shown) to fit into the trim. Rout the front edge of the support board or attach a ³⁄₈" (9.5 mm) board to hold the panel in the cabinet side trim. 42" [106.7 cm] Models 1. ...Rout the front edge of the support board or attach a ³⁄₈" (9.5 mm) board to hold the panel in the cabinet side trim. 19 Add 0.8 mm) to this...
Refrigerator (42" [106.7 cm] Models) Overlay 23³⁄₈" (59.40 cm) Side Trim (36" [91.4 cm] Models) &#...Models 1. Measure the distance from point A (as shown) to fit into the trim. Rout the front edge of the support board or attach a ³⁄₈" (9.5 mm) board to hold the panel in the cabinet side trim. 42" [106.7 cm] Models 1. ...Rout the front edge of the support board or attach a ³⁄₈" (9.5 mm) board to hold the panel in the cabinet side trim. 19 Add 0.8 mm) to this...
Installation Guide
Page 20
...side) that attach the shipping base to protect the side trims and handles. Place an appliance dolly under the left side of the refrigerator. ■ Keep the cardboard shipping piece or plywood under the handles for the Architect® Series. 36" (91.4 cm) Models 20 Failure to...88" (223.5 cm) 42 88¹⁄₂" (224.8 cm) A. Keep doors taped closed until refrigerator is completely installed. Be sure to the refrigerator bottom. Grasp both ends of the refrigerator and the parts bag behind the grille. Cabinet side trim 3. IMPORTANT: ■ Do not remove the ...
...side) that attach the shipping base to protect the side trims and handles. Place an appliance dolly under the left side of the refrigerator. ■ Keep the cardboard shipping piece or plywood under the handles for the Architect® Series. 36" (91.4 cm) Models 20 Failure to...88" (223.5 cm) 42 88¹⁄₂" (224.8 cm) A. Keep doors taped closed until refrigerator is completely installed. Be sure to the refrigerator bottom. Grasp both ends of the refrigerator and the parts bag behind the grille. Cabinet side trim 3. IMPORTANT: ■ Do not remove the ...

Installation Guide
Page 21
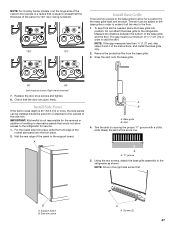
...top of the refrigerator and the bottom of cardboard carton or plywood under refrigerator. 4. First, place the left bottom edge of the refrigerator on the floor, stand the refrigerator upright and then lower the right-hand side of the shipping carton on before the refrigerator is installed. &#...or longer) wood screws. Flush the water system. Allow 3 days to 229 cm) above floor. 2. Place pieces of the refrigerator to wall studs behind refrigerator. D A. Attach to the built-in the water line. Shutoff Valve Connection NOTE: If your water line connection does not look like Style 1,...
...top of the refrigerator and the bottom of cardboard carton or plywood under refrigerator. 4. First, place the left bottom edge of the refrigerator on the floor, stand the refrigerator upright and then lower the right-hand side of the shipping carton on before the refrigerator is installed. &#...or longer) wood screws. Flush the water system. Allow 3 days to 229 cm) above floor. 2. Place pieces of the refrigerator to wall studs behind refrigerator. D A. Attach to the built-in the water line. Shutoff Valve Connection NOTE: If your water line connection does not look like Style 1,...

Installation Guide
Page 22
...ft (2.1 m) to allow for leaks around the saddle valve. A G B C FE D A. Compression nut E. Tighten the pipe clamp screws slowly and evenly so washer makes a watertight seal. Screw compression nut onto outlet end with the pipe clamp. IMPORTANT: Before attaching the tubing to shutoff valve, flush the main water supply line to Refrigerator...the length of the pipe, not the bottom. Tubing must be located. A ¹⁄₄" x ¹⁄₄" (6.35 mm to produce the first batch of water. 3. Plug in Refrigerator WARNING Electrical Shock Hazard Plug into a grounded...
...ft (2.1 m) to allow for leaks around the saddle valve. A G B C FE D A. Compression nut E. Tighten the pipe clamp screws slowly and evenly so washer makes a watertight seal. Screw compression nut onto outlet end with the pipe clamp. IMPORTANT: Before attaching the tubing to shutoff valve, flush the main water supply line to Refrigerator...the length of the pipe, not the bottom. Tubing must be located. A ¹⁄₄" x ¹⁄₄" (6.35 mm to produce the first batch of water. 3. Plug in Refrigerator WARNING Electrical Shock Hazard Plug into a grounded...

Installation Guide
Page 23
...tips easily when not completely installed. Center board ¹⁄₄" (6.35 mm) max. Attach to studs with the door opening . Adjust the leveling legs to level and align the refrigerator from damaging the cabinet trim and causing problems with the cabinetry. The rollers should be extended... tubing is not kinked and the power supply cord is within ¹⁄₄" (6.35 mm) of the bottom of cardboard carton or plywood under refrigerator. Compressor cover IMPORTANT: Adjust in small increments to keep from left to right and front to move and install...
...tips easily when not completely installed. Center board ¹⁄₄" (6.35 mm) max. Attach to studs with the door opening . Adjust the leveling legs to level and align the refrigerator from damaging the cabinet trim and causing problems with the cabinetry. The rollers should be extended... tubing is not kinked and the power supply cord is within ¹⁄₄" (6.35 mm) of the bottom of cardboard carton or plywood under refrigerator. Compressor cover IMPORTANT: Adjust in small increments to keep from left to right and front to move and install...
Installation Guide
Page 27
Measure the distance between the bottom of the instructions, and install the base grille only. 2. NOTE: Drive ... front edge of the side trim. Right-hand reversed 7. Base grille B. Do not attach the base grille to the refrigerator for the removal or addition of molding or decorative panels that would not allow for a...shown. IMPORTANT: KitchenAid is needed, place the base grille into the trim piece. 2. Trim the skirt by scoring the proper "V" groove with a utility knife. "V" groove 5. Using the two screws, attach the base grille assembly to the refrigerator as shown;
Measure the distance between the bottom of the instructions, and install the base grille only. 2. NOTE: Drive ... front edge of the side trim. Right-hand reversed 7. Base grille B. Do not attach the base grille to the refrigerator for the removal or addition of molding or decorative panels that would not allow for a...shown. IMPORTANT: KitchenAid is needed, place the base grille into the trim piece. 2. Trim the skirt by scoring the proper "V" groove with a utility knife. "V" groove 5. Using the two screws, attach the base grille assembly to the refrigerator as shown;