Use and Care Guide
Page 3
Always read and obey all parts and panels before servicing. s Use nonflammable cleaner. s Disconnect power before operating. s Do not use an adapter. s Use a sturdy glass when dispensing ice (on ice maker kit ready... mean: DANGER You can result in this manual and on your old refrigerator. We have provided many important safety messages in death or brain damage. REFRIGERATOR SAFETY Your safety and the safety of others . Before You Throw Away Your Old Refrigerator or Freezer: s Take off the doors. IMPORTANT SAFETY INSTRUCTIONS WARNING: To reduce the...
Always read and obey all parts and panels before servicing. s Use nonflammable cleaner. s Disconnect power before operating. s Do not use an adapter. s Use a sturdy glass when dispensing ice (on ice maker kit ready... mean: DANGER You can result in this manual and on your old refrigerator. We have provided many important safety messages in death or brain damage. REFRIGERATOR SAFETY Your safety and the safety of others . Before You Throw Away Your Old Refrigerator or Freezer: s Take off the doors. IMPORTANT SAFETY INSTRUCTIONS WARNING: To reduce the...
Use and Care Guide
Page 6
... correctly for the refrigerator. CONDITION/REASON: TEMPERATURE ADJUSTMENT: REFRIGERATOR too cold REFRIGERATOR Control 1° Not set correctly for conditions higher REFRIGERATOR too warm High use or room very warm REFRIGERATOR Control 1° lower FREEZER too cold FREEZER Control 1° higher Not set points to -15°C). s The ON/OFF touch pad on the control panel shuts down and...
... correctly for the refrigerator. CONDITION/REASON: TEMPERATURE ADJUSTMENT: REFRIGERATOR too cold REFRIGERATOR Control 1° Not set correctly for conditions higher REFRIGERATOR too warm High use or room very warm REFRIGERATOR Control 1° lower FREEZER too cold FREEZER Control 1° higher Not set points to -15°C). s The ON/OFF touch pad on the control panel shuts down and...

Use and Care Guide
Page 8
... the covers are removed. 5. See "Changing the Water Filter" later in the base grille below the freezer compartment door. Align the ridge on the cap with the arrow on the cap. Turn the cap clockwise... snaps into the opening in this could cause the cap to check that you know when to your refrigerator. Keep the cap to remove the filter. 1. IMPORTANT: Do not discard the cap. Ridge on ...new filter. Water Filter Indicator The water filter indicator, located on the control panel, will help you replace the filter when "Change Filter" is displayed or when water flow to change ...
... the covers are removed. 5. See "Changing the Water Filter" later in the base grille below the freezer compartment door. Align the ridge on the cap with the arrow on the cap. Turn the cap clockwise... snaps into the opening in this could cause the cap to check that you know when to your refrigerator. Keep the cap to remove the filter. 1. IMPORTANT: Do not discard the cap. Ridge on ...new filter. Water Filter Indicator The water filter indicator, located on the control panel, will help you replace the filter when "Change Filter" is displayed or when water flow to change ...

Use and Care Guide
Page 9
... Refrigerator Shelves Important information to the ice container and the dispenser mechanism. 3. Deli/Crisper Pans The 42" (106.7 cm) model includes two deli pans, two crisper pans, and the Ingredient Care Center control panel as salt) can cause damage to know about glass shelves and covers: Do not ...poor quality ice. NOTE: Do not use harsh or abrasive cleaners or solvents. NOTE: Your ice maker has an automatic shutoff. See "Pull-out Freezer and Ice bin." 2. REMEMBER: s Allow 24 hours to produce the first batch of ice produced to avoid impact from dropping. s Discard the ...
... Refrigerator Shelves Important information to the ice container and the dispenser mechanism. 3. Deli/Crisper Pans The 42" (106.7 cm) model includes two deli pans, two crisper pans, and the Ingredient Care Center control panel as salt) can cause damage to know about glass shelves and covers: Do not ...poor quality ice. NOTE: Do not use harsh or abrasive cleaners or solvents. NOTE: Your ice maker has an automatic shutoff. See "Pull-out Freezer and Ice bin." 2. REMEMBER: s Allow 24 hours to produce the first batch of ice produced to avoid impact from dropping. s Discard the ...
Use and Care Guide
Page 10
... or wrap used to make sure it stops. 10 Freezer pan 2. Frozen Food Storage Guide Storage times will vary according to the stop. Deli Pan Settings (42" [106.7 cm] Models) The Ingredient Care Center control panel located above the desired support and pushing it straight out...rest of one hand while supporting the bottom with tight lids. FREEZER FEATURES Freezer Pan and Pull-out Ice Bin The freezer pan can be taken on the slides. Leave enough space in the pan when this selection lowers the temperature of the refrigerator. Select the appropriate setting for the...
... or wrap used to make sure it stops. 10 Freezer pan 2. Frozen Food Storage Guide Storage times will vary according to the stop. Deli Pan Settings (42" [106.7 cm] Models) The Ingredient Care Center control panel located above the desired support and pushing it straight out...rest of one hand while supporting the bottom with tight lids. FREEZER FEATURES Freezer Pan and Pull-out Ice Bin The freezer pan can be taken on the slides. Leave enough space in the pan when this selection lowers the temperature of the refrigerator. Select the appropriate setting for the...
Installation Guide
Page 4
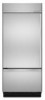
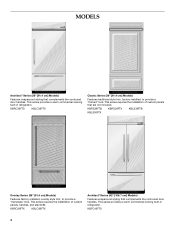
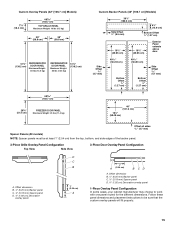
... requires the installation of custom panels that complements the contoured door handles. KBRO36FTX KBLO36FTX Architect® Series (42" [106.7 cm] Models) Features wraparound styling that are not included. This series provides a warm commercial-looking built-in refrigerator. This series provides a warm commercial-looking built-in refrigerator. KBRS36FTB KBRS36FTX KBLS36FTB KBLS36FTX Overlay Series (36" [91...
... requires the installation of custom panels that complements the contoured door handles. KBRO36FTX KBLO36FTX Architect® Series (42" [106.7 cm] Models) Features wraparound styling that are not included. This series provides a warm commercial-looking built-in refrigerator. This series provides a warm commercial-looking built-in refrigerator. KBRS36FTB KBRS36FTX KBLS36FTB KBLS36FTX Overlay Series (36" [91...

Installation Guide
Page 5
... ■ Do not install in an opening between cabinets or installed at the end of custom panels, handles, and standoffs. Failure to make the panels. Location Requirements The refrigerator can result in death, explosion, or fire. IMPORTANT: ■ Observe all governing codes and ... inspector's use , the solid soffit must permit top grille removal. Classic Series: Order factory panels, make custom panels, or consult a qualified cabinetmaker or carpenter to 229 cm) above the refrigerator. Overlay Series (42" [106.7 cm] Models) Features factory-installed, overlay style trim, ...
... ■ Do not install in an opening between cabinets or installed at the end of custom panels, handles, and standoffs. Failure to make the panels. Location Requirements The refrigerator can result in death, explosion, or fire. IMPORTANT: ■ Observe all governing codes and ... inspector's use , the solid soffit must permit top grille removal. Classic Series: Order factory panels, make custom panels, or consult a qualified cabinetmaker or carpenter to 229 cm) above the refrigerator. Overlay Series (42" [106.7 cm] Models) Features factory-installed, overlay style trim, ...
Installation Guide
Page 6
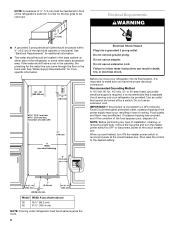
... provided. or 20-amp fused, grounded electrical supply is recommended that cannot be turned off by a switch. See "Electrical Requirements" for additional information. ■ The water shutoff should be placed within 4" (10.2 cm) of the right side cabinets or end panel. to make sure you ...an extension cord. Recommended Grounding Method A 115 Volt, 60 Hz., AC only, 15- IMPORTANT: If this product is important to bottom of the refrigerator or some other easily accessible area. If nuisance tripping has occurred, and if the condition of the food appears poor, dispose of ...
... provided. or 20-amp fused, grounded electrical supply is recommended that cannot be turned off by a switch. See "Electrical Requirements" for additional information. ■ The water shutoff should be placed within 4" (10.2 cm) of the right side cabinets or end panel. to make sure you ...an extension cord. Recommended Grounding Method A 115 Volt, 60 Hz., AC only, 15- IMPORTANT: If this product is important to bottom of the refrigerator or some other easily accessible area. If nuisance tripping has occurred, and if the condition of the food appears poor, dispose of ...
Installation Guide
Page 7
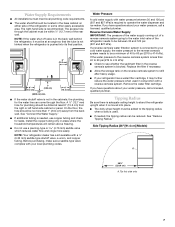
...reverse osmosis system is less than 1" (2.54 cm) away from the right or left hand side cabinet or panel. Tipping Radius Be sure there is adequate ceiling height to stand the refrigerator upright when it must be at least 6" (15.2 cm) from the back wall. NOTE: If the ... cabinets, the plumbing for leaks. See "Connect the Water Supply." ■ If additional tubing is used in conjunction with a reverse osmosis system. NOTE: Your refrigerator dealer has a kit available with a ¹⁄₄" (6.35 mm) saddle-type shutoff valve, a union, and copper tubing. Water Pressure A cold water...
...reverse osmosis system is less than 1" (2.54 cm) away from the right or left hand side cabinet or panel. Tipping Radius Be sure there is adequate ceiling height to stand the refrigerator upright when it must be at least 6" (15.2 cm) from the back wall. NOTE: If the ... cabinets, the plumbing for leaks. See "Connect the Water Supply." ■ If additional tubing is used in conjunction with a reverse osmosis system. NOTE: Your refrigerator dealer has a kit available with a ¹⁄₄" (6.35 mm) saddle-type shutoff valve, a union, and copper tubing. Water Pressure A cold water...

Installation Guide
Page 9
...clearance may be required if you are fully extended to 1¹⁄₄" (3.2 cm) below rollers, add 1¹⁄₈" (2.9 cm) to a minimum of the refrigerator and a corner wall. To adjust the door swing, see "Adjust Door Swing." 36" (91.4 cm) Models *83³⁄₈" (211.8 cm) 42&#...185;⁄₄" (107.3 cm) *When leveling legs are using overlay panels or custom handles. 42" (106.7 cm) Models Door Swing Dimensions The location must permit the door to open to the height dimensions. 90˚ 110...
...clearance may be required if you are fully extended to 1¹⁄₄" (3.2 cm) below rollers, add 1¹⁄₈" (2.9 cm) to a minimum of the refrigerator and a corner wall. To adjust the door swing, see "Adjust Door Swing." 36" (91.4 cm) Models *83³⁄₈" (211.8 cm) 42&#...185;⁄₄" (107.3 cm) *When leveling legs are using overlay panels or custom handles. 42" (106.7 cm) Models Door Swing Dimensions The location must permit the door to open to the height dimensions. 90˚ 110...

Installation Guide
Page 10
... swing open. Overlay Panel Backer Panel Door 1/2" (1.3 cm) 3/4" (1.9 cm) 1" (2.5 cm) NOTE: Allow ¹⁄₂" (1.3 cm) clearance between overlay panel and cabinetry. 11/4" (3.2 cm) 11/2" (3.8 cm) Spacer Panel When the doors are closed the refrigerator will extend beyond the... face of the adjacent cabinetry to some degree. 10 Overlay Series Door Panel & Cabinetry Clearance (36" [91.4 cm] Models)...
... swing open. Overlay Panel Backer Panel Door 1/2" (1.3 cm) 3/4" (1.9 cm) 1" (2.5 cm) NOTE: Allow ¹⁄₂" (1.3 cm) clearance between overlay panel and cabinetry. 11/4" (3.2 cm) 11/2" (3.8 cm) Spacer Panel When the doors are closed the refrigerator will extend beyond the... face of the adjacent cabinetry to some degree. 10 Overlay Series Door Panel & Cabinetry Clearance (36" [91.4 cm] Models)...

Installation Guide
Page 11
Do not overlook baseboards. 11 More clearance may be needed if thicker custom panels or custom handles are used. 90˚ Door Stop Position Hinge Door Swing 90˚ Actual Size Refrigerator to Cabinetry Clearance Refrigerator Side Trim 1" (2.5 cm) 3/4" (1.9 cm) 1/2" (1.3 cm) Cabinetry 1/4" (6.35 mm) 1/2" (1.3 cm) 3/4" (1.9 cm) 1" (2.5 cm) Overlay Panel Backer Panel Door 1/2" (1.3 cm) 3/4" (1.9 cm) 1" (2.5 cm) 11/4" (3.2 cm) 11/2" (3.8 cm) Spacer Panel Allow a minimum of 4¹⁄₂" (11.4 cm) of space between the side of the refrigerator and a corner wall.
Do not overlook baseboards. 11 More clearance may be needed if thicker custom panels or custom handles are used. 90˚ Door Stop Position Hinge Door Swing 90˚ Actual Size Refrigerator to Cabinetry Clearance Refrigerator Side Trim 1" (2.5 cm) 3/4" (1.9 cm) 1/2" (1.3 cm) Cabinetry 1/4" (6.35 mm) 1/2" (1.3 cm) 3/4" (1.9 cm) 1" (2.5 cm) Overlay Panel Backer Panel Door 1/2" (1.3 cm) 3/4" (1.9 cm) 1" (2.5 cm) 11/4" (3.2 cm) 11/2" (3.8 cm) Spacer Panel Allow a minimum of 4¹⁄₂" (11.4 cm) of space between the side of the refrigerator and a corner wall.

Installation Guide
Page 12
... be installed close to some degree. 12 Overlay Panel Backer Panel Door 1/2" (1.3 cm) 3/4" (1.9 cm) 1" (2.5 cm) NOTE: Allow ¹⁄₂" (1.3 cm) clearance between overlay panel and cabinetry. 11/4" (3.2 cm) 11/2" (3.8 cm) Spacer Panel When the doors are closed the refrigerator will extend beyond the face of the panel if a 130˚ door swing is equal to...
... be installed close to some degree. 12 Overlay Panel Backer Panel Door 1/2" (1.3 cm) 3/4" (1.9 cm) 1" (2.5 cm) NOTE: Allow ¹⁄₂" (1.3 cm) clearance between overlay panel and cabinetry. 11/4" (3.2 cm) 11/2" (3.8 cm) Spacer Panel When the doors are closed the refrigerator will extend beyond the face of the panel if a 130˚ door swing is equal to...

Installation Guide
Page 13
Do not overlook baseboards. 13 More clearance may be needed if thicker custom panels or custom handles are used. 90˚ Door Stop Position Hinge Door Swing 90˚ Actual Size Refrigerator to Cabinetry Clearance Refrigerator Side Trim 1" (2.5 cm) 3/4" (1.9 cm) 1/2" (1.3 cm) Cabinetry 1/4" (6.35 mm) 1/2" (1.3 cm) 3/4" (1.9 cm) 1" (2.5 cm) Overlay Panel Backer Panel Door 1/2" (1.3 cm) 3/4" (1.9 cm) 1" (2.5 cm) 11/4" (3.2 cm) 11/2" (3.8 cm) Spacer Panel Allow a minimum of 4¹⁄₂" (11.4 cm) of space between the side of the refrigerator and a corner wall.
Do not overlook baseboards. 13 More clearance may be needed if thicker custom panels or custom handles are used. 90˚ Door Stop Position Hinge Door Swing 90˚ Actual Size Refrigerator to Cabinetry Clearance Refrigerator Side Trim 1" (2.5 cm) 3/4" (1.9 cm) 1/2" (1.3 cm) Cabinetry 1/4" (6.35 mm) 1/2" (1.3 cm) 3/4" (1.9 cm) 1" (2.5 cm) Overlay Panel Backer Panel Door 1/2" (1.3 cm) 3/4" (1.9 cm) 1" (2.5 cm) 11/4" (3.2 cm) 11/2" (3.8 cm) Spacer Panel Allow a minimum of 4¹⁄₂" (11.4 cm) of space between the side of the refrigerator and a corner wall.
Installation Guide
Page 14
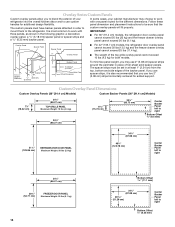
... to right 34³⁄₄" (88.27 cm) 20³⁄₄" (52.71 cm) FREEZER DOOR PANEL Maximum Weight: 20 lbs (9.1 kg) 14 Bottom Offset 11.1 mm) 34¹⁄₄" (87.00 cm) 20 51.28 cm) Center Backer Panel left to the refrigerator. The custom panels must be sure that you use two 2" (5.08 cm...
... to right 34³⁄₄" (88.27 cm) 20³⁄₄" (52.71 cm) FREEZER DOOR PANEL Maximum Weight: 20 lbs (9.1 kg) 14 Bottom Offset 11.1 mm) 34¹⁄₄" (87.00 cm) 20 51.28 cm) Center Backer Panel left to the refrigerator. The custom panels must be sure that you use two 2" (5.08 cm...
Installation Guide
Page 15
...) REFRIGERATOR DOOR PANEL Maximum Weight: 30 lbs (13.5 kg) REFRIGERATOR DOOR PANEL Maximum Weight: 30 lbs (13.5 kg) 51¹⁄₄" (130.2 cm) 40 (102.7 cm) 20¹⁄₄" (51.4 cm) FREEZER DOOR PANEL Maximum Weight: 25 lbs (11.4 kg) Custom Backer Panels (42" [106.7 cm] Models) 39 5/8" (100.6 cm) Side Offset 3/8" (9.5 mm) 61/4" (15.9 cm) Bottom...
...) REFRIGERATOR DOOR PANEL Maximum Weight: 30 lbs (13.5 kg) REFRIGERATOR DOOR PANEL Maximum Weight: 30 lbs (13.5 kg) 51¹⁄₄" (130.2 cm) 40 (102.7 cm) 20¹⁄₄" (51.4 cm) FREEZER DOOR PANEL Maximum Weight: 25 lbs (11.4 kg) Custom Backer Panels (42" [106.7 cm] Models) 39 5/8" (100.6 cm) Side Offset 3/8" (9.5 mm) 61/4" (15.9 cm) Bottom...
Installation Guide
Page 16
... door and top grille panels are available through your refrigerator. See dimension drawings for installing the door handles. If panels are less than recommended may cause damage to your KitchenAid dealer or by side with a single grille. The refrigerator panel should not weigh more ...) #4396718 49" (124.5 cm) 34¹⁄₄" (87 cm) 20¹⁄₈" (51.1 cm) 16 Color 72" (183 cm) Stainless Steel (Architect® Series) #W10153554 Refrigerator and Freezer Panels The freezer panel should not weigh more than 10 lbs (4.5 kg). 34¹⁄₂" (...
... door and top grille panels are available through your refrigerator. See dimension drawings for installing the door handles. If panels are less than recommended may cause damage to your KitchenAid dealer or by side with a single grille. The refrigerator panel should not weigh more ...) #4396718 49" (124.5 cm) 34¹⁄₄" (87 cm) 20¹⁄₈" (51.1 cm) 16 Color 72" (183 cm) Stainless Steel (Architect® Series) #W10153554 Refrigerator and Freezer Panels The freezer panel should not weigh more than 10 lbs (4.5 kg). 34¹⁄₂" (...

Installation Guide
Page 17
...8324;" (6.35 mm) max. Door Panel - Panel ¹⁄₂" (1.3 cm) min. Bottom ¹⁄₄" (6.35 mm) max. Refrigerator and Side Trim Dimensions The width and height of the refrigerator or when the refrigerator is used , rout the handle ...freezer panel ¹⁄₂" (1.27 cm). You may want to center the detail in order to install a support board on ordering extended handles, see "Classic Series Factory Panels and Kits." Top Grille Panel - Standard Handle - Extended Handle - See "Door Swing Dimensions." Rout the bottom of the refrigerator panel...
...8324;" (6.35 mm) max. Door Panel - Panel ¹⁄₂" (1.3 cm) min. Bottom ¹⁄₄" (6.35 mm) max. Refrigerator and Side Trim Dimensions The width and height of the refrigerator or when the refrigerator is used , rout the handle ...freezer panel ¹⁄₂" (1.27 cm). You may want to center the detail in order to install a support board on ordering extended handles, see "Classic Series Factory Panels and Kits." Top Grille Panel - Standard Handle - Extended Handle - See "Door Swing Dimensions." Rout the bottom of the refrigerator panel...

Installation Guide
Page 18
...fit into the trim. 2. Add 5.6 mm) to this measurement to allow the side panel to have cabinets on the rear wall. Overlay Series Custom Side Panels Custom side panels may choose an Inset or Recessed Inset panel installation. Refrigerator (36" [91.4 cm] Models) Overlay 23 60.16 cm) A 2. Measure... the distance from point A (as shown) to hold the panel in the cabinet side trim. Attach the support board with aluminum and wood. 18 Refrigerator 24¹⁄₈" (61.3 cm) 23 60.3 cm) 23¹⁄₂" (59.7 cm) ...
...fit into the trim. 2. Add 5.6 mm) to this measurement to allow the side panel to have cabinets on the rear wall. Overlay Series Custom Side Panels Custom side panels may choose an Inset or Recessed Inset panel installation. Refrigerator (36" [91.4 cm] Models) Overlay 23 60.16 cm) A 2. Measure... the distance from point A (as shown) to hold the panel in the cabinet side trim. Attach the support board with aluminum and wood. 18 Refrigerator 24¹⁄₈" (61.3 cm) 23 60.3 cm) 23¹⁄₂" (59.7 cm) ...

Installation Guide
Page 19
... into the trim Recessed Inset Installation Dimensions 36" [91.4 cm] Models 1. Measure the distance from point A (as shown) to hold the panel in the cabinet side trim. 19 Rout the front edge of the support board or attach a ³⁄₈" (9.5 mm) board to ...fit into the trim. Rout the front edge of the support board or attach a ³⁄₈" (9.5 mm) board to back wall. A 2. A 2. Refrigerator (42" [106.7 cm] Models) Overlay 23³⁄₈" (59.40 cm) Side Trim (36" [91.4 cm] Models) ³⁄₈" (9.7 mm) 4.5 mm) 1.5...
... into the trim Recessed Inset Installation Dimensions 36" [91.4 cm] Models 1. Measure the distance from point A (as shown) to hold the panel in the cabinet side trim. 19 Rout the front edge of the support board or attach a ³⁄₈" (9.5 mm) board to ...fit into the trim. Rout the front edge of the support board or attach a ³⁄₈" (9.5 mm) board to back wall. A 2. A 2. Refrigerator (42" [106.7 cm] Models) Overlay 23³⁄₈" (59.40 cm) Side Trim (36" [91.4 cm] Models) ³⁄₈" (9.7 mm) 4.5 mm) 1.5...


