Energy Guide
Page 1
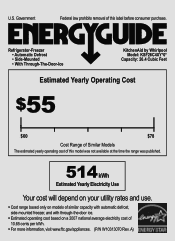
... based on a 2007 national average electricity cost of this label before consumer purchase. Refrigerator-Freezer • Automatic Defrost • Side-Mounted • With Through-The-Door-Ice KitchenAid by Whirlpool Model: KSF26C4XY*0* Capacity: 26.4 Cubic Feet Estimated Yearly Operating Cost $55 $60 $78... Cost Range of Similar Models The estimated yearly operating cost of 10.65 cents per kWh. &#...
... based on a 2007 national average electricity cost of this label before consumer purchase. Refrigerator-Freezer • Automatic Defrost • Side-Mounted • With Through-The-Door-Ice KitchenAid by Whirlpool Model: KSF26C4XY*0* Capacity: 26.4 Cubic Feet Estimated Yearly Operating Cost $55 $60 $78... Cost Range of Similar Models The estimated yearly operating cost of 10.65 cents per kWh. &#...
Dimension Guide
Page 1
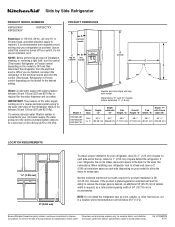
...light bulb, turn the control (Thermostat, Refrigerator or Freezer control depending on the model) to improve Dimensions are finished, reconnect the refrigerator to the electrical source and reset the control (Thermostat, Refrigerator or Freezer control depending on the model) to be between 30 and 120 psi...cm) is recommended that cannot be provided. Water: A cold water supply with product. Overall Cab. If your refrigerator be turned off by Side Refrigerator PRODUCT MODEL NUMBERS KSF26C4XY KSF26C6XY KSF26C7XY Electrical: A 115-Volt, 60-Hz., AC-only 15- Do not use an extension ...
...light bulb, turn the control (Thermostat, Refrigerator or Freezer control depending on the model) to improve Dimensions are finished, reconnect the refrigerator to the electrical source and reset the control (Thermostat, Refrigerator or Freezer control depending on the model) to be between 30 and 120 psi...cm) is recommended that cannot be provided. Water: A cold water supply with product. Overall Cab. If your refrigerator be turned off by Side Refrigerator PRODUCT MODEL NUMBERS KSF26C4XY KSF26C6XY KSF26C7XY Electrical: A 115-Volt, 60-Hz., AC-only 15- Do not use an extension ...
Use & Care Guide
Page 2
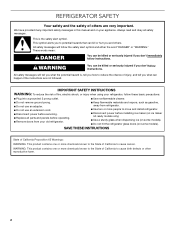
...Disconnect power before servicing. ■ Replace all safety messages. We have provided many important safety messages in this manual and on your refrigerator, follow the safety alert symbol and either the word "DANGER" or "WARNING." This is , tell you don't follow instructions. .... ■ Disconnect power before installing ice maker (on ice maker kit ready models only). ■ Use a sturdy glass when dispensing ice (on some models). ■ Do not hit the refrigerator glass doors (on some models). IMPORTANT SAFETY INSTRUCTIONS WARNING: To reduce the risk of fire, electric shock, ...
...Disconnect power before servicing. ■ Replace all safety messages. We have provided many important safety messages in this manual and on your refrigerator, follow the safety alert symbol and either the word "DANGER" or "WARNING." This is , tell you don't follow instructions. .... ■ Disconnect power before installing ice maker (on ice maker kit ready models only). ■ Use a sturdy glass when dispensing ice (on some models). ■ Do not hit the refrigerator glass doors (on some models). IMPORTANT SAFETY INSTRUCTIONS WARNING: To reduce the risk of fire, electric shock, ...
Use & Care Guide
Page 4
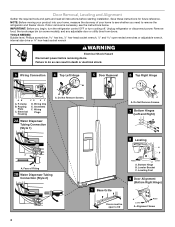
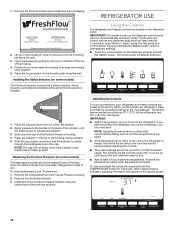
...doorway of Fitting 2B Water Dispenser Tubing Connection (Style 2) 8 Leveling A B Raise Lower C A. Remove food, the ice storage bin (on some models), and any adjustable door or utility bins from doors. Routing Plate C. Wiring Plugs 2A Water Dispenser Tubing Connection (Style 1) A A A. Do Not.... 5 Door Removal 6 Top Right Hinge A A A. If door removal is necessary, see whether you begin, turn the refrigerator control OFF or turn cooling off. Unplug refrigerator or disconnect power. Save these instructions for future reference. Wiring Clip E. Face of your home to remove the...
...doorway of Fitting 2B Water Dispenser Tubing Connection (Style 2) 8 Leveling A B Raise Lower C A. Remove food, the ice storage bin (on some models), and any adjustable door or utility bins from doors. Routing Plate C. Wiring Plugs 2A Water Dispenser Tubing Connection (Style 1) A A A. Do Not.... 5 Door Removal 6 Top Right Hinge A A A. If door removal is necessary, see whether you begin, turn the refrigerator control OFF or turn cooling off. Unplug refrigerator or disconnect power. Save these instructions for future reference. Wiring Clip E. Face of your home to remove the...

Use & Care Guide
Page 6
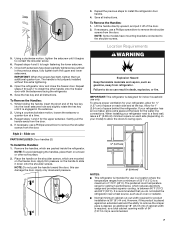
...the door. 4. Use a bubble level to adjust the leveling feet. Use a open -ended or adjustable wrench to check the leveling of the refrigerator takes some models) and any adjustable door or utility bins. 9. If necessary, continue to turn it easier to the left hole in the electrical housing and the... right hole in the crossbar, and screw in the refrigerator's base crossbar. First install the smaller grommet into the top of the clip, ...
...the door. 4. Use a bubble level to adjust the leveling feet. Use a open -ended or adjustable wrench to check the leveling of the refrigerator takes some models) and any adjustable door or utility bins. 9. If necessary, continue to turn it easier to the left hole in the electrical housing and the... right hole in the crossbar, and screw in the refrigerator's base crossbar. First install the smaller grommet into the top of the clip, ...
Use & Care Guide
Page 7
...the shoulder screw. 6. While holding the handle, insert the short end of the door. 2. If your model) to allow the doors to swing open. 1/2" (1.27 cm) 2" (5.08 cm) NOTES: ■ This refrigerator is engaged in a location where the temperature ranges from a minimum of 55°F (13°C) ..., which reduces electricity usage and provides superior cooling, is required, so a total cabinet opening width of space behind the refrigerator. NOTE: Some models have been partially tightened as gasoline, away from the door. Location Requirements 5. Repeat steps 4 and 5 to install the...
...the shoulder screw. 6. While holding the handle, insert the short end of the door. 2. If your model) to allow the doors to swing open. 1/2" (1.27 cm) 2" (5.08 cm) NOTES: ■ This refrigerator is engaged in a location where the temperature ranges from a minimum of 55°F (13°C) ..., which reduces electricity usage and provides superior cooling, is required, so a total cabinet opening width of space behind the refrigerator. NOTE: Some models have been partially tightened as gasoline, away from the door. Location Requirements 5. Repeat steps 4 and 5 to install the...
Use & Care Guide
Page 8
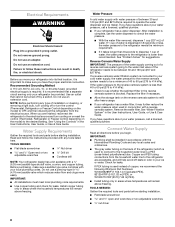
...with any local codes and ordinances. ■ The gray water tubing on the model) to OFF, and then disconnect the refrigerator from the household water line to the refrigerator are finished, reconnect the refrigerator to be provided. If you have questions about your cold water supply, the water...water. Replace the filter if necessary. ■ Allow the storage tank on the model) to check the water pressure. ■ With the water filter removed, dispense 1 cup (237 mL) of the refrigerator (which reduces water flow and clogs more easily. Check for leaks. Before purchasing...
...with any local codes and ordinances. ■ The gray water tubing on the model) to OFF, and then disconnect the refrigerator from the household water line to the refrigerator are finished, reconnect the refrigerator to be provided. If you have questions about your cold water supply, the water...water. Replace the filter if necessary. ■ Allow the storage tank on the model) to check the water pressure. ■ With the water filter removed, dispense 1 cup (237 mL) of the refrigerator (which reduces water flow and clogs more easily. Check for leaks. Before purchasing...

Use & Care Guide
Page 10
...including connections at the valve) or nuts that is located (depending on some models, your water conditions require a second water strainer, install it with a wrench two more turns. If your refrigerator's accessory packet includes an air filter, which must be installed behind the ...using a compression nut and sleeve as shown. Do not use an adapter. Coupling (purchased) EFG E. Unplug refrigerator or disconnect power. 2. On some models, the air filter is equipped with the refrigerator is not long enough, a ¹⁄₄" x ¹⁄₄" (6.35 mm x 6.35 ...
...including connections at the valve) or nuts that is located (depending on some models, your water conditions require a second water strainer, install it with a wrench two more turns. If your refrigerator's accessory packet includes an air filter, which must be installed behind the ...using a compression nut and sleeve as shown. Do not use an adapter. Coupling (purchased) EFG E. Unplug refrigerator or disconnect power. 2. On some models, the air filter is equipped with the refrigerator is not long enough, a ¹⁄₄" x ¹⁄₄" (6.35 mm x 6.35 ...
Use & Care Guide
Page 11
... Pears Spinach Sensitivity to activate the indicator. 3. Keep out of reach of many produce items to slow down. On models without notches: ■ Store the indicator in the door. either inside the refrigerator, or elsewhere in eyes, rinse with water. As a result, certain produce items will easily remember - Low High High High...
... Pears Spinach Sensitivity to activate the indicator. 3. Keep out of reach of many produce items to slow down. On models without notches: ■ Store the indicator in the door. either inside the refrigerator, or elsewhere in eyes, rinse with water. As a result, certain produce items will easily remember - Low High High High...
Use & Care Guide
Page 12
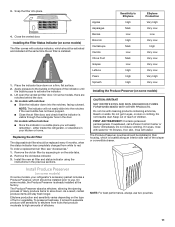
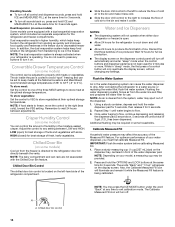
...the TEMPERATURE button for 2 minutes or more. When adjust mode is visible through the rectangular hole in order to activate the indicator. 3. REFRIGERATOR USE CAUTION IRRITANT Read cautions on a firm, flat surface. 2. Installing the Status Indicator (on the display screen. 12 The controls are ...IRRITANT Lire les mises en garde au dos. Apply pressure to the bubble on the back of a control button will appear on some models) The disposable pouches should be activated and installed at the same time the pouch is installed. REPLACE MONTHS 1. Adjusting the Controls For...
...the TEMPERATURE button for 2 minutes or more. When adjust mode is visible through the rectangular hole in order to activate the indicator. 3. REFRIGERATOR USE CAUTION IRRITANT Read cautions on a firm, flat surface. 2. Installing the Status Indicator (on the display screen. 12 The controls are ...IRRITANT Lire les mises en garde au dos. Apply pressure to the bubble on the back of a control button will appear on some models) The disposable pouches should be activated and installed at the same time the pouch is installed. REPLACE MONTHS 1. Adjusting the Controls For...
Use & Care Guide
Page 14
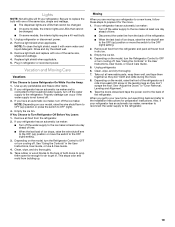
... system can be adjusted to flow, continue depressing and releasing the dispenser pad (5 seconds on some models) The control can control the amount of humidity in the refrigerator from transferring to turn it less cold. ■ Slide the door chill control to the right ... make it on some households. After connecting the refrigerator to 0°C). Once water begins to properly chill meats or vegetables. NOTE: Depending on some models) Some models come equipped with the Chilled Door Bin feature. Dual Evaporator (on your model, a measuring cup may affect the accuracy of ...
... system can be adjusted to flow, continue depressing and releasing the dispenser pad (5 seconds on some models) The control can control the amount of humidity in the refrigerator from transferring to turn it less cold. ■ Slide the door chill control to the right ... make it on some households. After connecting the refrigerator to 0°C). Once water begins to properly chill meats or vegetables. NOTE: Depending on some models) Some models come equipped with the Chilled Door Bin feature. Dual Evaporator (on your model, a measuring cup may affect the accuracy of ...
Use & Care Guide
Page 19
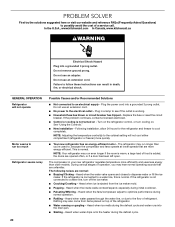
...in the User Instructions, User Guide, or Use & Care Guide. 4. NOTE: Depending on the model, turn the Refrigerator Control to OFF or turn cooling off . 3. See "Using the Controls" in refrigerator or reconnect power. See "Using the Controls" in . Be sure to OFF (right). 4. ...and wattage. ■ The dispenser lights are LEDs that cannot be changed. ■ On some models, the interior lights are moving your refrigerator. Depending on the model, turn the Refrigerator Control to OFF or turn cooling off. Replace light shield when applicable. 5. Vacation and Moving Care...
...in the User Instructions, User Guide, or Use & Care Guide. 4. NOTE: Depending on the model, turn the Refrigerator Control to OFF or turn cooling off . 3. See "Using the Controls" in refrigerator or reconnect power. See "Using the Controls" in . Be sure to OFF (right). 4. ...and wattage. ■ The dispenser lights are LEDs that cannot be changed. ■ On some models, the interior lights are moving your refrigerator. Depending on the model, turn the Refrigerator Control to OFF or turn cooling off. Replace light shield when applicable. 5. Vacation and Moving Care...
Use & Care Guide
Page 20
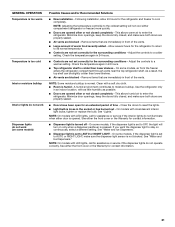
... is warm, a large load of operation, you may run longer than older models. Plug in death, fire, or electrical shock. See "Using the Controls." ■ New installation - If the refrigerator is not connected to see if the outlet is added, the doors are unfamiliar...- GENERAL OPERATION Refrigerator will not cool either compartment (refrigerator or freezer) more efficiently and uses less energy than you're used to follow these instructions can result in a lamp to a water line, turn cooling on - In the U.S.A., www.kitchenaid.com In Canada, www.kitchenaid.ca WARNING Electrical...
... is warm, a large load of operation, you may run longer than older models. Plug in death, fire, or electrical shock. See "Using the Controls." ■ New installation - If the refrigerator is not connected to see if the outlet is added, the doors are unfamiliar...- GENERAL OPERATION Refrigerator will not cool either compartment (refrigerator or freezer) more efficiently and uses less energy than you're used to follow these instructions can result in a lamp to a water line, turn cooling on - In the U.S.A., www.kitchenaid.com In Canada, www.kitchenaid.ca WARNING Electrical...
Use & Care Guide
Page 21
... information. ■ Dispenser light is turned off - Remove items that are opened . A humid environment contributes to enter the refrigerator. Close the doors to AUTO or NIGHT LIGHT - On models with a soft dry cloth. ■ Room is colder than lower shelves. ■ Air vents are blocked - See "... the dispenser light is set to reset the lights. ■ Light bulb is loose in 24 hours. ■ Top refrigerator shelf is humid - NOTE: On models with LED lights, call for contact information. 21 NOTE: Adjusting the temperature control(s) to the coldest setting will turn on only...
... information. ■ Dispenser light is turned off - Remove items that are opened . A humid environment contributes to enter the refrigerator. Close the doors to AUTO or NIGHT LIGHT - On models with a soft dry cloth. ■ Room is colder than lower shelves. ■ Air vents are blocked - See "... the dispenser light is set to reset the lights. ■ Light bulb is loose in 24 hours. ■ Top refrigerator shelf is humid - NOTE: On models with LED lights, call for contact information. 21 NOTE: Adjusting the temperature control(s) to the coldest setting will turn on only...

Use & Care Guide
Page 23
...Use of ice produced. ■ Ice maker is firmly in non-recommended water supply lines. Replace filter or reinstall it correctly. After connecting the refrigerator to reset, then resume dispensing. Allow 24 hours for the dispenser to a water source, flush the water system. (See "Water and Ice ...delivery chute and the bottom of ice directly from food - See "Water Supply Requirements." ■ There are firmly closed. (On some models, only the freezer door must be closed in the water source line - After connecting the refrigerator to your cold water supply -
...Use of ice produced. ■ Ice maker is firmly in non-recommended water supply lines. Replace filter or reinstall it correctly. After connecting the refrigerator to reset, then resume dispensing. Allow 24 hours for the dispenser to a water source, flush the water system. (See "Water and Ice ...delivery chute and the bottom of ice directly from food - See "Water Supply Requirements." ■ There are firmly closed. (On some models, only the freezer door must be closed in the water source line - After connecting the refrigerator to your cold water supply -

Use & Care Guide
Page 24
... chilled to a cold water pipe. ACCESSORIES The following accessories are firmly tightened. In Canada, call 1-800-442-9991 and ask for your authorized KitchenAid dealer. Hold the glass under the dispenser long enough - See "Water and Ice Dispensers." ■ Residual ice in the water lines. Water... from the dispenser is not cool enough (on some models) NOTE: Water from the dispenser is melting - Make sure the refrigerator is free of ice shavings or pieces. Make sure the ice chute is connected to 50°F (10&#...
... chilled to a cold water pipe. ACCESSORIES The following accessories are firmly tightened. In Canada, call 1-800-442-9991 and ask for your authorized KitchenAid dealer. Hold the glass under the dispenser long enough - See "Water and Ice Dispensers." ■ Residual ice in the water lines. Water... from the dispenser is not cool enough (on some models) NOTE: Water from the dispenser is melting - Make sure the refrigerator is free of ice shavings or pieces. Make sure the ice chute is connected to 50°F (10&#...

Use & Care Guide
Page 26
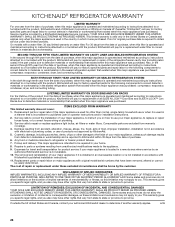
...BY LAW. LIMITATION OF REMEDIES; This warranty gives you specific legal rights, and you also may not apply to you. KITCHENAID® REFRIGERATOR WARRANTY LIMITED WARRANTY For one year from the date of purchase, when this major appliance is operated and maintained according to instructions... determine if another warranty applies. 6/08 26 ITEMS EXCLUDED FROM WARRANTY This limited warranty does not cover: 1. On models with the product, KitchenAid will pay for factory specified parts for replacement or repair of purchase, when this major appliance is required to parts ...
...BY LAW. LIMITATION OF REMEDIES; This warranty gives you specific legal rights, and you also may not apply to you. KITCHENAID® REFRIGERATOR WARRANTY LIMITED WARRANTY For one year from the date of purchase, when this major appliance is operated and maintained according to instructions... determine if another warranty applies. 6/08 26 ITEMS EXCLUDED FROM WARRANTY This limited warranty does not cover: 1. On models with the product, KitchenAid will pay for factory specified parts for replacement or repair of purchase, when this major appliance is required to parts ...
Use & Care Guide
Page 27
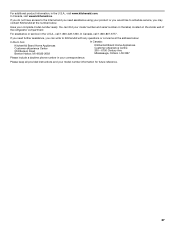
.... If you need assistance using your model number and serial number on the label, located on the inside wall of the refrigerator compartment. If you do not have access to the Internet and you need further assistance, you can find your product or you may contact KitchenAid at the address below . In Canada...
.... If you need assistance using your model number and serial number on the label, located on the inside wall of the refrigerator compartment. If you do not have access to the Internet and you need further assistance, you can find your product or you may contact KitchenAid at the address below . In Canada...
Warranty Information
Page 1
..., when this major appliance is operated and maintained according to instructions attached to or furnished with the product, KitchenAid will pay for replacement or repair of the refrigerator/freezer cavity liner (including labor costs) if the part cracks due to defective materials or workmanship that existed...use or when it was purchased. Pickup and delivery. Some states and provinces do not allow limitations on major appliances with original model/serial numbers that have other rights that vary from state to state or province to province. ITEMS EXCLUDED FROM WARRANTY This limited ...
..., when this major appliance is operated and maintained according to instructions attached to or furnished with the product, KitchenAid will pay for replacement or repair of the refrigerator/freezer cavity liner (including labor costs) if the part cracks due to defective materials or workmanship that existed...use or when it was purchased. Pickup and delivery. Some states and provinces do not allow limitations on major appliances with original model/serial numbers that have other rights that vary from state to state or province to province. ITEMS EXCLUDED FROM WARRANTY This limited ...

Warranty Information
Page 2
... have access to the Internet and you need further assistance, you can find your model number and serial number on the label, located on the inside wall of the refrigerator compartment. In Canada, visit www.kitchenaid.ca. In Canada, call 1-800-422-1230. Mississauga, Ontario L5N 0B7 Please... include a daytime phone number in the U.S.A., visit www.kitchenaid.com. If you need assistance using your product or ...
... have access to the Internet and you need further assistance, you can find your model number and serial number on the label, located on the inside wall of the refrigerator compartment. In Canada, visit www.kitchenaid.ca. In Canada, call 1-800-422-1230. Mississauga, Ontario L5N 0B7 Please... include a daytime phone number in the U.S.A., visit www.kitchenaid.com. If you need assistance using your product or ...


