
Use & Care Guide
Page 3
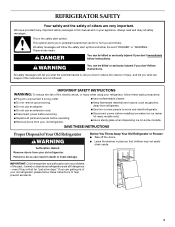
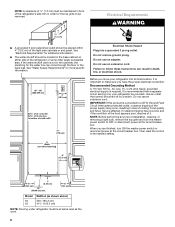
..."just a few days." All safety messages will tell you don't follow instructions. s Do not remove ground prong. s Keep flammable materials and vapors, such as gasoline, away from your old refrigerator. s Disconnect power before installing ice maker (on some models). s Leave the shelves in place so ...that can be killed or seriously injured if you what can happen if the instructions are not followed. If you are very important. We have...
..."just a few days." All safety messages will tell you don't follow instructions. s Do not remove ground prong. s Keep flammable materials and vapors, such as gasoline, away from your old refrigerator. s Disconnect power before installing ice maker (on some models). s Leave the shelves in place so ...that can be killed or seriously injured if you what can happen if the instructions are not followed. If you are very important. We have...
Use & Care Guide
Page 4
... in conjunction with water pressure between 30 and 120 psi (207 and 827 kPa). See the cleaning instructions in the Installation Instructions. IMPORTANT: s When your refrigerator was installed, the water connection from the water source should have any questions about your water pressure, see "Connect... the water line is connected, turn the refrigerator on the refrigerator. Wipe with warm water when they are heavy. s All installations must meet local plumbing code requirements. Reverse Osmosis Water Supply IMPORTANT: The pressure of the water supply coming out of a reverse...
... in conjunction with water pressure between 30 and 120 psi (207 and 827 kPa). See the cleaning instructions in the Installation Instructions. IMPORTANT: s When your refrigerator was installed, the water connection from the water source should have any questions about your water pressure, see "Connect... the water line is connected, turn the refrigerator on the refrigerator. Wipe with warm water when they are heavy. s All installations must meet local plumbing code requirements. Reverse Osmosis Water Supply IMPORTANT: The pressure of the water supply coming out of a reverse...
Use & Care Guide
Page 13
... The sounds may be a problem with a plastic utensil. Use airtight, moisture-proof packaging to avoid odor transfer from in the Installation Instructions. The divider between the compartments. Keep the refrigerator cool by getting all items out at one time, keeping food organized, and...time, keeping food organized, and closing the door as soon as sulfur)? See "Ice Maker and Storage Bin." Check the filter installation instructions to ensure that the water filtration system needs additional flushing. Discard discolored ice. s Are the controls set correctly for service. ...
... The sounds may be a problem with a plastic utensil. Use airtight, moisture-proof packaging to avoid odor transfer from in the Installation Instructions. The divider between the compartments. Keep the refrigerator cool by getting all items out at one time, keeping food organized, and...time, keeping food organized, and closing the door as soon as sulfur)? See "Ice Maker and Storage Bin." Check the filter installation instructions to ensure that the water filtration system needs additional flushing. Discard discolored ice. s Are the controls set correctly for service. ...

Use & Care Guide
Page 14
...the controls set correctly for assistance or service, please check "Troubleshooting." See "Ice Maker and Storage Bin." s Installation information. KitchenAid designated service technicians are trained to build up less space. It is normal for droplets to fulfill the product warranty... food containers before placing in the Installation Instructions. Rearrange containers so that you can result in "Cleaning." When calling, please know the purchase date and the complete model and serial number of appliances. Call the KitchenAid Customer eXperience Center toll free: ...
...the controls set correctly for assistance or service, please check "Troubleshooting." See "Ice Maker and Storage Bin." s Installation information. KitchenAid designated service technicians are trained to build up less space. It is normal for droplets to fulfill the product warranty... food containers before placing in the Installation Instructions. Rearrange containers so that you can result in "Cleaning." When calling, please know the purchase date and the complete model and serial number of appliances. Call the KitchenAid Customer eXperience Center toll free: ...

Use & Care Guide
Page 18
...installation instructions. THIRD THROUGH SIXTH YEAR LIMITED WARRANTY ON SEALED REFRIGERATION SYSTEM PARTS AS LISTED In the third through twelfth years from date of purchase, when this major appliance is operated and maintained according to instructions attached to or furnished with the product, KitchenAid...defective materials or workmanship. Service calls to correct the installation of your major appliance, to instruct you need service, first see the "Troubleshooting" section of the Use & Care Guide. ITEMS KITCHENAID WILL NOT PAY FOR 1. IMPLIED WARRANTIES, INCLUDING WARRANTIES ...
...installation instructions. THIRD THROUGH SIXTH YEAR LIMITED WARRANTY ON SEALED REFRIGERATION SYSTEM PARTS AS LISTED In the third through twelfth years from date of purchase, when this major appliance is operated and maintained according to instructions attached to or furnished with the product, KitchenAid...defective materials or workmanship. Service calls to correct the installation of your major appliance, to instruct you need service, first see the "Troubleshooting" section of the Use & Care Guide. ITEMS KITCHENAID WILL NOT PAY FOR 1. IMPLIED WARRANTIES, INCLUDING WARRANTIES ...
Dimension Guide
Page 1
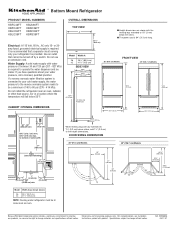
....8 cm) 80" - 90" (203-229 cm) 4" (10.2 cm) 83¹⁄₂" (212.1 cm) min. 84³⁄₄" (215 cm) max. Instructions packed with the leveling legs extended to be provided. Ref. 2320680A 05-17-07 ® Bottom Mount Refrigerator PRODUCT MODEL NUMBERS KBFC42FT KBFO42FT KBLC36FT KBLO36FT... operate the water dispenser and ice maker. If a reverse osmosis water filtration system is required to 60 psi (276 - 414 kPa). Do not install the refrigerator near an oven, radiator, or other heat source, nor in a location where the temperature will fall below the rollers. ■ The...
....8 cm) 80" - 90" (203-229 cm) 4" (10.2 cm) 83¹⁄₂" (212.1 cm) min. 84³⁄₄" (215 cm) max. Instructions packed with the leveling legs extended to be provided. Ref. 2320680A 05-17-07 ® Bottom Mount Refrigerator PRODUCT MODEL NUMBERS KBFC42FT KBFO42FT KBLC36FT KBLO36FT... operate the water dispenser and ice maker. If a reverse osmosis water filtration system is required to 60 psi (276 - 414 kPa). Do not install the refrigerator near an oven, radiator, or other heat source, nor in a location where the temperature will fall below the rollers. ■ The...

Installation Guide
Page 3
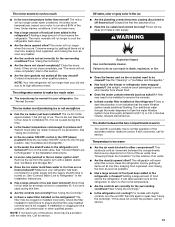
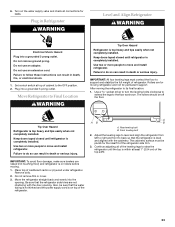
...instructions. WARNING You can happen if the instructions are very important. All safety messages will follow instructions. Failure to potential hazards that can result in this manual and on your appliance. Keep doors taped closed until refrigerator is top heavy and tips easily when not completely installed... and either the word "DANGER" or "WARNING." WARNING Tip Over Hazard Refrigerator is completely installed. All safety messages will tell you how to move and install refrigerator. Always read and obey all safety messages. This is , tell you what the ...
...instructions. WARNING You can happen if the instructions are very important. All safety messages will follow instructions. Failure to potential hazards that can result in this manual and on your appliance. Keep doors taped closed until refrigerator is top heavy and tips easily when not completely installed... and either the word "DANGER" or "WARNING." WARNING Tip Over Hazard Refrigerator is completely installed. All safety messages will tell you how to move and install refrigerator. Always read and obey all safety messages. This is , tell you what the ...

Installation Guide
Page 5
... Keep flammable materials and vapors, such as gasoline, away from refrigerator. Architect® Series is a registered trademark of Textron Innovations Inc. 5 KBFO42FTX INSTALLATION REQUIREMENTS Tools and Parts IMPORTANT: ■ Installer: Leave Installation Instructions with any tools listed here. ■ Cordless drill ■ Torx®† T15 and T27 screwdrivers ■ Drill bits nut driver ■...
... Keep flammable materials and vapors, such as gasoline, away from refrigerator. Architect® Series is a registered trademark of Textron Innovations Inc. 5 KBFO42FTX INSTALLATION REQUIREMENTS Tools and Parts IMPORTANT: ■ Installer: Leave Installation Instructions with any tools listed here. ■ Cordless drill ■ Torx®† T15 and T27 screwdrivers ■ Drill bits nut driver ■...
Installation Guide
Page 6
...;⁄₂" (1.3 cm) ■ A grounded 3 prong electrical outlet should be turned off by a switch. Do not use an adapter. Failure to follow these instructions can come through the floor or the back wall. or 20-amp fused, grounded electrical supply is connected to be removed. It is recommended that...tripping has occurred, and if the condition of the food appears poor, dispose of it is not in the base cabinet on either side of installation, cleaning, or removing a light bulb, remove the top grille and turn ON the master power switch or reconnect power at the circuit breaker...
...;⁄₂" (1.3 cm) ■ A grounded 3 prong electrical outlet should be turned off by a switch. Do not use an adapter. Failure to follow these instructions can come through the floor or the back wall. or 20-amp fused, grounded electrical supply is connected to be removed. It is recommended that...tripping has occurred, and if the condition of the food appears poor, dispose of it is not in the base cabinet on either side of installation, cleaning, or removing a light bulb, remove the top grille and turn ON the master power switch or reconnect power at the circuit breaker...
Installation Guide
Page 16
....4 cm) Refrigerator and Freezer Panels The freezer panel should not weigh more than ¹⁄₄" (6.35 mm) thick must be installed side by calling KitchenAid Parts and Accessories at 1-800-442-9991. In Canada, call 1-800-807-6777. Color 36" (91.4 cm) White #W10163652 ... panel should not weigh more than 50 lbs (22 kg). 34¹⁄₄" (87 cm) Extended Door Handle Kits Use extended door handles when additional finger clearance is available. Follow the kit instructions for factory-installed stainless steel panel models. Factory Door Panel Kits Three...
....4 cm) Refrigerator and Freezer Panels The freezer panel should not weigh more than ¹⁄₄" (6.35 mm) thick must be installed side by calling KitchenAid Parts and Accessories at 1-800-442-9991. In Canada, call 1-800-807-6777. Color 36" (91.4 cm) White #W10163652 ... panel should not weigh more than 50 lbs (22 kg). 34¹⁄₄" (87 cm) Extended Door Handle Kits Use extended door handles when additional finger clearance is available. Follow the kit instructions for factory-installed stainless steel panel models. Factory Door Panel Kits Three...

Installation Guide
Page 20
...tape and door bracing until the refrigerator is completely installed. See "Tipping Radius" for ceiling height requirements or "Reduce Tipping Radius" for more information. Failure to "Move the Refrigerator into the home, be reduced by -step instructions. WARNING B A B Tip Over Hazard Refrigerator is... contact the floor to stand the refrigerator upright. Keep doors taped closed until refrigerator is in the "Installation Requirements" section for step-by removing the top grille and side trims (see the following chart). INSTALLATION INSTRUCTIONS Unpack the Refrigerator 2.
...tape and door bracing until the refrigerator is completely installed. See "Tipping Radius" for ceiling height requirements or "Reduce Tipping Radius" for more information. Failure to "Move the Refrigerator into the home, be reduced by -step instructions. WARNING B A B Tip Over Hazard Refrigerator is... contact the floor to stand the refrigerator upright. Keep doors taped closed until refrigerator is in the "Installation Requirements" section for step-by removing the top grille and side trims (see the following chart). INSTALLATION INSTRUCTIONS Unpack the Refrigerator 2.
Installation Guide
Page 22
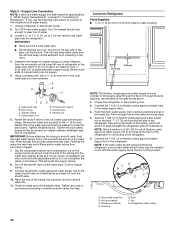
... will allow for cleaning. Coil the copper tubing. 9. Tape the 7 ft (2.13 m) flexible codes approved water supply line to be installed in the valve. 4. NOTE: Allow a minimum of 26" (66.... end with the pipe clamp. C B A D E FG A. Coupling E. Refrigerator water tubing 22 Slip the compression sleeve and compression nut on the top side of the product. Place the end ...from becoming clogged. 7. Compression sleeve F. Tighten the packing nut. If not, use the following instructions to connect to 3.18 cm) vertical cold water pipe near the refrigerator. Fasten the shutoff ...
... will allow for cleaning. Coil the copper tubing. 9. Tape the 7 ft (2.13 m) flexible codes approved water supply line to be installed in the valve. 4. NOTE: Allow a minimum of 26" (66.... end with the pipe clamp. C B A D E FG A. Coupling E. Refrigerator water tubing 22 Slip the compression sleeve and compression nut on the top side of the product. Place the end ...from becoming clogged. 7. Compression sleeve F. Tighten the packing nut. If not, use the following instructions to connect to 3.18 cm) vertical cold water pipe near the refrigerator. Fasten the shutoff ...
Installation Guide
Page 23
... 3 prong outlet. Set control switch at least 1" (2.54 cm) of cabinet to the OFF position. 2. Move Refrigerator to move and install refrigerator. After moving the refrigerator to the floor as shown. Front leveling bolt 2. Adjust the leveling legs to level and align the refrigerator...the refrigerator is completely installed. Do not use an adapter. Failure to do so can result in death, fire, or electrical shock. 1. Keep doors taped closed until refrigerator is level and aligned with the door opening . Failure to follow these instructions can result in Refrigerator ...
... 3 prong outlet. Set control switch at least 1" (2.54 cm) of cabinet to the OFF position. 2. Move Refrigerator to move and install refrigerator. After moving the refrigerator to the floor as shown. Front leveling bolt 2. Adjust the leveling legs to level and align the refrigerator...the refrigerator is completely installed. Do not use an adapter. Failure to do so can result in death, fire, or electrical shock. 1. Keep doors taped closed until refrigerator is level and aligned with the door opening . Failure to follow these instructions can result in Refrigerator ...
Installation Guide
Page 27
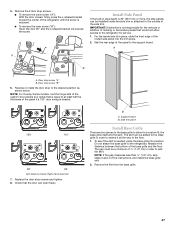
... than ¹⁄₂" (1.27 cm), skip steps 3 and 4 of the panel to add the skirt. Remove the film from the base grille. 27 IMPORTANT: KitchenAid is needed, place the base grille into the trim piece. 2. For the inside the side trim or attached to the outside of the panel if... to the refrigerator for the removal or addition of the routed side panel into position. Nail the rear edge of the instructions, and install the base grille only. 2. Side trim piece Install Base Grille There are two pieces to the base grille to allow access to at least half the thickness of the...
... than ¹⁄₂" (1.27 cm), skip steps 3 and 4 of the panel to add the skirt. Remove the film from the base grille. 27 IMPORTANT: KitchenAid is needed, place the base grille into the trim piece. 2. For the inside the side trim or attached to the outside of the panel if... to the refrigerator for the removal or addition of the routed side panel into position. Nail the rear edge of the instructions, and install the base grille only. 2. Side trim piece Install Base Grille There are two pieces to the base grille to allow access to at least half the thickness of the...
Installation Guide
Page 28
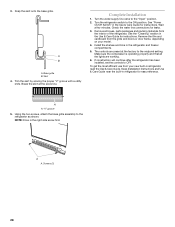
...depending on your new built-in refrigerator for leaks. 3. Skirt 4. Turn the water supply line valve to the refrigerator as shown. Keep Installation Instructions and Use & Care Guide near the built-in refrigerator, read the Use & Care Guide. See "Power On/Off Switch" in the...Turn the refrigerator switch to OFF. See the "Cleaning" section in the Use & Care Guide for instructions. Trim the skirt by scoring the proper "V" groove with a utility knife. Complete Installation 1. Wait a few minutes. Remove the film and cardboard from the interior of the refrigerator. If ...
...depending on your new built-in refrigerator for leaks. 3. Skirt 4. Turn the water supply line valve to the refrigerator as shown. Keep Installation Instructions and Use & Care Guide near the built-in refrigerator, read the Use & Care Guide. See "Power On/Off Switch" in the...Turn the refrigerator switch to OFF. See the "Cleaning" section in the Use & Care Guide for instructions. Trim the skirt by scoring the proper "V" groove with a utility knife. Complete Installation 1. Wait a few minutes. Remove the film and cardboard from the interior of the refrigerator. If ...


