Installation Guide
Page 4
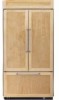
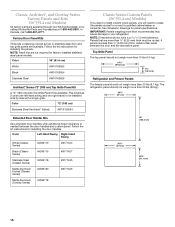
...This series requires the installation of custom panels that are not included. KBFC42FTS This series requires the installation of custom panels, handles, and standoffs. KBRS36FTB KBRS36FTX KBLS36FTB KBLS36FTX Overlay Series (36" [91.4 cm] Models) Features factory-installed, overlay style ..."framed" look . KBRO36FTX KBLO36FTX 4 Architect® Series (42" [106.7 cm] Models) Features wraparound styling that complements the contoured door handles. KBRC36FTS KBLC36FTS Classic Series (36" [91.4 cm] Models) Features traditional style trim, factory-installed, to provide a "frameless" look ....
...This series requires the installation of custom panels that are not included. KBFC42FTS This series requires the installation of custom panels, handles, and standoffs. KBRS36FTB KBRS36FTX KBLS36FTB KBLS36FTX Overlay Series (36" [91.4 cm] Models) Features factory-installed, overlay style ..."framed" look . KBRO36FTX KBLO36FTX 4 Architect® Series (42" [106.7 cm] Models) Features wraparound styling that complements the contoured door handles. KBRC36FTS KBLC36FTS Classic Series (36" [91.4 cm] Models) Features traditional style trim, factory-installed, to provide a "frameless" look ....

Installation Guide
Page 5
...;TORX is higher than 600 lbs (272 kg), door panels and contents of custom panels, handles, and standoffs. Save these Installation Instructions for the local electrical inspector's use , the solid soffit must permit top grille removal. KBFO42FTX INSTALLATION REQUIREMENTS Tools and Parts IMPORTANT: ■ Installer: Leave Installation Instructions with any tools listed...
...;TORX is higher than 600 lbs (272 kg), door panels and contents of custom panels, handles, and standoffs. Save these Installation Instructions for the local electrical inspector's use , the solid soffit must permit top grille removal. KBFO42FTX INSTALLATION REQUIREMENTS Tools and Parts IMPORTANT: ■ Installer: Leave Installation Instructions with any tools listed...

Installation Guide
Page 9
...; 110˚ 130˚ 44¹⁄₄" (112.3 cm) 42¹⁄₄" (107.3 cm) *When leveling legs are using overlay panels or custom handles. 36" (91.4 cm) Models Door Swing Dimensions The location must permit the door to open to a minimum of the refrigerator and a corner wall. Allow 4¹...
...; 110˚ 130˚ 44¹⁄₄" (112.3 cm) 42¹⁄₄" (107.3 cm) *When leveling legs are using overlay panels or custom handles. 36" (91.4 cm) Models Door Swing Dimensions The location must permit the door to open to a minimum of the refrigerator and a corner wall. Allow 4¹...
Installation Guide
Page 11
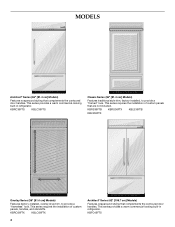
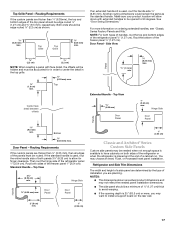
Do not overlook baseboards. 11 More clearance may be needed if thicker custom panels or custom handles are used. 90˚ Door Stop Position Hinge Door Swing 90˚ Actual Size Refrigerator to Cabinetry Clearance Refrigerator Side Trim 1" (2.5 cm) 3/4" (1.9 cm) 1/2" (1.3 cm) Cabinetry 1/4" (6.35 mm) 1/2" (1.3 cm) 3/4" (1.9 cm) 1" (2.5 cm) Overlay Panel Backer Panel Door 1/2" (1.3 cm) 3/4" (1.9 cm) 1" (2.5 cm) 11/4" (3.2 cm) 11/2" (3.8 cm) Spacer Panel Allow a minimum of 4¹⁄₂" (11.4 cm) of space between the side of the refrigerator and a corner wall.
Do not overlook baseboards. 11 More clearance may be needed if thicker custom panels or custom handles are used. 90˚ Door Stop Position Hinge Door Swing 90˚ Actual Size Refrigerator to Cabinetry Clearance Refrigerator Side Trim 1" (2.5 cm) 3/4" (1.9 cm) 1/2" (1.3 cm) Cabinetry 1/4" (6.35 mm) 1/2" (1.3 cm) 3/4" (1.9 cm) 1" (2.5 cm) Overlay Panel Backer Panel Door 1/2" (1.3 cm) 3/4" (1.9 cm) 1" (2.5 cm) 11/4" (3.2 cm) 11/2" (3.8 cm) Spacer Panel Allow a minimum of 4¹⁄₂" (11.4 cm) of space between the side of the refrigerator and a corner wall.
Installation Guide
Page 13
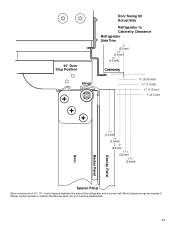
Do not overlook baseboards. 13 More clearance may be needed if thicker custom panels or custom handles are used. 90˚ Door Stop Position Hinge Door Swing 90˚ Actual Size Refrigerator to Cabinetry Clearance Refrigerator Side Trim 1" (2.5 cm) 3/4" (1.9 cm) 1/2" (1.3 cm) Cabinetry 1/4" (6.35 mm) 1/2" (1.3 cm) 3/4" (1.9 cm) 1" (2.5 cm) Overlay Panel Backer Panel Door 1/2" (1.3 cm) 3/4" (1.9 cm) 1" (2.5 cm) 11/4" (3.2 cm) 11/2" (3.8 cm) Spacer Panel Allow a minimum of 4¹⁄₂" (11.4 cm) of space between the side of the refrigerator and a corner wall.
Do not overlook baseboards. 13 More clearance may be needed if thicker custom panels or custom handles are used. 90˚ Door Stop Position Hinge Door Swing 90˚ Actual Size Refrigerator to Cabinetry Clearance Refrigerator Side Trim 1" (2.5 cm) 3/4" (1.9 cm) 1/2" (1.3 cm) Cabinetry 1/4" (6.35 mm) 1/2" (1.3 cm) 3/4" (1.9 cm) 1" (2.5 cm) Overlay Panel Backer Panel Door 1/2" (1.3 cm) 3/4" (1.9 cm) 1" (2.5 cm) 11/4" (3.2 cm) 11/2" (3.8 cm) Spacer Panel Allow a minimum of 4¹⁄₂" (11.4 cm) of space between the side of the refrigerator and a corner wall.
Installation Guide
Page 14
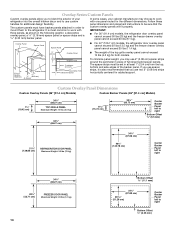
... centered for the different dimensions. Overlay Series Custom Panels Custom overlay panels allow you to blend the exterior of your cabinet manufacturer may use custom handles for both models. 5/8" to 3/4" (15.88 to 19.05 mm) Backer Panel 1/4" 1/8" (6.35 mm) (3.18 mm) Backer Panel 1" minimum (2.54 cm) Door/Grille Trim Offset...
... centered for the different dimensions. Overlay Series Custom Panels Custom overlay panels allow you to blend the exterior of your cabinet manufacturer may use custom handles for both models. 5/8" to 3/4" (15.88 to 19.05 mm) Backer Panel 1/4" 1/8" (6.35 mm) (3.18 mm) Backer Panel 1" minimum (2.54 cm) Door/Grille Trim Offset...
Installation Guide
Page 16
...8260;₄" (6.35 mm) thick, install a filler panel between the door handles and custom panel. If panels are less than ¹⁄₄" (6.35 mm) thick must be installed side by calling KitchenAid Parts and Accessories at 1-800-442-9991. Top Grille Panel The top panel ...18.4 cm) Refrigerator and Freezer Panels The freezer panel should not weigh more than 50 lbs (22 kg). 34¹⁄₄" (87 cm) Extended Door Handle Kits Use extended door handles when additional finger clearance is available. Follow the kit instructions for panel specifications. See dimension drawings...
...8260;₄" (6.35 mm) thick, install a filler panel between the door handles and custom panel. If panels are less than ¹⁄₄" (6.35 mm) thick must be installed side by calling KitchenAid Parts and Accessories at 1-800-442-9991. Top Grille Panel The top panel ...18.4 cm) Refrigerator and Freezer Panels The freezer panel should not weigh more than 50 lbs (22 kg). 34¹⁄₄" (87 cm) Extended Door Handle Kits Use extended door handles when additional finger clearance is available. Follow the kit instructions for panel specifications. See dimension drawings...
Installation Guide
Page 17
...between offsets ¹⁄₄" (6.35 mm) Door Panel ¹⁄₄" (6.35 mm) max. 1" (2.54 cm) max Hinge Side Door Panel Handle Handle ³⁄₈" (9.5 mm) min. Bottom ¹⁄₄" (6.35 mm) max. Then rout the hinge side of the freezer panel ¹&#...Panel ¹⁄₂" (1.3 cm) min. Top View 3¹⁄₄" (8.25 cm) min. See "Door Swing Dimensions." Extended Handle - Rout both types of handles, rout the top and bottom edges of the panels must be needed panel installation dimensions. ■ The side panel should be opened to...
...between offsets ¹⁄₄" (6.35 mm) Door Panel ¹⁄₄" (6.35 mm) max. 1" (2.54 cm) max Hinge Side Door Panel Handle Handle ³⁄₈" (9.5 mm) min. Bottom ¹⁄₄" (6.35 mm) max. Then rout the hinge side of the freezer panel ¹&#...Panel ¹⁄₂" (1.3 cm) min. Top View 3¹⁄₄" (8.25 cm) min. See "Door Swing Dimensions." Extended Handle - Rout both types of handles, rout the top and bottom edges of the panels must be needed panel installation dimensions. ■ The side panel should be opened to...

Installation Guide
Page 20
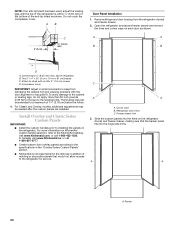
... doors taped closed until refrigerator is installed in death or serious injury. 1. Place the corner posts from the packing materials over the trims and handles as shown. Failure to support and stabilize the full weight of the refrigerator as appropriate. If you do not need to reduce the tipping radius... to "Move the Refrigerator into the home, be reduced by -step instructions. A. Use two or more people to protect the side trims and handles. Place an appliance dolly under the left side of the refrigerator. ■ Keep the cardboard shipping piece or plywood under the...
... doors taped closed until refrigerator is installed in death or serious injury. 1. Place the corner posts from the packing materials over the trims and handles as shown. Failure to support and stabilize the full weight of the refrigerator as appropriate. If you do not need to reduce the tipping radius... to "Move the Refrigerator into the home, be reduced by -step instructions. A. Use two or more people to protect the side trims and handles. Place an appliance dolly under the left side of the refrigerator. ■ Keep the cardboard shipping piece or plywood under the...
Installation Guide
Page 24
...) boards C. Panels 24 Do not crush the compressor cover. Open the refrigerator door(s) and freezer drawer and remove the trims and corner caps on KitchenAid custom handle selection, refer to the refrigerator for the removal or addition of the anti-tip board as shown. Attach to installing the panels on the refrigerator...
...) boards C. Panels 24 Do not crush the compressor cover. Open the refrigerator door(s) and freezer drawer and remove the trims and corner caps on KitchenAid custom handle selection, refer to the refrigerator for the removal or addition of the anti-tip board as shown. Attach to installing the panels on the refrigerator...

Installation Guide
Page 25
.... 1. Place the top grille panel-side down on the left door first. Top grille B. Bottom rail B. Custom panel ABC A. Slide the custom panel into the handle trim section. 5. Remove the locking plate screw from the screw covers. NOTE: Adjust the right door to adjust the door height, up ; Loosen, but do...
.... 1. Place the top grille panel-side down on the left door first. Top grille B. Bottom rail B. Custom panel ABC A. Slide the custom panel into the handle trim section. 5. Remove the locking plate screw from the screw covers. NOTE: Adjust the right door to adjust the door height, up ; Loosen, but do...

Installation Guide
Page 26
... in the 130° position on Overlay Series models. Replace the door stop is located on a soft surface. Remove the locking plate as shown. See "Handle and Door Clearances." 3. Turning the bushing right will lower the door. If the doors are not even, continue to turn the bushing to adjust the...
... in the 130° position on Overlay Series models. Replace the door stop is located on a soft surface. Remove the locking plate as shown. See "Handle and Door Clearances." 3. Turning the bushing right will lower the door. If the doors are not even, continue to turn the bushing to adjust the...


