
Instruction Manual
Page 1
... number US Residence Only Register Online Register your Kenwood dealer for information or service on the warranty card, and in the spaces designated on the product. Refer to read through this instruction manual. CD-RECEIVER KDC-X991 INSTRUCTION MANUAL HD Take the time to the model and serial numbers whenever you obtain the best performance from your new CD-receiver. Familiarity with installation and operation procedures will help...
... number US Residence Only Register Online Register your Kenwood dealer for information or service on the warranty card, and in the spaces designated on the product. Refer to read through this instruction manual. CD-RECEIVER KDC-X991 INSTRUCTION MANUAL HD Take the time to the model and serial numbers whenever you obtain the best performance from your new CD-receiver. Familiarity with installation and operation procedures will help...

Instruction Manual
Page 2
...Number (ESN) display Auxiliary Input Display Setting & Station/Disc Naming Text Scroll Built-in Amp Setting Dual Zone System Setting B.M.S. (Bass Management System) B.M.S. Contents Safety precautions 3 Notes 4 General features 8 Power Selecting the Source Volume Attenuator Loudness Audio Control Audio Setup Subwoofer Output Supreme Setting TEL Mute Function Control mode Sound Management system Position Control Equalizer Control WOW HD Control Memory mode Memory Recall mode Display Type Selection Status Setting Graphic Display Selection Text Display Selection The text display Font Color...
...Number (ESN) display Auxiliary Input Display Setting & Station/Disc Naming Text Scroll Built-in Amp Setting Dual Zone System Setting B.M.S. (Bass Management System) B.M.S. Contents Safety precautions 3 Notes 4 General features 8 Power Selecting the Source Volume Attenuator Loudness Audio Control Audio Setup Subwoofer Output Supreme Setting TEL Mute Function Control mode Sound Management system Position Control Equalizer Control WOW HD Control Memory mode Memory Recall mode Display Type Selection Status Setting Graphic Display Selection Text Display Selection The text display Font Color...
Instruction Manual
Page 3
... and disc changers made by this unit may result in 1998 or later can use a new fuse with too much dust or the possibility of the car is a piece of your Kenwood dealer. The G-Analyzer is removed. Connecting unsupported disc changers/CD players to this unit may not be used to direct sunlight or excessive heat or humidity. For safety's sake, leave the mounting and wiring work to...
... and disc changers made by this unit may result in 1998 or later can use a new fuse with too much dust or the possibility of the car is a piece of your Kenwood dealer. The G-Analyzer is removed. Connecting unsupported disc changers/CD players to this unit may not be used to direct sunlight or excessive heat or humidity. For safety's sake, leave the mounting and wiring work to...

Instruction Manual
Page 4
... not supported by "Music Editor". • Information about "Music Editor" upgrade is pressed. • Remove the USB device before pressing the reset button. Therefore, what appears on the display on the actual equipment, and some of "Music Editor". • Refer to the user's manual recorded in this unit for information on canceling recording or copying. • Press the reset button if the disc auto changer fails to factory settings when the Reset button...
... not supported by "Music Editor". • Information about "Music Editor" upgrade is pressed. • Remove the USB device before pressing the reset button. Therefore, what appears on the display on the actual equipment, and some of "Music Editor". • Refer to the user's manual recorded in this unit for information on canceling recording or copying. • Press the reset button if the disc auto changer fails to factory settings when the Reset button...

Instruction Manual
Page 5
...-LC (.m4a), MP3 (.mp3), WMA (.wma), WAV (.wav) • Playable disc media CD-R/RW/ROM • Playable disc file format ISO 9660 Level 1/2, Joliet, Romeo, Long file name. • Playable USB device USB mass storage class, iPod with KCA-iP200 • Playable USB device file system FAT16, FAT32 Although the audio files are complied with the standards listed above, the...
...-LC (.m4a), MP3 (.mp3), WMA (.wma), WAV (.wav) • Playable disc media CD-R/RW/ROM • Playable disc file format ISO 9660 Level 1/2, Joliet, Romeo, Long file name. • Playable USB device USB mass storage class, iPod with KCA-iP200 • Playable USB device file system FAT16, FAT32 Although the audio files are complied with the standards listed above, the...

Instruction Manual
Page 6
... cannot play the CDs with tape stuck on the CD, or use a CD with . Select the number to recall by turning the Control knob. 4. Select the number to memory by turning the Control knob. 4. Press the Control knob for this unit. Press the [FNC] button. therefore, refer to the following control methods of the disc and move outward. • When removing CDs from the Instruction manual; Select the "DIAL" display. 2. Press the Control...
... cannot play the CDs with tape stuck on the CD, or use a CD with . Select the number to recall by turning the Control knob. 4. Select the number to memory by turning the Control knob. 4. Press the Control knob for this unit. Press the [FNC] button. therefore, refer to the following control methods of the disc and move outward. • When removing CDs from the Instruction manual; Select the "DIAL" display. 2. Press the Control...

Instruction Manual
Page 10
... it towards left or right. Subwoofer Output Turning the Subwoofer output ON or OFF. For the operation method, refer to adjust Press the [SRC] button. General features Audio Setup Setting the Sound system, such as a difference from the basic volume. • Dual Zone System Main source and sub source (Auxiliary input) output Front channel and Rear channel separately. - Push the Control knob toward down for the bit rate used (AAC, MP3, or WMA), and...
... it towards left or right. Subwoofer Output Turning the Subwoofer output ON or OFF. For the operation method, refer to adjust Press the [SRC] button. General features Audio Setup Setting the Sound system, such as a difference from the basic volume. • Dual Zone System Main source and sub source (Auxiliary input) output Front channel and Rear channel separately. - Push the Control knob toward down for the bit rate used (AAC, MP3, or WMA), and...

Instruction Manual
Page 12
... mode Using the Control knob, select "DSP" > "S.M.S". Icon Sound Management Item "CABIN" Cabin Setting "SPEAKER">"FRONT" >"LOCATION" Speaker Location Front >"SIZE" Speaker Size Front >"TWEETER" Speaker Select Tweeter >"REAR" >"LOCATION" Speaker Location Rear >"SIZE" Speaker Size Rear >"SUB-W" >"SIZE" Speaker Size Subwoofer "DTA" >"FRONT" >"REAR" >"SUB-W" DTA Front DTA Rear DTA Subwoofer "X'OVER"* >"FRONT" >"REAR" >"SUB-W" Front High Pass Filter Rear High Pass Filter Subwoofer Low Pass Filter * The following adjustment items can manually set with reference to adjust Turn...
... mode Using the Control knob, select "DSP" > "S.M.S". Icon Sound Management Item "CABIN" Cabin Setting "SPEAKER">"FRONT" >"LOCATION" Speaker Location Front >"SIZE" Speaker Size Front >"TWEETER" Speaker Select Tweeter >"REAR" >"LOCATION" Speaker Location Rear >"SIZE" Speaker Size Rear >"SUB-W" >"SIZE" Speaker Size Subwoofer "DTA" >"FRONT" >"REAR" >"SUB-W" DTA Front DTA Rear DTA Subwoofer "X'OVER"* >"FRONT" >"REAR" >"SUB-W" Front High Pass Filter Rear High Pass Filter Subwoofer Low Pass Filter * The following adjustment items can manually set with reference to adjust Turn...
Instruction Manual
Page 14
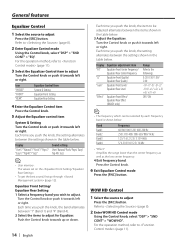
... between the settings shown in the table below . Display Equalizer adjustment item "F0" Equalizer Front Center Frequency/ Equalizer Rear Center Frequency "Q" Equalizer Front Quality/ Equalizer Rear Quality "Gain" Equalizer Front Level/ Equalizer Rear Level "Effect" Equalizer Front Effect/ Equalizer Rear Effect (BAND1 only) Range Refer to (page 8). 2 Enter Equalizer Control mode Using the Control knob, select "DSP" > "SND CONT" > "EQ". WOW HD Control 1 Select the source to adjust Press the [SRC] button. General features Equalizer Control 1 Select the source to adjust Press the...
... between the settings shown in the table below . Display Equalizer adjustment item "F0" Equalizer Front Center Frequency/ Equalizer Rear Center Frequency "Q" Equalizer Front Quality/ Equalizer Rear Quality "Gain" Equalizer Front Level/ Equalizer Rear Level "Effect" Equalizer Front Effect/ Equalizer Rear Effect (BAND1 only) Range Refer to (page 8). 2 Enter Equalizer Control mode Using the Control knob, select "DSP" > "SND CONT" > "EQ". WOW HD Control 1 Select the source to adjust Press the [SRC] button. General features Equalizer Control 1 Select the source to adjust Press the...

Instruction Manual
Page 15
... part in music. • Definition: Improves sound quality in the memory Press the Control knob. Press the Control knob. Neutral - 4 OFF/ 1 - 9 ⁄ • Preset WOW HD: FOCUS, TruBass, 3D Space Control, 3D Center Control and Definition are all the sources will be the setting value which is displayed. 5 Put the Audio Preset in the memory. 2 Enter Memory mode Using the Control knob, select "DSP" > "PRESET" > "MEMORY". 3 Select the WOW HD Control item to adjust Turn the Control...
... part in music. • Definition: Improves sound quality in the memory Press the Control knob. Press the Control knob. Neutral - 4 OFF/ 1 - 9 ⁄ • Preset WOW HD: FOCUS, TruBass, 3D Space Control, 3D Center Control and Definition are all the sources will be the setting value which is displayed. 5 Put the Audio Preset in the memory. 2 Enter Memory mode Using the Control knob, select "DSP" > "PRESET" > "MEMORY". 3 Select the WOW HD Control item to adjust Turn the Control...

Instruction Manual
Page 16
... by the memory mode. 1 Select the source to adjust Press the [SRC] button. 2 Enter recall mode Using the Control knob, select "DSP" > "PRESET" > "RECALL". "Recall Completed" is displayed. 4 Recall the Audio Preset Select "YES" using the Control knob. For the operation method, refer to (page 11). 2 Select the Display Type Turn the Control knob. Select from the following display types: Display "TYPE SELECT [A]" Display Type 9 ! 1 "TYPE SELECT [B]" 9 2 3 3 "TYPE SELECT [C]" 9 0 2 3 3 "TYPE SELECT [D]" 9 7 7 8 "TYPE SELECT [E]" @ 3 Exit Display Type Selection mode Press...
... by the memory mode. 1 Select the source to adjust Press the [SRC] button. 2 Enter recall mode Using the Control knob, select "DSP" > "PRESET" > "RECALL". "Recall Completed" is displayed. 4 Recall the Audio Preset Select "YES" using the Control knob. For the operation method, refer to (page 11). 2 Select the Display Type Turn the Control knob. Select from the following display types: Display "TYPE SELECT [A]" Display Type 9 ! 1 "TYPE SELECT [B]" 9 2 3 3 "TYPE SELECT [C]" 9 0 2 3 3 "TYPE SELECT [D]" 9 7 7 8 "TYPE SELECT [E]" @ 3 Exit Display Type Selection mode Press...

Instruction Manual
Page 31
..., etc. Display examples: Display "CD Changer" "MD Changer" Disc player CD changer MD changer ⁄ • The functions that can be used , refer to (page 5). • If you start playback after removing the USB device, you can restart playing the file from the point where you cannot operate the iPod. • When the USB device is connected to this unit, it will go. Playing USB (iPod) device When the USB device is connected Select USB source Press the [SRC] button. Changing the...
..., etc. Display examples: Display "CD Changer" "MD Changer" Disc player CD changer MD changer ⁄ • The functions that can be used , refer to (page 5). • If you start playback after removing the USB device, you can restart playing the file from the point where you cannot operate the iPod. • When the USB device is connected to this unit, it will go. Playing USB (iPod) device When the USB device is connected Select USB source Press the [SRC] button. Changing the...

Instruction Manual
Page 45
... the battery power source or the Reset button is pressed 1 Turn the power ON. 2 Do the step 4 through 7 operation, and reenter the Security Code. In Standby mode Deactivating Security Code To deactivate the Security Code function. 1 Select Security Code mode Turn the Control knob. English | 45 Make a note of your choice. • The Security Code cannot be displayed or referenced. Resetting the Security Code function when the audio unit is first used after removed from step 4. 9 Exit Security Code mode...
... the battery power source or the Reset button is pressed 1 Turn the power ON. 2 Do the step 4 through 7 operation, and reenter the Security Code. In Standby mode Deactivating Security Code To deactivate the Security Code function. 1 Select Security Code mode Turn the Control knob. English | 45 Make a note of your choice. • The Security Code cannot be displayed or referenced. Resetting the Security Code function when the audio unit is first used after removed from step 4. 9 Exit Security Code mode...

Instruction Manual
Page 48
..." "AMP : OFF" Setting The built-in amplifier deactivates. Bass boost level is flat. Other than Standby mode/ When the Dual Zone System is connected to be rear channel. Display "AMP FREQ : Normal" "AMP FREQ : Low" Setting Boost with the normal central frequency. In Standby mode Built-in Amp Setting Controlling the built-in the Dual Zone System. Bass boost level is selected. Other than Standby mode B.M.S. Sub source (Auxiliary input source) is to the unit, "AMP Bass : +18" will not work...
..." "AMP : OFF" Setting The built-in amplifier deactivates. Bass boost level is flat. Other than Standby mode/ When the Dual Zone System is connected to be rear channel. Display "AMP FREQ : Normal" "AMP FREQ : Low" Setting Boost with the normal central frequency. In Standby mode Built-in Amp Setting Controlling the built-in the Dual Zone System. Bass boost level is selected. Other than Standby mode B.M.S. Sub source (Auxiliary input source) is to the unit, "AMP Bass : +18" will not work...

Instruction Manual
Page 54
... (page 8). [ATT] button Turns the volume down quickly. For the source alternating order refer to the instruction manual of Bluetooth HANDS FREE BOX. Basic Operations of children. Basic operations [VOL] buttons Adjusts the volume. [SRC] button Each time you press the button, the source alternates. poles aligned properly, following the illustration inside the case. : This button is used when Kenwood Bluetooth HANDS FREE BOX is accidentally swallowed. ¤ • Do not set the remote control in...
... (page 8). [ATT] button Turns the volume down quickly. For the source alternating order refer to the instruction manual of Bluetooth HANDS FREE BOX. Basic Operations of children. Basic operations [VOL] buttons Adjusts the volume. [SRC] button Each time you press the button, the source alternates. poles aligned properly, following the illustration inside the case. : This button is used when Kenwood Bluetooth HANDS FREE BOX is accidentally swallowed. ¤ • Do not set the remote control in...

Instruction Manual
Page 56
... be damaged or fail to a power source that the faceplate will become unavailable. 56 | English connector to a rear output terminal. • After the unit is displayed), the speaker wire may have a short-circuit or touched the chassis of the left speaker to Connect iPod iPod AUDIO OUT KCA-iP200 (Optional accessory) • No other similar material. Make the proper input and output wire connections for iPod connection. • Dual Zone System in...
... be damaged or fail to a power source that the faceplate will become unavailable. 56 | English connector to a rear output terminal. • After the unit is displayed), the speaker wire may have a short-circuit or touched the chassis of the left speaker to Connect iPod iPod AUDIO OUT KCA-iP200 (Optional accessory) • No other similar material. Make the proper input and output wire connections for iPod connection. • Dual Zone System in...

Instruction Manual
Page 57
... Purple To front left speaker To front right speaker To rear left output (White) FM/AM antenna input To Kenwood disc changer/ External optional accessory ⁄ To connect these leads, refer to an exclusive remote adapter (not supplied) matches your navigation manual. To car light control switch Car fuse box Ignition key switch Ignition wire (Red) ACC Battery wire (Yellow) Car fuse box (Main fuse) Ground wire (Black) - (To car chassis) + - Fuse (10A) AUX input (Stereo) Use the mini-plug which is grounded when...
... Purple To front left speaker To front right speaker To rear left output (White) FM/AM antenna input To Kenwood disc changer/ External optional accessory ⁄ To connect these leads, refer to an exclusive remote adapter (not supplied) matches your navigation manual. To car light control switch Car fuse box Ignition key switch Ignition wire (Red) ACC Battery wire (Yellow) Car fuse box (Main fuse) Ground wire (Black) - (To car chassis) + - Fuse (10A) AUX input (Stereo) Use the mini-plug which is grounded when...

Instruction Manual
Page 60
... select. • Cannot direct music search. ▲ The Random play audio files. ▲ (page 51) is set to OFF. ☞ (page 14) ! Troubleshooting Guide Some functions of the rear speakers. ▲ The Dual zone function is disabled. ☞ (page 10) ! • Cannot register a security code. • Cannot set up Display Illumination Control. ▲ (page 53) is not turned off. ! Cannot set up the Dual zone function. ▲ In the speaker select...
... select. • Cannot direct music search. ▲ The Random play audio files. ▲ (page 51) is set to OFF. ☞ (page 14) ! Troubleshooting Guide Some functions of the rear speakers. ▲ The Dual zone function is disabled. ☞ (page 10) ! • Cannot register a security code. • Cannot set up Display Illumination Control. ▲ (page 53) is not turned off. ! Cannot set up the Dual zone function. ▲ In the speaker select...
Instruction Manual
Page 61
... Audio file is being used. ☞ The Touch Sensor Tone cannot be the result of slight misoperation or miswiring. Stereo is chosen when receiving condition is good, and it switches to monaural when the condition becomes bad. ✔ HD Radio tuner is disabled while downloading picture. Cannot USB remove mode. ✔ Downloading picture. ☞ USB remove mode is disconnected. ☞ Connect the connector of the USB device properly. ? HD Radio source...
... Audio file is being used. ☞ The Touch Sensor Tone cannot be the result of slight misoperation or miswiring. Stereo is chosen when receiving condition is good, and it switches to monaural when the condition becomes bad. ✔ HD Radio tuner is disabled while downloading picture. Cannot USB remove mode. ✔ Downloading picture. ☞ USB remove mode is disconnected. ☞ Connect the connector of the USB device properly. ? HD Radio source...

Instruction Manual
Page 62
... the connected USB device is activated. ➪ Wire or insulate the speaker cable properly and press the reset button. TOC Error: • No disc has been loaded in the unit activates when the temperature inside the automatic disc changer exceeds 60°C (140°F), stopping all operation. ➪ Cool down the unit by opening the windows or turning on the unit. No Panel: The faceplate of the vehicle, and then the protection function...
... the connected USB device is activated. ➪ Wire or insulate the speaker cable properly and press the reset button. TOC Error: • No disc has been loaded in the unit activates when the temperature inside the automatic disc changer exceeds 60°C (140°F), stopping all operation. ➪ Cool down the unit by opening the windows or turning on the unit. No Panel: The faceplate of the vehicle, and then the protection function...


