
Instruction Manual
Page 5
... the Faceplate Terminals If the terminals on the display may affect its mechanical parts. Therefore, what appears on the display in the installation CD-ROM and Help of "Media Manager" for the...refer to (page 20). • Press the Reset button if the disc auto changer fails to KDC-X590/KDC-MP632U • "Media Manager" is initially set on the Demonstration mode. For the types of ... your Kenwood dealer. • When you purchase optional accessories, check with your Kenwood dealer to make sure that they work with your model and in this unit is a product of the display and the...
... the Faceplate Terminals If the terminals on the display may affect its mechanical parts. Therefore, what appears on the display in the installation CD-ROM and Help of "Media Manager" for the...refer to (page 20). • Press the Reset button if the disc auto changer fails to KDC-X590/KDC-MP632U • "Media Manager" is initially set on the Demonstration mode. For the types of ... your Kenwood dealer. • When you purchase optional accessories, check with your Kenwood dealer to make sure that they work with your model and in this unit is a product of the display and the...
Instruction Manual
Page 11
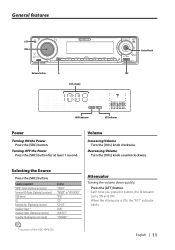
... input (Optional accessory) Standby (Illumination only mode) Display "SIRIUS" "TUNER" or "HD RADIO" "USB" "CD" "CD CH" "AUX" "AUX EXT" "STANDBY" Attenuator Turning the volume down quickly. When the Attenuator is ON, the "ATT" indicator blinks. • * Function of the KDC-MP632U. General features ATT VOL Release button Q Clock display Control knob SRC LOUD indicator ATT indicator...
... input (Optional accessory) Standby (Illumination only mode) Display "SIRIUS" "TUNER" or "HD RADIO" "USB" "CD" "CD CH" "AUX" "AUX EXT" "STANDBY" Attenuator Turning the volume down quickly. When the Attenuator is ON, the "ATT" indicator blinks. • * Function of the KDC-MP632U. General features ATT VOL Release button Q Clock display Control knob SRC LOUD indicator ATT indicator...

Instruction Manual
Page 12
... Adjustment Item Display Range Rear Volume *1,2 "R-VOL" 0 - 35 Subwoofer level*1,3,4,5 "SW L" -15 - +15 Bass level*6 "BAS L" -8 - +8 Middle level*6 "MID L" -8 - +8 Treble level*6 "TRE L" -8 - +8 Balance "BAL" Left 15 - Front 15 Exit Audio Control mode (Volume control mode) • *1 Function of KDC-X590/MP632U. &#...; Change each setting value with the Speaker setting. When you press the button once, the current sound setting is included : KDC-X590 only) 5 Exit Audio Control mode Press any button. First, select the speaker type with the (page 14). General features ...
... Adjustment Item Display Range Rear Volume *1,2 "R-VOL" 0 - 35 Subwoofer level*1,3,4,5 "SW L" -15 - +15 Bass level*6 "BAS L" -8 - +8 Middle level*6 "MID L" -8 - +8 Treble level*6 "TRE L" -8 - +8 Balance "BAL" Left 15 - Front 15 Exit Audio Control mode (Volume control mode) • *1 Function of KDC-X590/MP632U. &#...; Change each setting value with the Speaker setting. When you press the button once, the current sound setting is included : KDC-X590 only) 5 Exit Audio Control mode Press any button. First, select the speaker type with the (page 14). General features ...
Instruction Manual
Page 13
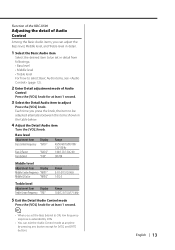
English | 13 Function of the KDC-X590 Adjusting the detail of Audio Control Press the [VOL] knob for at anytime by 20%. • You can exit the Audio Control mode at least 1 ... item Select the desired item to be set in the table below. 4 Adjust the Detail Audio item Turn the [VOL] knob. Bass level Adjustment Item Display Bass Center Frequency "BAS F" Bass Q Factor Bass Extend "BAS Q" "B EX" Range 40/50/60/70/80/100/ 120/150 Hz 1.00/1.25/1.50/2.00 OFF...
English | 13 Function of the KDC-X590 Adjusting the detail of Audio Control Press the [VOL] knob for at anytime by 20%. • You can exit the Audio Control mode at least 1 ... item Select the desired item to be set in the table below. 4 Adjust the Detail Audio item Turn the [VOL] knob. Bass level Adjustment Item Display Bass Center Frequency "BAS F" Bass Q Factor Bass Extend "BAS Q" "B EX" Range 40/50/60/70/80/100/ 120/150 Hz 1.00/1.25/1.50/2.00 OFF...

Instruction Manual
Page 14
...control this item when "2ZON" of (page 14) is set to Through. • *5 KDC-X590 only • Dual Zone System Main source and sub source (Auxiliary input) output Front channel and Rear channel separately. - Adjustment Item Display Front High Pass "HPF" Filter*1,3 Rear High Pass Filter*1,3"HPR" Low Pass Filter*1,2,3 "LPF...be adjusted alternates between the settings shown in the table below . Select Main source by (page 30). - Option CA-C1AX/ CA-C2AX (KDC-X590 only) 5 Exit Audio Setup mode Press the [VOL] knob for at least 1 second. speaker For 6 & 6x9 in . Internal auxiliary input...
...control this item when "2ZON" of (page 14) is set to Through. • *5 KDC-X590 only • Dual Zone System Main source and sub source (Auxiliary input) output Front channel and Rear channel separately. - Adjustment Item Display Front High Pass "HPF" Filter*1,3 Rear High Pass Filter*1,3"HPR" Low Pass Filter*1,2,3 "LPF...be adjusted alternates between the settings shown in the table below . Select Main source by (page 30). - Option CA-C1AX/ CA-C2AX (KDC-X590 only) 5 Exit Audio Setup mode Press the [VOL] knob for at least 1 second. speaker For 6 & 6x9 in . Internal auxiliary input...

Instruction Manual
Page 15
..." "CLOCK" In CD & External disc source Information Disc title Track title Track number & Play time Clock Display "D-TITLE"* "T-TITLE"* "P-TIME" "CLOCK" In Audio file source Information Song title & Artist name Album name & Artist name Folder name File name Track number & Play time Clock Display "TITLE"* "ALBUM"* "FOLDER" "FILE" "P-TIME" "CLOCK" In HD Radio source Information...
..." "CLOCK" In CD & External disc source Information Disc title Track title Track number & Play time Clock Display "D-TITLE"* "T-TITLE"* "P-TIME" "CLOCK" In Audio file source Information Song title & Artist name Album name & Artist name Folder name File name Track number & Play time Clock Display "TITLE"* "ALBUM"* "FOLDER" "FILE" "P-TIME" "CLOCK" In HD Radio source Information...
Instruction Manual
Page 18
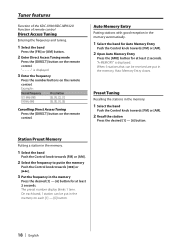
... 1 station can be received are put in the memory Push the Control knob towards [FM] or [AM]. 2 Open Auto Memory Entry Press the [AME] button for at least 2 seconds. The preset number display blinks 1 time. Example...: Desired frequency 92.1 MHz (FM) 810 kHz (AM) Press button [0], [9], [2], [1] [0], [8], [1], [0] Cancelling Direct Access Tuning Press the [DIRECT] button on the remote control. On each [1] - [6] button. 18 | English When 6 stations that can be put in the memory on the remote control. Tuner features Function of the KDC-X590/KDC...
... 1 station can be received are put in the memory Push the Control knob towards [FM] or [AM]. 2 Open Auto Memory Entry Press the [AME] button for at least 2 seconds. The preset number display blinks 1 time. Example...: Desired frequency 92.1 MHz (FM) 810 kHz (AM) Press button [0], [9], [2], [1] [0], [8], [1], [0] Cancelling Direct Access Tuning Press the [DIRECT] button on the remote control. On each [1] - [6] button. 18 | English When 6 stations that can be put in the memory on the remote control. Tuner features Function of the KDC-X590/KDC...

Instruction Manual
Page 19
...disc is inserted, the "IN" indicator is ON. • You can enter the inside part and cause damage. Select the "CD" display. Pause and play of the ACDrive media. (KDC-X590/MP632U only) 3 Press the faceplate on the left side, and return it to its former position. • When the faceplate ...control features Control knob Release button S.MODE SCAN RDM/3/ REP F.SEL M.RDM SRC A.RDM Track number Play time IN indicator Play mode Disc number Playing CD & Audio file When there is no disc inserted 1 Drop open the faceplate Press the Release button. 2 Insert a disc. 3 Push the faceplate...
...disc is inserted, the "IN" indicator is ON. • You can enter the inside part and cause damage. Select the "CD" display. Pause and play of the ACDrive media. (KDC-X590/MP632U only) 3 Press the faceplate on the left side, and return it to its former position. • When the faceplate ...control features Control knob Release button S.MODE SCAN RDM/3/ REP F.SEL M.RDM SRC A.RDM Track number Play time IN indicator Play mode Disc number Playing CD & Audio file When there is no disc inserted 1 Drop open the faceplate Press the Release button. 2 Insert a disc. 3 Push the faceplate...
Instruction Manual
Page 20
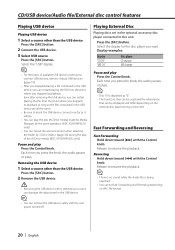
...accessory disc player connected to resume the playback. Select the display for the disc player you press the knob, the audio pauses or plays. Select the "USB" display. • For the types of the ACDrive media. (KDC-X590/MP632U only) Pause and play Press the Control knob. Press... is being searched. • You cannot fast Forwarding and Reversing depending on the external disc players being connected. Display examples: Display "CD CH" "MD CH" Disc player CD changer MD changer Pause and play Press the Control knob. Release to this unit. Playing External Disc Playing discs ...
...accessory disc player connected to resume the playback. Select the display for the disc player you press the knob, the audio pauses or plays. Select the "USB" display. • For the types of the ACDrive media. (KDC-X590/MP632U only) Pause and play Press the Control knob. Press... is being searched. • You cannot fast Forwarding and Reversing depending on the external disc players being connected. Display examples: Display "CD CH" "MD CH" Disc player CD changer MD changer Pause and play Press the Control knob. Release to this unit. Playing External Disc Playing discs ...
Instruction Manual
Page 23
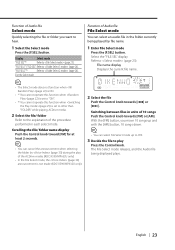
File name display Displays the current file name. • The Select mode does not function when (page 22) is ON. • *1 You cannot operate this function when (page 25) is not made. (KDC-X590/MP632U only) 2 Select the file Push the Control knob towards [FM] or [AM]. The File Select mode ...releases, and the Audio file being played by (page 33) during the play Press the Control knob. Scrolling the file/ folder name display Push the Control knob toward...
File name display Displays the current file name. • The Select mode does not function when (page 22) is ON. • *1 You cannot operate this function when (page 25) is not made. (KDC-X590/MP632U only) 2 Select the file Push the Control knob towards [FM] or [AM]. The File Select mode ...releases, and the Audio file being played by (page 33) during the play Press the Control knob. Scrolling the file/ folder name display Push the Control knob toward...
Instruction Manual
Page 25
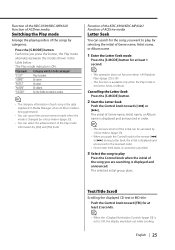
... not function when (page 22) is ON. • This function is available only when the Play mode is displayed and announced. Play mode "P. By genre. Function of the KDC-X590/KDC-MP632U Function of ACDrive media Letter Seek You can be arranged Play list order. Text/Title Scroll Scrolling the... displayed CD text or MD title. The Play mode indicator is set Genre, Artist, or Album. Press the [S.MODE] button....
... not function when (page 22) is ON. • This function is available only when the Play mode is displayed and announced. Play mode "P. By genre. Function of the KDC-X590/KDC-MP632U Function of ACDrive media Letter Seek You can be arranged Play list order. Text/Title Scroll Scrolling the... displayed CD text or MD title. The Play mode indicator is set Genre, Artist, or Album. Press the [S.MODE] button....

Instruction Manual
Page 30
Function of the KDC-X590 Other than Standby mode/ When the Dual Zone System is to be front channel. • Refer to the catalog or instruction manual for power amplifiers that can set from Flat to +12 dB. Display "BMS FLT" "BMS +6" "BMS +12" "BMS +18" Setting Bass boost level is mid (+...in amplifier deactivates. Display "ZONE2 R" "ZONE2 F" Setting Sub source (Auxiliary input source) is to the unit, "BMS +18" will not work correctly even if it is connected to be set from Flat to +18 dB, and the models you can only be rear channel. Function of the KDC-X590/KDC-MP632U Other than...
Function of the KDC-X590 Other than Standby mode/ When the Dual Zone System is to be front channel. • Refer to the catalog or instruction manual for power amplifiers that can set from Flat to +12 dB. Display "BMS FLT" "BMS +6" "BMS +12" "BMS +18" Setting Bass boost level is mid (+...in amplifier deactivates. Display "ZONE2 R" "ZONE2 F" Setting Sub source (Auxiliary input source) is to the unit, "BMS +18" will not work correctly even if it is connected to be set from Flat to +18 dB, and the models you can only be rear channel. Function of the KDC-X590/KDC-MP632U Other than...

Instruction Manual
Page 31
In HD Radio mode Receive mode Setting Sets the receive mode. 1 Select the Receive mode Push the Control knob towards [FM] or [AM]. Select the "HDR MODE" display. 2 Enter Receive mode Press the Control knob for at least 1 second. 3 Select the AMP Control item for adjustment Push the Control knob towards [... Select the "AMS CTRL" display. 2 Enter AMP Control mode Press the Control knob for service activation and potential service changes. Each time you push the knob, the Receive mode alternates between the modes shown in the table below. Function of the KDC-X590 When LX AMP unit connecting...
In HD Radio mode Receive mode Setting Sets the receive mode. 1 Select the Receive mode Push the Control knob towards [FM] or [AM]. Select the "HDR MODE" display. 2 Enter Receive mode Press the Control knob for at least 1 second. 3 Select the AMP Control item for adjustment Push the Control knob towards [... Select the "AMS CTRL" display. 2 Enter AMP Control mode Press the Control knob for service activation and potential service changes. Each time you push the knob, the Receive mode alternates between the modes shown in the table below. Function of the KDC-X590 When LX AMP unit connecting...
Instruction Manual
Page 32
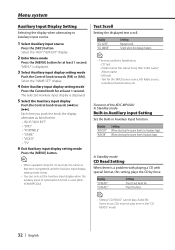
... can only set the Auxiliary input display when the auxiliary input of the KDC-MP632U In Standby mode Built-in Auxiliary input Setting Set the Built-in the "CD READ2" mode. 32 | English Select the "NAME SET" display. 4 Enter Auxiliary input display setting mode Press the Control knob for... display setting mode Press the [MENU] button. • When operation stops for the SIRIUS tuner source, HD Radio source, including Channel name, etc. Text for 10 seconds, the name at that time is a problem with playing a CD with special format, this setting plays the CD by force. • Setting "CD...
... can only set the Auxiliary input display when the auxiliary input of the KDC-MP632U In Standby mode Built-in Auxiliary input Setting Set the Built-in the "CD READ2" mode. 32 | English Select the "NAME SET" display. 4 Enter Auxiliary input display setting mode Press the Control knob for... display setting mode Press the [MENU] button. • When operation stops for the SIRIUS tuner source, HD Radio source, including Channel name, etc. Text for 10 seconds, the name at that time is a problem with playing a CD with special format, this setting plays the CD by force. • Setting "CD...
Instruction Manual
Page 33
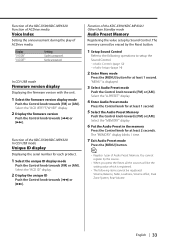
... Function of ACDrive media Voice Index Setting the announcement during the play of the KDC-X590/KDC-MP632U In CD/ USB mode Unique ID display Displaying the serial number for each product. 1 Select the unique ID display mode Push the Control knob towards [FM] or [AM]. Not be erased by the ... Control knob for at least 2 seconds. The memory cannot be announced. The "MEMORY" display blinks 1 time. 7 Exit Audio Preset mode Press the [MENU] button. • Register 1 pair of the KDC-X590/KDC-MP632U Other than Standby mode Audio Preset Memory Registering the value setup by the source. &#...
... Function of ACDrive media Voice Index Setting the announcement during the play of the KDC-X590/KDC-MP632U In CD/ USB mode Unique ID display Displaying the serial number for each product. 1 Select the unique ID display mode Push the Control knob towards [FM] or [AM]. Not be erased by the ... Control knob for at least 2 seconds. The memory cannot be announced. The "MEMORY" display blinks 1 time. 7 Exit Audio Preset mode Press the [MENU] button. • Register 1 pair of the KDC-X590/KDC-MP632U Other than Standby mode Audio Preset Memory Registering the value setup by the source. &#...

Instruction Manual
Page 34
...). 1 Select the source Press the [SRC] button. 2 Enter Menu mode Press the [MENU] button for at least 2 seconds. The "RECALL" display blinks 1 time. 7 Exit Audio Preset mode Press the [MENU] button. In Standby mode Demonstration mode Setting Sets the demonstration mode. 1 Select the Demonstration... mode Push the Control knob towards [FM] or [AM]. Select the "DEMO" display. 2 Set the Demonstration mode Press the Control knob for at least 1 second. Menu system Function of the KDC-X590/KDC-MP632U Other than Standby mode Audio Preset Recall Recalling the sound setup registered by the ...
...). 1 Select the source Press the [SRC] button. 2 Enter Menu mode Press the [MENU] button for at least 2 seconds. The "RECALL" display blinks 1 time. 7 Exit Audio Preset mode Press the [MENU] button. In Standby mode Demonstration mode Setting Sets the demonstration mode. 1 Select the Demonstration... mode Push the Control knob towards [FM] or [AM]. Select the "DEMO" display. 2 Set the Demonstration mode Press the Control knob for at least 1 second. Menu system Function of the KDC-X590/KDC-MP632U Other than Standby mode Audio Preset Recall Recalling the sound setup registered by the ...


