
Instruction Manual
Page 1
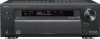
Register Online Register your Kenwood Home Audio product at our web site. AUDIO VIDEO SURROUND RECEIVER VR-9070 INSTRUCTION MANUAL KENWOOD CORPORATION About the supplied remote control Compared to switch its design and how to receive e-mail updates and other audio/video components. In order to effectively ... instructions and obtain a proper understanding of the remote control and how to standard remote controls, the remote control supplied with this receiver has several operation modes. For the U.S.A. B60-5553-00 00 CS (K, P) 0412 These modes enable the remote control to ...
Register Online Register your Kenwood Home Audio product at our web site. AUDIO VIDEO SURROUND RECEIVER VR-9070 INSTRUCTION MANUAL KENWOOD CORPORATION About the supplied remote control Compared to switch its design and how to receive e-mail updates and other audio/video components. In order to effectively ... instructions and obtain a proper understanding of the remote control and how to standard remote controls, the remote control supplied with this receiver has several operation modes. For the U.S.A. B60-5553-00 00 CS (K, P) 0412 These modes enable the remote control to ...
Instruction Manual
Page 2
...alcohol, etc. Consult the dealer or an experienced radio / TV technician for operation as follows. As an ENERGY STAR® Partner, Kenwood Corporation has determined that the cable ground shall be connected to the grounding system of the building, as a detailed explanation of the ...a malfunction. This product can be able to CATV system installer This reminder is divided into an outlet on the receiver. For the U.S.A. Since this receiver works with this page carefully to provide reasonable protection against harmful interference in this equipment if an unauthorized change or ...
...alcohol, etc. Consult the dealer or an experienced radio / TV technician for operation as follows. As an ENERGY STAR® Partner, Kenwood Corporation has determined that the cable ground shall be connected to the grounding system of the building, as a detailed explanation of the ...a malfunction. This product can be able to CATV system installer This reminder is divided into an outlet on the receiver. For the U.S.A. Since this receiver works with this page carefully to provide reasonable protection against harmful interference in this equipment if an unauthorized change or ...
Instruction Manual
Page 3
... sources 26 Recording video 26 Recording audio (digital sources 26 Listening to radio broadcasts 28 Tuning radio stations 28 Presetting radio stations manually 28 Receiving preset stations 29 Receiving preset stations in order (P.CALL) ... 29 Ambience effects 30 Surround modes 30 Surround play 33 Virtual modes 35 DVD 6-channel playback 35 Convenient...
... sources 26 Recording video 26 Recording audio (digital sources 26 Listening to radio broadcasts 28 Tuning radio stations 28 Presetting radio stations manually 28 Receiving preset stations 29 Receiving preset stations in order (P.CALL) ... 29 Ambience effects 30 Surround modes 30 Surround play 33 Virtual modes 35 DVD 6-channel playback 35 Convenient...

Instruction Manual
Page 4
If any accessories are present. Operating range (Approx.) Remote sensor 6 m RECEIVER ON Infrared ray system • When pressing more than one remote control key successively, press the keys securely by the polarity markings. Remote control unit (1) ... prevent malfunction. 4 EN In such a case, change the location of 1 second or more between keys. Kenwood recommends that all accessories are missing, or if the unit is lit, the power turns ON when you press the RECEIVER ON key on the remote control. When the remote-controllable distance gets shorter than ordinary...
If any accessories are present. Operating range (Approx.) Remote sensor 6 m RECEIVER ON Infrared ray system • When pressing more than one remote control key successively, press the keys securely by the polarity markings. Remote control unit (1) ... prevent malfunction. 4 EN In such a case, change the location of 1 second or more between keys. Kenwood recommends that all accessories are missing, or if the unit is lit, the power turns ON when you press the RECEIVER ON key on the remote control. When the remote-controllable distance gets shorter than ordinary...
Instruction Manual
Page 5
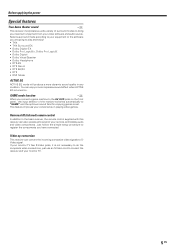
... with this receiver can enjoy a more dynamic sound quality in playing video games. You can also operate almost all of your video software and audio source. Just follow the simple setup procedure to register the components you are going to play and enjoy! • THX • THX Surround EX... you have connected. Select a surround mode according to your convenience in any condition. Before applying the power Special features True home theater sound º This receiver incorporates a wide variety of surround modes to bring you connect a game machine to the AV AUX jacks on .
... with this receiver can enjoy a more dynamic sound quality in playing video games. You can also operate almost all of your video software and audio source. Just follow the simple setup procedure to register the components you are going to play and enjoy! • THX • THX Surround EX... you have connected. Select a surround mode according to your convenience in any condition. Before applying the power Special features True home theater sound º This receiver incorporates a wide variety of surround modes to bring you connect a game machine to the AV AUX jacks on .
Instruction Manual
Page 6
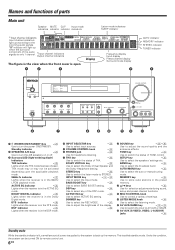
...applicable playback mode. 96kHz fs indicator ‡ Lights when the receiver is in the Dolby Digital mode. DOLBY DIGITAL indicator ‹ Lights when the receiver is in the preset memory. 9 5/∞ keys ) Use for headphone listening. 7 THX key ‹ Use to switch the status of settings. !... SOUND key )fl Use to adjust the sound quality and the ambience effects. THX mode may or may not be turned ON by remote control unit. 6 EN DTS indicator ‹ Lights when the receiver is called standby mode. BAND key • Use to select the speakers' settings...
...applicable playback mode. 96kHz fs indicator ‡ Lights when the receiver is in the Dolby Digital mode. DOLBY DIGITAL indicator ‹ Lights when the receiver is in the preset memory. 9 5/∞ keys ) Use for headphone listening. 7 THX key ‹ Use to switch the status of settings. !... SOUND key )fl Use to adjust the sound quality and the ambience effects. THX mode may or may not be turned ON by remote control unit. 6 EN DTS indicator ‹ Lights when the receiver is called standby mode. BAND key • Use to select the speakers' settings...
Instruction Manual
Page 7
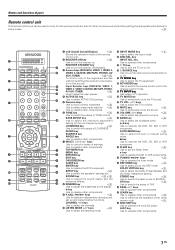
... EN LAST key Use to operate other remote code. LOUDNESS key ¢ Use to switch the status of the registered sources without switching the receiver's input selec- Use to operate other components. 9 P.CALL 4/¢ keys ª Use for selection adjustments during sound, set the Sleep... CHANNEL + DSP MODE DOLBY VIRTUAL LISTEN MODE STEREO THX PAGE INPUT MODE DISC SEL. AUDIO key SUBTITLE key ANGLE key Use to operate other non-Kenwood products by setting the appropriate manufacturer's setup codes. · RECEIVER ON STANDBY SOURCE TV DVD/6CH VIDEO1 VIDEO2 VIDEO3 ...
... EN LAST key Use to operate other remote code. LOUDNESS key ¢ Use to switch the status of the registered sources without switching the receiver's input selec- Use to operate other components. 9 P.CALL 4/¢ keys ª Use for selection adjustments during sound, set the Sleep... CHANNEL + DSP MODE DOLBY VIRTUAL LISTEN MODE STEREO THX PAGE INPUT MODE DISC SEL. AUDIO key SUBTITLE key ANGLE key Use to operate other non-Kenwood products by setting the appropriate manufacturer's setup codes. · RECEIVER ON STANDBY SOURCE TV DVD/6CH VIDEO1 VIDEO2 VIDEO3 ...
Instruction Manual
Page 8
... 3 6CH INPUT (DVD/6CH input only) 4 ANALOG (analog input) Auto detect: In FULL AUTO mode ("AUTO DETECT" indicator lights up), the receiver detects the digital or analog input signals automatically. These cables usually have been made using RCA pin cords. Each press switches the setting as shown... power consumption is larger than what is not possible or an erroneous display appears, even though all connections have 2 plugs on the receiver, follow the steps below. Microcomputer malfunction If operation is indicated on the input signal. ‹ Fixed to analog input: Select this...
... 3 6CH INPUT (DVD/6CH input only) 4 ANALOG (analog input) Auto detect: In FULL AUTO mode ("AUTO DETECT" indicator lights up), the receiver detects the digital or analog input signals automatically. These cables usually have been made using RCA pin cords. Each press switches the setting as shown... power consumption is larger than what is not possible or an erroneous display appears, even though all connections have 2 plugs on the receiver, follow the steps below. Microcomputer malfunction If operation is indicated on the input signal. ‹ Fixed to analog input: Select this...

Instruction Manual
Page 9
... position. Speaker placement Center Speaker 1 Strip coating. 2 Push the lever. 3 Insert the cord. 4 Return the lever. Connection of the receiver, connect speakers with matching impedance ratings. Using speakers with ambiguous acoustic imaging. Front (Left and Right) Speakers Place at the front left and ... (Since the subwoofer has less directivity than other than that can offer the best low frequency reproduction according to the speakers or receiver. speaker cords. • If the left and right speakers are connected inversely or the speaker cords are required for surround playback...
... position. Speaker placement Center Speaker 1 Strip coating. 2 Push the lever. 3 Insert the cord. 4 Return the lever. Connection of the receiver, connect speakers with matching impedance ratings. Using speakers with ambiguous acoustic imaging. Front (Left and Right) Speakers Place at the front left and ... (Since the subwoofer has less directivity than other than that can offer the best low frequency reproduction according to the speakers or receiver. speaker cords. • If the left and right speakers are connected inversely or the speaker cords are required for surround playback...
Instruction Manual
Page 10
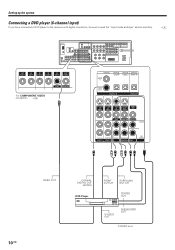
Setting up the system Connecting a DVD player (6-channel input) If you have connected a DVD player to the receiver with digital connection, be sure to read the "Input mode settings" section carefully. 8 OUT VIDEO IN VIDEO IN VIDEO IN VIDEO IN VIDEO OUT VIDEO ...
Setting up the system Connecting a DVD player (6-channel input) If you have connected a DVD player to the receiver with digital connection, be sure to read the "Input mode settings" section carefully. 8 OUT VIDEO IN VIDEO IN VIDEO IN VIDEO IN VIDEO OUT VIDEO ...
Instruction Manual
Page 11
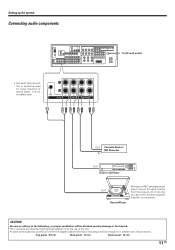
... components • The earth terminal with the H symbol is not for noise reduction of the unit. • Leave some space around the unit (from the receiver unit. It is used for safety earth. CAUTION Be sure to adhere to or greater than, shown below. L R IN PHONO IN CD/DVD REC OUT...
... components • The earth terminal with the H symbol is not for noise reduction of the unit. • Leave some space around the unit (from the receiver unit. It is used for safety earth. CAUTION Be sure to adhere to or greater than, shown below. L R IN PHONO IN CD/DVD REC OUT...
Instruction Manual
Page 13
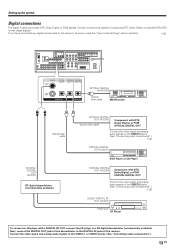
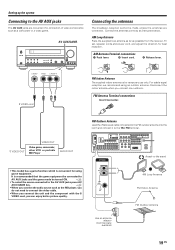
Connect the video signal and analog audio signals to a RF digital demodulator (commercially available). If you have connected any digital components to the receiver, be sure to read the "Input mode settings" section carefully. 8 COAXIAL VIDEO 2 OPTICAL OPTICAL OPTICAL CD/DVD VIDEO 3 MONITOR DVD/ 6CH DIGITAL IN DIGITAL OUT ... of the demodulator to the DIGITAL IN jacks of outputting DTS, Dolby Digital, or standard PCM (CD) format digital signals. Connect components capable of the receiver.
Connect the video signal and analog audio signals to a RF digital demodulator (commercially available). If you have connected any digital components to the receiver, be sure to read the "Input mode settings" section carefully. 8 COAXIAL VIDEO 2 OPTICAL OPTICAL OPTICAL CD/DVD VIDEO 3 MONITOR DVD/ 6CH DIGITAL IN DIGITAL OUT ... of the demodulator to the DIGITAL IN jacks of outputting DTS, Dolby Digital, or standard PCM (CD) format digital signals. Connect components capable of the receiver.
Instruction Manual
Page 14
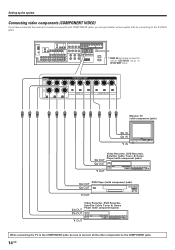
... picture quality than by connecting to the COMPONENT jacks. 14 EN Setting up the system Connecting video components (COMPONENT VIDEO) If you have connected the receiver to a video component with component jacks) Y OUT When connecting the TV to the COMPONENT jacks, be sure to connect all the other components to the...
... picture quality than by connecting to the COMPONENT jacks. 14 EN Setting up the system Connecting video components (COMPONENT VIDEO) If you have connected the receiver to a video component with component jacks) Y OUT When connecting the TV to the COMPONENT jacks, be sure to connect all the other components to the...

Instruction Manual
Page 16
... jacks, press only the SPEAKERS A key to an external power amplifier as shown in the example below. Setting up the system PRE OUT connections This receiver has additional PRE OUT jacks.
... jacks, press only the SPEAKERS A key to an external power amplifier as shown in the example below. Setting up the system PRE OUT connections This receiver has additional PRE OUT jacks.
Instruction Manual
Page 18
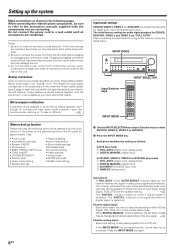
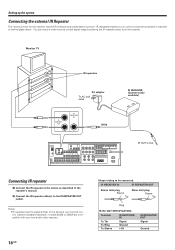
...; IR repeaters send a signal similar to be connected. Xantech repeaters (example : models 284M or 286M) are compatible with your new audio-video receiver. 18 EN Shape of plug to the device's own remote control. IR repeaters enables you to the IR REPEATER OUT jack(s). Setting up the ... the IR (infrared rays) transmission function. Monitor TV IR repeaters AC adapter To AC wall outlet IR REPEATER OUT IR RECEIVER IN IR IN IR RECEIVER (Commercially available) MONITOR IR OUT is free Connecting IR repeater 1 Connect the IR repeater to the device as described in the repeater's ...
...; IR repeaters send a signal similar to be connected. Xantech repeaters (example : models 284M or 286M) are compatible with your new audio-video receiver. 18 EN Shape of plug to the device's own remote control. IR repeaters enables you to the IR REPEATER OUT jack(s). Setting up the ... the IR (infrared rays) transmission function. Monitor TV IR repeaters AC adapter To AC wall outlet IR REPEATER OUT IR RECEIVER IN IR IN IR RECEIVER (Commercially available) MONITOR IR OUT is free Connecting IR repeater 1 Connect the IR repeater to the device as described in the repeater's ...
Instruction Manual
Page 19
... game. AM Antenna Terminal connections 1 Push lever. 2 Insert cord. 3 Release lever. FM Antenna Terminal connections Insert Connector. Connect the antennas correctly as possible from the receiver, TV set, speaker cords and power cord, and adjust the direction for best reception. S VIDEO VIDEO L-AUDIO-R S VIDEO cord FM Indoor Antenna The supplied indoor...
... game. AM Antenna Terminal connections 1 Push lever. 2 Insert cord. 3 Release lever. FM Antenna Terminal connections Insert Connector. Connect the antennas correctly as possible from the receiver, TV set, speaker cords and power cord, and adjust the direction for best reception. S VIDEO VIDEO L-AUDIO-R S VIDEO cord FM Indoor Antenna The supplied indoor...
Instruction Manual
Page 20
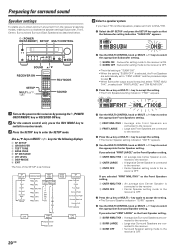
...STEREO 4 Use the MULTI CONTROL knob or MULTI %/fi keys to select the appropriate Front Speakers setting. 1 FRNT NML/THX : Average size Front Speakers are connected to the receiver. 2 FRNT LARGE : Large size Front Speakers are con- ceiver is selected, the Front Speakers are con- nected to ...setting. 1 SUBW ON :Subwoofer setting mode to the receiver is ON. 2 SUBW OFF :Subwoofer setting mode to the receiver is OFF. • The initial setting is "SUBW ON". • When the setting "SUBW OFF" is OFF. If you have THX certified speakers, please set to "FRNT LARGE" and the ...
...STEREO 4 Use the MULTI CONTROL knob or MULTI %/fi keys to select the appropriate Front Speakers setting. 1 FRNT NML/THX : Average size Front Speakers are connected to the receiver. 2 FRNT LARGE : Large size Front Speakers are con- ceiver is selected, the Front Speakers are con- nected to ...setting. 1 SUBW ON :Subwoofer setting mode to the receiver is ON. 2 SUBW OFF :Subwoofer setting mode to the receiver is OFF. • The initial setting is "SUBW ON". • When the setting "SUBW OFF" is OFF. If you have THX certified speakers, please set to "FRNT LARGE" and the ...
Instruction Manual
Page 21
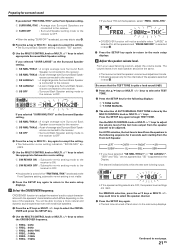
... Speaker. Preparing for surround sound If you selected "FRNT NML/THX" as the Front Speaker setting, 1 SURR NML/THX : Average size Surround Speakers are connected to the receiver. 2 SURR OFF : Surround Speaker setting mode to the receiver is OFF. • When the setting "SURR OFF" is...C SW R A B CLIP LFE SL SB SR STEREO If you have THX certified speakers, select "FREQ. : 80Hz-THX". From your usual listening position, adjust the volume levels. Use the MULTI CONTROL knob or MULTI %/fi keys to the receiver. 2 SB NML/THXx2 : A pair of large size Surround Back Speak-...
... Speaker. Preparing for surround sound If you selected "FRNT NML/THX" as the Front Speaker setting, 1 SURR NML/THX : Average size Surround Speakers are connected to the receiver. 2 SURR OFF : Surround Speaker setting mode to the receiver is OFF. • When the setting "SURR OFF" is...C SW R A B CLIP LFE SL SB SR STEREO If you have THX certified speakers, select "FREQ. : 80Hz-THX". From your usual listening position, adjust the volume levels. Use the MULTI CONTROL knob or MULTI %/fi keys to the receiver. 2 SB NML/THXx2 : A pair of large size Surround Back Speak-...
Instruction Manual
Page 23
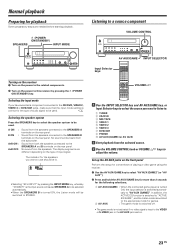
... SPEAKERS key to select the speaker system to be used. Set up the AV AUX jacks on the type of playing a video game using the receiver. 1 Use the AV AUX/GAME key to select "AV AUX [GAME]" (or "AV AUX"). 2 Press and hold the AV AUX/GAME key for more than... MODE Listening to a source component VOLUME CONTROL AV AUX/GAME INPUT SELECTOR Input Selector keys Turning on the receiver 1 Turn on the power to the related components. 2 Turn on the rear panel. cally to this receiver by pressing the INPUT MODE key, whereby "DVD/6CH" is the input source will be lit.
... SPEAKERS key to select the speaker system to be used. Set up the AV AUX jacks on the type of playing a video game using the receiver. 1 Use the AV AUX/GAME key to select "AV AUX [GAME]" (or "AV AUX"). 2 Press and hold the AV AUX/GAME key for more than... MODE Listening to a source component VOLUME CONTROL AV AUX/GAME INPUT SELECTOR Input Selector keys Turning on the receiver 1 Turn on the power to the related components. 2 Turn on the rear panel. cally to this receiver by pressing the INPUT MODE key, whereby "DVD/6CH" is the input source will be lit.

Instruction Manual
Page 24
... PL II x • The adjustment mode is displayed for each input source. 2 For the remote control unit, press the RCV MODE key to switch to receiver mode. 3 Press the SOUND and 5/∞ keys or MULTI @/# keys repeatedly until the "INPUT" indication appears. 4 Use the MULTI CONTROL knob or MULTI %/fi ... you want to adjust. • You can adjust the sound quality when the receiver is in the PCM stereo mode, analog stereo mode and when "THX OFF". 1 For the remote control, press the RCV MODE key to switch to receiver mode. 2 Press the TONE key to select the TONE mode. 3 Use the ...
... PL II x • The adjustment mode is displayed for each input source. 2 For the remote control unit, press the RCV MODE key to switch to receiver mode. 3 Press the SOUND and 5/∞ keys or MULTI @/# keys repeatedly until the "INPUT" indication appears. 4 Use the MULTI CONTROL knob or MULTI %/fi ... you want to adjust. • You can adjust the sound quality when the receiver is in the PCM stereo mode, analog stereo mode and when "THX OFF". 1 For the remote control, press the RCV MODE key to switch to receiver mode. 2 Press the TONE key to select the TONE mode. 3 Use the ...


