
Instruction Manual
Page 1
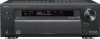
..., the remote control supplied with this receiver has several operation modes. Register Online Register your Kenwood Home Audio product at our web site. These modes enable the remote control to receive e-mail updates and other offers when... you register at www.kenwoodusa.com Plus opt in incorrect operations. Using the remote control without completely understanding its operation modes (etc.). AUDIO VIDEO SURROUND RECEIVER VR-9070 INSTRUCTION MANUAL KENWOOD...
..., the remote control supplied with this receiver has several operation modes. Register Online Register your Kenwood Home Audio product at our web site. These modes enable the remote control to receive e-mail updates and other offers when... you register at www.kenwoodusa.com Plus opt in incorrect operations. Using the remote control without completely understanding its operation modes (etc.). AUDIO VIDEO SURROUND RECEIVER VR-9070 INSTRUCTION MANUAL KENWOOD...
Instruction Manual
Page 2
... THE LITERATURE ACCOMPANYING THE APPLIANCE. This equipment may cause harmful interference to ensure safe operation. As an ENERGY STAR® Partner, Kenwood Corporation has determined that provides guidelines for they may generate or use thinner, benzine, alcohol, etc. Be specially careful not to...CATV system installer's attention to Article 820-40 of the NEC that this manual for a Class B digital device, pursuant to correct the interference by turning the equipment off and on the receiver. Preparations Shows you how to this equipment may cause discoloration. Consult the...
... THE LITERATURE ACCOMPANYING THE APPLIANCE. This equipment may cause harmful interference to ensure safe operation. As an ENERGY STAR® Partner, Kenwood Corporation has determined that provides guidelines for they may generate or use thinner, benzine, alcohol, etc. Be specially careful not to...CATV system installer's attention to Article 820-40 of the NEC that this manual for a Class B digital device, pursuant to correct the interference by turning the equipment off and on the receiver. Preparations Shows you how to this equipment may cause discoloration. Consult the...
Instruction Manual
Page 3
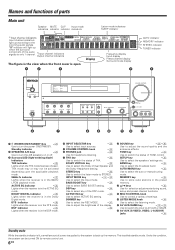
... Contents Caution : Read the pages marked safe operation. carefully to ensure Before applying the power 2 Safety precautions 2 How to use this manual 2 Unpacking 4 Preparing the remote control 4 Special features 5 Names and functions of parts 6 Main unit 6 Remote control unit 7 Preparations...26 Recording audio (digital sources 26 Listening to radio broadcasts 28 Tuning radio stations 28 Presetting radio stations manually 28 Receiving preset stations 29 Receiving preset stations in order (P.CALL) ... 29 Ambience effects 30 Surround modes 30 Surround play 33 Virtual modes...
... Contents Caution : Read the pages marked safe operation. carefully to ensure Before applying the power 2 Safety precautions 2 How to use this manual 2 Unpacking 4 Preparing the remote control 4 Special features 5 Names and functions of parts 6 Main unit 6 Remote control unit 7 Preparations...26 Recording audio (digital sources 26 Listening to radio broadcasts 28 Tuning radio stations 28 Presetting radio stations manually 28 Receiving preset stations 29 Receiving preset stations in order (P.CALL) ... 29 Ambience effects 30 Surround modes 30 Surround play 33 Virtual modes...

Instruction Manual
Page 4
...remote control Loading the batteries 1 Remove the cover. 2 Insert the batteries. If any accessories are present. Kenwood recommends that all accessories are missing, or if the unit is lit, the power turns ON when you need to ...operate. Keep this manual handy for future reference. • Insert two AAA-size (R03) batteries as indicated by leaving an... the original carton and packing materials in case you press the RECEIVER ON key on the remote control. Remote control unit (1) RC-R0918 Batteries (R03/AAA) (2) 3 Close ...
...remote control Loading the batteries 1 Remove the cover. 2 Insert the batteries. If any accessories are present. Kenwood recommends that all accessories are missing, or if the unit is lit, the power turns ON when you need to ...operate. Keep this manual handy for future reference. • Insert two AAA-size (R03) batteries as indicated by leaving an... the original carton and packing materials in case you press the RECEIVER ON key on the remote control. Remote control unit (1) RC-R0918 Batteries (R03/AAA) (2) 3 Close ...
Instruction Manual
Page 6
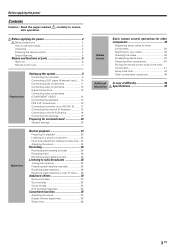
... the status of THX. TONE key ¢ Use to select the auto or manual tuning mode. AUTO/MONO key • Use to switch the status of TONE control. Under the condition, the system can be activated depending upon the applicable playback mode. 96kHz fs indicator ‡ Lights when the receiver is in the...
... the status of THX. TONE key ¢ Use to select the auto or manual tuning mode. AUTO/MONO key • Use to switch the status of TONE control. Under the condition, the system can be activated depending upon the applicable playback mode. 96kHz fs indicator ‡ Lights when the receiver is in the...
Instruction Manual
Page 7
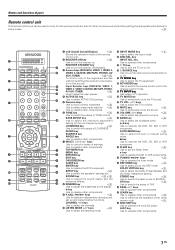
.... # TV key Use to turn the other non-Kenwood products by setting the appropriate manufacturer's setup codes. · RECEIVER ON STANDBY SOURCE TV DVD/6CH VIDEO1 VIDEO2 VIDEO3 CD.../DVD MD/TAPE PHONO AV AUX TUNER ACTIVE EQ RCV MODE TV MODE TV INPUT TV MUTE INFO TV VOL. AUTO/MONO key • Use to select the auto or manual...select the Input mode. @ DISC SEL. CHANNEL + DSP MODE DOLBY VIRTUAL LISTEN MODE STEREO THX PAGE INPUT MODE DISC SEL. q • DISC SKIP key Use to control a variety of...
.... # TV key Use to turn the other non-Kenwood products by setting the appropriate manufacturer's setup codes. · RECEIVER ON STANDBY SOURCE TV DVD/6CH VIDEO1 VIDEO2 VIDEO3 CD.../DVD MD/TAPE PHONO AV AUX TUNER ACTIVE EQ RCV MODE TV MODE TV INPUT TV MUTE INFO TV VOL. AUTO/MONO key • Use to select the auto or manual...select the Input mode. @ DISC SEL. CHANNEL + DSP MODE DOLBY VIRTUAL LISTEN MODE STEREO THX PAGE INPUT MODE DISC SEL. q • DISC SKIP key Use to control a variety of...
Instruction Manual
Page 8
...the right channel and one white for the left channel. These cables are usually packed together with the components you want to the instruction manuals supplied with the source unit, or are connecting. After completing connections and turning on each include jacks for CD/DVD, DVD/6CH, VIDEO... auto- This means the audio signal corresponds to match the type of two channels. Press the INPUT MODE key again. 8 EN The receiver will be produced. These cables transfer stereo audio signal in the current listen mode. matically during playback to the actual audio of input signal...
...the right channel and one white for the left channel. These cables are usually packed together with the components you want to the instruction manuals supplied with the source unit, or are connecting. After completing connections and turning on each include jacks for CD/DVD, DVD/6CH, VIDEO... auto- This means the audio signal corresponds to match the type of two channels. Press the INPUT MODE key again. 8 EN The receiver will be produced. These cables transfer stereo audio signal in the current listen mode. matically during playback to the actual audio of input signal...
Instruction Manual
Page 18
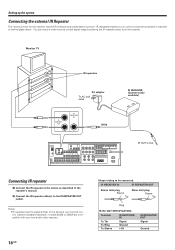
You can enjoy a wider remote control signal range by placing the IR repeater away from the receiver. Notes • IR repeaters send a signal similar to control components located in the repeater's manual. 2 Connect the IR repeater cable(s) to be connected. IR repeaters enables you to the device's ...own remote control. Monitor TV IR repeaters AC adapter To AC wall outlet IR REPEATER OUT IR RECEIVER IN IR IN IR RECEIVER (Commercially available) MONITOR IR...
You can enjoy a wider remote control signal range by placing the IR repeater away from the receiver. Notes • IR repeaters send a signal similar to control components located in the repeater's manual. 2 Connect the IR repeater cable(s) to be connected. IR repeaters enables you to the device's ...own remote control. Monitor TV IR repeaters AC adapter To AC wall outlet IR REPEATER OUT IR RECEIVER IN IR IN IR RECEIVER (Commercially available) MONITOR IR...
Instruction Manual
Page 20
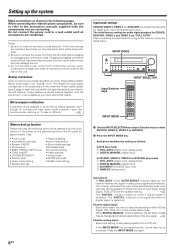
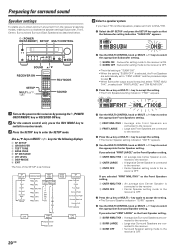
...THX certified speakers, please set to "FRNT LARGE" and the procedure skips to step 6. • When Subwoofer output sound is OFF. SP MUTE L C SW R A B CLIP LFE SL SB SR STEREO 4 Use the MULTI CONTROL knob or MULTI %/fi keys to select the appropriate Front Speakers setting. 1 FRNT NML/THX...setting. 1 SUBW ON :Subwoofer setting mode to the receiver is ON. 2 SUBW OFF :Subwoofer setting mode to the receiver is OFF. • The initial setting is "...to NML/THX. 1 Select the SP SETUP and press the SETUP key again so that the Subwoofer setting indication "SUBW ON" appears. TONE MANUAL L ...
...THX certified speakers, please set to "FRNT LARGE" and the procedure skips to step 6. • When Subwoofer output sound is OFF. SP MUTE L C SW R A B CLIP LFE SL SB SR STEREO 4 Use the MULTI CONTROL knob or MULTI %/fi keys to select the appropriate Front Speakers setting. 1 FRNT NML/THX...setting. 1 SUBW ON :Subwoofer setting mode to the receiver is ON. 2 SUBW OFF :Subwoofer setting mode to the receiver is OFF. • The initial setting is "...to NML/THX. 1 Select the SP SETUP and press the SETUP key again so that the Subwoofer setting indication "SUBW ON" appears. TONE MANUAL L ...
Instruction Manual
Page 21
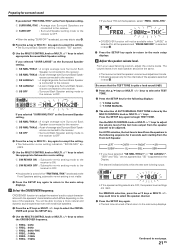
...MANUAL selection, press the 5/∞ keys or MULTI @/# keys each starting from the speaker channel to be available when "LARGE" is selected for the following sequence for 2 seconds each time to the receiver. 2 SB NML/THXx2 : A pair of the speakers. SP MUTE L C SW R A B CLIP LFE SL SB SR STEREO If you have THX certified... speakers, select "FREQ. : 80Hz-THX". From your usual listening position, ...
...MANUAL selection, press the 5/∞ keys or MULTI @/# keys each starting from the speaker channel to be available when "LARGE" is selected for the following sequence for 2 seconds each time to the receiver. 2 SB NML/THXx2 : A pair of the speakers. SP MUTE L C SW R A B CLIP LFE SL SB SR STEREO If you have THX certified... speakers, select "FREQ. : 80Hz-THX". From your usual listening position, ...
Instruction Manual
Page 26
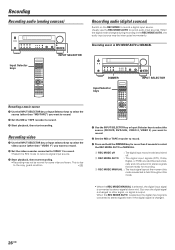
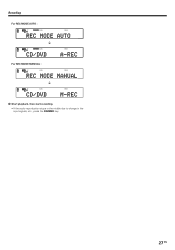
... is output. Usually use the REC MODE AUTO to record a digital input source. When the digital mode changes during recording in REC MODE AUTO or MANUAL DIMMER Input Selector keys INPUT SELECTOR Recording a music source 1 Use the INPUT SELECTOR key or Input Selector keys to select the source (other signal, ...no signal is due to select the REC MODE AUTO or MANUAL. 1 REC MODE off : The digital input record mode is switched off. 2 REC MODE AUTO : The digital input signals (DTS, Dolby Digital, or PCM) are...
... is output. Usually use the REC MODE AUTO to record a digital input source. When the digital mode changes during recording in REC MODE AUTO or MANUAL DIMMER Input Selector keys INPUT SELECTOR Recording a music source 1 Use the INPUT SELECTOR key or Input Selector keys to select the source (other signal, ...no signal is due to select the REC MODE AUTO or MANUAL. 1 REC MODE off : The digital input record mode is switched off. 2 REC MODE AUTO : The digital input signals (DTS, Dolby Digital, or PCM) are...
Instruction Manual
Page 27
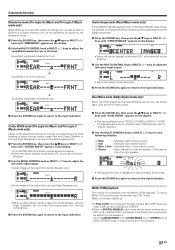
Recording For REC MODE AUTO : SP MUTE AUTO DETECT DIGITAL L C R A B CLIP LFE SL S SB SR STEREO SP MUTE AUTO DETECT DIGITAL L C R A B CLIP LFE SL S SB SR For REC MODE MANUAL : SP MUTE L C R A B CLIP LFE SL S SB SR DIGITAL STEREO STEREO SP MUTE L C R A B CLIP LFE SL S SB SR DIGITAL STEREO 4 Start playback, then start recording. • If the audio reproduction stops in the middle due to change in the input signals, etc., press the DIMMER key. 27 EN
Recording For REC MODE AUTO : SP MUTE AUTO DETECT DIGITAL L C R A B CLIP LFE SL S SB SR STEREO SP MUTE AUTO DETECT DIGITAL L C R A B CLIP LFE SL S SB SR For REC MODE MANUAL : SP MUTE L C R A B CLIP LFE SL S SB SR DIGITAL STEREO STEREO SP MUTE L C R A B CLIP LFE SL S SB SR DIGITAL STEREO 4 Start playback, then start recording. • If the audio reproduction stops in the middle due to change in the input signals, etc., press the DIMMER key. 27 EN
Instruction Manual
Page 28
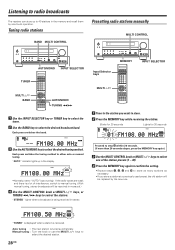
... elapse, press the MEMORY key again). 3 Use the MULTI CONTROL knob or MULTI %/ fi keys to select one of interference, switch to manual tuning. (With manual tuning, stereo broadcasts will be received in monaural.) 4 Use the MULTI CONTROL knob or MULTI %/ fi keys, or TUNING 1 / ¡ keys to the station you store a station...
... elapse, press the MEMORY key again). 3 Use the MULTI CONTROL knob or MULTI %/ fi keys to select one of interference, switch to manual tuning. (With manual tuning, stereo broadcasts will be received in monaural.) 4 Use the MULTI CONTROL knob or MULTI %/ fi keys, or TUNING 1 / ¡ keys to the station you store a station...

Instruction Manual
Page 31
... mode has user-adjustable characteristics to offer the three optional controls, like "Dimension", "Center Width" and "Panorama" modes to be activated manually. Especially in Pro Logic IIx "GAME" mode, base sound not only from Front and Center but also from Dolby Surround encoded sources ... system or an amplifier with a built-in high sampling frequency, multichannel audio with side wall imaging. DTS-ES DTS-ES (Digital Theater System-Extended Surround) presents 6.1 channels surround system with an astonishing fidelity from Dolby Digital program sources (such as adding a center channel...
... mode has user-adjustable characteristics to offer the three optional controls, like "Dimension", "Center Width" and "Panorama" modes to be activated manually. Especially in Pro Logic IIx "GAME" mode, base sound not only from Front and Center but also from Dolby Surround encoded sources ... system or an amplifier with a built-in high sampling frequency, multichannel audio with side wall imaging. DTS-ES DTS-ES (Digital Theater System-Extended Surround) presents 6.1 channels surround system with an astonishing fidelity from Dolby Digital program sources (such as adding a center channel...
Instruction Manual
Page 37
...• The adjustment item is displayed for approximately 20 seconds. 3 Press the SOUND key again to return to the input indication. 96kHz LPCM playback The receiver is set the listen mode other position, center image from Center Speaker, Left and Right Speakers can be heard from the speakers. To play a 96kHz... only. Center Image mode (Neo:6 Music mode only) In the CENTER IMAGE setting mode of the Neo:6 MUSIC listen mode, it is in DIGITAL MANUAL input mode and the listen mode is compatible with the 96kHz LPCM playback. Use the LISTEN MODE knob, LISTEN MODE key or STEREO key to...
...• The adjustment item is displayed for approximately 20 seconds. 3 Press the SOUND key again to return to the input indication. 96kHz LPCM playback The receiver is set the listen mode other position, center image from Center Speaker, Left and Right Speakers can be heard from the speakers. To play a 96kHz... only. Center Image mode (Neo:6 Music mode only) In the CENTER IMAGE setting mode of the Neo:6 MUSIC listen mode, it is in DIGITAL MANUAL input mode and the listen mode is compatible with the 96kHz LPCM playback. Use the LISTEN MODE knob, LISTEN MODE key or STEREO key to...
Instruction Manual
Page 50
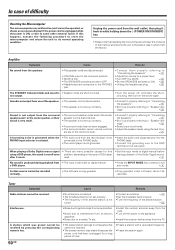
... key. • The preset station belongs to a frequency that resetting the microcomputer will clear the contents of time. • Preset a station with a receivable frequency. • Preset the station again. 50 EN a DVD player. • Press the INPUT MODE key to select to full auto mode. 9 ...A video source cannot be recorded normally. • The software is set to digital manual. A station which was cleared because the power cord had been unplugged for this happens, execute the following procedure to reset the microcomputer and ...
... key. • The preset station belongs to a frequency that resetting the microcomputer will clear the contents of time. • Preset a station with a receivable frequency. • Preset the station again. 50 EN a DVD player. • Press the INPUT MODE key to select to full auto mode. 9 ...A video source cannot be recorded normally. • The software is set to digital manual. A station which was cleared because the power cord had been unplugged for this happens, execute the following procedure to reset the microcomputer and ...
