

User Manual
Page 2
... as they are wet. • Ensure that disconnects the unit from the transceiver, and contact your KENWOOD dealer. ◆◆ Use of the transceiver while you use only a speaker/microphone in these locations when replacing the battery pack. • Do not immerse the transceiver in water. • Always switch the transceiver power off in the following locations: ◆◆ In...
... as they are wet. • Ensure that disconnects the unit from the transceiver, and contact your KENWOOD dealer. ◆◆ Use of the transceiver while you use only a speaker/microphone in these locations when replacing the battery pack. • Do not immerse the transceiver in water. • Always switch the transceiver power off in the following locations: ◆◆ In...

User Manual
Page 4
...] (ENC) control to switch the transceiver OFF. Turn the [PWR/VOL] control counterclockwise fully to select a memory channel. SELECTING A BAND (Dual Band MODEL) Press the left [A/B] control to the VFO mode. SELECTING THE VFO MODE Press the [VFO] to select band A or B. TH-D74: Press [ ]/[ ] (1s) to decrease the volume. Release the PTT switch to receive. • For best sound quality at the receiving station, hold the microphone approximately 3 cm...
...] (ENC) control to switch the transceiver OFF. Turn the [PWR/VOL] control counterclockwise fully to select a memory channel. SELECTING A BAND (Dual Band MODEL) Press the left [A/B] control to the VFO mode. SELECTING THE VFO MODE Press the [VFO] to select band A or B. TH-D74: Press [ ]/[ ] (1s) to decrease the volume. Release the PTT switch to receive. • For best sound quality at the receiving station, hold the microphone approximately 3 cm...
Operation Manual
Page 3
... can generate radio frequency energy and, if not installed and used in accordance with the limits for technical assistance. INFORMATION TO THE DIGITAL DEVICE USER REQUIRED BY THE FCC This equipment has been tested and found on KENWOOD lithium-ion (Li-ion) battery packs indicates KENWOOD's voluntary participation in the instruction manual. These limits are expressly approved in an industry program to collect...
... can generate radio frequency energy and, if not installed and used in accordance with the limits for technical assistance. INFORMATION TO THE DIGITAL DEVICE USER REQUIRED BY THE FCC This equipment has been tested and found on KENWOOD lithium-ion (Li-ion) battery packs indicates KENWOOD's voluntary participation in the instruction manual. These limits are expressly approved in an industry program to collect...
Operation Manual
Page 4
... the instructions and regulations provided by KENWOOD. • If the die-cast chassis or other transceiver part is damaged, do not touch the damaged parts. • If a headset or headphone is connected to the volume level when turning the squelch off in your area. • Do not expose the transceiver to an easily accessible AC socket. Transmitting at gasoline service stations...
... the instructions and regulations provided by KENWOOD. • If the die-cast chassis or other transceiver part is damaged, do not touch the damaged parts. • If a headset or headphone is connected to the volume level when turning the squelch off in your area. • Do not expose the transceiver to an easily accessible AC socket. Transmitting at gasoline service stations...

Operation Manual
Page 7
......1 Supplied Accessories 1 Installing the Antenna 1 Installing the Battery Pack 2 Installing the Belt Clip 2 Charging the Battery Pack 3 Connecting to the PC 5 GETTING ACQUAINTED 6 Panel...6 Display...8 BASIC OPERATION 10 Switching the Power On/Off 10 Adjusting the Volume 10 Adjusting the Squelch 10 Selecting a Frequency 11 Transmitting/ Receiving 11 Direct Frequency Entry 12 Selecting an Output Power 12 Backlight 13 Monitor...13 Lock Function 14 MENU SETUP...15 What is a Menu 15 Menu Access 15 Menu Function List 16 MEMORY CHANNELS 18...
......1 Supplied Accessories 1 Installing the Antenna 1 Installing the Battery Pack 2 Installing the Belt Clip 2 Charging the Battery Pack 3 Connecting to the PC 5 GETTING ACQUAINTED 6 Panel...6 Display...8 BASIC OPERATION 10 Switching the Power On/Off 10 Adjusting the Volume 10 Adjusting the Squelch 10 Selecting a Frequency 11 Transmitting/ Receiving 11 Direct Frequency Entry 12 Selecting an Output Power 12 Backlight 13 Monitor...13 Lock Function 14 MENU SETUP...15 What is a Menu 15 Menu Access 15 Menu Function List 16 MEMORY CHANNELS 18...
Operation Manual
Page 8
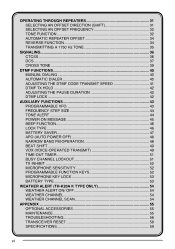
... APO (Auto Power Off 48 Narrow Band FM Operation 48 Beat Shift 49 VOX (Voice-Operated Transmit 49 Time-Out Timer 51 Busy Channel Lockout 51 TX Inhibit...52 Microphone Sensitivity 52 Programmable Function Keys 52 Microphone Key Lock 53 Battery Type 53 WEATHER ALERT (TH-K20A K TYPE ONLY 54 Weather Alert On/ Off 54 Weather Channel 54 Weather Channel Scan 54 APPENDIX...55 OPTIONAL ACCESSORIES 55 MAINTENANCE 55 TROUBLESHOOTING 56 TRANSCEIVER RESET 58 SPECIFICATIONS 59...
... APO (Auto Power Off 48 Narrow Band FM Operation 48 Beat Shift 49 VOX (Voice-Operated Transmit 49 Time-Out Timer 51 Busy Channel Lockout 51 TX Inhibit...52 Microphone Sensitivity 52 Programmable Function Keys 52 Microphone Key Lock 53 Battery Type 53 WEATHER ALERT (TH-K20A K TYPE ONLY 54 Weather Alert On/ Off 54 Weather Channel 54 Weather Channel Scan 54 APPENDIX...55 OPTIONAL ACCESSORIES 55 MAINTENANCE 55 TROUBLESHOOTING 56 TRANSCEIVER RESET 58 SPECIFICATIONS 59...

Operation Manual
Page 11
... the transceiver with a battery pack installed, be sure to turn the transceiver power OFF. 2 Plug the AC adapter cable into the charging slot. • Make sure the metal contacts of the battery pack mate securely with the charger terminals. • The indicator lights red and charging starts. 5 When charging is completed, the indicator flashing green. u When using this problem, reinsert the battery pack after it has...
... the transceiver with a battery pack installed, be sure to turn the transceiver power OFF. 2 Plug the AC adapter cable into the charging slot. • Make sure the metal contacts of the battery pack mate securely with the charger terminals. • The indicator lights red and charging starts. 5 When charging is completed, the indicator flashing green. u When using this problem, reinsert the battery pack after it has...

Operation Manual
Page 13
... a hindrance while driving. To the jack To the cigarette lighter socket Charger + KVC-22 DC power cable (supplied with the KVC-22) Note: Refer to malfunctions of the COM (serial) ports on your computer. 5 Connecting to a PC. When using the Charger, attach it will be erased or destroyed due to the KVC-22 instruction manual for data that may change without notice.) Note: No...
... a hindrance while driving. To the jack To the cigarette lighter socket Charger + KVC-22 DC power cable (supplied with the KVC-22) Note: Refer to malfunctions of the COM (serial) ports on your computer. 5 Connecting to a PC. When using the Charger, attach it will be erased or destroyed due to the KVC-22 instruction manual for data that may change without notice.) Note: No...

Operation Manual
Page 14
... control Turn clockwise to adjust the volume level. Rotate to switch the transceiver ON. ENC Control Rotate to select an operating frequency, Memory channel, Menu number, and setting value or to change the scan direction, etc. [PTT] (Push to talk) switch Press and hold, then speak into the microphone to transmit. [MONI] Press and hold to unmute the speaker in order to normal operation {page 13}. 6 TX-RX LED Lights red...
... control Turn clockwise to adjust the volume level. Rotate to switch the transceiver ON. ENC Control Rotate to select an operating frequency, Memory channel, Menu number, and setting value or to change the scan direction, etc. [PTT] (Push to talk) switch Press and hold, then speak into the microphone to transmit. [MONI] Press and hold to unmute the speaker in order to normal operation {page 13}. 6 TX-RX LED Lights red...
Operation Manual
Page 15
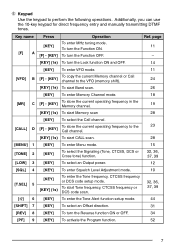
... operations. To select the Signaling (Tone, CTCSS, DCS or Cross tone) function. To select an Output power. 15 32, 36, 37, 39 12 [SQL] 4 [KEY] To enter Squelch Level Adjustment mode. [KEY] To enter the Tone frequency, CTCSS frequency or DCS code setup mode. [T.SEL] 5 [KEY] (1s) To start CALL scan. 28 [MENU] 1 [TONE] 2 [LOW] 3 [KEY] [KEY] [KEY] To enter Menu mode. Keypad Use the keypad to the Call channel. 23 [KEY] (1s) To start Tone frequency, CTCSS frequency...
... operations. To select the Signaling (Tone, CTCSS, DCS or Cross tone) function. To select an Output power. 15 32, 36, 37, 39 12 [SQL] 4 [KEY] To enter Squelch Level Adjustment mode. [KEY] To enter the Tone frequency, CTCSS frequency or DCS code setup mode. [T.SEL] 5 [KEY] (1s) To start CALL scan. 28 [MENU] 1 [TONE] 2 [LOW] 3 [KEY] [KEY] [KEY] To enter Menu mode. Keypad Use the keypad to the Call channel. 23 [KEY] (1s) To start Tone frequency, CTCSS frequency...

Operation Manual
Page 16
... cable to a PC {page 5}. Blinks when receiving a signal. (TH-K20A K type only) Appears when the Reverse function is ON. Appears when the Tone function is ON. Key name [LAMP] [STEP] 0 [ENT] # Press Operation [KEY] To turn the Backlight ON. [F] - [KEY] To keep the Backlight ON continuously. [KEY] To enter the Frequency step size setup mode. [KEY] To enter Direct frequency entry mode. DISPLAY Indicator 8 Description Appears while using Low output power. Appears while using...
... cable to a PC {page 5}. Blinks when receiving a signal. (TH-K20A K type only) Appears when the Reverse function is ON. Appears when the Tone function is ON. Key name [LAMP] [STEP] 0 [ENT] # Press Operation [KEY] To turn the Backlight ON. [F] - [KEY] To keep the Backlight ON continuously. [KEY] To enter the Frequency step size setup mode. [KEY] To enter Direct frequency entry mode. DISPLAY Indicator 8 Description Appears while using Low output power. Appears while using...

Operation Manual
Page 17
... in Memory Input mode. Displays the Memory channel number. Appears when the selected Memory channel is set to plus. Performs as an S meter when receiving a signal and displays the battery power remaining while Low power transmitting. Appears when the Shift function is ON. 9 Appears when the Lock function is set to -7.6 MHz. (TH-K40E (E type) only) Displays the operating frequency, setting information, etc. Appears while in Function mode. Appears when Priority scan is ON...
... in Memory Input mode. Displays the Memory channel number. Appears when the selected Memory channel is set to plus. Performs as an S meter when receiving a signal and displays the battery power remaining while Low power transmitting. Appears when the Shift function is ON. 9 Appears when the Lock function is set to -7.6 MHz. (TH-K40E (E type) only) Displays the operating frequency, setting information, etc. Appears while in Function mode. Appears when Priority scan is ON...

Operation Manual
Page 28
... those repeaters without programming the offset frequency and direction. 1 Store the desired receiving frequency and related data by pressing [ENT] after entering the channel number. The memory channel last used is stored in the memory channel. Using a Numeric Keypad You can also recall a memory channel by entering a desired memory channel number with a non-standard offset. STORING ODD-SPLIT REPEATER FREQUENCIES Some repeaters use a receive/transmit frequency pair with the keypad...
... those repeaters without programming the offset frequency and direction. 1 Store the desired receiving frequency and related data by pressing [ENT] after entering the channel number. The memory channel last used is stored in the memory channel. Using a Numeric Keypad You can also recall a memory channel by entering a desired memory channel number with a non-standard offset. STORING ODD-SPLIT REPEATER FREQUENCIES Some repeaters use a receive/transmit frequency pair with the keypad...

Operation Manual
Page 31
..., you may use the Call Channel as an odd-split channel, select a receiving frequency first. 2 Press [F] - [CALL]. • The selected frequency and related data are stored in the Call Channel. In this case, Call Scan will be useful. Reprogramming the Call Channel 1 Select your desired frequency and related data (Tone, CTCSS, DCS, or offset direction, etc.). • When you are operating the transceiver. To...
..., you may use the Call Channel as an odd-split channel, select a receiving frequency first. 2 Press [F] - [CALL]. • The selected frequency and related data are stored in the Call Channel. In this case, Call Scan will be useful. Reprogramming the Call Channel 1 Select your desired frequency and related data (Tone, CTCSS, DCS, or offset direction, etc.). • When you are operating the transceiver. To...

Operation Manual
Page 34
... VFO frequency or Memory channel. For example, if you selected. Checks the activities on the current band. Scans the specified frequency ranges stored in progress. • To change the scan direction, rotate the ENC control clockwise or counterclockwise . 4 To exit Band Scan, press any key other than the following type of scans: Band Scan Program Scan Memory Scan CALL Scan Priority Scan Scans all frequencies stored in order to pause scan in...
... VFO frequency or Memory channel. For example, if you selected. Checks the activities on the current band. Scans the specified frequency ranges stored in progress. • To change the scan direction, rotate the ENC control clockwise or counterclockwise . 4 To exit Band Scan, press any key other than the following type of scans: Band Scan Program Scan Memory Scan CALL Scan Priority Scan Scans all frequencies stored in order to pause scan in...

Operation Manual
Page 40
... function On. • Each time you have set the selected frequency. SELECTING AN OFFSET FREQUENCY To access a repeater which is used by most repeaters. 1 Enter Menu mode and access Menu No. 7 (OFFSET). 2 Rotate the ENC control to select the appropriate offset frequency value. • The selectable range is from the default which requires an odd-split frequency pair, change the offset frequency from 0.000 MHz to...
... function On. • Each time you have set the selected frequency. SELECTING AN OFFSET FREQUENCY To access a repeater which is used by most repeaters. 1 Enter Menu mode and access Menu No. 7 (OFFSET). 2 Rotate the ENC control to select the appropriate offset frequency value. • The selectable range is from the default which requires an odd-split frequency pair, change the offset frequency from 0.000 MHz to...
Operation Manual
Page 50
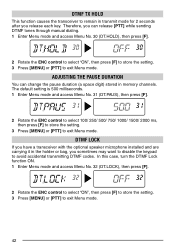
... setting. 3 Press [MENU] or [PTT] to exit Menu mode. DTMF LOCK If you have a transceiver with the optional speaker microphone installed and are carrying it in the holder or bag, you can change the pause duration (a space digit) stored in transmit mode for 2 seconds after you release each key. Therefore, you sometimes may want to disable the keypad to remain in memory channels...
... setting. 3 Press [MENU] or [PTT] to exit Menu mode. DTMF LOCK If you have a transceiver with the optional speaker microphone installed and are carrying it in the holder or bag, you can change the pause duration (a space digit) stored in transmit mode for 2 seconds after you release each key. Therefore, you sometimes may want to disable the keypad to remain in memory channels...

Operation Manual
Page 62
... store the setting. 3 Press [MENU] or [PTT] to exit Menu mode. • When activated, the " " icon appears on the display. • When a signal is received. • Memory scanning stops when performing any operation other than [LAMP], [MONI], [Key Lock] ([F] (1s)), and ENC control. 54 WEATHER CHANNEL Whether or not Weather Alert is available only in the USA and Canada. WEATHER CHANNEL SCAN The memory channel only for a received NOAA 1050...
... store the setting. 3 Press [MENU] or [PTT] to exit Menu mode. • When activated, the " " icon appears on the display. • When a signal is received. • Memory scanning stops when performing any operation other than [LAMP], [MONI], [Key Lock] ([F] (1s)), and ENC control. 54 WEATHER CHANNEL Whether or not Weather Alert is available only in the USA and Canada. WEATHER CHANNEL SCAN The memory channel only for a received NOAA 1050...
Operation Manual
Page 63
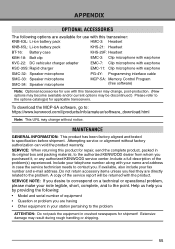
...: Li-ion battery pack KHS-21: Headset BT-16: Battery case KHS-29F: Headset KBH-18: Belt clip EMC-3: Clip microphone with earphone KVC-22: DC vehicular charger adapter EMC-7: Clip microphone with earphone KSC-35S: Rapid charger EMC-11: Clip microphone with earphone SMC-32: Speaker microphone PG-4Y: Programming interface cable SMC-33: Speaker microphone SMC-34: Speaker microphone MCP-5A: Memory Control Program (free software) Note: Optional accessories for repair, send...
...: Li-ion battery pack KHS-21: Headset BT-16: Battery case KHS-29F: Headset KBH-18: Belt clip EMC-3: Clip microphone with earphone KVC-22: DC vehicular charger adapter EMC-7: Clip microphone with earphone KSC-35S: Rapid charger EMC-11: Clip microphone with earphone SMC-32: Speaker microphone PG-4Y: Programming interface cable SMC-33: Speaker microphone SMC-34: Speaker microphone MCP-5A: Memory Control Program (free software) Note: Optional accessories for repair, send...

Operation Manual
Page 65
... transmit before the transceiver cools down, the thermal protector gradually decreases the output power to 1 W. TX inhibit is inevitable when you cannot receive any signals or you use superheterodyne receivers. Select a frequency within the allowable transmit frequency range. Problem Solution You selected a frequency outside the limit. Change or replace the battery. Try other offset directions. However, the following symptoms when you continuously transmit for a long...
... transmit before the transceiver cools down, the thermal protector gradually decreases the output power to 1 W. TX inhibit is inevitable when you cannot receive any signals or you use superheterodyne receivers. Select a frequency within the allowable transmit frequency range. Problem Solution You selected a frequency outside the limit. Change or replace the battery. Try other offset directions. However, the following symptoms when you continuously transmit for a long...


