
Instruction Manual
Page 1
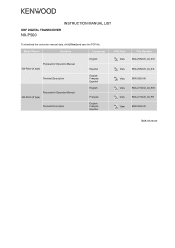
INSTRUCTION MANUAL LIST UHF DIGITAL TRANSCEIVER NX-P500 To download the instruction manual data, click [View] and save the PDF file. Model Name Contents Language Preparation/ Operation Manual NX-P500 (K type) Terminal Description Preparation/ Operation Manual NX-P500 (P type) Terminal Description English Español English Français Español English Français English Français Español File View View File Number B5A-2558-00_02_EN View B5A-2558-00_02_ES View B5K-0526-00 View B5A-2778-00_02_EN View B5A-2778-00_02_FR View B5K-0526-00 B5K-0516-00
INSTRUCTION MANUAL LIST UHF DIGITAL TRANSCEIVER NX-P500 To download the instruction manual data, click [View] and save the PDF file. Model Name Contents Language Preparation/ Operation Manual NX-P500 (K type) Terminal Description Preparation/ Operation Manual NX-P500 (P type) Terminal Description English Español English Français Español English Français English Français Español File View View File Number B5A-2558-00_02_EN View B5A-2558-00_02_ES View B5K-0526-00 View B5A-2778-00_02_EN View B5A-2778-00_02_FR View B5K-0526-00 B5K-0516-00
User Manual 2
Page 3
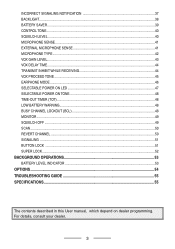
... RECEIVING 44 VOX PROCEED TONE...45 EARPHONE MODE...46 SELECTABLE POWER ON LED 47 SELECTABLE POWER ON TONE 48 TIME-OUT TIMER (TOT)...48 LOW BATTERY WARNING...48 BUSY CHANNEL LOCKOUT (BCL 48 MONITOR...49 SQUELCH OFF...49 SCAN...50 REVERT CHANNEL...50 SIGNALING ...51 BUTTON LOCK ...51 SUPER LOCK...52 BACKGROUND OPERATIONS 53 BATTERY LEVEL INDICATOR...53 OPTIONS...54 TROUBLESHOOTING GUIDE 55 SPECIFICATIONS...55 The contents described in this User manual...
... RECEIVING 44 VOX PROCEED TONE...45 EARPHONE MODE...46 SELECTABLE POWER ON LED 47 SELECTABLE POWER ON TONE 48 TIME-OUT TIMER (TOT)...48 LOW BATTERY WARNING...48 BUSY CHANNEL LOCKOUT (BCL 48 MONITOR...49 SQUELCH OFF...49 SCAN...50 REVERT CHANNEL...50 SIGNALING ...51 BUTTON LOCK ...51 SUPER LOCK...52 BACKGROUND OPERATIONS 53 BATTERY LEVEL INDICATOR...53 OPTIONS...54 TROUBLESHOOTING GUIDE 55 SPECIFICATIONS...55 The contents described in this User manual...

User Manual 2
Page 16
... button programmed as a reference in Analog mode, use the Squelch off Function. BASIC OPERATION POWER ON Switch the transceiver power ON by turning the Power switch/ Volume control knob clockwise. • A confirmation tone sounds, the LCD lights up when the power is necessary. Power OFF / Volume DOWN Power ON / Volume UP Channel number • Setting the color of group, you press the button programmed as [Channel Up] or [Channel Down]. 16 Note: ◆ To adjust the volume using background noise as [Channel...
... button programmed as a reference in Analog mode, use the Squelch off Function. BASIC OPERATION POWER ON Switch the transceiver power ON by turning the Power switch/ Volume control knob clockwise. • A confirmation tone sounds, the LCD lights up when the power is necessary. Power OFF / Volume DOWN Power ON / Volume UP Channel number • Setting the color of group, you press the button programmed as [Channel Up] or [Channel Down]. 16 Note: ◆ To adjust the volume using background noise as [Channel...

User Manual 2
Page 21
... number. SELCALL MODE (SELECTIVE CALLING) The basic operation is the same as [ID List]. • The ID List you called last is a general term for the NXDN wireless communication protocol which uses 4 Level FSK. Various digital communications, including individual and group voice communications are possible. Select an ID from a preregistered list and call ) represents a group of stations. 3 Press the PTT switch...
... number. SELCALL MODE (SELECTIVE CALLING) The basic operation is the same as [ID List]. • The ID List you called last is a general term for the NXDN wireless communication protocol which uses 4 Level FSK. Various digital communications, including individual and group voice communications are possible. Select an ID from a preregistered list and call ) represents a group of stations. 3 Press the PTT switch...

User Manual 2
Page 29
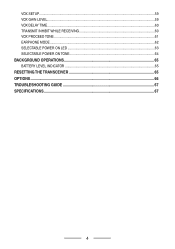
... button programmed as described on p.43. 9 To exit VOX mode, set up in Setting mode {p.43}. 1 Set up a VOX gain level from " 1" to "10". 2 Connect a headset to the transceiver. • The VOX function does not activate when a headset is configured to a higher, more sensitive level, louder received signals may cause the transceiver to use this feature, however, you can select the delay time as [Channel Menu...
... button programmed as described on p.43. 9 To exit VOX mode, set up in Setting mode {p.43}. 1 Set up a VOX gain level from " 1" to "10". 2 Connect a headset to the transceiver. • The VOX function does not activate when a headset is configured to a higher, more sensitive level, louder received signals may cause the transceiver to use this feature, however, you can select the delay time as [Channel Menu...

User Manual 2
Page 30
... Signaling Notification Backlight Battery Saver Control Tone Squelch Level*2 Microphone Sense External Microphone Sense Microphone Type VOX Gain Level VOX Delay Time Transmit Inhibit while Receiving VOX Proceed Tone Analog Digital Settings Ref. SETTING MODE Many functions on this transceiver are selected or configured through the Menu instead of physical controls. 1 With the transceiver power OFF, press and hold the button programmed as [Channel Menu] while turning the transceiver power ON. 2 Press the button programmed...
... Signaling Notification Backlight Battery Saver Control Tone Squelch Level*2 Microphone Sense External Microphone Sense Microphone Type VOX Gain Level VOX Delay Time Transmit Inhibit while Receiving VOX Proceed Tone Analog Digital Settings Ref. SETTING MODE Many functions on this transceiver are selected or configured through the Menu instead of physical controls. 1 With the transceiver power OFF, press and hold the button programmed as [Channel Menu] while turning the transceiver power ON. 2 Press the button programmed...

User Manual 2
Page 33
... CHANNEL OPERATION 1 Press the button programmed as [Home channel]. 2 A beep sounds and "HOME" appears on the display for 1 second. 3 Pressing the button programmed as [Channel Up] or [Channel Down] to the original channel. HOME CHANNEL SETUP 1 Enter the Channel menu mode {p.24} 2 Press the button programmed as [Channel Up] or [Channel Down] to select " ". 3 Press the button programmed as [Channel Menu] then press the button programmed as [Home channel] again returns to select your desired channel using Home Channel Select. HOME CHANNEL...
... CHANNEL OPERATION 1 Press the button programmed as [Home channel]. 2 A beep sounds and "HOME" appears on the display for 1 second. 3 Pressing the button programmed as [Channel Up] or [Channel Down] to the original channel. HOME CHANNEL SETUP 1 Enter the Channel menu mode {p.24} 2 Press the button programmed as [Channel Up] or [Channel Down] to select " ". 3 Press the button programmed as [Channel Menu] then press the button programmed as [Home channel] again returns to select your desired channel using Home Channel Select. HOME CHANNEL...

User Manual 2
Page 36
... switch and release it to the operation mode. TRANSMIT TONE LEVEL Adjust the volume on the sender's side if the volume of the alert tone etc. he hears is a function to operate handsfree without using the VOX function. PTT HOLD It is too loud. 1 Enter the Setting mode {p.30}. 2 Press the button programmed as [Channel Up] or [Channel Down] to select " ". 3 Press the button programmed as [Channel Menu...
... switch and release it to the operation mode. TRANSMIT TONE LEVEL Adjust the volume on the sender's side if the volume of the alert tone etc. he hears is a function to operate handsfree without using the VOX function. PTT HOLD It is too loud. 1 Enter the Setting mode {p.30}. 2 Press the button programmed as [Channel Up] or [Channel Down] to select " ". 3 Press the button programmed as [Channel Menu...

User Manual 2
Page 50
.... • If a new signal is received before the 3 seconds elapse, the transceiver will allow you to transmit on the channel until the new signal is no longer present, at the channel and opens the squelch so you can turn the scan function (the ability to start scanning. Before using before continuing. 4 To end the scan at any time, press the button programmed as [Scan] to perform scan) ON or...
.... • If a new signal is received before the 3 seconds elapse, the transceiver will allow you to transmit on the channel until the new signal is no longer present, at the channel and opens the squelch so you can turn the scan function (the ability to start scanning. Before using before continuing. 4 To end the scan at any time, press the button programmed as [Scan] to perform scan) ON or...

User Manual 2
Page 52
... lock setting: 1 With the transceiver power OFF, press and hold the PTT switch and the Side button while turning the transceiver power ON. 2 Press the button programmed as [Channel Menu] then press the button programmed as [Channel Up] or [Channel Down] to exit Super Lock Setting mode. • The icon appears on the display when the transceiver buttons are locked. With this setting, the following operations are still available even during Super Lock. • Power-switch/ Volume control...
... lock setting: 1 With the transceiver power OFF, press and hold the PTT switch and the Side button while turning the transceiver power ON. 2 Press the button programmed as [Channel Menu] then press the button programmed as [Channel Up] or [Channel Down] to exit Super Lock Setting mode. • The icon appears on the display when the transceiver buttons are locked. With this setting, the following operations are still available even during Super Lock. • Power-switch/ Volume control...

User Manual 2
Page 55
... not be dead. Make sure you are using Privacy Talk. Change the QT/DQT or RAN settings. Make sure all group members change the settings on {p.53}. You cannot transmit even by pressing the PTT switch. The battery pack may need replacing. Reset the transceiver as the other group members. SPECIFICATIONS High RF output power Low Audio output power Frequency stability Operating voltage Dimensions (W x H x D) (projections not included) Weight...
... not be dead. Make sure you are using Privacy Talk. Change the QT/DQT or RAN settings. Make sure all group members change the settings on {p.53}. You cannot transmit even by pressing the PTT switch. The battery pack may need replacing. Reset the transceiver as the other group members. SPECIFICATIONS High RF output power Low Audio output power Frequency stability Operating voltage Dimensions (W x H x D) (projections not included) Weight...

User Manual 3
Page 2
... THE BATTERY PACK 6 INSTALLING / REMOVING THE BELT CLIP HOLSTER 8 INSTALLING THE OPTIONAL SPEAKER/ MICROPHONE (OR HEADSET 8 ORIENTATION...10 BUTTONS AND CONTROLS...10 DISPLAY...11 BASIC OPERATION...13 SWITCHING POWER ON...13 ADJUST THE VOLUME...13 SELECT A CHANNEL...13 MAKE A CALL...14 RECEIVE VOICE...14 CONTINUE CALLING...14 SWITCHING POWER OFF...14 CHANNEL SETUP MODE...15 CHANNEL TYPE...16 TRANSMIT MODE...16 TRANSMIT POWER...17 PRIVACY TALK...17 PTT ID (Analog FleetSync)/ SELCALL ON PTT (Digital...
... THE BATTERY PACK 6 INSTALLING / REMOVING THE BELT CLIP HOLSTER 8 INSTALLING THE OPTIONAL SPEAKER/ MICROPHONE (OR HEADSET 8 ORIENTATION...10 BUTTONS AND CONTROLS...10 DISPLAY...11 BASIC OPERATION...13 SWITCHING POWER ON...13 ADJUST THE VOLUME...13 SELECT A CHANNEL...13 MAKE A CALL...14 RECEIVE VOICE...14 CONTINUE CALLING...14 SWITCHING POWER OFF...14 CHANNEL SETUP MODE...15 CHANNEL TYPE...16 TRANSMIT MODE...16 TRANSMIT POWER...17 PRIVACY TALK...17 PTT ID (Analog FleetSync)/ SELCALL ON PTT (Digital...
User Manual 3
Page 4
VOX SETUP...59 VOX GAIN LEVEL...59 VOX DELAY TIME...60 TRANSMIT INHIBIT WHILE RECEIVING 60 VOX PROCEED TONE...61 EARPHONE MODE...62 SELECTABLE POWER ON LED 63 SELECTABLE POWER ON TONE 64 BACKGROUND OPERATIONS 65 BATTERY LEVEL INDICATOR...65 RESETTING THE TRANSCEIVER 65 OPTIONS...66 TROUBLESHOOTING GUIDE 67 SPECIFICATIONS...67 4
VOX SETUP...59 VOX GAIN LEVEL...59 VOX DELAY TIME...60 TRANSMIT INHIBIT WHILE RECEIVING 60 VOX PROCEED TONE...61 EARPHONE MODE...62 SELECTABLE POWER ON LED 63 SELECTABLE POWER ON TONE 64 BACKGROUND OPERATIONS 65 BATTERY LEVEL INDICATOR...65 RESETTING THE TRANSCEIVER 65 OPTIONS...66 TROUBLESHOOTING GUIDE 67 SPECIFICATIONS...67 4

User Manual 3
Page 13
... current channel number is displayed. Note: ◆ To adjust the volume using background noise as a reference in Analog mode, use the Squelch off Function. SELECT A CHANNEL Select a channel by turning the Power switch/ Volume control clockwise. • A confirmation tone sounds, the LCD lights up when the power is necessary. Power OFF / Volume DOWN Power ON / Volume UP RAN number Channel number • Setting the color of group, you press the or button. 13 BASIC OPERATION SWITCHING POWER ON Switch the transceiver power ON...
... current channel number is displayed. Note: ◆ To adjust the volume using background noise as a reference in Analog mode, use the Squelch off Function. SELECT A CHANNEL Select a channel by turning the Power switch/ Volume control clockwise. • A confirmation tone sounds, the LCD lights up when the power is necessary. Power OFF / Volume DOWN Power ON / Volume UP RAN number Channel number • Setting the color of group, you press the or button. 13 BASIC OPERATION SWITCHING POWER ON Switch the transceiver power ON...

User Manual 3
Page 33
... mode, set up in Setting mode {p.59}. 1 Set up a VOX gain level from " 1" to "10". 2 Connect a headset to the transceiver. • The VOX function does not activate when a headset is configured to a higher, more sensitive level, louder received signals may cause the transceiver to use this feature, however, you can select the delay time as described on a boom that rests in microphone. VOICE OPERATED...
... mode, set up in Setting mode {p.59}. 1 Set up a VOX gain level from " 1" to "10". 2 Connect a headset to the transceiver. • The VOX function does not activate when a headset is configured to a higher, more sensitive level, louder received signals may cause the transceiver to use this feature, however, you can select the delay time as described on a boom that rests in microphone. VOICE OPERATED...

User Manual 3
Page 37
Setting Menu List Display Name Analog Digital Settings Default Ref. SETTING MODE Many functions on this transceiver are selected or configured through the Menu instead of physical controls. 1 With the transceiver power OFF, press and hold the Menu button while turning the transceiver power ON. 2 Press the or button to select your desired value. Pg ~ Channel 1 ~ Channel 6 Frequency Setting OFF/ Frequency 1 ~ Frequency 99 39 ~ Channel 7 ~ Channel 16 Frequency Setting OFF/ Frequency 1 ~ Frequency 99 39 Profile Number 0 ~ 9 0 39 Optional Signaling (Analog) OFF/ FS...
Setting Menu List Display Name Analog Digital Settings Default Ref. SETTING MODE Many functions on this transceiver are selected or configured through the Menu instead of physical controls. 1 With the transceiver power OFF, press and hold the Menu button while turning the transceiver power ON. 2 Press the or button to select your desired value. Pg ~ Channel 1 ~ Channel 6 Frequency Setting OFF/ Frequency 1 ~ Frequency 99 39 ~ Channel 7 ~ Channel 16 Frequency Setting OFF/ Frequency 1 ~ Frequency 99 39 Profile Number 0 ~ 9 0 39 Optional Signaling (Analog) OFF/ FS...

User Manual 3
Page 46
... alert tones are used to identify yourself to your desired value. ~ 1 ~ 16 Select from 16 type tones. • Each time you press button set for 1 second. 3 If you press or to select a call alert tone, the new tone sounds. 4 Press the Menu button to confirm the selection, then press the PTT switch or the Side button to return to the operation mode.
... alert tones are used to identify yourself to your desired value. ~ 1 ~ 16 Select from 16 type tones. • Each time you press button set for 1 second. 3 If you press or to select a call alert tone, the new tone sounds. 4 Press the Menu button to confirm the selection, then press the PTT switch or the Side button to return to the operation mode.
User Manual 3
Page 59
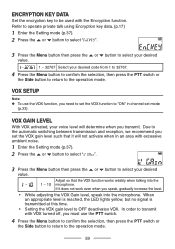
Refer to operate private talk using Encryption key data. {p.17} 1 Enter the Setting mode {p.37}. 2 Press the or button to select " ". 3 Press the Menu button then press the or button to select your desired value. ~ 1 ~ 32767 Select your desired value. VOX SETUP Note: ◆ To use the PTT switch. 4 Press the Menu button to confirm the selection, then press the PTT switch or the Side button to return...
Refer to operate private talk using Encryption key data. {p.17} 1 Enter the Setting mode {p.37}. 2 Press the or button to select " ". 3 Press the Menu button then press the or button to select your desired value. ~ 1 ~ 32767 Select your desired value. VOX SETUP Note: ◆ To use the PTT switch. 4 Press the Menu button to confirm the selection, then press the PTT switch or the Side button to return...

User Manual 3
Page 65
BACKGROUND OPERATIONS BATTERY LEVEL INDICATOR When turned ON, the battery level indicator on the display lets you may desire to reset the transceiver settings to their default values. (The default values are listed in the "Channel menu mode" and "Setting mode" tables.) To reset the transceiver: 1 With the transceiver power OFF, press and hold the and buttons while turning the transceiver power ON reset) will appear on the display. 2 Release the , or buttons. •...
BACKGROUND OPERATIONS BATTERY LEVEL INDICATOR When turned ON, the battery level indicator on the display lets you may desire to reset the transceiver settings to their default values. (The default values are listed in the "Channel menu mode" and "Setting mode" tables.) To reset the transceiver: 1 With the transceiver power OFF, press and hold the and buttons while turning the transceiver power ON reset) will appear on the display. 2 Release the , or buttons. •...

User Manual 3
Page 67
... group members. • Other group members may be too far away. Change the setting to "FS (FleetSync)". TROUBLESHOOTING GUIDE Problem Solution Cannot turn the transceiver power ON. • The battery pack may be installed correctly. SPECIFICATIONS High RF output power Low Audio output power Frequency stability Operating voltage Dimensions (W x D x H) (projections not included) Weight (with a new one. Replace the battery pack with KNB-81L) 2.0 W 1.0 W Max 750 mW or more ±2.5 ppm...
... group members. • Other group members may be too far away. Change the setting to "FS (FleetSync)". TROUBLESHOOTING GUIDE Problem Solution Cannot turn the transceiver power ON. • The battery pack may be installed correctly. SPECIFICATIONS High RF output power Low Audio output power Frequency stability Operating voltage Dimensions (W x D x H) (projections not included) Weight (with a new one. Replace the battery pack with KNB-81L) 2.0 W 1.0 W Max 750 mW or more ±2.5 ppm...


