

User Manual
Page 2
... near to or touching the antenna, to avoid the possibility of radio frequency burns or related physical injury. ◆◆ DYNAMITE BLASTING CAPS Operating the transceiver within 500 feet (150 m) of dynamite blasting caps may catch the cable. ◆◆ For passenger safety, install the transceiver securely using the supplied mounting bracket and screw set so the transceiver will become...
... near to or touching the antenna, to avoid the possibility of radio frequency burns or related physical injury. ◆◆ DYNAMITE BLASTING CAPS Operating the transceiver within 500 feet (150 m) of dynamite blasting caps may catch the cable. ◆◆ For passenger safety, install the transceiver securely using the supplied mounting bracket and screw set so the transceiver will become...

User Manual
Page 3
... it becomes free. 3 Press the PTT switch and speak into the microphone. Press [ ] again to increase the volume. ADJUSTING THE VOLUME Press the key programmed as [Zone Up]/ [Zone Down] and [Channel Up]/ [Channel Down]. BASIC OPERATION SWITCHING POWER ON/ OFF Press [ ] to 4 cm (1.5 inches) from your transceiver settings. 2 < MO_BASIC_OP_PMR > Release the PTT switch to receive. • For best sound quality at the receiving station, hold the microphone approximately 3 cm...
... it becomes free. 3 Press the PTT switch and speak into the microphone. Press [ ] again to increase the volume. ADJUSTING THE VOLUME Press the key programmed as [Zone Up]/ [Zone Down] and [Channel Up]/ [Channel Down]. BASIC OPERATION SWITCHING POWER ON/ OFF Press [ ] to 4 cm (1.5 inches) from your transceiver settings. 2 < MO_BASIC_OP_PMR > Release the PTT switch to receive. • For best sound quality at the receiving station, hold the microphone approximately 3 cm...

Instruction Manual 1
Page 4
... 7 GND 9 TXD2 10 RXD2 11 GND 18 GND 25 ME MIC Signal Input Ground Serial Data Output Serial Data Input Ground Ground Ground Antenna Terminal Impedance is 50 600 Ground TTL TTL Ground Ground Ground I - Pin Name Description 1 BLC 2 SB 3 GND Mic key backlight control Power Output Ground 4 PTT/ TXD PTT Input/Serial Data Output 5 ME MIC Ground 6 MIC MIC Signal Input 7 HOOK/ RXD Hook Detection/ Serial Data Input 8 DM MIC Data Detection ACC (D-SUB 25 Pin Connector) Pin No. I - - - O I /O - Terminal Descriptions Microphone Jack Pin No.
... 7 GND 9 TXD2 10 RXD2 11 GND 18 GND 25 ME MIC Signal Input Ground Serial Data Output Serial Data Input Ground Ground Ground Antenna Terminal Impedance is 50 600 Ground TTL TTL Ground Ground Ground I - Pin Name Description 1 BLC 2 SB 3 GND Mic key backlight control Power Output Ground 4 PTT/ TXD PTT Input/Serial Data Output 5 ME MIC Ground 6 MIC MIC Signal Input 7 HOOK/ RXD Hook Detection/ Serial Data Input 8 DM MIC Data Detection ACC (D-SUB 25 Pin Connector) Pin No. I - - - O I /O - Terminal Descriptions Microphone Jack Pin No.

Instruction Manual 1
Page 6
... change or modification is no guarantee that to which can generate radio frequency energy and, if not installed and used in accordance with the limits for technical assistance. Check the battery polarity and voltage of the vehicle before installing the transceiver. ◆ Use only a KENWOOD optional DC power cable. ◆ Do not cut and/or remove the fuse holder on the DC power cable...
... change or modification is no guarantee that to which can generate radio frequency energy and, if not installed and used in accordance with the limits for technical assistance. Check the battery polarity and voltage of the vehicle before installing the transceiver. ◆ Use only a KENWOOD optional DC power cable. ◆ Do not cut and/or remove the fuse holder on the DC power cable...

Instruction Manual 1
Page 10
... band. • Be sure to leave enough slack in your KENWOOD dealer, an authorized KENWOOD service facility, or the factory. PREPARATION Various electronic equipment in the cables so the transceiver can be careful not to damage vehicle wiring or parts. Note: The following tools are not properly protected from the radio frequency energy which is present while transmitting. Check the battery...
... band. • Be sure to leave enough slack in your KENWOOD dealer, an authorized KENWOOD service facility, or the factory. PREPARATION Various electronic equipment in the cables so the transceiver can be careful not to damage vehicle wiring or parts. Note: The following tools are not properly protected from the radio frequency energy which is present while transmitting. Check the battery...

Instruction Manual 1
Page 12
... h i j k l m a (power) switch Press and hold for approximately 1 second to activate its programmable function {page 7}. The default setting is Squelch Off Momentary. 4 h key Press to activate its programmable function {page 7}. i key Press to activate its programmable function {page 7}. The default setting is Volume Down. d key Press to activate its programmable function {page 7}. f Microphone jack Insert the microphone plug into this jack. The default setting is Menu mode. j key Press to switch the transceiver power...
... h i j k l m a (power) switch Press and hold for approximately 1 second to activate its programmable function {page 7}. The default setting is Squelch Off Momentary. 4 h key Press to activate its programmable function {page 7}. i key Press to activate its programmable function {page 7}. The default setting is Volume Down. d key Press to activate its programmable function {page 7}. f Microphone jack Insert the microphone plug into this jack. The default setting is Menu mode. j key Press to switch the transceiver power...

Instruction Manual 1
Page 13
... Site Lock function is activated. DISPLAY Indicator Description Appears when the Monitor or Squelch Off function is activated. 5 Blinks when a new message has arrived. The default setting is activated. Blinks while paused at a channel. Appears when the Operator Selectable Tone (OST) function is Zone Down. k key Press to activate its programmable function {page 7}. Appears when you are using Scan mode. l key Press to the scanning sequence...
... Site Lock function is activated. DISPLAY Indicator Description Appears when the Monitor or Squelch Off function is activated. 5 Blinks when a new message has arrived. The default setting is activated. Blinks while paused at a channel. Appears when the Operator Selectable Tone (OST) function is Zone Down. k key Press to activate its programmable function {page 7}. Appears when you are using Scan mode. l key Press to the scanning sequence...
Instruction Manual 1
Page 16
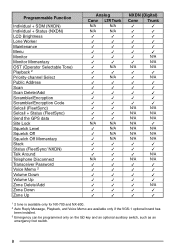
... Brightness Lone Worker Maintenance Menu Monitor Monitor Momentary OST (Operator Selectable Tone) Playback 2 Priority-channel Select Public Address Scan Scan Delete/Add Scrambler/Encryption Scrambler/Encryption Code Selcall (FleetSync) Selcall + Status (FleetSync) Send the GPS data Site Lock Squelch Level Squelch Off Squelch Off Momentary Stack Status (FleetSync/ NXDN) Talk Around Telephone Disconnect Transceiver Password Voice Memo 2 Volume Down Volume Up Zone Delete/Add Zone...
... Brightness Lone Worker Maintenance Menu Monitor Monitor Momentary OST (Operator Selectable Tone) Playback 2 Priority-channel Select Public Address Scan Scan Delete/Add Scrambler/Encryption Scrambler/Encryption Code Selcall (FleetSync) Selcall + Status (FleetSync) Send the GPS data Site Lock Squelch Level Squelch Off Squelch Off Momentary Stack Status (FleetSync/ NXDN) Talk Around Telephone Disconnect Transceiver Password Voice Memo 2 Volume Down Volume Up Zone Delete/Add Zone...

Instruction Manual 1
Page 17
... using a microphone keypad, you enter an incorrect password, an error tone sounds and the transceiver remains locked. • The password can toggle the display between the zone and channel/group ID names and number by pressing the key programmed as CH/GID Up / CH/GID Down. Each zone contains a group of 6 digits. BASIC OPERATIONS SWITCHING POWER ON/OFF Press and hold the switch for approximately 1 second to turn...
... using a microphone keypad, you enter an incorrect password, an error tone sounds and the transceiver remains locked. • The password can toggle the display between the zone and channel/group ID names and number by pressing the key programmed as CH/GID Up / CH/GID Down. Each zone contains a group of 6 digits. BASIC OPERATIONS SWITCHING POWER ON/OFF Press and hold the switch for approximately 1 second to turn...

Instruction Manual 1
Page 24
... channel has been changed , the newly selected channel is the revert zone and channel. PRIORITY-CHANNEL SELECT If the Priority channel has been set the channel as the new revert channel. The transceiver "talks back" on the display. 3 Press the / keys to select the channel type for your current channel. • You can also press and hold the key programmed as Scan. • A list of the following Scan Revert channels...
... channel has been changed , the newly selected channel is the revert zone and channel. PRIORITY-CHANNEL SELECT If the Priority channel has been set the channel as the new revert channel. The transceiver "talks back" on the display. 3 Press the / keys to select the channel type for your current channel. • You can also press and hold the key programmed as Scan. • A list of the following Scan Revert channels...
Instruction Manual 1
Page 27
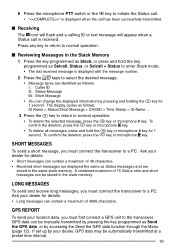
... > Time Stamp > ID Name ... 3 Press the key to return to the transceiver. The display cycles as Stack, or press and hold the key or microphone # key for details. • Long messages can contain a maximum of 4096 characters. GPS data can be manually transmitted by pressing the key programmed as Selcall, Status, or Selcall + Status to enter Stack mode. • The last received message...
... > Time Stamp > ID Name ... 3 Press the key to return to the transceiver. The display cycles as Stack, or press and hold the key or microphone # key for details. • Long messages can contain a maximum of 4096 characters. GPS data can be manually transmitted by pressing the key programmed as Selcall, Status, or Selcall + Status to enter Stack mode. • The last received message...

Instruction Manual 1
Page 28
... key programmed as you enter them. • Alternatively, you release the microphone PTT switch, transmit mode will end even if the complete number has not been sent. ■ Keypad Auto PTT (Microphone Keypad Only) If your desired Autodial list number. • The stored entry appears on the display as Autodial. 2 Enter the desired digits using the microphone keypad. • The corresponding DTMF tones sound each time...
... key programmed as you enter them. • Alternatively, you release the microphone PTT switch, transmit mode will end even if the complete number has not been sent. ■ Keypad Auto PTT (Microphone Keypad Only) If your desired Autodial list number. • The stored entry appears on the display as Autodial. 2 Enter the desired digits using the microphone keypad. • The corresponding DTMF tones sound each time...
Instruction Manual 1
Page 32
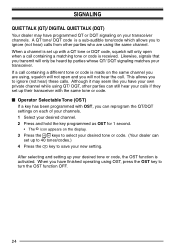
... or code is set up your transceiver. After selecting and setting up to 40 tones/codes.) 4 Press the key to turn the OST function OFF. 24 SIGNALING QUIET TALK (QT)/ DIGITAL QUIET TALK (DQT) Your dealer may seem like you have your own private channel while using QT/ DQT, other parties who are using, squelch will not open when a call . When a channel is received.
... or code is set up your transceiver. After selecting and setting up to 40 tones/codes.) 4 Press the key to turn the OST function OFF. 24 SIGNALING QUIET TALK (QT)/ DIGITAL QUIET TALK (DQT) Your dealer may seem like you have your own private channel while using QT/ DQT, other parties who are using, squelch will not open when a call . When a channel is received.

Instruction Manual 1
Page 33
.... (NX-700/ NX-800 only) DTMF Signaling: DTMF Signaling opens the squelch only when the transceiver receives a call containing a matching DTMF code. Refer to "SELCALL (SELECTIVE CALLING)" on the same channel you are using, squelch will not hear the call containing a matching RAN is received. NXDN ID Signaling: NXDN ID is an optional signaling system available only for digital radio communications. When a channel is set up with a RAN, squelch...
.... (NX-700/ NX-800 only) DTMF Signaling: DTMF Signaling opens the squelch only when the transceiver receives a call containing a matching DTMF code. Refer to "SELCALL (SELECTIVE CALLING)" on the same channel you are using, squelch will not hear the call containing a matching RAN is received. NXDN ID Signaling: NXDN ID is an optional signaling system available only for digital radio communications. When a channel is set up with a RAN, squelch...

Instruction Manual 1
Page 37
... you change to transmit on the display without flashing. If End of Transmit is set , the ID signal is transmitted when you release the microphone PTT switch. While searching for a control channel, no signals can be made only in use, a warning tone will sound. 2 Release the PTT switch, then press and hold the microphone PTT switch. • If the channel is already in analog operation. If...
... you change to transmit on the display without flashing. If End of Transmit is set , the ID signal is transmitted when you release the microphone PTT switch. While searching for a control channel, no signals can be made only in use, a warning tone will sound. 2 Release the PTT switch, then press and hold the microphone PTT switch. • If the channel is already in analog operation. If...

Operation Manual
Page 11
Hex-headed screws Antenna connector Flat washer Spring washer Self-tapping screw Optioinal microphone Power input connector Mounting bracket DC power cable Ignition sense cable External speaker jack Black (-) cable Red (+) cable Fuse 12 V vehicle battery 3 INSTALLING THE TRANSCEIVER For passenger safety, install the transceiver securely using an optional mounting bracket and screw set so the transceiver will not interfere with the safe operation of the vehicle. When replacing the fuse in the DC power cable, be mounted in the dash...
Hex-headed screws Antenna connector Flat washer Spring washer Self-tapping screw Optioinal microphone Power input connector Mounting bracket DC power cable Ignition sense cable External speaker jack Black (-) cable Red (+) cable Fuse 12 V vehicle battery 3 INSTALLING THE TRANSCEIVER For passenger safety, install the transceiver securely using an optional mounting bracket and screw set so the transceiver will not interfere with the safe operation of the vehicle. When replacing the fuse in the DC power cable, be mounted in the dash...

Operation Manual
Page 14
... (Operator Selectable Tone) 1 • Playback 2 • Priority-channel Select 10 • Public Address • Scan • Scan Delete/Add • Scrambler/Encryption • Scrambler/Encryption Code 8 • SDM (FleetSync/ NXDN) • Selcall (FleetSync) 4 • Selcall + SDM (FleetSync) 4 • Selcall + Status (FleetSync) 4 • Send the GPS data • Site Down 5 • Site Lock 5 • Site Up 5 • Squelch Level 1 • Squelch...
... (Operator Selectable Tone) 1 • Playback 2 • Priority-channel Select 10 • Public Address • Scan • Scan Delete/Add • Scrambler/Encryption • Scrambler/Encryption Code 8 • SDM (FleetSync/ NXDN) • Selcall (FleetSync) 4 • Selcall + SDM (FleetSync) 4 • Selcall + Status (FleetSync) 4 • Send the GPS data • Site Down 5 • Site Lock 5 • Site Up 5 • Squelch Level 1 • Squelch...
Operation Manual
Page 23
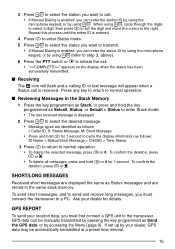
... to cycle the display information as Selcall, Status, or Selcall + Status to enter Stack mode. • The last received message is received. GPS REPORT To send your location data, you must first connect a GPS unit to the transceiver. To send short messages, and to send and receive long messages, you must connect the transceiver to a PC. If set the digit and move the...
... to cycle the display information as Selcall, Status, or Selcall + Status to enter Stack mode. • The last received message is received. GPS REPORT To send your location data, you must first connect a GPS unit to the transceiver. To send short messages, and to send and receive long messages, you must connect the transceiver to a PC. If set the digit and move the...

Operation Manual
Page 25
... the PTT switch to speak, and release it is set the transceiver to emit tones and received signals as normal, or mute the speaker during Emergency operation. SCRAMBLER Press the key programmed as Scrambler/ Encryption, or access the Menu {page 9}, to switch the transceiver to secure (encrypted) transmission. • Pressing the microphone PTT switch after the Scrambler function has been turned ON encrypts...
... the PTT switch to speak, and release it is set the transceiver to emit tones and received signals as normal, or mute the speaker during Emergency operation. SCRAMBLER Press the key programmed as Scrambler/ Encryption, or access the Menu {page 9}, to switch the transceiver to secure (encrypted) transmission. • Pressing the microphone PTT switch after the Scrambler function has been turned ON encrypts...

Operation Manual
Page 27
... Clock Adjustment mode. • You can view the clock any time to exit Clock Adjustment mode. To toggle Horn Alert ON and OFF, press the key programmed as LCD Brightness. • Each press of a received call is received that matches the optional signaling set up on the display when the PA system is active. This function causes all audio input via the microphone to be turned off...
... Clock Adjustment mode. • You can view the clock any time to exit Clock Adjustment mode. To toggle Horn Alert ON and OFF, press the key programmed as LCD Brightness. • Each press of a received call is received that matches the optional signaling set up on the display when the PA system is active. This function causes all audio input via the microphone to be turned off...


