

User Manual
Page 2
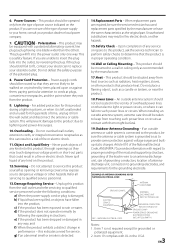
... IMPORTANT OPERATING AND MAINTENANCE (SERVICING) INSTRUCTIONS IN THE LITERATURE ACCOMPANYING THE APPLIANCE. Follow Instructions - Do not use liquid cleaners or aerosol cleaners. Use only with care. Before applying power ¤ Caution : Read this page carefully to ensure safe operation. Units are provided for example, near a swimming pool; REFER SERVICING TO QUALIFIED SERVICE PERSONNEL. Unplug this product from overheating, and these openings must...
... IMPORTANT OPERATING AND MAINTENANCE (SERVICING) INSTRUCTIONS IN THE LITERATURE ACCOMPANYING THE APPLIANCE. Follow Instructions - Do not use liquid cleaners or aerosol cleaners. Use only with care. Before applying power ¤ Caution : Read this page carefully to ensure safe operation. Units are provided for example, near a swimming pool; REFER SERVICING TO QUALIFIED SERVICE PERSONNEL. Unplug this product from overheating, and these openings must...
User Manual
Page 3
...) GROUND CLAMP POWER SERVICE GROUNDING ELECTRODE SYSTEM (NEC ART 250, PART H) Notes: 1. When replacement parts are unable to replace your electrician to insert the plug fully into such power lines or circuits. When installing an outside antenna or cable system is grounded so as the original part. Do not attempt to service this product through openings as recommended by following conditions: a) When the power-supply cord or plug is left unattended...
...) GROUND CLAMP POWER SERVICE GROUNDING ELECTRODE SYSTEM (NEC ART 250, PART H) Notes: 1. When replacement parts are unable to replace your electrician to insert the plug fully into such power lines or circuits. When installing an outside antenna or cable system is grounded so as the original part. Do not attempt to service this product through openings as recommended by following conditions: a) When the power-supply cord or plug is left unattended...
User Manual
Page 4
... 10 Switching the system to standby mode 10 Volume control 10 Sound control 10 Headphones 10 Using the CD/MP3-CD/WMA-CD/ USB device 11 Preparation 11 Playing a disc/USB device 11 Selecting a desired track/passage 11 Selecting a desired album/file (For audio file only 12 Programming tracks 12 Programming files (For audio file only 13 Random play 13 Repeat play 13 Intro scan 14 Recording on a USB device 14 Program recording 14 Changing the display of the disc/USB device...
... 10 Switching the system to standby mode 10 Volume control 10 Sound control 10 Headphones 10 Using the CD/MP3-CD/WMA-CD/ USB device 11 Preparation 11 Playing a disc/USB device 11 Selecting a desired track/passage 11 Selecting a desired album/file (For audio file only 12 Programming tracks 12 Programming files (For audio file only 13 Random play 13 Repeat play 13 Intro scan 14 Recording on a USB device 14 Program recording 14 Changing the display of the disc/USB device...

User Manual
Page 5
Connecting the AM antenna Set up the AM loop antenna, and then connect it to AM LOOP terminal on , press the button you want to operate. ⁄ • The supplied battery may cause a malfunction. When the power comes on the back. Preparing the remote control unit Operation When the power cord is plugged in this equipment will be able to receive AM broadcast. Top panel : 50 cm Back panel : 10...
Connecting the AM antenna Set up the AM loop antenna, and then connect it to AM LOOP terminal on , press the button you want to operate. ⁄ • The supplied battery may cause a malfunction. When the power comes on the back. Preparing the remote control unit Operation When the power cord is plugged in this equipment will be able to receive AM broadcast. Top panel : 50 cm Back panel : 10...
User Manual
Page 6
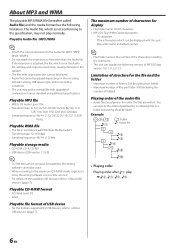
... Playable storage media • CD-ROM, CD-R, CD-RW • USB device (USB version 1.1/2.0) ⁄ • CD-RW discs which is not conforming to the specification, may not be used. • When recording to the maximum CD-R/RW media capacity at once". • For details on the encoding software setting, USB device type, and/or recording conditions. • The unit may not play 6 EN Example CD (1) ¡! ^: Folddeerr...
... Playable storage media • CD-ROM, CD-R, CD-RW • USB device (USB version 1.1/2.0) ⁄ • CD-RW discs which is not conforming to the specification, may not be used. • When recording to the maximum CD-R/RW media capacity at once". • For details on the encoding software setting, USB device type, and/or recording conditions. • The unit may not play 6 EN Example CD (1) ¡! ^: Folddeerr...

User Manual
Page 7
... as to whether your USB device conforms to the USB mass storage class specs. • Using an unsupported USB device can play audio files stored in this manual, the button names are referred to operate from the remote control unit. Description of the button name in the flash memory and digital audio player that have a USB port (these devices are described using any special driver or application software. • Contact the sales agent as an...
... as to whether your USB device conforms to the USB mass storage class specs. • Using an unsupported USB device can play audio files stored in this manual, the button names are referred to operate from the remote control unit. Description of the button name in the flash memory and digital audio player that have a USB port (these devices are described using any special driver or application software. • Contact the sales agent as an...

User Manual
Page 9
... working. 28 TIMER SET button To set the delay time and turn the system on to the selected source. 12 RVS PLAY ( ) button To start or interrupt playback for CD, USB and TAPE. Buttons both on the remote control unit and the unit 1 ( ) button To switch the system on or to the standby mode. 3 STEREO/MONO button To switch between stereo mode and mono mode (on FM band only) for TUNER. 4 RDS DISPLAY button To change the information display for audio files. standby indicator (on the remote control...
... working. 28 TIMER SET button To set the delay time and turn the system on to the selected source. 12 RVS PLAY ( ) button To start or interrupt playback for CD, USB and TAPE. Buttons both on the remote control unit and the unit 1 ( ) button To switch the system on or to the standby mode. 3 STEREO/MONO button To switch between stereo mode and mono mode (on FM band only) for TUNER. 4 RDS DISPLAY button To change the information display for audio files. standby indicator (on the remote control...
User Manual
Page 10
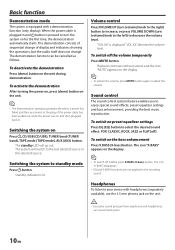
... the display. ⁄ • To switch off X-BASS, press X.BASS (X-bass) button. The icon "X-BASS" appears on the display. ⁄ • To restore the volume, press MUTE button again or adjust the volume. When the power cable is plugged in . To deactivate the demonstration Press (demo) button on Press , CD/USB (CD/USB), TUNER band (TUNER band), TAPE mode (TAPE mode), AUX (AUX) button. Switching the system on the unit during demonstration. Switching the system to enjoy special sound effects; Standby indicator is pressed to turn (volume) knob...
... the display. ⁄ • To switch off X-BASS, press X.BASS (X-bass) button. The icon "X-BASS" appears on the display. ⁄ • To restore the volume, press MUTE button again or adjust the volume. When the power cable is plugged in . To deactivate the demonstration Press (demo) button on Press , CD/USB (CD/USB), TUNER band (TUNER band), TAPE mode (TAPE mode), AUX (AUX) button. Switching the system on the unit during demonstration. Switching the system to enjoy special sound effects; Standby indicator is pressed to turn (volume) knob...

User Manual
Page 11
... be used to the USB device. Using the CD/MP3-CD/WMA-CD/USB device Preparation Loading a disc 1 Press CD/USB (CD/USB) button to select CD mode. 2 Press (0) button to open the CD tray. 3 Place a disc into one disc/USB device. • For audio files, "A" on the display represents ALBUM. • For audio files, the total album number on the display indicates the number of the current track/file appear on the front panel. 3 Press CD/USB (CD/USB) button to close the CD tray. EN11 The playing time starts flashing. When playing...
... be used to the USB device. Using the CD/MP3-CD/WMA-CD/USB device Preparation Loading a disc 1 Press CD/USB (CD/USB) button to select CD mode. 2 Press (0) button to open the CD tray. 3 Place a disc into one disc/USB device. • For audio files, "A" on the display represents ALBUM. • For audio files, the total album number on the display indicates the number of the current track/file appear on the front panel. 3 Press CD/USB (CD/USB) button to close the CD tray. EN11 The playing time starts flashing. When playing...

User Manual
Page 12
... number and track number will be used to select tracks. • "FULL" starts flashing if you want to select the desired track. Press TIME DISPLAY button. Then the route name and the file name will be used to select and store other desired tracks in stop mode, press FILE SEARCH button. The icon "PGM" and "- - The program number starts flashing. 3 Press P.MODE button to input. 6 Press FILE SEARCH button...
... number and track number will be used to select tracks. • "FULL" starts flashing if you want to select the desired track. Press TIME DISPLAY button. Then the route name and the file name will be used to select and store other desired tracks in stop mode, press FILE SEARCH button. The icon "PGM" and "- - The program number starts flashing. 3 Press P.MODE button to input. 6 Press FILE SEARCH button...
User Manual
Page 13
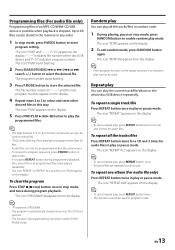
... as the CD tray is opened. • The function of program setting cannot be used to select files. • "FULL" starts flashing if you attempt to enable random play all programmed files is on the display. 4 Repeat steps 2 to 3 to enter program setting. To repeat all the tracks/files Press REPEAT button twice for a CD and 3 times for audio files. P-01" appear on the display. The file number returns...
... as the CD tray is opened. • The function of program setting cannot be used to select files. • "FULL" starts flashing if you attempt to enable random play all programmed files is on the display. 4 Repeat steps 2 to 3 to enter program setting. To repeat all the tracks/files Press REPEAT button twice for a CD and 3 times for audio files. P-01" appear on the display. The file number returns...

User Manual
Page 14
... disc/USB device information Pressing TIME DISPLAY button shows various display information of the disc/USB device, such as time information of the current track or a whole disc, file and artist name of the current track. • To interrupt recording, press FWD PLAY 6 (6) button. File system: FAT 16/32 Program recording Desired CD tracks can be programmed in MP3 format. 1 Insert a USB device to the USB connector on the front panel. 2 Press SEARCH/TUNING...
... disc/USB device information Pressing TIME DISPLAY button shows various display information of the disc/USB device, such as time information of the current track or a whole disc, file and artist name of the current track. • To interrupt recording, press FWD PLAY 6 (6) button. File system: FAT 16/32 Program recording Desired CD tracks can be programmed in MP3 format. 1 Insert a USB device to the USB connector on the front panel. 2 Press SEARCH/TUNING...
User Manual
Page 15
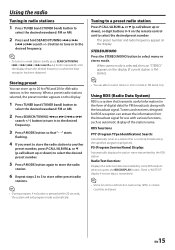
... RDS station. Storing preset You can extract the information from the broadcast signal for FM broadcasts along with various functions, such as automatic display of digital data) for use with the broadcast signal. When a preset radio stations selected, the preset number appears on the remote control unit to the desired frequency. 3 Press P.MODE button so that is pressed within 20 seconds, the system will exit program mode...
... RDS station. Storing preset You can extract the information from the broadcast signal for FM broadcasts along with various functions, such as automatic display of digital data) for use with the broadcast signal. When a preset radio stations selected, the preset number appears on the remote control unit to the desired frequency. 3 Press P.MODE button so that is pressed within 20 seconds, the system will exit program mode...
User Manual
Page 16
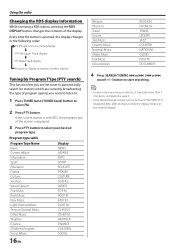
Every time the button is pressed, the display changes in the following order: PS (Program Service name) display « PTY (Program TYpe) display « RT (Radio Text) display « Frequency display and preset number display Tuning by Program TYpe (PTY search) This function lets you set the tuner to automatically search for stations which are currently broadcasting the type of the station is displayed. 3 Press PTY button to select your desired program type. If the...
Every time the button is pressed, the display changes in the following order: PS (Program Service name) display « PTY (Program TYpe) display « RT (Radio Text) display « Frequency display and preset number display Tuning by Program TYpe (PTY search) This function lets you set the tuner to automatically search for stations which are currently broadcasting the type of the station is displayed. 3 Press PTY button to select your desired program type. If the...
User Manual
Page 17
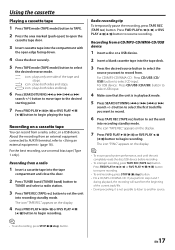
For the best recording, use a normal bias tape (Type 1 only). appears on a cassette tape You can record from a radio, a disc, or a USB device. For USB device : Press CD/USB (CD/USB) button to select USB input. 4 Make sure that the unit is not possible to listen to another source. icon : plays both sides and stops. Recording on the display. 4 Press FWD PLAY 6 (6) or RVS PLAY ( ) button to begin recording. ⁄ • To end recording, press...
For the best recording, use a normal bias tape (Type 1 only). appears on a cassette tape You can record from a radio, a disc, or a USB device. For USB device : Press CD/USB (CD/USB) button to select USB input. 4 Make sure that the unit is not possible to listen to another source. icon : plays both sides and stops. Recording on the display. 4 Press FWD PLAY 6 (6) or RVS PLAY ( ) button to begin recording. ⁄ • To end recording, press...
User Manual
Page 18
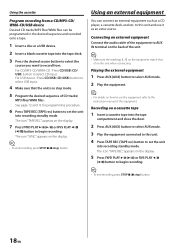
... the display. 5 Press FWD PLAY 6 (6) or RVS PLAY ( ) button to select USB input. 4 Make sure that of CD tracks/ MP3 files/WMA files. appears on the equipment match that the unit is in the desired sequence and recorded onto a tape. 1 Insert a disc or a USB device. 2 Insert a blank cassette tape into recording standby mode. For USB device : Press CD/USB (CD/USB) button to begin recording. to this unit. 4 Press TAPE REC (TAPE rec) button to set...
... the display. 5 Press FWD PLAY 6 (6) or RVS PLAY ( ) button to select USB input. 4 Make sure that of CD tracks/ MP3 files/WMA files. appears on the equipment match that the unit is in the desired sequence and recorded onto a tape. 1 Insert a disc or a USB device. 2 Insert a blank cassette tape into recording standby mode. For USB device : Press CD/USB (CD/USB) button to begin recording. to this unit. 4 Press TAPE REC (TAPE rec) button to set...
User Manual
Page 19
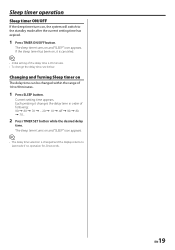
... the display returns to last mode if no operation for 20 seconds. EN19 The sleep timer turns on and "SLEEP" icon appears. ⁄ • The delay time selection is 90 minutes. • To chenge the delay time, see below. If the sleep timer has been on, it changes the delay time in order of 10 to the standby mode after the current setting time...
... the display returns to last mode if no operation for 20 seconds. EN19 The sleep timer turns on and "SLEEP" icon appears. ⁄ • The delay time selection is 90 minutes. • To chenge the delay time, see below. If the sleep timer has been on, it changes the delay time in order of 10 to the standby mode after the current setting time...

User Manual
Page 20
...make copies of tapes or discs without the permission of the copyright owners. Do not wipe in the following circumstances: When this unit is carried from the center out. General information Maintenance Cleaning the cabinet • Use a soft cloth slightly moistened with cleaning fluid. • You also can clean the heads by playing a cleaning tape... difference in the room where this unit and the outside. Cleaning discs • When a disc becomes dirty, clean it is installed increases, etc. In this case, leave the unit for analogue records. Do not use solvents such as...
...make copies of tapes or discs without the permission of the copyright owners. Do not wipe in the following circumstances: When this unit is carried from the center out. General information Maintenance Cleaning the cabinet • Use a soft cloth slightly moistened with cleaning fluid. • You also can clean the heads by playing a cleaning tape... difference in the room where this unit and the outside. Cleaning discs • When a disc becomes dirty, clean it is installed increases, etc. In this case, leave the unit for analogue records. Do not use solvents such as...
User Manual
Page 22
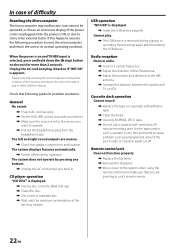
... and direction of the AM antenna. \ Increase the distance between the system and TV or VCR. USB operation "NO USB" is displayed. \ Insert a disc correctly (label side up). \ Clean the disc. \ Use a new or readable disc. \ Wait until the moisture condensation at unit's remote sensor. 22 EN CD player operation "NO DISC" is displayed. \ Insert the USB device properly. Radio reception Noise in . The system displays features automatically. \ Switch off . When the power is...
... and direction of the AM antenna. \ Increase the distance between the system and TV or VCR. USB operation "NO USB" is displayed. \ Insert a disc correctly (label side up). \ Clean the disc. \ Use a new or readable disc. \ Wait until the moisture condensation at unit's remote sensor. 22 EN CD player operation "NO DISC" is displayed. \ Insert the USB device properly. Radio reception Noise in . The system displays features automatically. \ Switch off . When the power is...

User Manual
Page 23
... length 760 ~ 800 nm Laser power class Class 1 (IEC) D/A conversion 1 Bit USB interface USB standard USB 1.1/2.0 Maximum supply current 500 mA File system FAT 12/ 16/ 32 MP3 decode Compliant with MPEG-1/2 Audio Layer-3 WMA decode Compliant with Windows Media Audio 9 Recording format MP3, 128 kbps/44.1 kHz Cassette deck section Track 4-track, 2-channel stereo AUX section Input (Sensitivity/ Impedance) 1000 mV/10...
... length 760 ~ 800 nm Laser power class Class 1 (IEC) D/A conversion 1 Bit USB interface USB standard USB 1.1/2.0 Maximum supply current 500 mA File system FAT 12/ 16/ 32 MP3 decode Compliant with MPEG-1/2 Audio Layer-3 WMA decode Compliant with Windows Media Audio 9 Recording format MP3, 128 kbps/44.1 kHz Cassette deck section Track 4-track, 2-channel stereo AUX section Input (Sensitivity/ Impedance) 1000 mV/10...


