

User Manual
Page 3
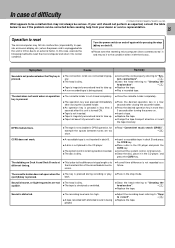
... Dolby HX pro headroom extension and auto-bias function provide a recording with superior high-frequency characterisitics. ¶Simple operations allow you to use should you transport or ship the unit in deck B. Audio cord 2) System control cord 1) Contents Caution: Read the pages marked carefully to record (CT-203/KXF-W4010; We recommend that all accessories are present. Deck B only 21 CD synchro...
... Dolby HX pro headroom extension and auto-bias function provide a recording with superior high-frequency characterisitics. ¶Simple operations allow you to use should you transport or ship the unit in deck B. Audio cord 2) System control cord 1) Contents Caution: Read the pages marked carefully to record (CT-203/KXF-W4010; We recommend that all accessories are present. Deck B only 21 CD synchro...
User Manual
Page 4
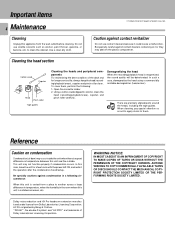
... COPYRIGHT TO MAKE COPIES OF TAPES OR DISCS WITHOUT THE PERMISSION OF THE COPYRIGHT OWNERS. Note There are trademarks of Dolby Laboratories Licensing Corporation. In such a case, demagnetize the head using a commercially available demagnetizer (head eraser). Reference Caution on condensation Condensation (of the deck and for a few hours with the power left ON, and restart the operation after...
... COPYRIGHT TO MAKE COPIES OF TAPES OR DISCS WITHOUT THE PERMISSION OF THE COPYRIGHT OWNERS. Note There are trademarks of Dolby Laboratories Licensing Corporation. In such a case, demagnetize the head using a commercially available demagnetizer (head eraser). Reference Caution on condensation Condensation (of the deck and for a few hours with the power left ON, and restart the operation after...

User Manual
Page 6
Left and right panels: 10 cm, rear panel: 10 cm REC PLAY L R LINEIN LINEOUT SYSTEM CONTROL AC110120V~ AC220240V~ Audio cords PHONO L R CD TUNER TAPE MD REC PLAY REC PLAY L R System control cord SYSTEM CONTROL SL 16 XS 8 To wall AC outlet Amplifier Audio cord SYSTEM LINE OUTPUT CONTROL VARIABLE L SL16 XS 8 R System control cord *The connected component model is not possible or erroneous display appears even though all connections have been made properly, reset the microcomputer referring to "In case of the power cord can cause...
Left and right panels: 10 cm, rear panel: 10 cm REC PLAY L R LINEIN LINEOUT SYSTEM CONTROL AC110120V~ AC220240V~ Audio cords PHONO L R CD TUNER TAPE MD REC PLAY REC PLAY L R System control cord SYSTEM CONTROL SL 16 XS 8 To wall AC outlet Amplifier Audio cord SYSTEM LINE OUTPUT CONTROL VARIABLE L SL16 XS 8 R System control cord *The connected component model is not possible or erroneous display appears even though all connections have been made properly, reset the microcomputer referring to "In case of the power cord can cause...
User Manual
Page 7
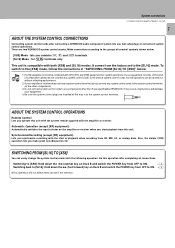
... unit is compatible with the start playback from CD. Do this kind of convenient system control operations. System connections CT-2050/203/KXF-W6010/W4010 (En/M) 7 ABOUT THE SYSTEM CONTROL CONNECTIONS Connecting system control cords after completing all the way in to the system control terminals. It comes from the factory set to ON. 8 ÷ This operation will not affect items stored in "SWITCHING FROM [SL16] TO [XS8]" below . [XS8] Mode : lets you make great...
... unit is compatible with the start playback from CD. Do this kind of convenient system control operations. System connections CT-2050/203/KXF-W6010/W4010 (En/M) 7 ABOUT THE SYSTEM CONTROL CONNECTIONS Connecting system control cords after completing all the way in to the system control terminals. It comes from the factory set to ON. 8 ÷ This operation will not affect items stored in "SWITCHING FROM [SL16] TO [XS8]" below . [XS8] Mode : lets you make great...
User Manual
Page 9
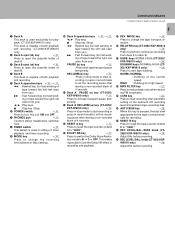
... start re- Connect stereo headphones (optional) here. 8 TIMER switch £ This switch is used exclusively for recording. ¡ RESET B key Press to reset the tape counter of timer playback and timer recording. 9 MODE key ^ Press to change the tape transport di- rection. ^ RELAY REC key (CT-2050/KXF-W6010 only) ( Press to perform continuous recording from you ) PAUSE (8) key ! :Press to switch the Dolby Noise Reduc- cally for play- Controls...
... start re- Connect stereo headphones (optional) here. 8 TIMER switch £ This switch is used exclusively for recording. ¡ RESET B key Press to reset the tape counter of timer playback and timer recording. 9 MODE key ^ Press to change the tape transport di- rection. ^ RELAY REC key (CT-2050/KXF-W6010 only) ( Press to perform continuous recording from you ) PAUSE (8) key ! :Press to switch the Dolby Noise Reduc- cally for play- Controls...
User Manual
Page 10
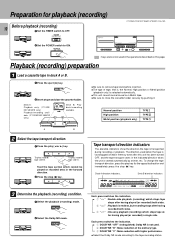
... stops after this page. REV.MODE 2 Select the Dolby NR mode. The direction used . 2 DOLBY NR "B": Noise reduction of tape, that is, the Normal, High position or Metal position (playback only) is transported during recording or playback. To change the tape transport direction, press the play (record) tape side A. TIMER REC OFF PLAY CT-2050/203/KXF-W6010/W4010 (En/M) 2 Set the POWER switch to OFF. Normal position High...
... stops after this page. REV.MODE 2 Select the Dolby NR mode. The direction used . 2 DOLBY NR "B": Noise reduction of tape, that is, the Normal, High position or Metal position (playback only) is transported during recording or playback. To change the tape transport direction, press the play (record) tape side A. TIMER REC OFF PLAY CT-2050/203/KXF-W6010/W4010 (En/M) 2 Set the POWER switch to OFF. Normal position High...
User Manual
Page 11
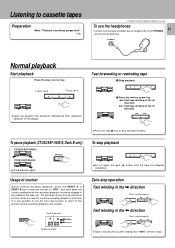
To pause playback (CT-203/KXF-W4010; this will make it stops. Listening to cassette tapes Preparation Make "Playback (recording) preparation". 0 CT-2050/203/KXF-W6010/W4010 (En/M) To use the Zero-stop fast tape winding. RESET A Deck A counter. PHONES Normal playback Start playback Press the play side A. 7 3 ÷ Tapes are played in the \ direction. 1 ¡ ÷ Press the stop (7) key to stop function to return to...
To pause playback (CT-203/KXF-W4010; this will make it stops. Listening to cassette tapes Preparation Make "Playback (recording) preparation". 0 CT-2050/203/KXF-W6010/W4010 (En/M) To use the Zero-stop fast tape winding. RESET A Deck A counter. PHONES Normal playback Start playback Press the play side A. 7 3 ÷ Tapes are played in the \ direction. 1 ¡ ÷ Press the stop (7) key to stop function to return to...
User Manual
Page 12
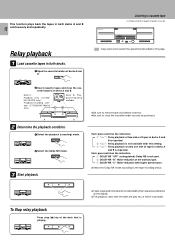
Each press switches the indication. 1 DOLBY NR "OFF" (extinguished): Dolby NR is not used in the operations described on the display. ÷ The playback starts with this page. ÷ Be sure to remove tape slack before insertion. ÷ Be sure to close the cassette holders of decks A and B. This function plays back the tapes in both decks. 1 Open the cassette holders of decks...
Each press switches the indication. 1 DOLBY NR "OFF" (extinguished): Dolby NR is not used in the operations described on the display. ÷ The playback starts with this page. ÷ Be sure to remove tape slack before insertion. ÷ Be sure to close the cassette holders of decks A and B. This function plays back the tapes in both decks. 1 Open the cassette holders of decks...
User Manual
Page 16
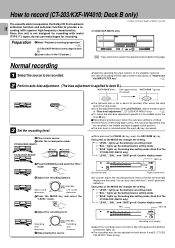
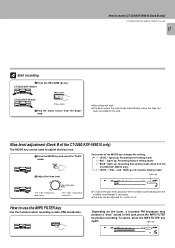
... indicators sometimes lights up : Recording bias setting mode (Deck B of the MODE key changes the setting. 1 "LEVEL" lights up : Recording level setting mode 2 "BAL." Insert a tape in deck B.) 2 (Load a disc in the CD player.) : Keys and control used in the operations described on both decks A and B. (CT-203/ KXF-W4010; CT-2050/KXF-W6010 8PAUSE ¶REC/ARM CT-203/KXF-W4010 3 Press the MODE key and select the "BAL." MODE 4 Adjust the recording...
... indicators sometimes lights up : Recording bias setting mode (Deck B of the MODE key changes the setting. 1 "LEVEL" lights up : Recording level setting mode 2 "BAL." Insert a tape in deck B.) 2 (Load a disc in the CD player.) : Keys and control used in the operations described on both decks A and B. (CT-203/ KXF-W4010; CT-2050/KXF-W6010 8PAUSE ¶REC/ARM CT-203/KXF-W4010 3 Press the MODE key and select the "BAL." MODE 4 Adjust the recording...
User Manual
Page 17
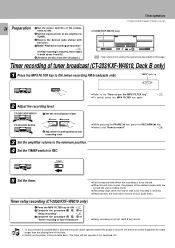
..." sound. In this function when recording a radio (FM) broadcasts. Bias level adjustment (Deck B of ±3. lights up ∞ MIN/L The high frequency decreases. How to record (CT-203/KXF-W4010; CT-2050/KXF-W6010 ¶REC/ARM CT-203/KXF-W4010 Press once. 2 Play the music source from the beginning. ÷ Recording will start. ÷ The deck enters the stop mode automatically when the tape...
..." sound. In this function when recording a radio (FM) broadcasts. Bias level adjustment (Deck B of ±3. lights up ∞ MIN/L The high frequency decreases. How to record (CT-203/KXF-W4010; CT-2050/KXF-W6010 ¶REC/ARM CT-203/KXF-W4010 Press once. 2 Play the music source from the beginning. ÷ Recording will start. ÷ The deck enters the stop mode automatically when the tape...

User Manual
Page 19
... omitted. 1 Play the music source. 2 Set the record-pause mode. (deck A). 3 Adjust the recording balance and record- RELAY REC : Keys and control used in the operations described on deck A has completed. ing level. ^ 4 Stop playing the music source. 4 Start recording. 1 Press the REC/ARM (¶) key (of deck A). ¶REC/ARM 2 Play the music source from deck A to B. After approximately "AUTO BIAS" lightsup. 40 seconds AUTO BIAS 3 Adjust the...
... omitted. 1 Play the music source. 2 Set the record-pause mode. (deck A). 3 Adjust the recording balance and record- RELAY REC : Keys and control used in the operations described on deck A has completed. ing level. ^ 4 Stop playing the music source. 4 Start recording. 1 Press the REC/ARM (¶) key (of deck A). ¶REC/ARM 2 Play the music source from deck A to B. After approximately "AUTO BIAS" lightsup. 40 seconds AUTO BIAS 3 Adjust the...
User Manual
Page 20
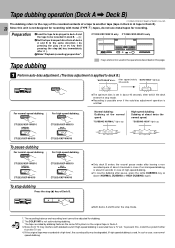
... stop mode. Preparation 1 Load the tape to be played in deck A and the tape to be adjusted for recording. CT-203/KXF-W4010 only CT-2050/KXF-W6010 only Tape dubbing : Keys and control used . The recording balance and recording level cannot be recorded in deck B. 0 2 Set the tape transport directions of decks A and B to the same direction ( by dubbing features the same NR system as...
... stop mode. Preparation 1 Load the tape to be played in deck A and the tape to be adjusted for recording. CT-203/KXF-W4010 only CT-2050/KXF-W6010 only Tape dubbing : Keys and control used . The recording balance and recording level cannot be recorded in deck B. 0 2 Set the tape transport directions of decks A and B to the same direction ( by dubbing features the same NR system as...
User Manual
Page 21
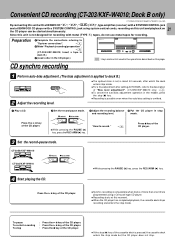
... tapes for recording with a SYSTEM CONTROL jack using a Carrousel type CD player. ÷ Recording starts at this page. mode. "How to record." ^ Press 7 key of the CD player. ÷ While pressing the PAUSE (8) key, press the REC/ARM (¶) key. Convenient CD recording (CT-203/KXF-W4010; CD synchro recording 1 Perform auto-bias adjustment. (The bias adjustment is applied to deck B.) AUTO BIAS ÷ The optinum bias is omitted. 1 Play a CD. 2 Set...
... tapes for recording with a SYSTEM CONTROL jack using a Carrousel type CD player. ÷ Recording starts at this page. mode. "How to record." ^ Press 7 key of the CD player. ÷ While pressing the PAUSE (8) key, press the REC/ARM (¶) key. Convenient CD recording (CT-203/KXF-W4010; CD synchro recording 1 Perform auto-bias adjustment. (The bias adjustment is applied to deck B.) AUTO BIAS ÷ The optinum bias is omitted. 1 Play a CD. 2 Set...
User Manual
Page 22
... 1 Complete the connections referring to "System connections". 6 2 (Set the input selector of the amplifier to CD.) 3 (Load a disc in the CD player.) (Edit tracks as required on the CD player.) : Keys and control used . 2 DOLBY NR "B": Noise reduction of the CD player is pressed or when the power is not used in about 8 seconds). REV.MODE ÷ For the tape direction setting, see the description below "Select the tape transport direction". 0 Each press switches the indication...
... 1 Complete the connections referring to "System connections". 6 2 (Set the input selector of the amplifier to CD.) 3 (Load a disc in the CD player.) (Edit tracks as required on the CD player.) : Keys and control used . 2 DOLBY NR "B": Noise reduction of the CD player is pressed or when the power is not used in about 8 seconds). REV.MODE ÷ For the tape direction setting, see the description below "Select the tape transport direction". 0 Each press switches the indication...
User Manual
Page 23
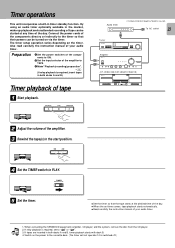
.../KXF-W6010/W4010 (En/M) To AC outlet 23 Tuner Amplifier (CT-2050/203/KXF-W6010/W4010) 2 Adjust the volume of your audio timer. Switch on the timer. The timer setup operation varies depending on the power to PLAY. Timer operations This unit incorporates a built-in both decks A and B, timer playback starts with deck B. 4. Preparation 1 Set the power switches of the components to ON. 2 Set the input selector of your audio timer. When connecting the KENWOOD equipment (amplifier, CD player) and the system, remove the disc from the CD player...
.../KXF-W6010/W4010 (En/M) To AC outlet 23 Tuner Amplifier (CT-2050/203/KXF-W6010/W4010) 2 Adjust the volume of your audio timer. Switch on the timer. The timer setup operation varies depending on the power to PLAY. Timer operations This unit incorporates a built-in both decks A and B, timer playback starts with deck B. 4. Preparation 1 Set the power switches of the components to ON. 2 Set the input selector of your audio timer. When connecting the KENWOOD equipment (amplifier, CD player) and the system, remove the disc from the CD player...
User Manual
Page 24
... desired radio station with the tuner. 4 Make "Playback (recording) preparation". 0 (If relay recording is required, insert tapes in both decks A and B.) 5 (Remove the disc from the CD player.) CT-2050/KXF-W6010 only : Keys and control used in the operations described on the power to ON.(when recording FM broadcasts only) "MPX" lights up. Timer operations CT-2050/203/KXF-W6010/W4010 (En/M) 24 Preparation 1Set the power switches of the components...
... desired radio station with the tuner. 4 Make "Playback (recording) preparation". 0 (If relay recording is required, insert tapes in both decks A and B.) 5 (Remove the disc from the CD player.) CT-2050/KXF-W6010 only : Keys and control used in the operations described on the power to ON.(when recording FM broadcasts only) "MPX" lights up. Timer operations CT-2050/203/KXF-W6010/W4010 (En/M) 24 Preparation 1Set the power switches of the components...
User Manual
Page 25
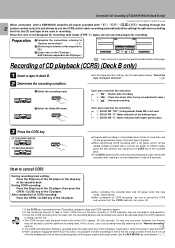
... in the CD player and press the CCRS key. ÷ Connect the system control cord securely. ÷ Clean the disc, place it to "Sys- If your dealer or service representative. 25 Operation to reset The microcomputer may fall into malfunction (impossibility to operate, erroneous display, etc.) when the power cord is unplugged while this unit is turned ON. ÷ Tape is not inserted. ÷ Tape is irregularly...
... in the CD player and press the CCRS key. ÷ Connect the system control cord securely. ÷ Clean the disc, place it to "Sys- If your dealer or service representative. 25 Operation to reset The microcomputer may fall into malfunction (impossibility to operate, erroneous display, etc.) when the power cord is unplugged while this unit is turned ON. ÷ Tape is not inserted. ÷ Tape is irregularly...
User Manual
Page 26
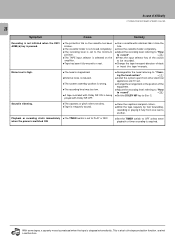
... head section". 4 ÷ Install the system apart from one reel to another. ÷ Set the TIMER switch to B or C. Sound is vibrating. ÷ The capstans or pinch rollers are dirty. ÷ Tape is required. when the power is switched ON. ÷ Clean the capstans and pinch rollers. ÷ Wind the tape regularly by fast forwarding, rewinding or playing it fully from...
... head section". 4 ÷ Install the system apart from one reel to another. ÷ Set the TIMER switch to B or C. Sound is vibrating. ÷ The capstans or pinch rollers are dirty. ÷ Tape is required. when the power is switched ON. ÷ Clean the capstans and pinch rollers. ÷ Wind the tape regularly by fast forwarding, rewinding or playing it fully from...
User Manual
Page 27
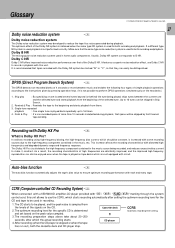
... high-frequency component contained in the music source being played, skips tunes between music and enables the following four types of simple playback operations according to the instructions given by fast forward tape winding. It features a superior noise reduction effect, use the CCRS, which starts recording automatically after which should be constant, is increased with "f", "ƒ", " (ƒ)" marking through the system control cord, this...
... high-frequency component contained in the music source being played, skips tunes between music and enables the following four types of simple playback operations according to the instructions given by fast forward tape winding. It features a superior noise reduction effect, use the CCRS, which starts recording automatically after which should be constant, is increased with "f", "ƒ", " (ƒ)" marking through the system control cord, this...
User Manual
Page 28
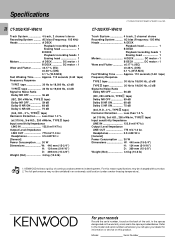
... Time ......... Model Serial Number KENWOOD follows a policy of the unit, in an extremely cold location (under a water-freezing temperature). The full performance may be exhibited in the spaces designated on this reason specifications may not be changed without notice. For this product. Specifications 28 CT-2050/KXF-W6010 Track System 4 track, 2 channel stereo Recording System .......... Less than 1.2 % (at 315 Hz, 3rd H.D., 250 nWb/m, TYPE tape) Input...
... Time ......... Model Serial Number KENWOOD follows a policy of the unit, in an extremely cold location (under a water-freezing temperature). The full performance may be exhibited in the spaces designated on this reason specifications may not be changed without notice. For this product. Specifications 28 CT-2050/KXF-W6010 Track System 4 track, 2 channel stereo Recording System .......... Less than 1.2 % (at 315 Hz, 3rd H.D., 250 nWb/m, TYPE tape) Input...


