
User Manual
Page 2
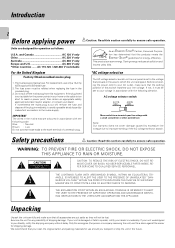
... voltage selection The AC voltage selector switch on the rear panel is set to your line voltage. Before connecting the power cord to your dealer immediately. If your unit was shipped to you transport or ship the unit in your home or the cable is damaged or fails to operate, notify your AC outlet, make sure that all accessories are coloured...
... voltage selection The AC voltage selector switch on the rear panel is set to your line voltage. Before connecting the power cord to your dealer immediately. If your unit was shipped to you transport or ship the unit in your home or the cable is damaged or fails to operate, notify your AC outlet, make sure that all accessories are coloured...
User Manual
Page 3
... SAFEGUARDS 4 System connections 6 Controls and indicators (CT-401/KXF-W1030 8 Controls and indicators (CT-403/KXF-W3030 9 Listening to cassette tapes 10 Preparation 10 Accessories Normal playback 10 Relay playback (CT-403/KXF-W3030 only 11 Convenient music search (DPSS 12 Skip play operation 12 Single-tune repeated playback operation 13 How to another across a large difference in temperature, when the humidity in the room where...
... SAFEGUARDS 4 System connections 6 Controls and indicators (CT-401/KXF-W1030 8 Controls and indicators (CT-403/KXF-W3030 9 Listening to cassette tapes 10 Preparation 10 Accessories Normal playback 10 Relay playback (CT-403/KXF-W3030 only 11 Convenient music search (DPSS 12 Skip play operation 12 Single-tune repeated playback operation 13 How to another across a large difference in temperature, when the humidity in the room where...
User Manual
Page 4
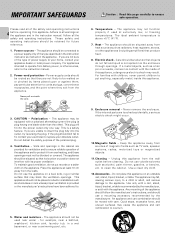
... safety and operating instructions. The ideal ambient temperature is a safety feature. If a metal objects, such as TV sets, speaker systems, radios, motorized toys or magnetized objects. 11.Cleaning - Do not place this appliance. 9. The appliance may block the ventilation openings. If you are not sure of the type of the polarized plug. 4. Electric shock - If the internal parts are...
... safety and operating instructions. The ideal ambient temperature is a safety feature. If a metal objects, such as TV sets, speaker systems, radios, motorized toys or magnetized objects. 11.Cleaning - Do not place this appliance. 9. The appliance may block the ventilation openings. If you are not sure of the type of the polarized plug. 4. Electric shock - If the internal parts are...
User Manual
Page 5
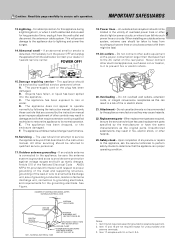
... serviced by following the instruction manual. The power-supply cord or the plug has been damaged. The appliance does not appear to grounding electrodes, and requirements for grounded or polarized equipment. 2. Adjust only those controls that described in fire, electric shock, or other electrical appliances, such as the original parts. E. The user should be sure the antenna system is in wire to an antenna discharge...
... serviced by following the instruction manual. The power-supply cord or the plug has been damaged. The appliance does not appear to grounding electrodes, and requirements for grounded or polarized equipment. 2. Adjust only those controls that described in fire, electric shock, or other electrical appliances, such as the original parts. E. The user should be sure the antenna system is in wire to an antenna discharge...
User Manual
Page 6
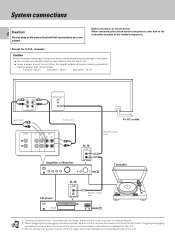
... system components, refer also to the instruction manuals of the power cord can cause malfunctions or damage to the unit. 3. Do not connect up a power source which is larger than , shown below . Top panel : 50 cm Side panel : 10 cm Back panel : 10 cm REC LL PLAY RR LINE IN LINE OUT Audio cord SYSTEM CONTROL Audio cord PHONO L R CD TUNER TAPE REC PLAY SL-16 SYSTEM CONTROL Amplifier or Receiver To AC outlet System control cord Turntable CD player SL-16 SYSTEM CONTROL 0 System control cord...
... system components, refer also to the instruction manuals of the power cord can cause malfunctions or damage to the unit. 3. Do not connect up a power source which is larger than , shown below . Top panel : 50 cm Side panel : 10 cm Back panel : 10 cm REC LL PLAY RR LINE IN LINE OUT Audio cord SYSTEM CONTROL Audio cord PHONO L R CD TUNER TAPE REC PLAY SL-16 SYSTEM CONTROL Amplifier or Receiver To AC outlet System control cord Turntable CD player SL-16 SYSTEM CONTROL 0 System control cord...
User Manual
Page 7
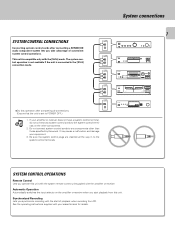
... compatible only with the amplifier or receiver. Synchronized Recording Lets you operate this unit. See the operating instructions supplied with the start playback from CD. SYSTEM CONTROL SYSTEM CONTROL SYSTEM CONTROL ÷ Do this operation after connecting a KENWOOD audio component system lets you start of convenient system control operations. Do not connect system control cords to POWER OFF.) Notes 1. Automatic Operation Automatically switches the input selector on the other than those specified by Kenwood. SYSTEM CONTROL This unit is connected in to the system...
... compatible only with the amplifier or receiver. Synchronized Recording Lets you operate this unit. See the operating instructions supplied with the start playback from CD. SYSTEM CONTROL SYSTEM CONTROL SYSTEM CONTROL ÷ Do this operation after connecting a KENWOOD audio component system lets you start of convenient system control operations. Do not connect system control cords to POWER OFF.) Notes 1. Automatic Operation Automatically switches the input selector on the other than those specified by Kenwood. SYSTEM CONTROL This unit is connected in to the system...
User Manual
Page 8
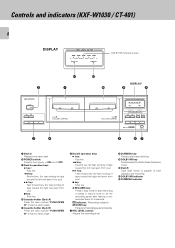
... mode to start tape dubbing. 9 DOLBY NR key: Press to select the Dolby Noise Reduction mode. 0 Deck B Tape deck which is capable of 4 seconds. ON - OFF 1¡ 7 3 PUSH/OPEN 0 TAPE A FULL LOGIC CONTROL 3 4 @ 0 DISPLAY 9 8 PUSH/OPEN 0 TAPE B FULL LOGIC CONTROL PEAK LEVEL METER (dB) -5 0 DOLBY NR +3 +6 (dB) DUBBING DOLBY NR DUBBING 1 ¡ 8PAUSE ¶REC/ARM 7 3 REC LEVEL DPSS MIN MAX 5 67 1 Deck A Playback-only tape deck. 2 POWER switch...
... mode to start tape dubbing. 9 DOLBY NR key: Press to select the Dolby Noise Reduction mode. 0 Deck B Tape deck which is capable of 4 seconds. ON - OFF 1¡ 7 3 PUSH/OPEN 0 TAPE A FULL LOGIC CONTROL 3 4 @ 0 DISPLAY 9 8 PUSH/OPEN 0 TAPE B FULL LOGIC CONTROL PEAK LEVEL METER (dB) -5 0 DOLBY NR +3 +6 (dB) DUBBING DOLBY NR DUBBING 1 ¡ 8PAUSE ¶REC/ARM 7 3 REC LEVEL DPSS MIN MAX 5 67 1 Deck A Playback-only tape deck. 2 POWER switch...
User Manual
Page 9
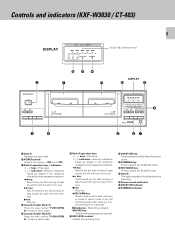
... LEVEL DPSS MIN MAX 5 67 8 1 Deck A Playback-only tape deck. 2 POWER switch: Press to select the REVERS mode. ! ON - Controls and indicators (KXF-W3030 / CT-403) 9 DISPLAY PEAK LEVEL METER (dB) Op -5 0 +3 +6 (dB) ∏ DOLBY NR DUBBING DOLBY NR reference level @#$ 2 1 DISPLAY ! 0 9 POWER - OFF. 3 Deck A operation keys / indicators @ , # keys : (Play keys) @ , # indicators : (direction indicators) Tapes are played in the directions indicated by their respective indicators. 1 key: Rewind key...
... LEVEL DPSS MIN MAX 5 67 8 1 Deck A Playback-only tape deck. 2 POWER switch: Press to select the REVERS mode. ! ON - Controls and indicators (KXF-W3030 / CT-403) 9 DISPLAY PEAK LEVEL METER (dB) Op -5 0 +3 +6 (dB) ∏ DOLBY NR DUBBING DOLBY NR reference level @#$ 2 1 DISPLAY ! 0 9 POWER - OFF. 3 Deck A operation keys / indicators @ , # keys : (Play keys) @ , # indicators : (direction indicators) Tapes are played in the directions indicated by their respective indicators. 1 key: Rewind key...
User Manual
Page 10
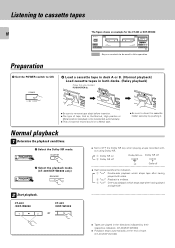
... this operation Preparation 1 Set the POWER switch to OFF the Dolby NR key when playing a tape recorded without using Dolby NR. 1 Dolby NR on 2 Dolby NR off Dolby NR on a Metal tape. PUSH0/OPEN (dB) - CT-403 /KXF-W3030 @ 7 # CT-401 /KXF-W1030 or 3 ÷ Set to ON. PUSH0/OPEN (dB) - ON - Normal playback 1 Determine the playback conditions. 1 Select the Dolby NR mode. (dB) - -5 0 +3 +6 (dB) DOLBY NR 2 Select the playback mode. (CT-403/KXF-W3030...
... this operation Preparation 1 Set the POWER switch to OFF the Dolby NR key when playing a tape recorded without using Dolby NR. 1 Dolby NR on 2 Dolby NR off Dolby NR on a Metal tape. PUSH0/OPEN (dB) - CT-403 /KXF-W3030 @ 7 # CT-401 /KXF-W1030 or 3 ÷ Set to ON. PUSH0/OPEN (dB) - ON - Normal playback 1 Determine the playback conditions. 1 Select the Dolby NR mode. (dB) - -5 0 +3 +6 (dB) DOLBY NR 2 Select the playback mode. (CT-403/KXF-W3030...
User Manual
Page 11
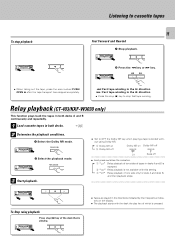
... to OFF the Dolby NR key when playing a tape recorded without using Dolby NR. 1 Dolby NR on 2 Dolby NR off Dolby NR on Dolby NR off DOLBY NR DOLBY NR Lit Goes off ÷ Each press switches the indication. 1 "[" :Relay playback of two sides of tapes in the directions indicated by their respective indicators on the display. ÷ The playback starts with this setting. 3 """ :Relay playback of...
... to OFF the Dolby NR key when playing a tape recorded without using Dolby NR. 1 Dolby NR on 2 Dolby NR off Dolby NR on Dolby NR off DOLBY NR DOLBY NR Lit Goes off ÷ Each press switches the indication. 1 "[" :Relay playback of two sides of tapes in the directions indicated by their respective indicators on the display. ÷ The playback starts with this setting. 3 """ :Relay playback of...
User Manual
Page 12
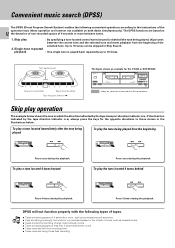
... or KXF-W3030 POWER PUSH/OPEN 0 PUSH/OPEN 0 (dB) - -5 0 +3 +6 (dB) 1¡ @ 7 # TAPE A AUTO REVERSE TAPE B AUTO REVERSE 1 ¡ 8PAUSE ¶REC/ARM @ 7 # : Keys or controls to be skipped in the middle of tunes, such as classical music. ÷ Tapes containing recording of large noise between tunes. ÷ Tapes containing spaces of 4 seconds or more between tunes. ÷ Tapes recorded with the following convenient operations according to the instructions of tapes...
... or KXF-W3030 POWER PUSH/OPEN 0 PUSH/OPEN 0 (dB) - -5 0 +3 +6 (dB) 1¡ @ 7 # TAPE A AUTO REVERSE TAPE B AUTO REVERSE 1 ¡ 8PAUSE ¶REC/ARM @ 7 # : Keys or controls to be skipped in the middle of tunes, such as classical music. ÷ Tapes containing recording of large noise between tunes. ÷ Tapes containing spaces of 4 seconds or more between tunes. ÷ Tapes recorded with the following convenient operations according to the instructions of tapes...
User Manual
Page 13
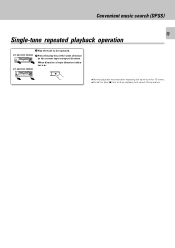
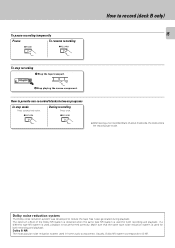
Convenient music search (DPSS) 13 Single-tune repeated playback operation 1 Play the tune to be repeated. (CT-401/KXF-W1030) 2 Press the play key of tape direction indicator is 3: (CT-403/KXF-W3030) (dB) - -5 0 +3 +6 (dB) 3 ÷ Normal playback resumes after repeating the same tune for 16 times. ÷ Press the stop (7) key to stop playback and cancel this operation. When direction of the same direction (dB) - -5 0 +3 +6 (dB) as the current tape transport direction.
Convenient music search (DPSS) 13 Single-tune repeated playback operation 1 Play the tune to be repeated. (CT-401/KXF-W1030) 2 Press the play key of tape direction indicator is 3: (CT-403/KXF-W3030) (dB) - -5 0 +3 +6 (dB) 3 ÷ Normal playback resumes after repeating the same tune for 16 times. ÷ Press the stop (7) key to stop playback and cancel this operation. When direction of the same direction (dB) - -5 0 +3 +6 (dB) as the current tape transport direction.
User Manual
Page 14
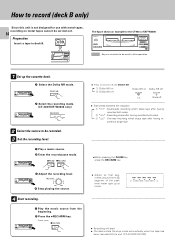
... meter light up the cassette deck. 1 Select the Dolby NR mode. (dB) - -5 0 +3 +6 (dB) DOLBY NR 2 Select the recording mode. (CT-403/KXF-W3030 only) (dB) - -5 0 +3 +6 (dB) REV.MODE 2 Select the source to be recorded. 3 Set the recording level. 1 Play a music source. 2 Enter the record-pause mode. (dB) - -5 0 +3 +6 (dB) 8PAUSE ¶REC/ARM ÷ Press to record with metal tapes, recording on DOLBY NR Dolby NR off DOLBY NR...
... meter light up the cassette deck. 1 Select the Dolby NR mode. (dB) - -5 0 +3 +6 (dB) DOLBY NR 2 Select the recording mode. (CT-403/KXF-W3030 only) (dB) - -5 0 +3 +6 (dB) REV.MODE 2 Select the source to be recorded. 3 Set the recording level. 1 Play a music source. 2 Enter the record-pause mode. (dB) - -5 0 +3 +6 (dB) 8PAUSE ¶REC/ARM ÷ Press to record with metal tapes, recording on DOLBY NR Dolby NR off DOLBY NR...
User Manual
Page 15
... during playback. Dolby noise reduction system The Dolby noise reduction system was developed to B NR. Make sure that the same type noise reduction system is used in home audio components. To pause recording temporarily Pause To resume recording 8PAUSE ¶REC/ARM How to provide non-recorded blanks between programs In stop recording 1 Stop the tape transport. (dB) - -5 0 +3 +6 (dB) 7 2 Stop playing the source component. The...
... during playback. Dolby noise reduction system The Dolby noise reduction system was developed to B NR. Make sure that the same type noise reduction system is used in home audio components. To pause recording temporarily Pause To resume recording 8PAUSE ¶REC/ARM How to provide non-recorded blanks between programs In stop recording 1 Stop the tape transport. (dB) - -5 0 +3 +6 (dB) 7 2 Stop playing the source component. The...
User Manual
Page 16
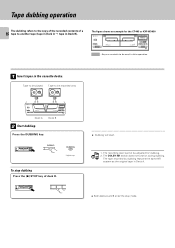
... the CT-403 or KXF-W3030 POWER PUSH/OPEN 0 PUSH/OPEN 0 (dB) - -5 0 +3 +6 (dB) 1¡ @ 7 # TAPE A AUTO REVERSE TAPE B AUTO REVERSE 1 ¡ 8PAUSE ¶REC/ARM @ 7 # : Keys or controls to be adjusted for dubbing. 2. Notes 1. The recording level cannot be recorded onto A POWER PUSH/OPEN 0 1¡ @ 7 # TAPE B AUTO REVERSE Deck A PUSH/OPEN 0 (dB) - -5 0 +3 +6 (dB) TAPE B AUTO REVERSE 1 ¡ 8PAUSE ¶REC/ARM @ 7 # Deck B 2 Start dubbing. Tape dubbing operation The dubbing refers to...
... the CT-403 or KXF-W3030 POWER PUSH/OPEN 0 PUSH/OPEN 0 (dB) - -5 0 +3 +6 (dB) 1¡ @ 7 # TAPE A AUTO REVERSE TAPE B AUTO REVERSE 1 ¡ 8PAUSE ¶REC/ARM @ 7 # : Keys or controls to be adjusted for dubbing. 2. Notes 1. The recording level cannot be recorded onto A POWER PUSH/OPEN 0 1¡ @ 7 # TAPE B AUTO REVERSE Deck A PUSH/OPEN 0 (dB) - -5 0 +3 +6 (dB) TAPE B AUTO REVERSE 1 ¡ 8PAUSE ¶REC/ARM @ 7 # Deck B 2 Start dubbing. Tape dubbing operation The dubbing refers to...
User Manual
Page 17
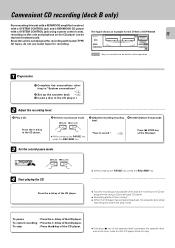
... (7) key of more than one CD are programmed using system control cords, recording on this unit and playback on the CD player can be used in this operation 1 Preparation 1 Complete the connections referring to "System connections". 6 2 Set up the cassette deck $ 3 (Load a disc in the CD player.) 2 Adjust the recording level. 1 Play a CD. 2 Set the record-pause mode. 8PAUSE ¶REC/ARM 3 Adjust the recording recording 4 Put the CD player in stop . "How to record...
... (7) key of more than one CD are programmed using system control cords, recording on this unit and playback on the CD player can be used in this operation 1 Preparation 1 Complete the connections referring to "System connections". 6 2 Set up the cassette deck $ 3 (Load a disc in the CD player.) 2 Adjust the recording level. 1 Play a CD. 2 Set the record-pause mode. 8PAUSE ¶REC/ARM 3 Adjust the recording recording 4 Put the CD player in stop . "How to record...
User Manual
Page 18
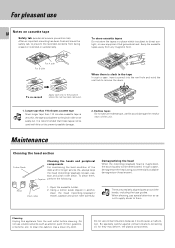
... oil, for longer service life, always keep the head (recording / playback / erase), capstan and pinch roller clean. To re-record Apply tape only to clean the cabinet. Maintenance Cleaning the head section Cotton Swab Cleaning the heads and peripheral components For maintaining the best condition of the unit. Do not use an endless tape, as this...
... oil, for longer service life, always keep the head (recording / playback / erase), capstan and pinch roller clean. To re-record Apply tape only to clean the cabinet. Maintenance Cleaning the head section Cotton Swab Cleaning the heads and peripheral components For maintaining the best condition of the unit. Do not use an endless tape, as this...
User Manual
Page 19
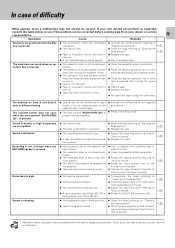
... the head section". ¶ Install the system apart from other side. Sound is due to "Cleaning the head section". * ¶ Replace the tape. ¶ Play a recorded tape. This is distorted. If your dealer or service representative. 19 Symptom Cause Remedy Sounds is not produced when the Play key is pressed. ¶ The connection cords are not audible. Sound is vibrating. ¶ The head...
... the head section". ¶ Install the system apart from other side. Sound is due to "Cleaning the head section". * ¶ Replace the tape. ¶ Play a recorded tape. This is distorted. If your dealer or service representative. 19 Symptom Cause Remedy Sounds is not produced when the Play key is pressed. ¶ The connection cords are not audible. Sound is vibrating. ¶ The head...
User Manual
Page 20
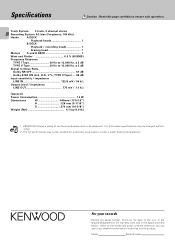
... the model and serial numbers whenever you call upon your records Record the serial number, found on this page carefully to ensure safe operation. For your dealer for information or service on the back of continuous advancements in the space provided below. Refer to Noise Ratio Dolby NR OFF 57 dB Dolby B NR ON (3rd, H.D., 3 %, TYPE II Tape) .... 66 dB Input...
... the model and serial numbers whenever you call upon your records Record the serial number, found on this page carefully to ensure safe operation. For your dealer for information or service on the back of continuous advancements in the space provided below. Refer to Noise Ratio Dolby NR OFF 57 dB Dolby B NR ON (3rd, H.D., 3 %, TYPE II Tape) .... 66 dB Input...


