Instruction Manual
Page 2
... Service Program Type (PTY) Function Program Type preset DAB Reception Primary/Secondary Switching Text Scroll Menu system 17 Menu System Transmission Frequency Modulation Level Data Transmission Speed Touch Sensor Tone Touch Sensor Tone Volume Text Scroll Built-in Auxiliary Input Setting Auxiliary Input Display Setting Firmware version display Search Mode Setting Auto Memory Entry Switching Seek Mode PTY Watch Select Mode Language Filter Search Mode Accessories/ Installation Procedure 22 Installation 23 Connecting Wires to Terminals 24 Troubleshooting Guide 26 Specifications 28...
... Service Program Type (PTY) Function Program Type preset DAB Reception Primary/Secondary Switching Text Scroll Menu system 17 Menu System Transmission Frequency Modulation Level Data Transmission Speed Touch Sensor Tone Touch Sensor Tone Volume Text Scroll Built-in Auxiliary Input Setting Auxiliary Input Display Setting Firmware version display Search Mode Setting Auto Memory Entry Switching Seek Mode PTY Watch Select Mode Language Filter Search Mode Accessories/ Installation Procedure 22 Installation 23 Connecting Wires to Terminals 24 Troubleshooting Guide 26 Specifications 28...

Instruction Manual
Page 3
... unit. • Mounting and wiring this unit Kenwood disc changers/ CD players released in damage. Also avoid places with too much dust or the possibility of water splashing. • When replacing a fuse, only use a new fuse with the wrong rating may differ depending on the models being connected. • You can damage both your unit and the CD changer if you connect them incorrectly. Set the "O-N" Switch...
... unit. • Mounting and wiring this unit Kenwood disc changers/ CD players released in damage. Also avoid places with too much dust or the possibility of water splashing. • When replacing a fuse, only use a new fuse with the wrong rating may differ depending on the models being connected. • You can damage both your unit and the CD changer if you connect them incorrectly. Set the "O-N" Switch...
Instruction Manual
Page 4
... of tuner may differ from the unit. The unit returns to purchase a commercially available USB device. How to you purchase optional accessories, check with your Kenwood dealer to make sure that have muting, there may be disposed as a silicon cloth. 4 | English After waiting several seconds, connect power supply cord plug again. You need to factory settings. Information on the display may be inapplicable. • The...
... of tuner may differ from the unit. The unit returns to purchase a commercially available USB device. How to you purchase optional accessories, check with your Kenwood dealer to make sure that have muting, there may be disposed as a silicon cloth. 4 | English After waiting several seconds, connect power supply cord plug again. You need to factory settings. Information on the display may be inapplicable. • The...
Instruction Manual
Page 5
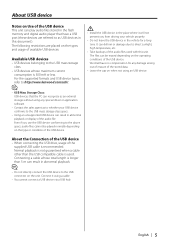
... flash memory and digital audio player that the PC can play audio files stored in abnormal playback. • Do not directly connect the USB device to the above specs, audio files cannot be erased depending on the unit. The files can be played normally depending on Use of the USB device This unit can recognize as an external storage without using a cable. • You cannot connect a USB device via a USB...
... flash memory and digital audio player that the PC can play audio files stored in abnormal playback. • Do not directly connect the USB device to the above specs, audio files cannot be erased depending on the unit. The files can be played normally depending on Use of the USB device This unit can recognize as an external storage without using a cable. • You cannot connect a USB device via a USB...
Instruction Manual
Page 6
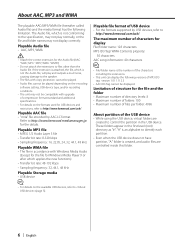
...; Maximum number of files per folder: 4096 About partition of the USB device • While using the USB device, virtual folders are controlled inside this folder. • For details on the encoding software setting, USB device type, and/or recording conditions. • The unit may not display correctly. Limitation of structure for the details. These folders appear in accordance with Windows Media Audio (Except...
...; Maximum number of files per folder: 4096 About partition of the USB device • While using the USB device, virtual folders are controlled inside this folder. • For details on the encoding software setting, USB device type, and/or recording conditions. • The unit may not display correctly. Limitation of structure for the details. These folders appear in accordance with Windows Media Audio (Except...

Instruction Manual
Page 8
... (program service name) mode for display. Power Sets the car radio FM station to ON. Contact a doctor immediately if the battery is accidentally swallowed. • Do not set the remote control in hot places such as illustrated. General features MENU POWER OFF ON SRC 4/¢ Loading and Replacing the battery Use two "AA"/ "R6"-size batteries. Turning OFF the Power Slide the [POWER] switch to (page 18). Insert the batteries with the + and - You can change...
... (program service name) mode for display. Power Sets the car radio FM station to ON. Contact a doctor immediately if the battery is accidentally swallowed. • Do not set the remote control in hot places such as illustrated. General features MENU POWER OFF ON SRC 4/¢ Loading and Replacing the battery Use two "AA"/ "R6"-size batteries. Turning OFF the Power Slide the [POWER] switch to (page 18). Insert the batteries with the + and - You can change...
Instruction Manual
Page 9
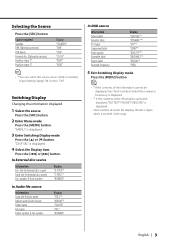
... Folder number & File number Display "TITLE"* "ALBUM"* "FOLDER" "FILE" "NUMBER" In DAB source Information Service label Dynamic label PTY label Component label Audio quality Ensemble label Region label Received Frequency Display "SERV LBL"* "DYNAMIC"*¹ "PTY"*¹ "COMP"* "QUALITY"*¹ "ENSEMBLE"* "REGION"* "FREQ" 5 Exit Switching Display mode Press the [MENU] button. • * If the contents of the information cannot be displayed, Disc/Track number, Folder/File number or Frequency is displayed...
... Folder number & File number Display "TITLE"* "ALBUM"* "FOLDER" "FILE" "NUMBER" In DAB source Information Service label Dynamic label PTY label Component label Audio quality Ensemble label Region label Received Frequency Display "SERV LBL"* "DYNAMIC"*¹ "PTY"*¹ "COMP"* "QUALITY"*¹ "ENSEMBLE"* "REGION"* "FREQ" 5 Exit Switching Display mode Press the [MENU] button. • * If the contents of the information cannot be displayed, Disc/Track number, Folder/File number or Frequency is displayed...
Instruction Manual
Page 10
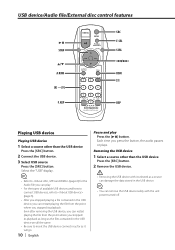
... the data stored in the USB device. • You can restart playing the file from the point where you press the button, the audio pauses or plays. Removing the USB device 1 Select a source other than the USB device Press the [SRC] button. 2 Remove the USB device. • Removing the USB device with the unit power turned off. Even after removing the USB device...
... the data stored in the USB device. • You can restart playing the file from the point where you press the button, the audio pauses or plays. Removing the USB device 1 Select a source other than the USB device Press the [SRC] button. 2 Remove the USB device. • Removing the USB device with the unit power turned off. Even after removing the USB device...
Instruction Manual
Page 11
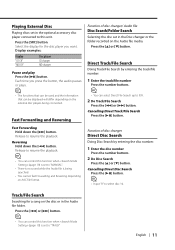
.... Cancelling Direct Track/File Search Press the [38] button. Select the display for a song on the disc or in the Audio file folder. Press the [5] or [∞] button. Reversing Hold down the [¢] button. Playing External Disc Playing discs set to "MANUAL". • There is no sound while the Audio file is set in the Disc changer or the folder recorded on the Audio file media...
.... Cancelling Direct Track/File Search Press the [38] button. Select the display for a song on the disc or in the Audio file folder. Press the [5] or [∞] button. Reversing Hold down the [¢] button. Playing External Disc Playing discs set to "MANUAL". • There is no sound while the Audio file is set in the Disc changer or the folder recorded on the Audio file media...
Instruction Manual
Page 12
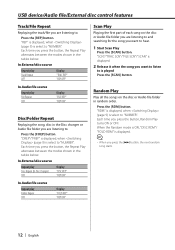
...modes shown in the tables below . Random Play Play all the songs on the disc or Audio file folder you are listening to and searching for the song you want to listen to "NUMBER". "SCN"/"TRAC SCN"/"FILE SCN"/"SCAN" is displayed. 2 Release it when the song you want to hear. 1 Start Scan Play Press the [SCAN] button. In External...DREP"/"FREP" is displayed, when (page 9) is select to is displayed. • When you press the [¢] button, the next random song starts. 12 | English Press the [RDM] button. USB device/Audio file/External disc control features Track/File ...
...modes shown in the tables below . Random Play Play all the songs on the disc or Audio file folder you are listening to and searching for the song you want to listen to "NUMBER". "SCN"/"TRAC SCN"/"FILE SCN"/"SCAN" is displayed. 2 Release it when the song you want to hear. 1 Start Scan Play Press the [SCAN] button. In External...DREP"/"FREP" is displayed, when (page 9) is select to is displayed. • When you press the [¢] button, the next random song starts. 12 | English Press the [RDM] button. USB device/Audio file/External disc control features Track/File ...

Instruction Manual
Page 16
Switching the ensemble channel Ensemble • Service 1 • Service 2 • Service 3 (band III) (L band) Switching service 1 Select the ensemble or service Press the [SCAN] button. Selecting the service mode. 2 Switching the ensemble or service Press the [4] or [¢] button. • Switching the Service causes a break-off . • The Primary/ Secondary switching is no switching to data service. ... Display "FREQ" "SERVICE" Setting Selecting the ensemble mode. Primary/Secondary Switching The Primary and Secondary can be switched with services that are composed of...
Switching the ensemble channel Ensemble • Service 1 • Service 2 • Service 3 (band III) (L band) Switching service 1 Select the ensemble or service Press the [SCAN] button. Selecting the service mode. 2 Switching the ensemble or service Press the [4] or [¢] button. • Switching the Service causes a break-off . • The Primary/ Secondary switching is no switching to data service. ... Display "FREQ" "SERVICE" Setting Selecting the ensemble mode. Primary/Secondary Switching The Primary and Secondary can be switched with services that are composed of...

Instruction Manual
Page 17
... the [5] or [∞] button. "MENU" is after this operation explanation. 1 Enter Menu mode Press the [MENU] button. functions. You can continue by returning to step 2 and setting other items. 4 Exit Menu mode Press the [MENU] button. • When other items those applicable to set the beep sound, select the "BEEP" display. 3 Set the menu item Press the [4] or [¢] button. Menu system MENU OK SRC 4/¢ Menu System Setting beep sound during operation, etc.
... the [5] or [∞] button. "MENU" is after this operation explanation. 1 Enter Menu mode Press the [MENU] button. functions. You can continue by returning to step 2 and setting other items. 4 Exit Menu mode Press the [MENU] button. • When other items those applicable to set the beep sound, select the "BEEP" display. 3 Set the menu item Press the [4] or [¢] button. Menu system MENU OK SRC 4/¢ Menu System Setting beep sound during operation, etc.

Instruction Manual
Page 18
... If it occurs, change the frequency. Display "BEEP ON" "BEEP OFF" Setting Beep is displayed correctly by car stereo. Display and Setting "MOD LV1" "MOD LV2" (Original setting) "MOD LV3" • When you play sources, if the volume is low compared with that a text is heard. In Standby mode Touch Sensor Tone Setting the operation check sound (beep sound) ON/OFF. Modulation Level Setting the modulation level of RDS...
... If it occurs, change the frequency. Display "BEEP ON" "BEEP OFF" Setting Beep is displayed correctly by car stereo. Display and Setting "MOD LV1" "MOD LV2" (Original setting) "MOD LV3" • When you play sources, if the volume is low compared with that a text is heard. In Standby mode Touch Sensor Tone Setting the operation check sound (beep sound) ON/OFF. Modulation Level Setting the modulation level of RDS...
Instruction Manual
Page 19
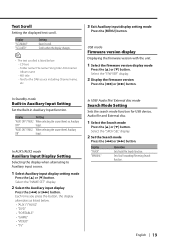
...; "VIDEO" • "TV" In USB/ Audio file/ External disc mode Search Mode Setting Sets the search mode function for the DAB source including Channel name, etc. 3 Exit Auxiliary input display setting mode Press the [MENU] button. In Standby mode Built-in Auxiliary Input Setting Set the Built-in Auxiliary Input function. Select the "SRCH SEL" display. 2 Set the Search mode Press the [4] or [¢] button. Display "SCL MANU" "SCL AUTO" Setting Doesn't scroll. CD text - MD title - Display "TRACK" "MANUAL" Operation Sets Track/File Search function...
...; "VIDEO" • "TV" In USB/ Audio file/ External disc mode Search Mode Setting Sets the search mode function for the DAB source including Channel name, etc. 3 Exit Auxiliary input display setting mode Press the [MENU] button. In Standby mode Built-in Auxiliary Input Setting Set the Built-in Auxiliary Input function. Select the "SRCH SEL" display. 2 Set the Search mode Press the [4] or [¢] button. Display "SCL MANU" "SCL AUTO" Setting Doesn't scroll. CD text - MD title - Display "TRACK" "MANUAL" Operation Sets Track/File Search function...

Instruction Manual
Page 20
... receiving condition can be received are switched one after another. In DAB mode PTY Watch Select Mode After registering a desired programme type, when the programme in the registered type starts in the table below. As for available program types, refer to the instruction manual of the Pre-set number. Services registered can be selected and received. Tuning mode Display Auto Ensemble "AUTO1" Seek Preset Service "AUTO2" Recall Manual "MANUAL" Operation...
... receiving condition can be received are switched one after another. In DAB mode PTY Watch Select Mode After registering a desired programme type, when the programme in the registered type starts in the table below. As for available program types, refer to the instruction manual of the Pre-set number. Services registered can be selected and received. Tuning mode Display Auto Ensemble "AUTO1" Seek Preset Service "AUTO2" Recall Manual "MANUAL" Operation...

Instruction Manual
Page 21
... displayed. In DAB mode Language Filter Search Mode Audio programmes only in the desired language can selectively be received in the newly selected language starts. Switching to the instruction manual of DAB tuner for . 4 Searching for another programme in the Ensemble. 1 Select the Language Filter Search mode Press the [5] or [∞] button. Select the "LANG SEL" display. 2 Enter Language Filter Search mode Press the [OK] button. 3 Switching the setting Press...
... displayed. In DAB mode Language Filter Search Mode Audio programmes only in the desired language can selectively be received in the newly selected language starts. Switching to the instruction manual of DAB tuner for . 4 Searching for another programme in the Ensemble. 1 Select the Language Filter Search mode Press the [5] or [∞] button. Select the "LANG SEL" display. 2 Enter Language Filter Search mode Press the [OK] button. 3 Switching the setting Press...

Instruction Manual
Page 22
... connected to the unit. 5. Make the proper input and output wire connections for each unit. 3. Connect the wiring harness wires in your vehicle's ignition does not have not caused a short circuit, then replace the old fuse with one with the same rating. • Insulate unconnected wires with the ignition). battery. • Only use antenna conversion adapters (ISO-JASO) when the antenna cord has an ISO plug. • If your car. 6. Accessories/ Installation Procedure Accessories...
... connected to the unit. 5. Make the proper input and output wire connections for each unit. 3. Connect the wiring harness wires in your vehicle's ignition does not have not caused a short circuit, then replace the old fuse with one with the same rating. • Insulate unconnected wires with the ignition). battery. • Only use antenna conversion adapters (ISO-JASO) when the antenna cord has an ISO plug. • If your car. 6. Accessories/ Installation Procedure Accessories...
Instruction Manual
Page 23
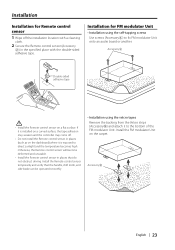
... tape adhesion may weaken and the controller may come off the installation location with a cleaning cloth. 2 Secure the Remote control sensor (Accessory 2) in the specified place with the double-sided adhesive tape. Installation Installation for FM modulator Unit • Installation using the velcro tapes Remove the backing from the Velcro strips (Accessory9) and attach it to direct sunlight and the temperature becomes...
... tape adhesion may weaken and the controller may come off the installation location with a cleaning cloth. 2 Secure the Remote control sensor (Accessory 2) in the specified place with the double-sided adhesive tape. Installation Installation for FM modulator Unit • Installation using the velcro tapes Remove the backing from the Velcro strips (Accessory9) and attach it to direct sunlight and the temperature becomes...

Instruction Manual
Page 26
...). ? Direct Search can 't switch. ✔ The Disc changer isn't connected. ☞ Connect the Disc changer. The sound skips when an Audio file is being played. ✔ The media is scratched or dirty. ☞ Clean the media. ✔ The recording condition is a strong broadcast station signal near the setting transmission frequency. ☞ Change the (page 18) setting. ? There's a source you can 't be the result of the USB device...
...). ? Direct Search can 't switch. ✔ The Disc changer isn't connected. ☞ Connect the Disc changer. The sound skips when an Audio file is being played. ✔ The media is scratched or dirty. ☞ Clean the media. ✔ The recording condition is a strong broadcast station signal near the setting transmission frequency. ☞ Change the (page 18) setting. ? There's a source you can 't be the result of the USB device...
Instruction Manual
Page 27
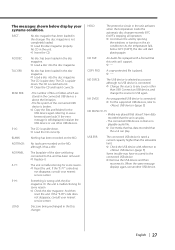
... no playable audio file. ➪ Use media that has data recorded that this unit has been removed. ➪ Replace it has a title. NO MUSIC/ E-15: • Media was played that doesn't have occurred to this unit can play . • The connected USB device contains no USB device is still displayed, initialize the USB device or use another USB device. Some trouble may have data recorded that the unit can play...
... no playable audio file. ➪ Use media that has data recorded that this unit has been removed. ➪ Replace it has a title. NO MUSIC/ E-15: • Media was played that doesn't have occurred to this unit can play . • The connected USB device contains no USB device is still displayed, initialize the USB device or use another USB device. Some trouble may have data recorded that the unit can play...


