
Quick Start Guide
Page 1
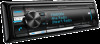
Familiarity with installation and operation procedures will help you call upon your Kenwood dealer for information or service on the warranty card, and in the space provided below. Refer to read through this instruction manual. Model KDC-X997/ KDC-BT955HD/ KDC-X897/ KDC-BT855U/ KDC-X697/ KDC-655U/ KMR-555U Serial number US Residence Only Register Online Register your Kenwood product...
Familiarity with installation and operation procedures will help you call upon your Kenwood dealer for information or service on the warranty card, and in the space provided below. Refer to read through this instruction manual. Model KDC-X997/ KDC-BT955HD/ KDC-X897/ KDC-BT855U/ KDC-X697/ KDC-655U/ KMR-555U Serial number US Residence Only Register Online Register your Kenwood product...
Quick Start Guide
Page 2
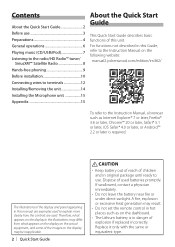
... Playing music (CD/USB/iPod 7 Listening to the radio/HD Radio™ tuner/ SiriusXM™ Satellite Radio 8 Hands-free phoning 9 Before installation 10 Connecting wires to the Instruction Manual on the dashboard. • The Lithium battery is required. Dispose of this unit. A fire, explosion ...; Keep battery out of reach of children and in this Guide, refer to terminals 12 Installing/Removing the unit 14 Installing the Microphone unit 15 Appendix 15 About the Quick Start Guide This Quick Start Guide describes basic functions of used . For functions not described in...
... Playing music (CD/USB/iPod 7 Listening to the radio/HD Radio™ tuner/ SiriusXM™ Satellite Radio 8 Hands-free phoning 9 Before installation 10 Connecting wires to the Instruction Manual on the dashboard. • The Lithium battery is required. Dispose of this unit. A fire, explosion ...; Keep battery out of reach of children and in this Guide, refer to terminals 12 Installing/Removing the unit 14 Installing the Microphone unit 15 Appendix 15 About the Quick Start Guide This Quick Start Guide describes basic functions of used . For functions not described in...
Quick Start Guide
Page 4
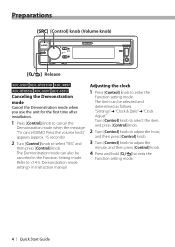
... exits the Function setting mode. 4 | Quick Start Guide Refer to in the Function Setting mode. Preparations [SRC] [Control] knob (Volume knob) [1/6] Release KDC-X997 KDC-BT955HD KDC-X897 KDC-BT855U KDC-X697 KDC-655U Canceling the Demonstration mode Cancel the Demonstration mode when you use the unit for the first time after installation. 1 Press [Control] knob to cancel the...
... exits the Function setting mode. 4 | Quick Start Guide Refer to in the Function Setting mode. Preparations [SRC] [Control] knob (Volume knob) [1/6] Release KDC-X997 KDC-BT955HD KDC-X897 KDC-BT855U KDC-X697 KDC-655U Canceling the Demonstration mode Cancel the Demonstration mode when you use the unit for the first time after installation. 1 Press [Control] knob to cancel the...
Quick Start Guide
Page 10
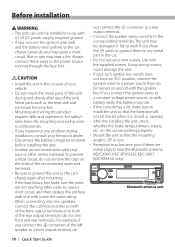
... console of your vehicle. • Do not touch the metal parts of this unit during installation, consult your Kenwood dealer. • Disconnect the battery's negative terminal before installing the unit. • Insulate unconnected wires with vinyl tape or other parts to cause a short...After the installing the unit, check whether the brake lamps, blinkers, wipers, etc. To prevent a short circuit, do not remove the caps on the car are metal objects near the Bluetooth antenna. (KDC-X997, KDC-BT955HD, KDC-X897, KDC-BT855U only) Bluetooth antenna unit 10 | Quick Start Guide For safety...
... console of your vehicle. • Do not touch the metal parts of this unit during installation, consult your Kenwood dealer. • Disconnect the battery's negative terminal before installing the unit. • Insulate unconnected wires with vinyl tape or other parts to cause a short...After the installing the unit, check whether the brake lamps, blinkers, wipers, etc. To prevent a short circuit, do not remove the caps on the car are metal objects near the Bluetooth antenna. (KDC-X997, KDC-BT955HD, KDC-X897, KDC-BT855U only) Bluetooth antenna unit 10 | Quick Start Guide For safety...
Quick Start Guide
Page 14
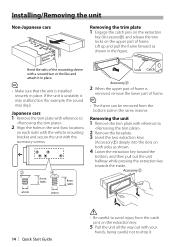
Accessory2 ø5mm ø5mm 14 | Quick Start Guide ! • Be careful to avoid injury from the bottom side in the same manner. Installing/Removing the unit Non-Japanese cars Removing the trim plate 1 Engage the catch pins on the extraction key (Accessory2) and release the two locks on ... the holes in place. Bend the tabs of the mounting sleeve with reference to drop it in place. < • Make sure that the unit is installed securely in the unit (two locations on each side) with the vehicle mounting bracket and secure the unit with your hands, being careful not to...
Accessory2 ø5mm ø5mm 14 | Quick Start Guide ! • Be careful to avoid injury from the bottom side in the same manner. Installing/Removing the unit Non-Japanese cars Removing the trim plate 1 Engage the catch pins on the extraction key (Accessory2) and release the two locks on ... the holes in place. Bend the tabs of the mounting sleeve with reference to drop it in place. < • Make sure that the unit is installed securely in the unit (two locations on each side) with the vehicle mounting bracket and secure the unit with your hands, being careful not to...


