Instruction Manual
Page 2
... Control Audio Setup Speaker Setting Audio Preset Memory Audio Preset Recall Satellite Radio tuner control (Optional) 26 Basic Operation Category and Channel Search Direct Access Tuning Preset Memory Preset Tuning Basic Operations of remote control 28 Appendix 30 Accessories/ Installation Procedure 33 Connecting Wires to Terminals 34 Installation/Removing the Unit 35 Troubleshooting Guide 37 Specifications 39 • iPod is trademark of Dolby Laboratories. 2 | KDC-X792/KDC-X692/KDC-MP738U/KDC-MP638U and other countries. • The "AAC" logo is a trademark of each function...
... Control Audio Setup Speaker Setting Audio Preset Memory Audio Preset Recall Satellite Radio tuner control (Optional) 26 Basic Operation Category and Channel Search Direct Access Tuning Preset Memory Preset Tuning Basic Operations of remote control 28 Appendix 30 Accessories/ Installation Procedure 33 Connecting Wires to Terminals 34 Installation/Removing the Unit 35 Troubleshooting Guide 37 Specifications 39 • iPod is trademark of Dolby Laboratories. 2 | KDC-X792/KDC-X692/KDC-MP738U/KDC-MP638U and other countries. • The "AAC" logo is a trademark of each function...
Instruction Manual
Page 3
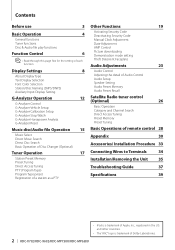
... lens fogging, this unit for the first time This unit is stained badly, wipe the stain off with a cloth moistened with neutral cleaner, then wipe it with your model and in your Kenwood dealer. • When you turn on the car heater in any broadcasting station. • In this unit or the connected unit (disc auto changer, etc.) fails to reset your vehicle is only...
... lens fogging, this unit for the first time This unit is stained badly, wipe the stain off with a cloth moistened with neutral cleaner, then wipe it with your model and in your Kenwood dealer. • When you turn on the car heater in any broadcasting station. • In this unit or the connected unit (disc auto changer, etc.) fails to reset your vehicle is only...
Instruction Manual
Page 4
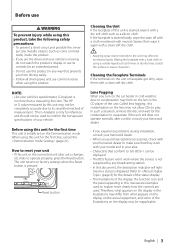
... as CD source on the connected unit. Tuner ("TUNER") , USB or iPod ("USB" or "iPod"), CD ("Compact Disc") , Auxiliary input ("AUX"), and Standby ("STANDBY") Press at least 2 seconds. Allows you to set up the display. Muting volume upon reception of the iPod is recognized, the source display changes from "USB" to "iPod". • USB (iPod) source is pressed during a call ends, "CALL" disappears and the audio system comes back on the power. Band select Control knob Switches between sources. Function Control [FNC] Pressing this button each time pushing...
... as CD source on the connected unit. Tuner ("TUNER") , USB or iPod ("USB" or "iPod"), CD ("Compact Disc") , Auxiliary input ("AUX"), and Standby ("STANDBY") Press at least 2 seconds. Allows you to set up the display. Muting volume upon reception of the iPod is recognized, the source display changes from "USB" to "iPod". • USB (iPod) source is pressed during a call ends, "CALL" disappears and the audio system comes back on the power. Band select Control knob Switches between sources. Function Control [FNC] Pressing this button each time pushing...
Instruction Manual
Page 6
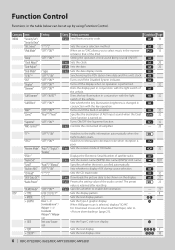
... 1 - 6/ Downloaded Wallpaper*1/ Wallpaper scan > SIDE Text icon/ Source icon > TEXT > COLOR*1, 3 Entry Setting overview 1 sec. Turns on/off the built-in amplifier. 32 Specifies the destination of the vehicle. Sets the station name (SNPS)/ disc name (DNPS)/ AUX name. Synchronizing the RDS station time data and this unit's clock. Sets the CD read mode. 1 sec. Setting the operation check sound (beep sound) ON/OFF. 1 sec. The preset value is turned on. Sets the display pattern. Function Control Functions...
... 1 - 6/ Downloaded Wallpaper*1/ Wallpaper scan > SIDE Text icon/ Source icon > TEXT > COLOR*1, 3 Entry Setting overview 1 sec. Turns on/off the built-in amplifier. 32 Specifies the destination of the vehicle. Sets the station name (SNPS)/ disc name (DNPS)/ AUX name. Synchronizing the RDS station time data and this unit's clock. Sets the CD read mode. 1 sec. Setting the operation check sound (beep sound) ON/OFF. 1 sec. The preset value is turned on. Sets the display pattern. Function Control Functions...
Instruction Manual
Page 10
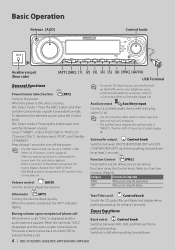
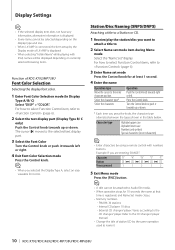
... Move the cursor to 2 Select Name set mode Press the Control knob for at that time is connected, the item setup by using a remote control with iPod, names will be attached to the selected text display part. 3 Select the Font Color Turn the Control knob or push it . 10 | KDC-X792/KDC-X692/KDC-MP738U/KDC-MP638U Press the Control knob. Character Button Times pressed "D" "A" "N" "C" "E" [3] [¢] [2] [¢] [6] [¢] [2] [¢] [3] 1 1 2 3 2 5 Exit Menu mode Press the [FNC] button. ⁄ • A title...
... Move the cursor to 2 Select Name set mode Press the Control knob for at that time is connected, the item setup by using a remote control with iPod, names will be attached to the selected text display part. 3 Select the Font Color Turn the Control knob or push it . 10 | KDC-X792/KDC-X692/KDC-MP738U/KDC-MP638U Press the Control knob. Character Button Times pressed "D" "A" "N" "C" "E" [3] [¢] [2] [¢] [6] [¢] [2] [¢] [3] 1 1 2 3 2 5 Exit Menu mode Press the [FNC] button. ⁄ • A title...
Instruction Manual
Page 12
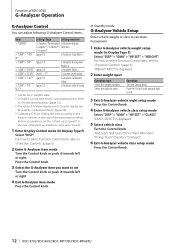
... driving situations calling for few accelerations, set in standby state. *1 G-Graphic can be switched to "Level1". In the case of frequent accelerations, set Turn the Control knob or push it up to customized pictures. "WEIGHT INPUT" is displayed. 5 Select vehicle class Turn the Control knob. "CLASS SELECT" is displayed. 2 Enter weight input Operation type Select the weight numbers Select the digits to "Level3". 1 Enter Display Control mode (In Display Type F) Select "DISP". Graphic/ Downloaded...
... driving situations calling for few accelerations, set in standby state. *1 G-Graphic can be switched to "Level1". In the case of frequent accelerations, set Turn the Control knob or push it up to customized pictures. "WEIGHT INPUT" is displayed. 5 Select vehicle class Turn the Control knob. "CLASS SELECT" is displayed. 2 Enter weight input Operation type Select the weight numbers Select the digits to "Level3". 1 Enter Display Control mode (In Display Type F) Select "DISP". Graphic/ Downloaded...
Instruction Manual
Page 14
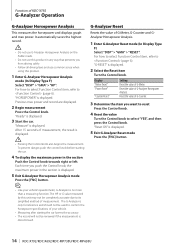
... displayed. "G-RESET" is no more than a measuring function. Each time you push the Control knob, the maximum power in the section is displayed. 5 Exit G-Analyzer Horsepower Analysis mode Press the [FNC] button. ⁄ • Like your vehicle. • Measuring after starting the car. 4 To display the maximum power in any way that prevents you want to reset Press the Control knob. 4 Reset the value Turn the Control...
... displayed. "G-RESET" is no more than a measuring function. Each time you push the Control knob, the maximum power in the section is displayed. 5 Exit G-Analyzer Horsepower Analysis mode Press the [FNC] button. ⁄ • Like your vehicle. • Measuring after starting the car. 4 To display the maximum power in any way that prevents you want to reset Press the Control knob. 4 Reset the value Turn the Control...
Instruction Manual
Page 20
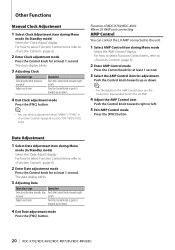
... When LX AMP unit connecting AMP Control You can control the LX AMP connected to (page 6). 2 Enter Clock adjustment mode Press the Control knob for at least 1 second. The clock display blinks. 3 Adjusting Clock Operation type Selecting the item (hours or minutes) Adjust each item Turn the Control knob or push it towards up or down . 4 Exit Date adjustment mode Press the [FNC] button. 20 | KDC-X792/KDC-X692/KDC-MP738U/KDC-MP638U Other Functions Manual Clock Adjustment 1 Select Clock Adjustment item during Menu mode (In Standby mode) Select the "Clock Adjust" display.
... When LX AMP unit connecting AMP Control You can control the LX AMP connected to (page 6). 2 Enter Clock adjustment mode Press the Control knob for at least 1 second. The clock display blinks. 3 Adjusting Clock Operation type Selecting the item (hours or minutes) Adjust each item Turn the Control knob or push it towards up or down . 4 Exit Date adjustment mode Press the [FNC] button. 20 | KDC-X792/KDC-X692/KDC-MP738U/KDC-MP638U Other Functions Manual Clock Adjustment 1 Select Clock Adjustment item during Menu mode (In Standby mode) Select the "Clock Adjust" display.
Instruction Manual
Page 21
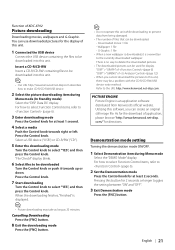
... cannot download the pictures to this unit while downloading to be used for directions. When the downloading finishes, "Finished" is an application software distributed from being damaged. • The number of application, please browse "http://www.kenwood.net-disp. G-Graphic: 1 file • When a new wallpaper is no way to make CD-R/CD-RW/USB device. 2 Select the picture downloading item during Menu mode Select the "DEMO Mode" display. Utilizing this unit. ⁄...
... cannot download the pictures to this unit while downloading to be used for directions. When the downloading finishes, "Finished" is an application software distributed from being damaged. • The number of application, please browse "http://www.kenwood.net-disp. G-Graphic: 1 file • When a new wallpaper is no way to make CD-R/CD-RW/USB device. 2 Select the picture downloading item during Menu mode Select the "DEMO Mode" display. Utilizing this unit. ⁄...
Instruction Manual
Page 23
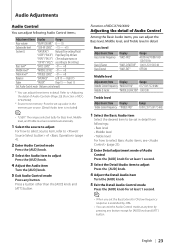
... Audio Control mode (Volume control mode) * You can adjust these items in detail from followings; • Bass level • Middle level • Treble level For how to select Basic Audio items, see (page 23). 2 Enter Detail adjustment mode of (page 4). 2 Enter Audio Control mode Press the [AUD] knob. 3 Select the Audio item to (Page 23). (Function of Audio Control Among the Basic Audio items, you set in detail. Adjustment Item Display Range Rear volume "REAR VOLUME" 0 - 35 Subwoofer level "SUB-W LEVEL" -15 - +15 System Q "NATURAL"/ Natural/User setting...
... Audio Control mode (Volume control mode) * You can adjust these items in detail from followings; • Bass level • Middle level • Treble level For how to select Basic Audio items, see (page 23). 2 Enter Detail adjustment mode of (page 4). 2 Enter Audio Control mode Press the [AUD] knob. 3 Select the Audio item to (Page 23). (Function of Audio Control Among the Basic Audio items, you set in detail. Adjustment Item Display Range Rear volume "REAR VOLUME" 0 - 35 Subwoofer level "SUB-W LEVEL" -15 - +15 System Q "NATURAL"/ Natural/User setting...
Instruction Manual
Page 24
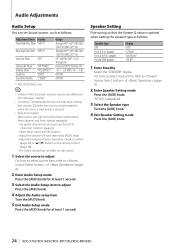
... displayed. 3 Select the Speaker type Turn the [AUD] knob. 4 Exit Speaker Setting mode Press the [AUD] knob. 24 | KDC-X792/KDC-X692/KDC-MP738U/KDC-MP638U Adjust the volume of (page 4). 2 Enter Audio Setup mode Press the [AUD] knob for at least 1 second. The Audio Control has no effect on the remote control (page 28). - "SP SEL" is optimal when setting the speaker type as a source.) • Dual Zone System Main source and sub source (Auxiliary input) output Front channel and Rear channel...
... displayed. 3 Select the Speaker type Turn the [AUD] knob. 4 Exit Speaker Setting mode Press the [AUD] knob. 24 | KDC-X792/KDC-X692/KDC-MP738U/KDC-MP638U Adjust the volume of (page 4). 2 Enter Audio Setup mode Press the [AUD] knob for at least 1 second. The Audio Control has no effect on the remote control (page 28). - "SP SEL" is optimal when setting the speaker type as a source.) • Dual Zone System Main source and sub source (Auxiliary input) output Front channel and Rear channel...
Instruction Manual
Page 25
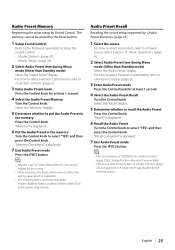
... source tone memory item of (page 23) is changed to the value which is displayed. 7 Exit Audio Preset mode Press the [FNC] button. ⁄ • Register 1 pair of (page 4). 2 Select Audio Preset item during Menu mode (Other than Standby mode) Select the "Audio Preset" display. Volume, Balance, Fader, Loudness, Volume offset, Dual Zone System, Rear Volume Audio Preset Recall Recalling the sound setup registered by Sound Control. is displayed. 6 Put the Audio Preset in the memory Press the Control knob. English | 25 For how to select Function Control...
... source tone memory item of (page 23) is changed to the value which is displayed. 7 Exit Audio Preset mode Press the [FNC] button. ⁄ • Register 1 pair of (page 4). 2 Select Audio Preset item during Menu mode (Other than Standby mode) Select the "Audio Preset" display. Volume, Balance, Fader, Loudness, Volume offset, Dual Zone System, Rear Volume Audio Preset Recall Recalling the sound setup registered by Sound Control. is displayed. 6 Put the Audio Preset in the memory Press the Control knob. English | 25 For how to select Function Control...
Instruction Manual
Page 26
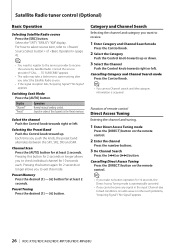
... mode. Preset Memory Press the desired [1] - [6] button for 10 seconds each. Each time you to receive the service by Satellite Radio. Search in the input Channel due to receive. 1 Enter Category and Channel Search mode Press the Control knob. 2 Select the Category Push the Control knob towards right or left . Channel Scan Press the [AUTO] button for at least 2 seconds. Select the "SAT"/ "SIRIUS"/ "XM" display. Function of remote control Direct Access Tuning Entering the channel and tuning. 1 Enter Direct Access Tuning mode...
... mode. Preset Memory Press the desired [1] - [6] button for 10 seconds each. Each time you to receive the service by Satellite Radio. Search in the input Channel due to receive. 1 Enter Category and Channel Search mode Press the Control knob. 2 Select the Category Push the Control knob towards right or left . Channel Scan Press the [AUTO] button for at least 2 seconds. Select the "SAT"/ "SIRIUS"/ "XM" display. Function of remote control Direct Access Tuning Entering the channel and tuning. 1 Enter Direct Access Tuning mode...
Instruction Manual
Page 28
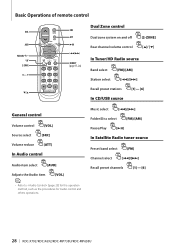
.../Disc select [FM]/[AM] Pause/Play [38] In Satellite Radio tuner source Preset band select [FM] Channel select [4]/[¢] Recall preset channels [1] - [6] 28 | KDC-X792/KDC-X692/KDC-MP738U/KDC-MP638U Basic Operations of remote control VOL AUD FM/AM/+/- 2-ZONE 0 - 9 Dual Zone control SRC ATT Dual zone system on and off [2-ZONE] Rear channel volume control [5]/ [∞] DIRECT (page 17, 26) In Tuner/HD Radio source Band select [FM]/[AM] Station select [4]/[¢] Recall preset stations [1] - [6] In CD/USB source General control Volume control [VOL] Source...
.../Disc select [FM]/[AM] Pause/Play [38] In Satellite Radio tuner source Preset band select [FM] Channel select [4]/[¢] Recall preset channels [1] - [6] 28 | KDC-X792/KDC-X692/KDC-MP738U/KDC-MP638U Basic Operations of remote control VOL AUD FM/AM/+/- 2-ZONE 0 - 9 Dual Zone control SRC ATT Dual zone system on and off [2-ZONE] Rear channel volume control [5]/ [∞] DIRECT (page 17, 26) In Tuner/HD Radio source Band select [FM]/[AM] Station select [4]/[¢] Recall preset stations [1] - [6] In CD/USB source General control Volume control [VOL] Source...
Instruction Manual
Page 30
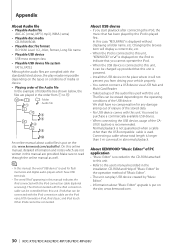
... (.m4a), MP3 (.mp3), WMA (.wma) • Playable disc media CD-R/RW/ROM • Playable disc file format ISO 9660 Level 1/2, Joliet, Romeo, Long file name. • Playable USB device USB mass storage class • Playable USB device file system FAT16, FAT32 Although the audio files are complied with the standards listed above, the play maybe impossible depending on the types or...
... (.m4a), MP3 (.mp3), WMA (.wma) • Playable disc media CD-R/RW/ROM • Playable disc file format ISO 9660 Level 1/2, Joliet, Romeo, Long file name. • Playable USB device USB mass storage class • Playable USB device file system FAT16, FAT32 Although the audio files are complied with the standards listed above, the play maybe impossible depending on the types or...
Instruction Manual
Page 32
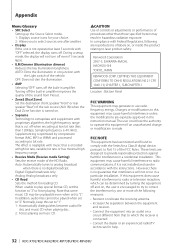
... user could lose the authority to operate this set to analog broadcast when there is no guarantee that some music CD may cause harmful interference to radio communications, if it is not installed and used in a residential installation. Auto: Automatically tunes to "2". Changes or modifications to this unit is not operated at least 5 seconds with proprietary algorithm, the high-frequency range that to which the receiver...
... user could lose the authority to operate this set to analog broadcast when there is no guarantee that some music CD may cause harmful interference to radio communications, if it is not installed and used in a residential installation. Auto: Automatically tunes to "2". Changes or modifications to this unit is not operated at least 5 seconds with proprietary algorithm, the high-frequency range that to which the receiver...

Instruction Manual
Page 33
... left speaker to a rear output terminal. • After the unit is 30° or less. Accessories/ Installation Procedure Accessories 1 5* ..........1 ..........1 2 6* ..........2 ..........2 3 7* ..........4 4 ..........2 ..........4 * KDC- Reconnect the - Installation Procedure 1. battery. 2. Make the proper input and output wire connections for each unit. 3. Always connect those wires to the power source running through the fuse box. ¤ • Mounting and wiring this unit If the CD player/ disc changer has the "O-N" switch, set it to direct sunlight...
... left speaker to a rear output terminal. • After the unit is 30° or less. Accessories/ Installation Procedure Accessories 1 5* ..........1 ..........1 2 6* ..........2 ..........2 3 7* ..........4 4 ..........2 ..........4 * KDC- Reconnect the - Installation Procedure 1. battery. 2. Make the proper input and output wire connections for each unit. 3. Always connect those wires to the power source running through the fuse box. ¤ • Mounting and wiring this unit If the CD player/ disc changer has the "O-N" switch, set it to direct sunlight...
Instruction Manual
Page 34
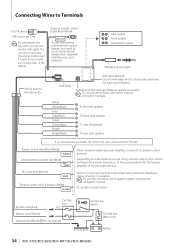
... remote control (Light Blue/Yellow) REMO.CONT To use the USB cable. Connect to the terminal that is grounded when either to the control terminal of the motor antenna, or to the power terminal for the booster amplifier of the vehicle. Battery + 34 | KDC-X792/KDC-X692/KDC-MP738U/KDC-MP638U Rear output L R Front output Sub Woofer output FM/AM antenna input Wiring harness (Accessory1) Fuse (10A) AUX input (Stereo) Use the mini-plug which is stereo type and does not have any metallic part...
... remote control (Light Blue/Yellow) REMO.CONT To use the USB cable. Connect to the terminal that is grounded when either to the control terminal of the motor antenna, or to the power terminal for the booster amplifier of the vehicle. Battery + 34 | KDC-X792/KDC-X692/KDC-MP738U/KDC-MP638U Rear output L R Front output Sub Woofer output FM/AM antenna input Wiring harness (Accessory1) Fuse (10A) AUX input (Stereo) Use the mini-plug which is stereo type and does not have any metallic part...
Instruction Manual
Page 37
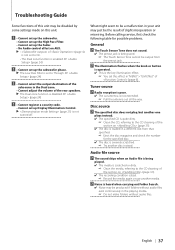
... that specified. ☞ Eject the disc magazine and check the number for possible problems. General ? The illumination flashes when the knob or button is operated. ✔ This is the key illumination effect. ☞ You set this unit. ! • Cannot set up the subwoofer. • Cannot set up the High Pass Filter. • Cannot set up the Fader. • No Audio control effect on AUX. ▲ •...
... that specified. ☞ Eject the disc magazine and check the number for possible problems. General ? The illumination flashes when the knob or button is operated. ✔ This is the key illumination effect. ☞ You set this unit. ! • Cannot set up the subwoofer. • Cannot set up the High Pass Filter. • Cannot set up the Fader. • No Audio control effect on AUX. ▲ •...
Instruction Manual
Page 38
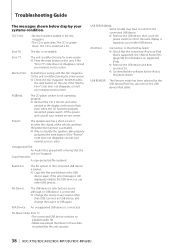
... service center. Unsupported File: An Audio file is played with the disc magazine. Connect an USB device, and change the source to flash even when the CD has been properly reinserted, please switch off the power and consult your nearest service center. If the same display is supported. USB REMOVE: The Remove mode has been selected for some reason. ➪ Check the disc magazine. You can remove the USB device/iPod safely. 38 | KDC-X792/KDC-X692/KDC-MP738U/KDC-MP638U...
... service center. Unsupported File: An Audio file is played with the disc magazine. Connect an USB device, and change the source to flash even when the CD has been properly reinserted, please switch off the power and consult your nearest service center. If the same display is supported. USB REMOVE: The Remove mode has been selected for some reason. ➪ Check the disc magazine. You can remove the USB device/iPod safely. 38 | KDC-X792/KDC-X692/KDC-MP738U/KDC-MP638U...


