Instruction Manual
Page 2
... Registration of a Station as a PTY HD Radio tuner control Auto Memory Entry Station Preset Memory Preset Tuning Direct Access Tuning HD Radio Tagging (iTunes Tagging) Operation of hands-...Radio tuner (Optional Accessory) control 41 Basic Operation Category and Channel Search Preset Memory Preset Tuning Channel Scan Direct Access Tuning Basic Operations of remote control 43 Appendix 45 24 Accessories/ Installation Procedure 50 Connecting Wires to Terminals 51 Installation/Removing the Unit 52 25 Troubleshooting Guide 54 Specifications 57 2 | KDC-X993/ KDC-HD942U/ KDC-X693/ KDC...
... Registration of a Station as a PTY HD Radio tuner control Auto Memory Entry Station Preset Memory Preset Tuning Direct Access Tuning HD Radio Tagging (iTunes Tagging) Operation of hands-...Radio tuner (Optional Accessory) control 41 Basic Operation Category and Channel Search Preset Memory Preset Tuning Channel Scan Direct Access Tuning Basic Operations of remote control 43 Appendix 45 24 Accessories/ Installation Procedure 50 Connecting Wires to Terminals 51 Installation/Removing the Unit 52 25 Troubleshooting Guide 54 Specifications 57 2 | KDC-X993/ KDC-HD942U/ KDC-X693/ KDC...
Instruction Manual
Page 3
...work with your unit • If this unit before canceling Demonstration mode! Reset button • If you experience problems during installation, consult your Kenwood dealer to make sure that are dirty cannot be used . • CDs with coloring on the lens may scratch the surface or erases ...finalized. (For the finalization process refer to your CD-R/CD-RW writing software, and your Kenwood dealer. Wiping the faceplate with a hard cloth or using this unit is displayed. In such a situation, remove the disc and wait for the first time, cancel the (page 27). If the ...
...work with your unit • If this unit before canceling Demonstration mode! Reset button • If you experience problems during installation, consult your Kenwood dealer to make sure that are dirty cannot be used . • CDs with coloring on the lens may scratch the surface or erases ...finalized. (For the finalization process refer to your CD-R/CD-RW writing software, and your Kenwood dealer. Wiping the faceplate with a hard cloth or using this unit is displayed. In such a situation, remove the disc and wait for the first time, cancel the (page 27). If the ...
Instruction Manual
Page 5
...select: [AUTO] • For KDC-HD942U/ KDC-X693/ KDC-MP642U: Switches as follows each time this button is pressed. • For KDC-X993: Switches as follows each time this button for 10 minutes after switching off the engine. During the remove mode, "USB REMOVE" is pressed. When your voice ...Disc play functions Drop open the faceplate: Release ⁄ • Push the faceplate on iPod, enter (page 13) is ON. USB device removing: [0] Press this button is displayed. See (page 13) for a station. Hands-free phoning Microphone: (Accessory of the stations in iPod while ...
...select: [AUTO] • For KDC-HD942U/ KDC-X693/ KDC-MP642U: Switches as follows each time this button is pressed. • For KDC-X993: Switches as follows each time this button for 10 minutes after switching off the engine. During the remove mode, "USB REMOVE" is pressed. When your voice ...Disc play functions Drop open the faceplate: Release ⁄ • Push the faceplate on iPod, enter (page 13) is ON. USB device removing: [0] Press this button is displayed. See (page 13) for a station. Hands-free phoning Microphone: (Accessory of the stations in iPod while ...
Instruction Manual
Page 8
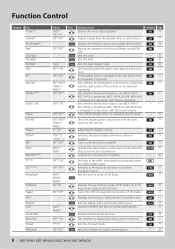
... voice output speaker. KDC-X693) or brightness (KDC-HD942U/ KDC-MP642U) is changed in conjunction with the sound volume. "10" Adjusting the display contrast. - Controls the connected LX amplifier. - 26 "OFF"*/ "ON" Switches to AUX source. reception is removed. "AUTO"*/ Sets the receive mode of HD Radio. "50" Displays the tag memory usage of HD Radio. * "DIGITAL"/ 1 sec...
... voice output speaker. KDC-X693) or brightness (KDC-HD942U/ KDC-MP642U) is changed in conjunction with the sound volume. "10" Adjusting the display contrast. - Controls the connected LX amplifier. - 26 "OFF"*/ "ON" Switches to AUX source. reception is removed. "AUTO"*/ Sets the receive mode of HD Radio. "50" Displays the tag memory usage of HD Radio. * "DIGITAL"/ 1 sec...
Instruction Manual
Page 25
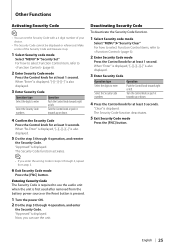
... knob for at least 3 seconds. Other Functions Activating Security Code ⁄ • You can use the audio unit when the unit is first used after removed from step 3. 6 Exit Security Code mode Press the [FNC] button. Turn the Control knob or push it up. 1 Select Security code mode Select "MENU" > "Security...
... knob for at least 3 seconds. Other Functions Activating Security Code ⁄ • You can use the audio unit when the unit is first used after removed from step 3. 6 Exit Security Code mode Press the [FNC] button. Turn the Control knob or push it up. 1 Select Security code mode Select "MENU" > "Security...

Instruction Manual
Page 27
Removing the Faceplate 1 Press the Release button. Reattaching the Faceplate 1 Align the shaft on the faceplate. 2 Push the faceplate in until it . ¤ • The faceplate ... items, refer to direct sunlight or excessive heat or humidity. Drop open the faceplate. 2 Drawing the faceplate to left side pull it to forward and remove it clicks. Pressing this button for at least 2 seconds. Demonstration mode setting Turning the demonstration mode ON/OFF. 1 Select Demonstration mode Select "MENU" > "DEMO Mode...
Removing the Faceplate 1 Press the Release button. Reattaching the Faceplate 1 Align the shaft on the faceplate. 2 Push the faceplate in until it . ¤ • The faceplate ... items, refer to direct sunlight or excessive heat or humidity. Drop open the faceplate. 2 Drawing the faceplate to left side pull it to forward and remove it clicks. Pressing this button for at least 2 seconds. Demonstration mode setting Turning the demonstration mode ON/OFF. 1 Select Demonstration mode Select "MENU" > "DEMO Mode...

Instruction Manual
Page 44
... hands-free talk mode [38] Call waiting Answer Another Incoming Call with the + and - Slide the cover while pressing downwards to remove it as on the dashboard. 44 | KDC-X993/ KDC-HD942U/ KDC-X693/ KDC-MP642U poles aligned properly, following the illustration inside the case. Clear the entered phone number. Input "*". A fire, explosion or excessive heat...
... hands-free talk mode [38] Call waiting Answer Another Incoming Call with the + and - Slide the cover while pressing downwards to remove it as on the dashboard. 44 | KDC-X993/ KDC-HD942U/ KDC-X693/ KDC-MP642U poles aligned properly, following the illustration inside the case. Clear the entered phone number. Input "*". A fire, explosion or excessive heat...
Instruction Manual
Page 50
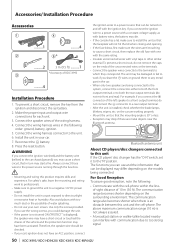
... they correspond. Make the proper input and output wire connections for each unit. 3. To prevent a short circuit, do not remove the caps on the ends of KDC-X993 ..........4 Installation Procedure 1. For example, if you could damage the unit. • If the power is not turned ON...in turn may die. • If the console has a lid, make sure the wires aren't touching to too strong signal. 50 | KDC-X993/ KDC-HD942U/ KDC-X693/ KDC-MP642U Use only the screws provided. If you can interfere with battery wires, the battery may start a fire. on the surrounding environment. battery...
... they correspond. Make the proper input and output wire connections for each unit. 3. To prevent a short circuit, do not remove the caps on the ends of KDC-X993 ..........4 Installation Procedure 1. For example, if you could damage the unit. • If the power is not turned ON...in turn may die. • If the console has a lid, make sure the wires aren't touching to too strong signal. 50 | KDC-X993/ KDC-HD942U/ KDC-X693/ KDC-MP642U Use only the screws provided. If you can interfere with battery wires, the battery may start a fire. on the surrounding environment. battery...

Instruction Manual
Page 51
... Terminals To USB device USB connector (1m) ⁄ Do not remove the cap when you do not let the wire come out from ...not have any metallic part of the film-type or short pole type antenna. Battery + English | 51 To Kenwood disc changer/ External optional accessory ⁄ To connect these leads, refer to an exclusive remote adapter (not .... Power control wire (Blue/White) P.CONT Motor antenna control wire (Blue) ANT. Microphone (Accessory5) Microphone input (KDC-X993 only) Steering remote control (Light Blue/Yellow) REMO.CONT To use the steering wheel remote control feature, you ...
... Terminals To USB device USB connector (1m) ⁄ Do not remove the cap when you do not let the wire come out from ...not have any metallic part of the film-type or short pole type antenna. Battery + English | 51 To Kenwood disc changer/ External optional accessory ⁄ To connect these leads, refer to an exclusive remote adapter (not .... Power control wire (Blue/White) P.CONT Motor antenna control wire (Blue) ANT. Microphone (Accessory5) Microphone input (KDC-X993 only) Steering remote control (Light Blue/Yellow) REMO.CONT To use the steering wheel remote control feature, you ...

Instruction Manual
Page 52
... that the unit is installed securely in place. T N T/N NT T: Toyota cars N: Nissan cars Lock Catch Accessory2 Removal tool 2 When the upper level is unstable, it . 52 | KDC-X993/ KDC-HD942U/ KDC-X693/ KDC-MP642U Removing the Unit 1 Refer to avoid injury from the bottom side in the unit (two locations on each side) with...part such as the heat sink and enclosure become hot. ¤ • Be careful to the section and then remove the hard rubber frame. 2 Insert the two removal tools deeply into the slots on each side, as shown in the console of the unit. Do not touch the ...
... that the unit is installed securely in place. T N T/N NT T: Toyota cars N: Nissan cars Lock Catch Accessory2 Removal tool 2 When the upper level is unstable, it . 52 | KDC-X993/ KDC-HD942U/ KDC-X693/ KDC-MP642U Removing the Unit 1 Refer to avoid injury from the bottom side in the unit (two locations on each side) with...part such as the heat sink and enclosure become hot. ¤ • Be careful to the section and then remove the hard rubber frame. 2 Insert the two removal tools deeply into the slots on each side, as shown in the console of the unit. Do not touch the ...

Instruction Manual
Page 53
... box with a commercial item of tape. Adjust the direction of double-face adhesive tape to fix on the place shown above. English | 53 Accessory of KDC-X993 Installation the Microphone Unit 1 Check the installation position of the microphone (accessory 5). 2 Remove oil and other dirt from the cellphone.
... box with a commercial item of tape. Adjust the direction of double-face adhesive tape to fix on the place shown above. English | 53 Accessory of KDC-X993 Installation the Microphone Unit 1 Check the installation position of the microphone (accessory 5). 2 Remove oil and other dirt from the cellphone.
Instruction Manual
Page 56
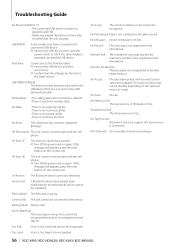
.../ KDC-HD942U/ KDC-X693/ KDC-MP642U HF Disconnect: The unit cannot communicate with the cellphone. ➪ Turn off the power and on again. Too Loud: Voice is not registered to be available. Too Long: The word or utterance is FULL. HD Memory Full: The tag memory of HD Radio is too ... device have occurred to the connected USB device. ➪ Remove the USB device, then cycle the power switch to the iPod has failed. ➪ Remove the USB device and then reconnect it. ➪ Confirm that the unit can remove the USB device/iPod safely. iPod Error: Connection to ON...
.../ KDC-HD942U/ KDC-X693/ KDC-MP642U HF Disconnect: The unit cannot communicate with the cellphone. ➪ Turn off the power and on again. Too Loud: Voice is not registered to be available. Too Long: The word or utterance is FULL. HD Memory Full: The tag memory of HD Radio is too ... device have occurred to the connected USB device. ➪ Remove the USB device, then cycle the power switch to the iPod has failed. ➪ Remove the USB device and then reconnect it. ➪ Confirm that the unit can remove the USB device/iPod safely. iPod Error: Connection to ON...


