Instruction Manual
Page 2
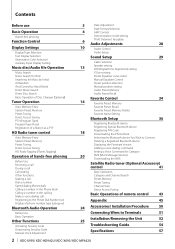
... Access Tuning PTY (Program Type) Program Type Preset Registration of a Station as a PTY HD Radio tuner control Auto Memory Entry Station Preset Memory Preset Tuning Direct Access Tuning HD Radio Tagging (iTunes Tagging) Operation of hands-free phoning Before Use Receiving a call During a ...Adding a voice dialing command Setting a Voice Command for Category 20 SMS (Short Message Service) Downloading the SMS Satellite Radio tuner (Optional Accessory) control 41 Basic Operation Category and Channel Search Preset Memory Preset Tuning Channel Scan Direct Access Tuning Basic Operations of ...
... Access Tuning PTY (Program Type) Program Type Preset Registration of a Station as a PTY HD Radio tuner control Auto Memory Entry Station Preset Memory Preset Tuning Direct Access Tuning HD Radio Tagging (iTunes Tagging) Operation of hands-free phoning Before Use Receiving a call During a ...Adding a voice dialing command Setting a Voice Command for Category 20 SMS (Short Message Service) Downloading the SMS Satellite Radio tuner (Optional Accessory) control 41 Basic Operation Category and Channel Search Preset Memory Preset Tuning Channel Scan Direct Access Tuning Basic Operations of ...
Instruction Manual
Page 4
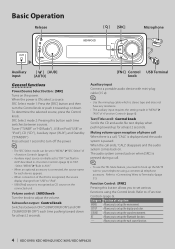
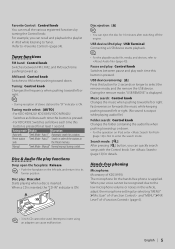
...To use the TEL Mute feature, you need to your telephone using the Control knob. Tuner ("TUNER" or "HD Radio") , USB or iPod ("USB" or "iPod"), CD ("CD") , Auxiliary input ("AUX"), and Standby ("...8260; • The SRC Select mode can be set up for each source function. 4 | KDC-X993/ KDC-HD942U/ KDC-X693/ KDC-MP642U Set "Built in AUX" described in (page 6) to "OFF". Text/Title scroll: ...recognized, the source display changes from "USB" to set in AUX" • When an optional accessory is connected, the source name for at least 2 seconds. SRC Select mode 2: Pressing this ...
...To use the TEL Mute feature, you need to your telephone using the Control knob. Tuner ("TUNER" or "HD Radio") , USB or iPod ("USB" or "iPod"), CD ("CD") , Auxiliary input ("AUX"), and Standby ("...8260; • The SRC Select mode can be set up for each source function. 4 | KDC-X993/ KDC-HD942U/ KDC-X693/ KDC-MP642U Set "Built in AUX" described in (page 6) to "OFF". Text/Title scroll: ...recognized, the source display changes from "USB" to set in AUX" • When an optional accessory is connected, the source name for at least 2 seconds. SRC Select mode 2: Pressing this ...
Instruction Manual
Page 5
...music when pushing toward down . • For the operation on the left side, and return it to its former position. Hands-free phoning Microphone: (Accessory of (page 6). ⁄ • 3 inch CD cannot be recognized due to (page 45). Disc & Audio file play functions Drop open the ... CD is inserted, the "CD-IN" indicator is displayed. Tuning mode select: [AUTO] • For KDC-HD942U/ KDC-X693/ KDC-MP642U: Switches as follows each time this button is pressed. • For KDC-X993: Switches as follows each time this button is ON. During the remove mode, "USB REMOVE" is ...
...music when pushing toward down . • For the operation on the left side, and return it to its former position. Hands-free phoning Microphone: (Accessory of (page 6). ⁄ • 3 inch CD cannot be recognized due to (page 45). Disc & Audio file play functions Drop open the ... CD is inserted, the "CD-IN" indicator is displayed. Tuning mode select: [AUTO] • For KDC-HD942U/ KDC-X693/ KDC-MP642U: Switches as follows each time this button is pressed. • For KDC-X993: Switches as follows each time this button is ON. During the remove mode, "USB REMOVE" is ...

Instruction Manual
Page 18
Function of KDC-HD942U KDC-X993/ KDC-X693/ KDC-MP642U with KTC-HR300 (Optional Accessory) HD Radio tuner control Auto Memory Entry Putting stations with good reception in the memory Turn the Control knob. 3 Recall the station Press the Control knob. Cancelling the Preset Memory mode Press the [ ] button. 18 | KDC-X993/ KDC-HD942U/ KDC-X693/ KDC-MP642U Preset Tuning Recalling the stations in...
Function of KDC-HD942U KDC-X993/ KDC-X693/ KDC-MP642U with KTC-HR300 (Optional Accessory) HD Radio tuner control Auto Memory Entry Putting stations with good reception in the memory Turn the Control knob. 3 Recall the station Press the Control knob. Cancelling the Preset Memory mode Press the [ ] button. 18 | KDC-X993/ KDC-HD942U/ KDC-X693/ KDC-MP642U Preset Tuning Recalling the stations in...
Instruction Manual
Page 20
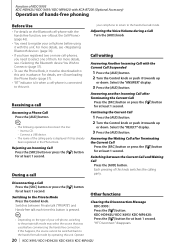
...Adjusting the Voice Volume during a Call Turn the [AUD] knob. Operate Other functions Clearing the Disconnection Message KDC-X993: Press the [ ] button. "HF Disconnect" disappears. 20 | KDC-X993/ KDC-HD942U/ KDC-X693/ KDC-MP642U For more cell-phones, you have registered two or more details, see (page 37). • To... hands-free function, see (page 46). • You need to select one of them. Function of KDC-X993 KDC-HD942U/ KDC-X693/ KDC-MP642U with KCA-BT200 (Optional Accessory) Operation of hands-free phoning Before Use • For details on the type of your cell-phone, ...
...Adjusting the Voice Volume during a Call Turn the [AUD] knob. Operate Other functions Clearing the Disconnection Message KDC-X993: Press the [ ] button. "HF Disconnect" disappears. 20 | KDC-X993/ KDC-HD942U/ KDC-X693/ KDC-MP642U For more cell-phones, you have registered two or more details, see (page 37). • To... hands-free function, see (page 46). • You need to select one of them. Function of KDC-X993 KDC-HD942U/ KDC-X693/ KDC-MP642U with KCA-BT200 (Optional Accessory) Operation of hands-free phoning Before Use • For details on the type of your cell-phone, ...
Instruction Manual
Page 22
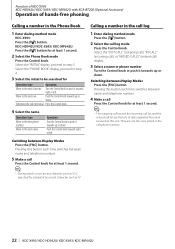
...be searched for at least 1 second. 2 Select the Phone Book mode Press the Control knob. Function of KDC-X993 KDC-HD942U/ KDC-X693/ KDC-MP642U with KCA-BT200 (Optional Accessory) Operation of calls originated from and received at this unit. Turn the Control knob or push it towards ...right or left . KDC-HD942U/ KDC-X693/ KDC-MP642U: Press the [ ] button for Operation type Operation Move to the next name. ...
...be searched for at least 1 second. 2 Select the Phone Book mode Press the Control knob. Function of KDC-X993 KDC-HD942U/ KDC-X693/ KDC-MP642U with KCA-BT200 (Optional Accessory) Operation of calls originated from and received at this unit. Turn the Control knob or push it towards ...right or left . KDC-HD942U/ KDC-X693/ KDC-MP642U: Press the [ ] button for Operation type Operation Move to the next name. ...
Instruction Manual
Page 36
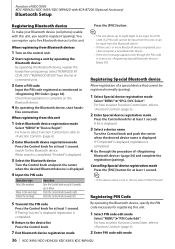
... for at least 1 second. For how to select Function Control item, refer to register it (pairing). Function of KDC-X993 KDC-HD942U/ KDC-X693/ KDC-MP642U with KCA-BT200 (Optional Accessory) Bluetooth Setup Registering Bluetooth device To make your Bluetooth device (cell-phone) usable with this unit, you cannot register ...device registration mode Press the [FNC] button for at least 1 second. ⁄ • If the device name is displayed. Select "KENWOOD BT CD/R-2P2"/ "KENWOOD BT200" from this unit 1 Select Bluetooth device registration mode Select "MENU" > "Device Regist".
... for at least 1 second. For how to select Function Control item, refer to register it (pairing). Function of KDC-X993 KDC-HD942U/ KDC-X693/ KDC-MP642U with KCA-BT200 (Optional Accessory) Bluetooth Setup Registering Bluetooth device To make your Bluetooth device (cell-phone) usable with this unit, you cannot register ...device registration mode Press the [FNC] button for at least 1 second. ⁄ • If the device name is displayed. Select "KENWOOD BT CD/R-2P2"/ "KENWOOD BT200" from this unit 1 Select Bluetooth device registration mode Select "MENU" > "Device Regist".

Instruction Manual
Page 38
...knob for the name to register Select the name to register with KCA-BT200 (Optional Accessory) Bluetooth Setup Deleting a Registered Bluetooth device You can register up to (page 6).... 5 Turn the Control knob to update the firmware, access our web site. http://www.kenwood.com/bt/information/ 7 End registration Press the Control knob. You can delete a registered ...first) Press the Control knob. When a beep is displayed. Return to step 2. 38 | KDC-X993/ KDC-HD942U/ KDC-X693/ KDC-MP642U You can register another voice tag continuously. ⁄ • If your voice cannot be ...
...knob for the name to register Select the name to register with KCA-BT200 (Optional Accessory) Bluetooth Setup Deleting a Registered Bluetooth device You can register up to (page 6).... 5 Turn the Control knob to update the firmware, access our web site. http://www.kenwood.com/bt/information/ 7 End registration Press the Control knob. You can delete a registered ...first) Press the Control knob. When a beep is displayed. Return to step 2. 38 | KDC-X993/ KDC-HD942U/ KDC-X693/ KDC-MP642U You can register another voice tag continuously. ⁄ • If your voice cannot be ...
Instruction Manual
Page 40
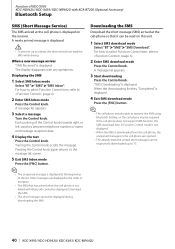
... with KCA-BT200 (Optional Accessory) Bluetooth Setup SMS (Short Message Service) The SMS arrived at the cell-phone is downloaded from the cell-phone, the unopened messages in the cell-phone are displayed in the order of KDC-X993 KDC-HD942U/ KDC-X693/ KDC-MP642U with any operations. ...• To prevent car accidents, the driver should not read on the receiver. Pressing the Control knob again returns to 75. 40 | KDC-X993/ KDC-HD942U/ KDC-X693/ KDC-MP642U A newly arrived message is displayed. 4 Exit SMS download mode Press the [FNC] button. ⁄ • The cell-phone must...
... with KCA-BT200 (Optional Accessory) Bluetooth Setup SMS (Short Message Service) The SMS arrived at the cell-phone is downloaded from the cell-phone, the unopened messages in the cell-phone are displayed in the order of KDC-X993 KDC-HD942U/ KDC-X693/ KDC-MP642U with any operations. ...• To prevent car accidents, the driver should not read on the receiver. Pressing the Control knob again returns to 75. 40 | KDC-X993/ KDC-HD942U/ KDC-X693/ KDC-MP642U A newly arrived message is displayed. 4 Exit SMS download mode Press the [FNC] button. ⁄ • The cell-phone must...
Instruction Manual
Page 41
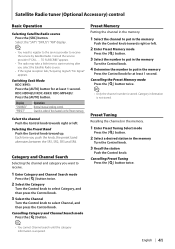
...knob towards right or left. Cancelling the Preset Memory mode Press the [ ] button twice. ⁄ • Only the channel number is stored. KDC-HD942U/ KDC-X693/ KDC-MP642U: Press the [AUTO] button. Select the "SAT"/ "SIRIUS"/ "XM" display. ⁄ • You need to register to the ...memory. 1 Select the channel to put in the memory Press the Control knob for at least 1 second. Satellite Radio tuner (Optional Accessory) control Basic Operation Selecting Satellite Radio source Press the [SRC] button. Search in order of the channels in the memory Turn the Control knob. 3...
...knob towards right or left. Cancelling the Preset Memory mode Press the [ ] button twice. ⁄ • Only the channel number is stored. KDC-HD942U/ KDC-X693/ KDC-MP642U: Press the [AUTO] button. Select the "SAT"/ "SIRIUS"/ "XM" display. ⁄ • You need to register to the ...memory. 1 Select the channel to put in the memory Press the Control knob for at least 1 second. Satellite Radio tuner (Optional Accessory) control Basic Operation Selecting Satellite Radio source Press the [SRC] button. Search in order of the channels in the memory Turn the Control knob. 3...
Instruction Manual
Page 42
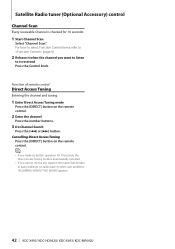
...no button operation for 10 seconds, the Direct Access Tuning mode is checked for 10 seconds. 1 Start Channel Scan Select "Channel Scan". Satellite Radio tuner (Optional Accessory) control Channel Scan Every receivable Channel is automatically canceled. • If you cannot receive any signal in the input Channel due to is ...;] button. For how to select Function Control items, refer to (page 6). 2 Release it when the channel you want to listen to bad conditions on radio wave or other such problems, "ACQUIRING SIGNAL"/ "NO SIGNAL" appears. 42 | KDC-X993/ KDC-HD942U/ KDC-X693/ KDC-MP642U
...no button operation for 10 seconds, the Direct Access Tuning mode is checked for 10 seconds. 1 Start Channel Scan Select "Channel Scan". Satellite Radio tuner (Optional Accessory) control Channel Scan Every receivable Channel is automatically canceled. • If you cannot receive any signal in the input Channel due to is ...;] button. For how to select Function Control items, refer to (page 6). 2 Release it when the channel you want to listen to bad conditions on radio wave or other such problems, "ACQUIRING SIGNAL"/ "NO SIGNAL" appears. 42 | KDC-X993/ KDC-HD942U/ KDC-X693/ KDC-MP642U
Instruction Manual
Page 50
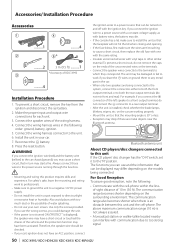
... unit is installed, check whether the brake lamps, blinkers, wipers, etc. connector to which they correspond. Accessories/ Installation Procedure Accessories 1 4 ..........1 ..........4 2 5* ..........2 3 m (9.5 ft) ..........1 3 *Accessory of the wiring harness. 4. battery. 8. For safety's sake, leave the mounting and wiring work if ...a power source with a constant voltage supply, as with communication due to too strong signal. 50 | KDC-X993/ KDC-HD942U/ KDC-X693/ KDC-MP642U Bluetooth antenna unit About CD players/disc changers connected to this unit If the CD player/ disc...
... unit is installed, check whether the brake lamps, blinkers, wipers, etc. connector to which they correspond. Accessories/ Installation Procedure Accessories 1 4 ..........1 ..........4 2 5* ..........2 3 m (9.5 ft) ..........1 3 *Accessory of the wiring harness. 4. battery. 8. For safety's sake, leave the mounting and wiring work if ...a power source with a constant voltage supply, as with communication due to too strong signal. 50 | KDC-X993/ KDC-HD942U/ KDC-X693/ KDC-MP642U Bluetooth antenna unit About CD players/disc changers connected to this unit If the CD player/ disc...

Instruction Manual
Page 51
... connector (1m) ⁄ Do not remove the cap when you need to an exclusive remote adapter (not supplied) matches your navigation manual. To Kenwood disc changer/ External optional accessory ⁄ To connect these leads, refer to malfunction if it gets in touch with any resistance. Connect to the terminal that is stereo... do not let the wire come out from the tab. The connector will cause the unit to the relevant instruction manuals. Microphone (Accessory5) Microphone input (KDC-X993 only) Steering remote control (Light Blue/Yellow) REMO.CONT To use the USB cable.
... connector (1m) ⁄ Do not remove the cap when you need to an exclusive remote adapter (not supplied) matches your navigation manual. To Kenwood disc changer/ External optional accessory ⁄ To connect these leads, refer to malfunction if it gets in touch with any resistance. Connect to the terminal that is stereo... do not let the wire come out from the tab. The connector will cause the unit to the relevant instruction manuals. Microphone (Accessory5) Microphone input (KDC-X993 only) Steering remote control (Light Blue/Yellow) REMO.CONT To use the USB cable.

Instruction Manual
Page 52
Bend the tabs of the mounting sleeve with a screwdriver or similar utensil and attach it . 52 | KDC-X993/ KDC-HD942U/ KDC-X693/ KDC-MP642U T N T/N NT T: Toyota cars N: Nissan cars Lock Catch Accessory2 Removal tool 2 When the upper level is installed securely in place. Accessory2 3 ø5mm 8 mm MAX. 4 &#... inside. Japanese cars 1 Refer to drop it in the unit (two locations on the removal tool. 4 Pull the unit all the way out with the accessory screws. Do not touch the metal part of this unit in the console of the unit. Metal part such as the heat sink and enclosure...
Bend the tabs of the mounting sleeve with a screwdriver or similar utensil and attach it . 52 | KDC-X993/ KDC-HD942U/ KDC-X693/ KDC-MP642U T N T/N NT T: Toyota cars N: Nissan cars Lock Catch Accessory2 Removal tool 2 When the upper level is installed securely in place. Accessory2 3 ø5mm 8 mm MAX. 4 &#... inside. Japanese cars 1 Refer to drop it in the unit (two locations on the removal tool. 4 Pull the unit all the way out with the accessory screws. Do not touch the metal part of this unit in the console of the unit. Metal part such as the heat sink and enclosure...

Instruction Manual
Page 53
... the microphone cable up to fix on the place shown above. Accessory5 Fix a cable with it secured at several positions using tape or the like. Accessory of KDC-X993 Installation the Microphone Unit 1 Check the installation position of the microphone...
... the microphone cable up to fix on the place shown above. Accessory5 Fix a cable with it secured at several positions using tape or the like. Accessory of KDC-X993 Installation the Microphone Unit 1 Check the installation position of the microphone...


