Instruction Manual
Page 2
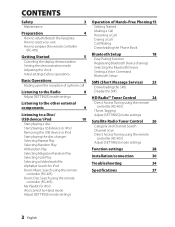
... [SETTINGS] mode settings Listening to the other external components 9 Listening to a Disc/ USB device/ iPod 10 Start playing a disc Start playing a USB device or iPod Removing the USB device or iPod Start playing the disc changer Selecting Repeat Play Selecting Random Play All Random Play Selecting Magazine Random Play Selecting Scan...
... [SETTINGS] mode settings Listening to the other external components 9 Listening to a Disc/ USB device/ iPod 10 Start playing a disc Start playing a USB device or iPod Removing the USB device or iPod Start playing the disc changer Selecting Repeat Play Selecting Random Play All Random Play Selecting Magazine Random Play Selecting Scan...

Instruction Manual
Page 3
... are owned by the developer to decrease harmful influence on the connector of Apple Inc. In this case, remove the disc and wait for iPhone" mean that Kenwood manufactured this precaution may differ from what appears on the panel with your area. Driving with the volume too...unit: Wipe off dirt on the environment. This may collect on the actual equipment. ■ If you experience problems during installation, consult your Kenwood dealer. ■ When you can hear sounds outside the car. Safety WARNING Stop the car before operating the unit. and other countries. &#...
... are owned by the developer to decrease harmful influence on the connector of Apple Inc. In this case, remove the disc and wait for iPhone" mean that Kenwood manufactured this precaution may differ from what appears on the panel with your area. Driving with the volume too...unit: Wipe off dirt on the environment. This may collect on the actual equipment. ■ If you experience problems during installation, consult your Kenwood dealer. ■ When you can hear sounds outside the car. Safety WARNING Stop the car before operating the unit. and other countries. &#...

Instruction Manual
Page 10
...-forwards/reverses. ■ Press to select next folder of CD changer. USB terminal Press to select a source other than "USB" or "iPod". 2 Remove the USB device or iPod. Playback starts automatically. Start playing a disc 1 Press SRC to turn on the power. 2 Slide open the cover. 3 Connect...to select "CD CHANGER". 10 English USB device (commercially available) CA-U1EX (optional accessory) Apple iPod (commercially available) KCA-iP102 (optional accessory) Removing the USB device or iPod 1 Press SRC to pause. Start playing a USB device or iPod 1 Press SRC to turn on the power. 2...
...-forwards/reverses. ■ Press to select next folder of CD changer. USB terminal Press to select a source other than "USB" or "iPod". 2 Remove the USB device or iPod. Playback starts automatically. Start playing a disc 1 Press SRC to turn on the power. 2 Slide open the cover. 3 Connect...to select "CD CHANGER". 10 English USB device (commercially available) CA-U1EX (optional accessory) Apple iPod (commercially available) KCA-iP102 (optional accessory) Removing the USB device or iPod 1 Press SRC to pause. Start playing a USB device or iPod 1 Press SRC to turn on the power. 2...
Instruction Manual
Page 13
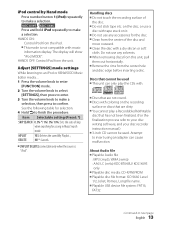
... ■ Do not stick tape etc. Adjust [SETTINGS] mode settings While listening to an iPod or KENWOOD Music Editor media ... 1 Press the volume knob to enter [FUNCTION] mode. 2 Turn the volume ...on it. ■ Do not use any solvents. ■ When removing discs from this unit, pull them out horizontally. ■ Remove the rims from the iPod. ■ This mode is "iPod". Do...5%/ 10%: Sets the ratio of skip when searching for the disc. ■ Clean from the unit. KDC-X395 / KDC-348U Press and hold iPod repeatedly to next page English 13 See the following table for selection. 4 Hold to...
... ■ Do not stick tape etc. Adjust [SETTINGS] mode settings While listening to an iPod or KENWOOD Music Editor media ... 1 Press the volume knob to enter [FUNCTION] mode. 2 Turn the volume ...on it. ■ Do not use any solvents. ■ When removing discs from this unit, pull them out horizontally. ■ Remove the rims from the iPod. ■ This mode is "iPod". Do...5%/ 10%: Sets the ratio of skip when searching for the disc. ■ Clean from the unit. KDC-X395 / KDC-348U Press and hold iPod repeatedly to next page English 13 See the following table for selection. 4 Hold to...

Instruction Manual
Page 30
...to the system, connect the connectors either to both the front output terminals or to both the rear output terminals (do not remove the caps on the ends of the unconnected wires or the terminals. ■ Be sure to ground this unit in turn.../connection Part list: A Faceplate 1) B Escutcheon 1) C Mounting sleeve 1) D Wiring harness 1) E Removal tool 2) F Flat head screw (for Nissan cars 4) G Round head screw (for Toyota cars 4) H Microphone (3 m) (KDC-X695 only 1) Basic procedure 1 Remove the key from the ignition switch, then disconnect the · terminal of the car battery. 2 Make...
...to the system, connect the connectors either to both the front output terminals or to both the rear output terminals (do not remove the caps on the ends of the unconnected wires or the terminals. ■ Be sure to ground this unit in turn.../connection Part list: A Faceplate 1) B Escutcheon 1) C Mounting sleeve 1) D Wiring harness 1) E Removal tool 2) F Flat head screw (for Nissan cars 4) G Round head screw (for Toyota cars 4) H Microphone (3 m) (KDC-X695 only 1) Basic procedure 1 Remove the key from the ignition switch, then disconnect the · terminal of the car battery. 2 Make...

Instruction Manual
Page 33
...your car C 4 5 B Bend the appropriate tabs to the C unit. T N NT T/N B 8 mm MAX. A Installing without using the mounting sleeve (Japanese car) 1 Remove the mounting sleeve and escutcheon B from the unit. 2 Align the holes in place. G ø5mm T: Toyota cars N: Nissan cars... Removing the unit 1 Detach the faceplate A. 2 Engage the catch pin on the removal tools E into the slots on each side, then follow the arrows instructions as shown on both sides) with the...
...your car C 4 5 B Bend the appropriate tabs to the C unit. T N NT T/N B 8 mm MAX. A Installing without using the mounting sleeve (Japanese car) 1 Remove the mounting sleeve and escutcheon B from the unit. 2 Align the holes in place. G ø5mm T: Toyota cars N: Nissan cars... Removing the unit 1 Detach the faceplate A. 2 Engage the catch pin on the removal tools E into the slots on each side, then follow the arrows instructions as shown on both sides) with the...
Instruction Manual
Page 34
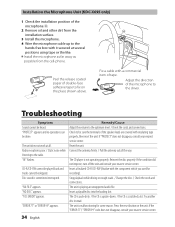
... unit is sometimes interrupted. Press the reset button on the place shown above. Reinsert the disc properly. Installation the Microphone Unit (KDC-X695 only) 1 Check the installation position of the microphone H. 2 Remove oil and other dirt from the cell-phone. If "PROTECT" does not disappear, consult your nearest service center. The unit...
... unit is sometimes interrupted. Press the reset button on the place shown above. Reinsert the disc properly. Installation the Microphone Unit (KDC-X695 only) 1 Check the installation position of the microphone H. 2 Remove oil and other dirt from the cell-phone. If "PROTECT" does not disappear, consult your nearest service center. The unit...

Instruction Manual
Page 35
... cannot communicate with the cell-phone. "READ ERROR" appears. No USB device is no missed call . (page 21) is large, voice cannot be adjusted independently. Remove the USB device, turn the unit off, then turn it . Noise is low. "READING" keeps flashing. Correct characters are recorded. Bluetooth Symptom Remedy/Cause The...
... cannot communicate with the cell-phone. "READ ERROR" appears. No USB device is no missed call . (page 21) is large, voice cannot be adjusted independently. Remove the USB device, turn the unit off, then turn it . Noise is low. "READING" keeps flashing. Correct characters are recorded. Bluetooth Symptom Remedy/Cause The...

Instruction Manual
Page 40
WARRANTY PERIOD This product is warranted lor aperiod ot (1) year from removal and! PeriodIC check·ups which theserial number has been effaced, modified or removed 5.lnstallationand!or removal charges. 6. Shipping or delivery charges to the authorized Kenwood Service Cenler. fully insured and shipping charges prepaid. c/o Yokota BX, JAf!V( AAFES·PAC, APO San Francisco...
WARRANTY PERIOD This product is warranted lor aperiod ot (1) year from removal and! PeriodIC check·ups which theserial number has been effaced, modified or removed 5.lnstallationand!or removal charges. 6. Shipping or delivery charges to the authorized Kenwood Service Cenler. fully insured and shipping charges prepaid. c/o Yokota BX, JAf!V( AAFES·PAC, APO San Francisco...
Instruction Manual
Page 41
...ANY DEFECTIVE PRODUCT IS LIMITED TO THE REPAIR ORREPLACEMENT OFTHE PRODUCT AT OUR OPTION. INSTALLATION OR REMOVAL CHARGES, DAMAGE TO OTHER PROPERTY CAUSED BY ANY DEFECTS IN KENWOOD CAR STEREO COMPONENTS, DAMAGES BASED UPON INCONVENIENCE. SOME STATES 00 NOT ALLOW LIMITATIONS ON HOW...6070 Kestrel Road. Any other rights which the serial number has been defaced, modified or removed. 3. under normal use of each new Kenwood product. The cuslomer is free trom any KENWOOD Authorized SerVice Cenler in aprolessional or commercial applicalion, which is purchased through Ihe U.S.A Military ...
...ANY DEFECTIVE PRODUCT IS LIMITED TO THE REPAIR ORREPLACEMENT OFTHE PRODUCT AT OUR OPTION. INSTALLATION OR REMOVAL CHARGES, DAMAGE TO OTHER PROPERTY CAUSED BY ANY DEFECTS IN KENWOOD CAR STEREO COMPONENTS, DAMAGES BASED UPON INCONVENIENCE. SOME STATES 00 NOT ALLOW LIMITATIONS ON HOW...6070 Kestrel Road. Any other rights which the serial number has been defaced, modified or removed. 3. under normal use of each new Kenwood product. The cuslomer is free trom any KENWOOD Authorized SerVice Cenler in aprolessional or commercial applicalion, which is purchased through Ihe U.S.A Military ...


