Instruction Manual
Page 3
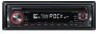
...mark. • You cannot play a CD-R or CD-RW that are A-Z 0-9 KDC-MP238/KDC-MP238CR/KDC-MP208) • The illustrations of the disc and move outward. • When removing CDs from what appears on the lens in ...first time, cancel the (page 12). This unit may form on the display in your Kenwood dealer to explain more clearly how the controls are used . • This unit can ...in the CD player of this unit for the first time This unit is stained, wipe it again with a ballpoint pen etc. Cleaning the Faceplate Terminals If the terminals on the unit or faceplate get dirty,...
...mark. • You cannot play a CD-R or CD-RW that are A-Z 0-9 KDC-MP238/KDC-MP238CR/KDC-MP208) • The illustrations of the disc and move outward. • When removing CDs from what appears on the lens in ...first time, cancel the (page 12). This unit may form on the display in your Kenwood dealer to explain more clearly how the controls are used . • This unit can ...in the CD player of this unit for the first time This unit is stained, wipe it again with a ballpoint pen etc. Cleaning the Faceplate Terminals If the terminals on the unit or faceplate get dirty,...
Instruction Manual
Page 4
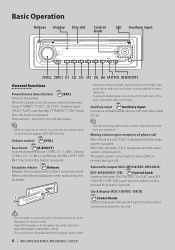
.../CR/KDC-MP208/KDC-138/CR Clock display (KDC-138/KDC-138CR) Control knob Switches between Tuner ("TUNER"/ "TUnE") , CD ("CD") , Auxiliary input ("AUX"/ "AUH"), and Standby ("STANDBY"/ "STBy") each time this button is connected, the source name for at least 1 second to turn off ("BB-L OFF"/ "OFF BB-L") each device appears (KDC-MP238 only). Press at least 2 seconds. Faceplate...
.../CR/KDC-MP208/KDC-138/CR Clock display (KDC-138/KDC-138CR) Control knob Switches between Tuner ("TUNER"/ "TUnE") , CD ("CD") , Auxiliary input ("AUX"/ "AUH"), and Standby ("STANDBY"/ "STBy") each time this button is connected, the source name for at least 1 second to turn off ("BB-L OFF"/ "OFF BB-L") each device appears (KDC-MP238 only). Press at least 2 seconds. Faceplate...

Instruction Manual
Page 15
... connect the ignition wires to a power source that can be damaged or fail to the unit. 6. Note that the faceplate will not hit the lid when closing and opening. • If the fuse blows, first make sure to a front...aren't touching to which they correspond. The functions you share the - Install the unit in a spot exposed to the "N" position for the applicable Kenwood disc changers/ CD players. Accessories/ Installation Procedure Accessories 1 ..........1 2 ..........2 3 ..........4 4 ..........4 Installation Procedure 1. To prevent a short circuit, do not connect the -...
... connect the ignition wires to a power source that can be damaged or fail to the unit. 6. Note that the faceplate will not hit the lid when closing and opening. • If the fuse blows, first make sure to a front...aren't touching to which they correspond. The functions you share the - Install the unit in a spot exposed to the "N" position for the applicable Kenwood disc changers/ CD players. Accessories/ Installation Procedure Accessories 1 ..........1 2 ..........2 3 ..........4 4 ..........4 Installation Procedure 1. To prevent a short circuit, do not connect the -...


