

Operation Manual
Page 3
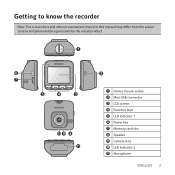
Getting to know the recorder NOTE: The screenshots and other presentations shown in this manual may differ from the actual screens and presentations generated by the actual product. 1 Device mount socket For the device mount. 2 Mini-USB connector Connects to the charger or computer. 3 LCD screen 4 Function keys 5 LED indicator 1 Indicates the system status of the recorder. 6 Power key 7 Memory card slot Videos are recorded to a MicroSD card. 8 Speaker Outputs audio. 9 Camera lens 10 LED indicator 2 Parking mode indicator. 11 Microphone Allows you to record the video with sounds. 2
Getting to know the recorder NOTE: The screenshots and other presentations shown in this manual may differ from the actual screens and presentations generated by the actual product. 1 Device mount socket For the device mount. 2 Mini-USB connector Connects to the charger or computer. 3 LCD screen 4 Function keys 5 LED indicator 1 Indicates the system status of the recorder. 6 Power key 7 Memory card slot Videos are recorded to a MicroSD card. 8 Speaker Outputs audio. 9 Camera lens 10 LED indicator 2 Parking mode indicator. 11 Microphone Allows you to record the video with sounds. 2

Operation Manual
Page 4
... OFF Red / Blinking OFF OFF OFF Red / Blinking OFF Red / Blinking Red / Blinking 3 You can perform the following using the Power key: ƒƒ To manually turn the recorder on and off . Power key Once the vehicle engine is started, the recorder automatically turns on . the recording is stopped. ƒƒ...
... OFF Red / Blinking OFF OFF OFF Red / Blinking OFF Red / Blinking Red / Blinking 3 You can perform the following using the Power key: ƒƒ To manually turn the recorder on and off . Power key Once the vehicle engine is started, the recorder automatically turns on . the recording is stopped. ƒƒ...

Operation Manual
Page 5
Example: 12 34 Icon Description 1 Press to enter the Settings Menu. 2 Press to manually activate Parking mode. 3 Press to take a photo. 4 Press to control the corresponding icons displayed at the bottom of the LCD screen. Function keys The device provides four function keys to manually start an emergency recording. 4 The key's function may vary on different screens. For example, the device will display four icons as shown below while continuous recording is in progress.
Example: 12 34 Icon Description 1 Press to enter the Settings Menu. 2 Press to manually activate Parking mode. 3 Press to take a photo. 4 Press to control the corresponding icons displayed at the bottom of the LCD screen. Function keys The device provides four function keys to manually start an emergency recording. 4 The key's function may vary on different screens. For example, the device will display four icons as shown below while continuous recording is in progress.

Operation Manual
Page 11
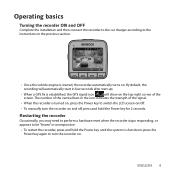
...and off, press and hold the Power key until the system is shut down; Select System > Date / Time and press . 3. Select Automatic or Manual: 10 Restarting the recorder Occasionally, you begin recording. 1. By default, the recording will automatically start in few seconds after start-up. ƒƒ ... may need to perform a hardware reset when the recorder stops responding, or appears to switch the LCD screen on/off. ƒƒ To manually turn the recorder on. The number of the vertical bars in a vehicle" section. ƒƒ Once the vehicle engine is turned on ....
...and off, press and hold the Power key until the system is shut down; Select System > Date / Time and press . 3. Select Automatic or Manual: 10 Restarting the recorder Occasionally, you begin recording. 1. By default, the recording will automatically start in few seconds after start-up. ƒƒ ... may need to perform a hardware reset when the recorder stops responding, or appears to switch the LCD screen on/off. ƒƒ To manually turn the recorder on. The number of the vertical bars in a vehicle" section. ƒƒ Once the vehicle engine is turned on ....

Operation Manual
Page 12
...recording is ongoing but there is in the "Video" category for file playback. 11 The recording may be found in progress, you select Manual, the system will display the date and time setting screen. Once confirmed, the new video clips will set the correct date and time ...connect the car charger to the cigarette lighter in the car, the recorder will start continuous recording automatically. ƒƒ The continuous recordings can manually stop between video clips. ƒƒ When continuous recording is not enough space on the screen. the system will not stop recording by ...
...recording is ongoing but there is in the "Video" category for file playback. 11 The recording may be found in progress, you select Manual, the system will display the date and time setting screen. Once confirmed, the new video clips will set the correct date and time ...connect the car charger to the cigarette lighter in the car, the recorder will start continuous recording automatically. ƒƒ The continuous recordings can manually stop between video clips. ƒƒ When continuous recording is not enough space on the screen. the system will not stop recording by ...

Operation Manual
Page 13
...turn or an accidental crash, the G sensor will automatically activate Parking mode. * The feature is triggered by default. a power bank) to manually start an emergency recording. ƒƒ If you may need an external power source (e.g. Go to Settings Menu > System > Storage allocation ...and use / to set a proper allocation for parking recording, and then press to manually activate Parking mode while continuous recording is in progress, press . To stop emergency recording and resume continuous recording, press . ƒƒ ...
...turn or an accidental crash, the G sensor will automatically activate Parking mode. * The feature is triggered by default. a power bank) to manually start an emergency recording. ƒƒ If you may need an external power source (e.g. Go to Settings Menu > System > Storage allocation ...and use / to set a proper allocation for parking recording, and then press to manually activate Parking mode while continuous recording is in progress, press . To stop emergency recording and resume continuous recording, press . ƒƒ ...
Quick Start Guide
Page 5
Getting to know the recorder Note: The screenshots and other presentations shown in this manual may differ from the actual screens and presentations generated by the actual product. 1 Device mount socket 2 Mini-USB connector 3 LCD screen 4 Function keys 5 LED indicator 1 6 Power key 7 Memory card slot 8 Speaker 9 Camera lens 10 LED indicator 2 11 Microphone ENGLISH 2
Getting to know the recorder Note: The screenshots and other presentations shown in this manual may differ from the actual screens and presentations generated by the actual product. 1 Device mount socket 2 Mini-USB connector 3 LCD screen 4 Function keys 5 LED indicator 1 6 Power key 7 Memory card slot 8 Speaker 9 Camera lens 10 LED indicator 2 11 Microphone ENGLISH 2
Quick Start Guide
Page 7
... is established, the GPS signal icon will show on . Restarting the recorder Occasionally, you may need to turn the recorder on and off . • To manually turn the recorder on . ENGLISH 4 press the Power key again to perform a hardware reset when the recorder stops responding; Operating basics Turning the recorder ON...
... is established, the GPS signal icon will show on . Restarting the recorder Occasionally, you may need to turn the recorder on and off . • To manually turn the recorder on . ENGLISH 4 press the Power key again to perform a hardware reset when the recorder stops responding; Operating basics Turning the recorder ON...

Quick Start Guide
Page 8
...> Detection > On. Follow the on , it will prompt the recorder to start an emergency recording. • If you want to manually start continuous recording automatically. • The continuous recordings can be divided into several video clips; The recording may be found in the "...emergency recordings can be found in the "Emergency" category for 5 minutes, the system starts parking recording. • If you want to manually start continuous recording automatically. Note: If the parking mode icon is not shown, please check your computer first. • When Parking mode ...
...> Detection > On. Follow the on , it will prompt the recorder to start an emergency recording. • If you want to manually start continuous recording automatically. • The continuous recordings can be divided into several video clips; The recording may be found in the "...emergency recordings can be found in the "Emergency" category for 5 minutes, the system starts parking recording. • If you want to manually start continuous recording automatically. Note: If the parking mode icon is not shown, please check your computer first. • When Parking mode ...

Quick Start Guide
Page 11
...charger when using the recorder in a car. For more information For the detailed instructions on how to use the recorder, please refer to the User Manual that you place the recorder in an appropriate place, so as not to obstruct the driver's view or deployment of airbags. • Make sure that...; Do not use the charger if the cord becomes damaged. • Do not attempt to excess moisture. The battery can download on our website: www.kenwood.com/cs/ce/ Precautions and notices • For your own safety, do not disassemble, crush, puncture, or dispose of in the equipment. Please keep ...
...charger when using the recorder in a car. For more information For the detailed instructions on how to use the recorder, please refer to the User Manual that you place the recorder in an appropriate place, so as not to obstruct the driver's view or deployment of airbags. • Make sure that...; Do not use the charger if the cord becomes damaged. • Do not attempt to excess moisture. The battery can download on our website: www.kenwood.com/cs/ce/ Precautions and notices • For your own safety, do not disassemble, crush, puncture, or dispose of in the equipment. Please keep ...


