Quick Start Guide
Page 2
... to the Radio 6 Hands-free phoning 7 Installation accessories 8 Installation Procedure 8 Before Installation 8 Installing the Microphone unit 9 Installation the Unit 10 Removing the Unit 11 Connecting Wires to Terminals 12 Appendix 14 About the Quick Start Guide This Quick Start Guide describes basic functions of this manual are used batteries promptly. Replace...
... to the Radio 6 Hands-free phoning 7 Installation accessories 8 Installation Procedure 8 Before Installation 8 Installing the Microphone unit 9 Installation the Unit 10 Removing the Unit 11 Connecting Wires to Terminals 12 Appendix 14 About the Quick Start Guide This Quick Start Guide describes basic functions of this manual are used batteries promptly. Replace...
Quick Start Guide
Page 8
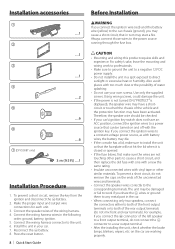
........1 2 .....1 3 .....1 4 .....2 5 .....6 6 .....6 7 (DPX500BT only) 3 m (9.5 ft) .....1 Installation Procedure 1. Connect the speaker wires of the rear output terminals (do not connect the connector to both of the wiring harness. 4. Reconnect the - Therefore, the speaker wire should be checked. • If your car's ignition key switch ...to direct sunlight or excessive heat or humidity. If you connect the + connector of the unconnected wires and terminals. • Connect the speaker wires correctly to a front output terminal, do not mix front and rear terminals). To prevent a...
........1 2 .....1 3 .....1 4 .....2 5 .....6 6 .....6 7 (DPX500BT only) 3 m (9.5 ft) .....1 Installation Procedure 1. Connect the speaker wires of the rear output terminals (do not connect the connector to both of the wiring harness. 4. Reconnect the - Therefore, the speaker wire should be checked. • If your car's ignition key switch ...to direct sunlight or excessive heat or humidity. If you connect the + connector of the unconnected wires and terminals. • Connect the speaker wires correctly to a front output terminal, do not mix front and rear terminals). To prevent a...
Quick Start Guide
Page 12
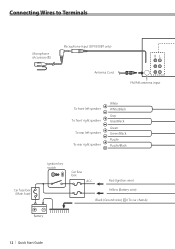
Connecting Wires to Terminals Microphone (Accessory7) Microphone input (DPX500BT only) Antenna Cord RL FM/AM antenna input To front left speaker To front right speaker To rear left speaker To rear right speaker White White/Black Gray Gray/Black Green Green/Black Purple Purple/Black Ignition key switch Car fuse box (Main fuse) + Battery - Car fuse box ACC Red (Ignition wire) Yellow (Battery wire) Black (Ground wire) · (To car chassis) 12 | Quick Start Guide
Connecting Wires to Terminals Microphone (Accessory7) Microphone input (DPX500BT only) Antenna Cord RL FM/AM antenna input To front left speaker To front right speaker To rear left speaker To rear right speaker White White/Black Gray Gray/Black Green Green/Black Purple Purple/Black Ignition key switch Car fuse box (Main fuse) + Battery - Car fuse box ACC Red (Ignition wire) Yellow (Battery wire) Black (Ground wire) · (To car chassis) 12 | Quick Start Guide

Quick Start Guide
Page 13
...from the tab. RL Rear output Front output Sub Woofer output Fuse (10A) To SiriusXM Connect Vehicle Tuner (optional accessory) Wiring harness (Accessory1) If no connections are using the optional power amplifier, connect to the terminal that matches your car is grounded ...when either the telephone rings or during conversation. (DPX300U only) ⁄ To connect the Kenwood navigation system, consult your navigation manual. English | 13 Blue (Antenna control wire) ANT. Blue/White (Power control wire) P.CONT When using , connect either to the control terminal of the motor antenna, or ...
...from the tab. RL Rear output Front output Sub Woofer output Fuse (10A) To SiriusXM Connect Vehicle Tuner (optional accessory) Wiring harness (Accessory1) If no connections are using the optional power amplifier, connect to the terminal that matches your car is grounded ...when either the telephone rings or during conversation. (DPX300U only) ⁄ To connect the Kenwood navigation system, consult your navigation manual. English | 13 Blue (Antenna control wire) ANT. Blue/White (Power control wire) P.CONT When using , connect either to the control terminal of the motor antenna, or ...


