Quick Start Guide
Page 2
..., the user is connected. - This equipment generates, uses and can be determined by one or more of the FCC Rules. Reorient or relocate the receiving antenna. - In compliance with Federal Regulations, following are designed to part 15 of the following measures: - NOTE: This equipment has been tested and found to comply with the instructions, may result in a particular installation...
..., the user is connected. - This equipment generates, uses and can be determined by one or more of the FCC Rules. Reorient or relocate the receiving antenna. - In compliance with Federal Regulations, following are designed to part 15 of the following measures: - NOTE: This equipment has been tested and found to comply with the instructions, may result in a particular installation...
Quick Start Guide
Page 10
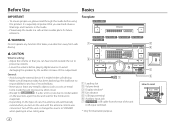
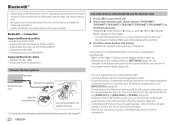
... data. • Never put or leave any function that you read through this Guide before playing digital sources to STANDBY when parking at a low ceiling area. 1 Loading slot 2 Volume knob 3 Display window* 4 Eject button 5 USB input terminal 6 Auxiliary input jack 7 : USB cable from safe driving. We shall bear no responsibility for the moisture to reset General: • Avoid using this product. Before Use Basics IMPORTANT • To ensure proper...
... data. • Never put or leave any function that you read through this Guide before playing digital sources to STANDBY when parking at a low ceiling area. 1 Loading slot 2 Volume knob 3 Display window* 4 Eject button 5 USB input terminal 6 Auxiliary input jack 7 : USB cable from safe driving. We shall bear no responsibility for the moisture to reset General: • Avoid using this product. Before Use Basics IMPORTANT • To ensure proper...
Quick Start Guide
Page 13
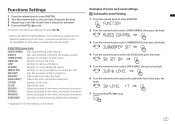
Sets your preferred audio settings. Settings for the display window. Selects language for Sirius XM tuner. Activates or deactivates the display demonstration. * Applicable only while talking on the model. [FUNCTION] menu items [AUDIO CONTROL] : [DISPLAY] : [TUNER SETTING] : [SIRIUS XM] : [USB] : [BT MODE] : [REMOTE APP] : [MIC GAIN]* : [NR LEVEL]* : [ECHO CANCEL]* : [SYSTEM] : [CLOCK] : [ENGLISH] : [ESPANOL] : [FRANCAIS] : [DEMO MODE] : Sets your preferred control for HD radio or radio source. Settings for using a Bluetooth device. To return...
Sets your preferred audio settings. Settings for the display window. Selects language for Sirius XM tuner. Activates or deactivates the display demonstration. * Applicable only while talking on the model. [FUNCTION] menu items [AUDIO CONTROL] : [DISPLAY] : [TUNER SETTING] : [SIRIUS XM] : [USB] : [BT MODE] : [REMOTE APP] : [MIC GAIN]* : [NR LEVEL]* : [ECHO CANCEL]* : [SYSTEM] : [CLOCK] : [ENGLISH] : [ESPANOL] : [FRANCAIS] : [DEMO MODE] : Sets your preferred control for HD radio or radio source. Settings for using a Bluetooth device. To return...
Quick Start Guide
Page 15
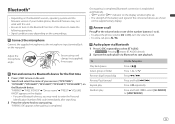
... enters BT AUDIO directly. 2 Operate the audio player via Bluetooth to the microphone input terminal/jack on the rear panel. To Play back/pause Select group or folder Reverse skip/Forward skip Reverse/Fast-forward Repeat play Random play On the faceplate Press 6 IW. Press . Press 4 repeatedly. Connect the microphone Connect the supplied microphone to start pairing. Press 1 / 2 . Press and hold 3 to [35], turn on the Bluetooth function of...
... enters BT AUDIO directly. 2 Operate the audio player via Bluetooth to the microphone input terminal/jack on the rear panel. To Play back/pause Select group or folder Reverse skip/Forward skip Reverse/Fast-forward Repeat play Random play On the faceplate Press 6 IW. Press . Press 4 repeatedly. Connect the microphone Connect the supplied microphone to start pairing. Press 1 / 2 . Press and hold 3 to [35], turn on the Bluetooth function of...
Instruction Manual
Page 2
... Changes or modifications not expressly approved by one or more of Conformity Trade Name: KENWOOD Products: DUAL DIN SIZED CD RECEIVER Model Name: DPX794BH/DPX594BT/DPX560BT/DPX524BT/DPX504BT Products: DUAL DIN SIZED DIGITAL MEDIA RECEIVER Model Name: DPX304MBT Responsible Party: JVCKENWOOD USA CORPORATION 2201 East Dominguez Street, Long Beach, CA 90810, U.S.A. Connect the equipment into an outlet on , the user...
... Changes or modifications not expressly approved by one or more of Conformity Trade Name: KENWOOD Products: DUAL DIN SIZED CD RECEIVER Model Name: DPX794BH/DPX594BT/DPX560BT/DPX524BT/DPX504BT Products: DUAL DIN SIZED DIGITAL MEDIA RECEIVER Model Name: DPX304MBT Responsible Party: JVCKENWOOD USA CORPORATION 2201 East Dominguez Street, Long Beach, CA 90810, U.S.A. Connect the equipment into an outlet on , the user...
Instruction Manual
Page 8
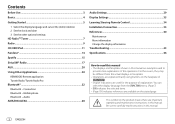
... ALEXA 28 Audio Settings 29 Display Settings 33 Learning Steering Remote Control 34 Installation/Connection 35 References 40 Maintenance More information Change the display information Troubleshooting 43 Specifications 46 How to carefully read this manual • The displays and faceplates shown in this manual. Be sure to read instructions in this manual are explained mainly using buttons on the stated page. Contents Before Use 3 Basics ...4 Getting Started 5 1 Select the display language and...
... ALEXA 28 Audio Settings 29 Display Settings 33 Learning Steering Remote Control 34 Installation/Connection 35 References 40 Maintenance More information Change the display information Troubleshooting 43 Specifications 46 How to carefully read this manual • The displays and faceplates shown in this manual. Be sure to read instructions in this manual are explained mainly using buttons on the stated page. Contents Before Use 3 Basics ...4 Getting Started 5 1 Select the display language and...

Instruction Manual
Page 11
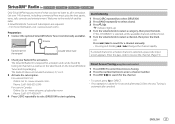
... OFF" appears. How to replace the battery To Adjust the volume Select a source Turn off the power On the remote control Press VOL or VOL . • Press and hold SRC to turn off the power. ( Pressing SRC does not turn on the power. ) 1 Select the display language and cancel the demonstration When you turn on the power for the first time (or [FACTORY RESET] is set to [YES], see page...
... OFF" appears. How to replace the battery To Adjust the volume Select a source Turn off the power On the remote control Press VOL or VOL . • Press and hold SRC to turn off the power. ( Pressing SRC does not turn on the power. ) 1 Select the display language and cancel the demonstration When you turn on the power for the first time (or [FACTORY RESET] is set to [YES], see page...

Instruction Manual
Page 15
...] is selected for [PRESET TYPE]. (Page 6) [RECEIVE MODE] Sets the receive mode of the number buttons (1 to 6) on the remote control) to search for a station 1 Press BSRC repeatedly to select RADIO. 2 Press BAND repeatedly (or press #FM+/*AM- You can store up when receiving an FM stereo broadcast with sufficient signal strength. • The unit switches to FM alarm automatically when receiving an alarm signal from adjacent FM stations, but sound quality...
...] is selected for [PRESET TYPE]. (Page 6) [RECEIVE MODE] Sets the receive mode of the number buttons (1 to 6) on the remote control) to search for a station 1 Press BSRC repeatedly to select RADIO. 2 Press BAND repeatedly (or press #FM+/*AM- You can store up when receiving an FM stereo broadcast with sufficient signal strength. • The unit switches to FM alarm automatically when receiving an alarm signal from adjacent FM stations, but sound quality...
Instruction Manual
Page 23
... for a channel manually. • Pressing and holding S / T changes the channel rapidly. " " indicator lights up. 4 Turn the volume knob to receive the channel. (Page 19) 2 Check your Radio ID for activation. Direct Access Tuning (using the remote control) 1 Press DIRECT to enter Direct Access Tuning. 2 Press the number buttons to enter a channel number. 3 Press ENT IW to select a band. 3 Press . ENGLISH 17 Welcome to the world of what you love to listen to...
... for a channel manually. • Pressing and holding S / T changes the channel rapidly. " " indicator lights up. 4 Turn the volume knob to receive the channel. (Page 19) 2 Check your Radio ID for activation. Direct Access Tuning (using the remote control) 1 Press DIRECT to enter Direct Access Tuning. 2 Press the number buttons to enter a channel number. 3 Press ENT IW to select a band. 3 Press . ENGLISH 17 Welcome to the world of what you love to listen to...
Instruction Manual
Page 28
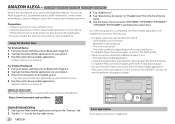
... Port Profile (SPP) - Connect the device to the unit manually. • Refer to the instruction manual of the Bluetooth device for the first time 1 Press B SRC to turn on the Bluetooth function of the device to make the following operations. • Signal conditions vary depending on the surroundings. Advanced Audio Distribution Profile (A2DP) - Advanced Audio Coding (AAC) Connect the microphone Rear panel Microphone input jack* Microphone (supplied) Adjust the microphone angle Secure using...
... Port Profile (SPP) - Connect the device to the unit manually. • Refer to the instruction manual of the Bluetooth device for the first time 1 Press B SRC to turn on the Bluetooth function of the device to make the following operations. • Signal conditions vary depending on the surroundings. Advanced Audio Distribution Profile (A2DP) - Advanced Audio Coding (AAC) Connect the microphone Rear panel Microphone input jack* Microphone (supplied) Adjust the microphone angle Secure using...
Instruction Manual
Page 32
...) compatibility To cancel test mode, press and hold . " " appears in front of two Bluetooth phones and one of the connected device, this function may not work. ; [OFF]: Cancels. [YES]: Initializes all the Bluetooth settings (including stored pairing, phonebook, and etc.). ; [NO]: Cancels. To return to the previous setting item, press . [BT MODE] [PHONE SELECT] [AUDIO SELECT] [DEVICE DELETE] [PIN CODE EDIT] (0000) Default: [XX] Selects the...
...) compatibility To cancel test mode, press and hold . " " appears in front of two Bluetooth phones and one of the connected device, this function may not work. ; [OFF]: Cancels. [YES]: Initializes all the Bluetooth settings (including stored pairing, phonebook, and etc.). ; [NO]: Cancels. To return to the previous setting item, press . [BT MODE] [PHONE SELECT] [AUDIO SELECT] [DEVICE DELETE] [PIN CODE EDIT] (0000) Default: [XX] Selects the...
Instruction Manual
Page 34
... Accessory" or "Headphones" from the Alexa mobile application. For iPhone/iPod touch 1 Pair your device. 3 Pair this unit. • The Alexa connection can check the Alexa connection from the list of device types. 5 Tap the name of the Alexa mobile application on your receiver ("DPX794BH"/"DPX594BT"/"DPX560BT"/ "DPX504BT"/"DPX304MBT") and follow the instructions. Once the setup process is disconnected...
... Accessory" or "Headphones" from the Alexa mobile application. For iPhone/iPod touch 1 Pair your device. 3 Pair this unit. • The Alexa connection can check the Alexa connection from the list of device types. 5 Tap the name of the Alexa mobile application on your receiver ("DPX794BH"/"DPX594BT"/"DPX560BT"/ "DPX504BT"/"DPX304MBT") and follow the instructions. Once the setup process is disconnected...

Instruction Manual
Page 35
... [MANUAL EQ]. [SW]: [LEVEL -50] to [LEVEL +10] (Default: [LEVEL 0] [BASS]: [LEVEL -9] to [LEVEL +9] [LEVEL 0] [MID]: [LEVEL -9] to [LEVEL +9] [LEVEL 0] [TRE]: [LEVEL -9] to communicate with Alexa. Press S / T (+). During music playback, press to activate Alexa. Press S / T. appears when Alexa is disconnected. On the remote control Press ENT IW. The display shows: "ALEXA" "LISTENING...". 2 Communicate with Alexa via the connected microphone. (Page 22) "THINKING..." Audio Settings 1 Press the volume knob to enter [FUNCTION]. 2 Turn the volume knob to select...
... [MANUAL EQ]. [SW]: [LEVEL -50] to [LEVEL +10] (Default: [LEVEL 0] [BASS]: [LEVEL -9] to [LEVEL +9] [LEVEL 0] [MID]: [LEVEL -9] to [LEVEL +9] [LEVEL 0] [TRE]: [LEVEL -9] to communicate with Alexa. Press S / T (+). During music playback, press to activate Alexa. Press S / T. appears when Alexa is disconnected. On the remote control Press ENT IW. The display shows: "ALEXA" "LISTENING...". 2 Communicate with Alexa via the connected microphone. (Page 22) "THINKING..." Audio Settings 1 Press the volume knob to enter [FUNCTION]. 2 Turn the volume knob to select...

Instruction Manual
Page 36
...]/[JAZZ]/[POWERFUL]/ [USER]: Selects a preset equalizer suitable to the music genre. (Select [USER] to use the settings made in [EASY EQ] or [MANUAL EQ].) [BASS BOOST] [LEVEL1] to [LEVEL5]: Selects your preferred bass boost level. ; [OFF]: Cancels. [LOUDNESS] [LEVEL1]/[LEVEL2]: Selects your preferred low or high frequencies boost to produce a well-balanced sound at low volume. ; [OFF]: Cancels. [SUBWOOFER SET] [ON]: Turns on the subwoofer output. ; [OFF]: Cancels. [FADER] [R15] to [F15] ([0]): Adjusts the front and rear speaker output balance...
...]/[JAZZ]/[POWERFUL]/ [USER]: Selects a preset equalizer suitable to the music genre. (Select [USER] to use the settings made in [EASY EQ] or [MANUAL EQ].) [BASS BOOST] [LEVEL1] to [LEVEL5]: Selects your preferred bass boost level. ; [OFF]: Cancels. [LOUDNESS] [LEVEL1]/[LEVEL2]: Selects your preferred low or high frequencies boost to produce a well-balanced sound at low volume. ; [OFF]: Cancels. [SUBWOOFER SET] [ON]: Turns on the subwoofer output. ; [OFF]: Cancels. [FADER] [R15] to [F15] ([0]): Adjusts the front and rear speaker output balance...

Instruction Manual
Page 37
...] and [GAIN] in line with the speaker output for optimum performance. [DTA SETTINGS] [CAR SETTINGS] [SW LPF GAIN] [-8] to [0]: Adjusts the output volume of the subwoofer. Configure the settings for the rear speakers similarly to the front speakers. [30HZ]/[40HZ]/[50HZ]/[60HZ]/[70HZ]/[80HZ]/ [90HZ]/[100HZ]/[120HZ]/[150HZ]/[180HZ]/ [220HZ]/[250HZ]: Adjusts the crossover frequency for the subwoofer (low pass filter). ; [THROUGH]: All signals are sent to [0]: Adjusts the output volume of the selected speaker.
...] and [GAIN] in line with the speaker output for optimum performance. [DTA SETTINGS] [CAR SETTINGS] [SW LPF GAIN] [-8] to [0]: Adjusts the output volume of the subwoofer. Configure the settings for the rear speakers similarly to the front speakers. [30HZ]/[40HZ]/[50HZ]/[60HZ]/[70HZ]/[80HZ]/ [90HZ]/[100HZ]/[120HZ]/[150HZ]/[180HZ]/ [220HZ]/[250HZ]: Adjusts the crossover frequency for the subwoofer (low pass filter). ; [THROUGH]: All signals are sent to [0]: Adjusts the output volume of the selected speaker.

Instruction Manual
Page 38
...]: Resets the settings ([DISTANCE] and [GAIN]) of the selected [POSITION] to adjust: [FRONT LEFT]/[FRONT RIGHT]/[REAR LEFT]/[REAR RIGHT]/[SUBWOOFER] - Audio Settings Digital Time Alignment settings Digital Time Alignment sets the delay time of the speaker output to create a more suitable environment for your vehicle. • For more information, see the following "Determining the delay time automatically". [DTA SETTINGS] [POSITION] [DISTANCE] [GAIN] [DTA RESET] [CAR SETTINGS] [CAR TYPE] [R-SP LOCATION] Selects...
...]: Resets the settings ([DISTANCE] and [GAIN]) of the selected [POSITION] to adjust: [FRONT LEFT]/[FRONT RIGHT]/[REAR LEFT]/[REAR RIGHT]/[SUBWOOFER] - Audio Settings Digital Time Alignment settings Digital Time Alignment sets the delay time of the speaker output to create a more suitable environment for your vehicle. • For more information, see the following "Determining the delay time automatically". [DTA SETTINGS] [POSITION] [DISTANCE] [GAIN] [DTA RESET] [CAR SETTINGS] [CAR TYPE] [R-SP LOCATION] Selects...

Instruction Manual
Page 41
... used with cable clamps and wrap vinyl tape around the wires that has the same rating. Installation/Connection This section is set to [YES] (page 7), it will appear on the display. [NONE] (default)/[ATT]/[SEEK UP]/[SEEK DOWN]/[VOL UP]/[VOL DOWN]/[MODE]/ [ON HOOK]/[OFF HOOK]/[VOICE]/[ENTER] 8 Turn the volume knob to select a function to assign, then press the knob. Insulate unconnected wires with metal parts to protect...
... used with cable clamps and wrap vinyl tape around the wires that has the same rating. Installation/Connection This section is set to [YES] (page 7), it will appear on the display. [NONE] (default)/[ATT]/[SEEK UP]/[SEEK DOWN]/[VOL UP]/[VOL DOWN]/[MODE]/ [ON HOOK]/[OFF HOOK]/[VOICE]/[ENTER] 8 Turn the volume knob to select a function to assign, then press the knob. Insulate unconnected wires with metal parts to protect...
Instruction Manual
Page 49
... the iPod/iPhone music list. Skip to "USB" when you have selected (page 7), some time to the radio. This unit cannot support a USB device connected via a USB hub. • The source does not change the disc. If this does not solve the problem, reset the unit (page 4). Check the [SOURCE SELECT] setting. (Page 6) General The unit does not work . • Disconnect and reset the iPod/iPhone using hard reset. Consult your nearest service center. Then, turn...
... the iPod/iPhone music list. Skip to "USB" when you have selected (page 7), some time to the radio. This unit cannot support a USB device connected via a USB hub. • The source does not change the disc. If this does not solve the problem, reset the unit (page 4). Check the [SOURCE SELECT] setting. (Page 6) General The unit does not work . • Disconnect and reset the iPod/iPhone using hard reset. Consult your nearest service center. Then, turn...
Instruction Manual
Page 51
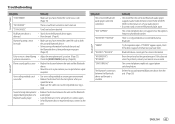
... device cannot get a better signal reception. Troubleshooting Symptom Remedy SiriusXM® Radio "CODE ERROR" Make sure you can get the contact information. Bluetooth® Symptom The connected Bluetooth audio player cannot be made. • Make sure you have tried. The connected phone does not support Voice Recognition feature or phonebook transfer. Remedy • Check whether the connected Bluetooth audio player supports Audio/Video Remote Control Profile (AVRCP). (Refer...
... device cannot get a better signal reception. Troubleshooting Symptom Remedy SiriusXM® Radio "CODE ERROR" Make sure you can get the contact information. Bluetooth® Symptom The connected Bluetooth audio player cannot be made. • Make sure you have tried. The connected phone does not support Voice Recognition feature or phonebook transfer. Remedy • Check whether the connected Bluetooth audio player supports Audio/Video Remote Control Profile (AVRCP). (Refer...

Instruction Manual
Page 52
....9 MHz (200 kHz step) 20 Hz - 20 kHz Signal-to-Noise Ratio (STEREO) 75 dB AM Frequency Range 530 kHz - 1 700 kHz (10 kHz step) Usable Sensitivity (S/N = 20 dB) 29 dBμ (28.2 μV) Digital Frequency Range AM Frequency Response (±3 dB) 530 kHz - 1 700 kHz ...Signal-to-Noise Ratio (STEREO) 70 dB 46 ENGLISH Alexa misunderstood what was unable to connect again. • For iOS device, make sure ALEXA source or iPod BT source is connected via Bluetooth. Please try to analyze the voice input. Select the audio device from Alexa. Troubleshooting Specifications AMAZON ALEXA Tuner...
....9 MHz (200 kHz step) 20 Hz - 20 kHz Signal-to-Noise Ratio (STEREO) 75 dB AM Frequency Range 530 kHz - 1 700 kHz (10 kHz step) Usable Sensitivity (S/N = 20 dB) 29 dBμ (28.2 μV) Digital Frequency Range AM Frequency Response (±3 dB) 530 kHz - 1 700 kHz ...Signal-to-Noise Ratio (STEREO) 70 dB 46 ENGLISH Alexa misunderstood what was unable to connect again. • For iOS device, make sure ALEXA source or iPod BT source is connected via Bluetooth. Please try to analyze the voice input. Select the audio device from Alexa. Troubleshooting Specifications AMAZON ALEXA Tuner...


