Instruction Manual
Page 4
... on the unit's display when you are driving for the condensation to factory settings when the Reset button is displayed. Refer to play the CDs with its mechanical parts. Handling discs •... • Remove the USB device before pressing the Reset button. This unit may affect its adapter into the unit, the adapter might 4 DNX series DNX9960/ DNX7160/ DNX7020EX The unit returns to evaporate. If the ... the unit or the connected unit fails to reset your Kenwood dealer. Pressing the Reset button with a hard cloth or using a volatile liquid such as a silicon cloth.
... on the unit's display when you are driving for the condensation to factory settings when the Reset button is displayed. Refer to play the CDs with its mechanical parts. Handling discs •... • Remove the USB device before pressing the Reset button. This unit may affect its adapter into the unit, the adapter might 4 DNX series DNX9960/ DNX7160/ DNX7020EX The unit returns to evaporate. If the ... the unit or the connected unit fails to reset your Kenwood dealer. Pressing the Reset button with a hard cloth or using a volatile liquid such as a silicon cloth.
Instruction Manual
Page 12
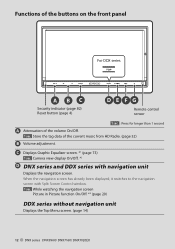
...Picture in Picture function On/Off. *3 (page 20) DDX series without navigation unit Displays the Top Menu screen. (page 14) 12 DNX series DNX9960/ DNX7160/ DNX7020EX Camera view display On/Off. *2 D DNX series and DDX series with Split Screen Control window. 1 sec. Store the tag data of the ...volume On/Off. 1 sec. Functions of the buttons on the front panel For DDX series A BC Security indicator (page 82) Reset button (page 4) DE FG Remote control sensor 1 sec. : Press for longer than 1 second A Attenuation of the current music from HD Radio. (page 52)...
...Picture in Picture function On/Off. *3 (page 20) DDX series without navigation unit Displays the Top Menu screen. (page 14) 12 DNX series DNX9960/ DNX7160/ DNX7020EX Camera view display On/Off. *2 D DNX series and DDX series with Split Screen Control window. 1 sec. Store the tag data of the ...volume On/Off. 1 sec. Functions of the buttons on the front panel For DDX series A BC Security indicator (page 82) Reset button (page 4) DE FG Remote control sensor 1 sec. : Press for longer than 1 second A Attenuation of the current music from HD Radio. (page 52)...
Instruction Manual
Page 81
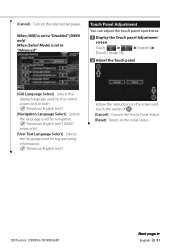
... for tag text (song information). ( "American English (en)") Follow the instruction on the screen and touch the center of . [Cancel] Cancels the Touch Panel Adjust. [Reset] Resets to the initial status. [Cancel] Cancels the selected language. DDX series DDX896/ DDX8046BT Next page 3 English 81
... for tag text (song information). ( "American English (en)") Follow the instruction on the screen and touch the center of . [Cancel] Cancels the Touch Panel Adjust. [Reset] Resets to the initial status. [Cancel] Cancels the selected language. DDX series DDX896/ DDX8046BT Next page 3 English 81

Instruction Manual
Page 82
If turned "ON", the security indicator on or off . 82 DNX series DNX9960/ DNX7160/ DNX7020EX Setup examples: 3:00 - 3:29 \ 3:00 3:30 - 3:59 \ 4:00 [Synchronize] Sets the clock time in synchronization with the time data sent from the navigation system ... OFF, warning potential thieves. 1 Display the Security screen Touch System] > [Security]. (page 78) 2 Setup the SI (Security Indicator) 1 Adjusts month, day, year, hours, and minute. [Reset] Sets "00" minute.
If turned "ON", the security indicator on or off . 82 DNX series DNX9960/ DNX7160/ DNX7020EX Setup examples: 3:00 - 3:29 \ 3:00 3:30 - 3:59 \ 4:00 [Synchronize] Sets the clock time in synchronization with the time data sent from the navigation system ... OFF, warning potential thieves. 1 Display the Security screen Touch System] > [Security]. (page 78) 2 Setup the SI (Security Indicator) 1 Adjusts month, day, year, hours, and minute. [Reset] Sets "00" minute.
Instruction Manual
Page 86
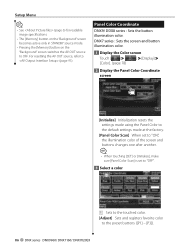
...illumination color. 1 Display the Color screen Touch Display] > [Color]. (page 78) 2 Display the Panel Color Coordinate screen [Initialize] Initialization resets the settings made using the Panel Color to the default settings made at the factory. [Panel Color Scan] When set to "ON", the ...to (page 91). Panel Color Coordinate DNX9/ DDX8 series : Sets the button illumination color. For resetting the AV OUT source, refer to the preset buttons ([P1] - [P3]). 86 DNX series DNX9960/ DNX7160/ DNX7020EX Setup Menu ⁄ • See (page 6) for readable image specifications. • ...
...illumination color. 1 Display the Color screen Touch Display] > [Color]. (page 78) 2 Display the Panel Color Coordinate screen [Initialize] Initialization resets the settings made using the Panel Color to the default settings made at the factory. [Panel Color Scan] When set to "ON", the ...to (page 91). Panel Color Coordinate DNX9/ DDX8 series : Sets the button illumination color. For resetting the AV OUT source, refer to the preset buttons ([P1] - [P3]). 86 DNX series DNX9960/ DNX7160/ DNX7020EX Setup Menu ⁄ • See (page 6) for readable image specifications. • ...
Instruction Manual
Page 113
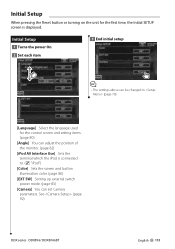
... Setup 1 Turns the power On 2 Set each item 3 End initial setup ⁄ • The settings above can set Camera parameters. Initial Setup When pressing the Reset button or turning on the unit for the control screen and setting items. (page 80) [Angle] You can adjust the position of the monitor. (page...
... Setup 1 Turns the power On 2 Set each item 3 End initial setup ⁄ • The settings above can set Camera parameters. Initial Setup When pressing the Reset button or turning on the unit for the control screen and setting items. (page 80) [Angle] You can adjust the position of the monitor. (page...
Instruction Manual
Page 117
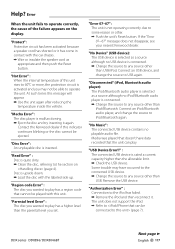
...the car chassis. ➡ Wire or insulate the speaker cord as appropriate and then push the Reset button. At such times this unit. If the "Error 07−67" message does not disappear, see your nearest Kenwood dealer. DDX series DDX896/ DDX8046BT Next page 3 English 117 "Hot Error" : When the...Bluetooth audio player is selected as a source although no USB device is activated and you wanted to any source other . ➡ Push the unit's Reset button. The unit does not support the iPod. ➡ Refer to some reason or other than the allowable limit. ➡ Check the USB device...
...the car chassis. ➡ Wire or insulate the speaker cord as appropriate and then push the Reset button. At such times this unit. If the "Error 07−67" message does not disappear, see your nearest Kenwood dealer. DDX series DDX896/ DDX8046BT Next page 3 English 117 "Hot Error" : When the...Bluetooth audio player is selected as a source although no USB device is activated and you wanted to any source other . ➡ Push the unit's Reset button. The unit does not support the iPod. ➡ Refer to some reason or other than the allowable limit. ➡ Check the USB device...
Instruction Manual
Page 121
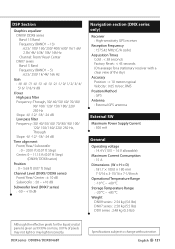
...) : -50 - +10 dB Navigation section (DNX series only) Receiver : High-sensitivity GPS receiver Reception Frequency : 1575.42 MHz (C/A code) Acquisition Times Cold : < 38 seconds Factory Reset : < 45 seconds (On average for the liquid crystal panel is given as 99.99% or more, 0.01% of the sky) Accuracy Position : < 10 meters typical...
...) : -50 - +10 dB Navigation section (DNX series only) Receiver : High-sensitivity GPS receiver Reception Frequency : 1575.42 MHz (C/A code) Acquisition Times Cold : < 38 seconds Factory Reset : < 45 seconds (On average for the liquid crystal panel is given as 99.99% or more, 0.01% of the sky) Accuracy Position : < 10 meters typical...
GPS Navigation Manual
Page 2
... 20 Calibrating the Fuel Economy 20 Adjusting the Fuel Price 20 Taking the ecoChallenge 21 Adjusting Your Vehicle Profile 21 Viewing the Mileage Report 21 Resetting ecoRoute Data 21 Calculate Routes that Use Less Fuel 21 2 GPS Navigation System Instruction Manual Contents Safety Precautions and Important Information 4 Find It and Go...
... 20 Calibrating the Fuel Economy 20 Adjusting the Fuel Price 20 Taking the ecoChallenge 21 Adjusting Your Vehicle Profile 21 Viewing the Mileage Report 21 Resetting ecoRoute Data 21 Calculate Routes that Use Less Fuel 21 2 GPS Navigation System Instruction Manual Contents Safety Precautions and Important Information 4 Find It and Go...
GPS Navigation Manual
Page 17
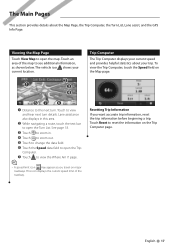
... may appear as shown below. This icon displays the current speed limit of the map to see additional information, as you want accurate trip information, reset the trip information before beginning a trip. Trip Computer The Trip Computer displays your current location. ➊ ➋ ➌ ➍ ➎&#...; Touch to zoom in this area. ➋ While navigating a route, touch the text bar to view and hear next turn . Resetting Trip Information If you travel on major roadways. English 17 Touch to open the map. Touch an area of the roadway. To view the...
... may appear as shown below. This icon displays the current speed limit of the map to see additional information, as you want accurate trip information, reset the trip information before beginning a trip. Trip Computer The Trip Computer displays your current location. ➊ ➋ ➌ ➍ ➎&#...; Touch to zoom in this area. ➋ While navigating a route, touch the text bar to view and hear next turn . Resetting Trip Information If you travel on major roadways. English 17 Touch to open the map. Touch an area of the roadway. To view the...

GPS Navigation Manual
Page 21
...Viewing the Mileage Report Mileage reports provide the distance, the time, the average fuel economy, and the fuel cost of navigating to reset. 3 Touch Reset. • Fuel Type-select a fuel type. • City Fuel Economy-enter the average city fuel efficiency for your vehicle.... more fuel you drive. The ecoChallenge tool helps you want to a destination. Taking the ecoChallenge Touch Tools > ecoRoute > ecoChallenge > Start. Resetting ecoRoute Data 1 Touch Tools > ecoRoute. 2 Select the category you maximize your fuel economy by scoring your overall score for most vehicles. English...
...Viewing the Mileage Report Mileage reports provide the distance, the time, the average fuel economy, and the fuel cost of navigating to reset. 3 Touch Reset. • Fuel Type-select a fuel type. • City Fuel Economy-enter the average city fuel efficiency for your vehicle.... more fuel you drive. The ecoChallenge tool helps you want to a destination. Taking the ecoChallenge Touch Tools > ecoRoute > ecoChallenge > Start. Resetting ecoRoute Data 1 Touch Tools > ecoRoute. 2 Select the category you maximize your fuel economy by scoring your overall score for most vehicles. English...

Installation Manual
Page 2
.... 8. Connect the speaker wires of mechanism the product is due to the unit. 6. Install the unit in the following order: ground, battery, ignition. 5. Press the reset button. 9. The power supply must wait while the system acquires satellite signals for each time thereafter. This process could take up to the wires via...
.... 8. Connect the speaker wires of mechanism the product is due to the unit. 6. Install the unit in the following order: ground, battery, ignition. 5. Press the reset button. 9. The power supply must wait while the system acquires satellite signals for each time thereafter. This process could take up to the wires via...


