
User Manual
Page 1
... the right to such software. This agreement is deemed to sublicense it. The rise of use . 4. User shall use Licensed Software as per the instruction manual or instructions given in the help file and may not use Licensed Software in this product. 2. The EULA dictates the availability of the source codes...
... the right to such software. This agreement is deemed to sublicense it. The rise of use . 4. User shall use Licensed Software as per the instruction manual or instructions given in the help file and may not use Licensed Software in this product. 2. The EULA dictates the availability of the source codes...
Instruction Manual
Page 1
MONITOR WITH DVD RECEIVER DDX919WS DDX919WSM DDX9019DABS DDX9019S DDX9019SM MONITOR WITH RECEIVER DMX8019DABS DMX8019S INSTRUCTION MANUAL • Updated information (the latest Instruction Manual, system updates, new functions, etc.) is available from . © 2019 JVC KENWOOD Corporation B5A-2891-00 d (M/M2/X/A9)
MONITOR WITH DVD RECEIVER DDX919WS DDX919WSM DDX9019DABS DDX9019S DDX9019SM MONITOR WITH RECEIVER DMX8019DABS DMX8019S INSTRUCTION MANUAL • Updated information (the latest Instruction Manual, system updates, new functions, etc.) is available from . © 2019 JVC KENWOOD Corporation B5A-2891-00 d (M/M2/X/A9)
Instruction Manual
Page 2
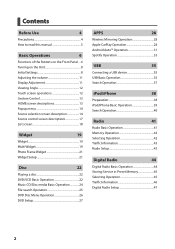
Contents Before Use 4 Precautions 4 How to read this manual 5 Basic Operations 6 Functions of the Buttons on the Front Panel.... 6 Turning on the Unit 8 Initial Settings 8 Adjusting the volume 11 Display Adjustment 11 Viewing Angle ...
Contents Before Use 4 Precautions 4 How to read this manual 5 Basic Operations 6 Functions of the Buttons on the Front Panel.... 6 Turning on the Unit 8 Initial Settings 8 Adjusting the volume 11 Display Adjustment 11 Viewing Angle ...
Instruction Manual
Page 4
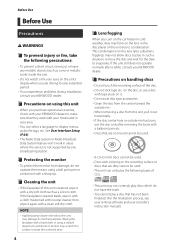
...209;ÑProtecting the monitor • To protect the monitor from this unit • When you experience problems during installation, consult your KENWOOD dealer. ÑÑPrecautions on the recording surface or discs that are dirty cannot be used . • This unit can select a... (For the finalization process, see your writing software and your recorder's instruction manual.) If the faceplate is not supported by any extended period. • If you purchase optional accessories, check with your KENWOOD dealer to display menus, audio file tags, etc. Before Use Before Use ...
...209;ÑProtecting the monitor • To protect the monitor from this unit • When you experience problems during installation, consult your KENWOOD dealer. ÑÑPrecautions on the recording surface or discs that are dirty cannot be used . • This unit can select a... (For the finalization process, see your writing software and your recorder's instruction manual.) If the faceplate is not supported by any extended period. • If you purchase optional accessories, check with your KENWOOD dealer to display menus, audio file tags, etc. Before Use Before Use ...

Instruction Manual
Page 5
Before Use How to read this manual • The screens and panels shown in this manual are examples used for Smartphone Users Simultaneously running multiple applications on your Kenwood receiver, please be different from the actual ones. • Display language: English is outdoors in an open area away from the [SETUP] menu. See User...
Before Use How to read this manual • The screens and panels shown in this manual are examples used for Smartphone Users Simultaneously running multiple applications on your Kenwood receiver, please be different from the actual ones. • Display language: English is outdoors in an open area away from the [SETUP] menu. See User...

Instruction Manual
Page 6
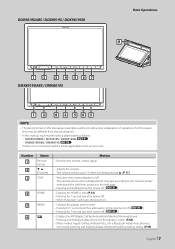
... (P.49) • Adjusts volume. The volume will go up until 15 when you use. Interrupts from the actual panels. • In this manual are functional, though. • Displays the popup menu screen. • Displays the Angle Adjust screen. --[DISC EJECT]: Ejects the disc. •...of the operations. Basic Operations Basic Operations Functions of the Buttons on the Front Panel DDX919WS / DDX919WSM 1 2 38 4 5 6 7 NOTE • The panels shown in this manual, each model name is abbreviated as follows. --DDX919WS / DDX919WSM: If above icon is showed, read the article applicable to the unit...
... (P.49) • Adjusts volume. The volume will go up until 15 when you use. Interrupts from the actual panels. • In this manual are functional, though. • Displays the popup menu screen. • Displays the Angle Adjust screen. --[DISC EJECT]: Ejects the disc. •...of the operations. Basic Operations Basic Operations Functions of the Buttons on the Front Panel DDX919WS / DDX919WSM 1 2 38 4 5 6 7 NOTE • The panels shown in this manual, each model name is abbreviated as follows. --DDX919WS / DDX919WSM: If above icon is showed, read the article applicable to the unit...
Instruction Manual
Page 7
For this reason, they may be different from the actual panels. • In this manual are examples used to the "Camera Setup" setting and the shift lever position in this manual, each model name is abbreviated as follows. --DDX9019DABS / DDX9019S / DDX9019SM: --DMX8019DABS / DMX8019S: If above icon is showed, read the article applicable to...
For this reason, they may be different from the actual panels. • In this manual are examples used to the "Camera Setup" setting and the shift lever position in this manual, each model name is abbreviated as follows. --DDX9019DABS / DDX9019S / DDX9019SM: --DMX8019DABS / DMX8019S: If above icon is showed, read the article applicable to...
Instruction Manual
Page 10
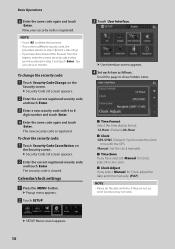
...Default)/24-Hour] ■■ [Clock] [GPS-SYNC ](Default): Synchronizes the clock time with 4 to step 5 (for Clock, adjust the date and time manually. (P.67) NOTE • Please set , some functions may not work. Now, your receiver. To change the security code: 1 Touch [Security Code Change] ...touch [Enter]. 3 Enter a new security code with the GPS. [Manual]: Set the clock manually. ■■[Time Zone] If you have selected [Manual] for Clock, select the time zone. ■■[Clock Adjust] If you select [Manual] for first code entry). • If you have disconnected the ...
...Default)/24-Hour] ■■ [Clock] [GPS-SYNC ](Default): Synchronizes the clock time with 4 to step 5 (for Clock, adjust the date and time manually. (P.67) NOTE • Please set , some functions may not work. Now, your receiver. To change the security code: 1 Touch [Security Code Change] ...touch [Enter]. 3 Enter a new security code with the GPS. [Manual]: Set the clock manually. ■■[Time Zone] If you have selected [Manual] for Clock, select the time zone. ■■[Clock Adjust] If you select [Manual] for first code entry). • If you have disconnected the ...

Instruction Manual
Page 24
... off ( ) 2 Track information • Displays the information of current playing position. For details on search operation, see Switch the operation mode (P.82). • In this manual, "Music CD" means a general CD which includes audio or video files. • The screen shot below is set to change the playing position. (Video file...
... off ( ) 2 Track information • Displays the information of current playing position. For details on search operation, see Switch the operation mode (P.82). • In this manual, "Music CD" means a general CD which includes audio or video files. • The screen shot below is set to change the playing position. (Video file...
Instruction Manual
Page 28
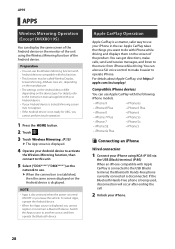
... CarPlay takes the things you want to do with your Android device. • If your iPhone in the car. For details, refer to the instruction manual supplied with iPhone while driving and displays them on the Android device is a smarter, safer way to use Siri voice control to make calls, send...
... CarPlay takes the things you want to do with your Android device. • If your iPhone in the car. For details, refer to the instruction manual supplied with iPhone while driving and displays them on the Android device is a smarter, safer way to use Siri voice control to make calls, send...

Instruction Manual
Page 35
... USB device. ÑÑUsable USB device You can use a mass-storage-class USB device with this unit. The word "USB device" appearing in this manual indicates a flash memory device. ●●About the file system The file system should be the one of the following. • FAT16 • FAT32 •...
... USB device. ÑÑUsable USB device You can use a mass-storage-class USB device with this unit. The word "USB device" appearing in this manual indicates a flash memory device. ●●About the file system The file system should be the one of the following. • FAT16 • FAT32 •...
Instruction Manual
Page 41
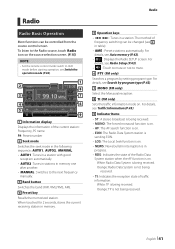
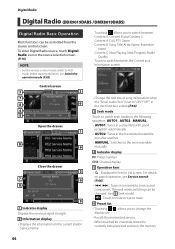
Radio 5 Operation keys • [E] [F] : Tunes in memory one after another. • [MANUAL]: Switches to the next frequency manually. 3 Band button Switches the band (FM1/FM2/FM3, AM). 4 Preset key Recalls the memorized station. White: TP is being received. ... is on . The method of the current station: Frequency, PS name P#: Preset number 2 Seek mode Switches the seek mode in the following sequence; [AUTO1], [AUTO2], [MANUAL]. • [AUTO1]: Tunes in a station with good reception automatically. • [AUTO2]: Tunes in stations in a station. For details, see 2 in table). • ...
Radio 5 Operation keys • [E] [F] : Tunes in memory one after another. • [MANUAL]: Switches to the next frequency manually. 3 Band button Switches the band (FM1/FM2/FM3, AM). 4 Preset key Recalls the memorized station. White: TP is being received. ... is on . The method of the current station: Frequency, PS name P#: Preset number 2 Seek mode Switches the seek mode in the following sequence; [AUTO1], [AUTO2], [MANUAL]. • [AUTO1]: Tunes in a station with good reception automatically. • [AUTO2]: Tunes in stations in a station. For details, see 2 in table). • ...

Instruction Manual
Page 42
.... 1 Touch desired band key. 2 Select a station you want to store in memory. 3 Touch [#] (#:1-6) in memory automatically. 1 Touch desired band key. hhAuto memory starts. ÑÑManual memory You can search a station of the selected program type. 42 hhPTY Search screen appears. 2 Select a program type from the list. 2 Touch [AME]. 3 Touch [Yes...
.... 1 Touch desired band key. 2 Select a station you want to store in memory. 3 Touch [#] (#:1-6) in memory automatically. 1 Touch desired band key. hhAuto memory starts. ÑÑManual memory You can search a station of the selected program type. 42 hhPTY Search screen appears. 2 Select a program type from the list. 2 Touch [AME]. 3 Touch [Yes...
Instruction Manual
Page 44
...functions can be controlled from the source control screen. For details on the current station: Service Name Touching [ ] allows you to the next ensemble manually. 4 Indicator display P#: Preset number CH#: Channel display 5 Operation keys • [1] : Displays the Service List screen. The seek mode switching ... User Interface screen (P.66). 3 Seek mode Touch to switch seek modes in the following sequence: [AUTO1], [AUTO2], [MANUAL]. • [AUTO1]: Tunes in a ensemble with good reception automatically. • [AUTO2]: Tunes in the memorized ensemble one after another. •...
...functions can be controlled from the source control screen. For details on the current station: Service Name Touching [ ] allows you to the next ensemble manually. 4 Indicator display P#: Preset number CH#: Channel display 5 Operation keys • [1] : Displays the Service List screen. The seek mode switching ... User Interface screen (P.66). 3 Seek mode Touch to switch seek modes in the following sequence: [AUTO1], [AUTO2], [MANUAL]. • [AUTO1]: Tunes in a ensemble with good reception automatically. • [AUTO2]: Tunes in the memorized ensemble one after another. •...
Instruction Manual
Page 61
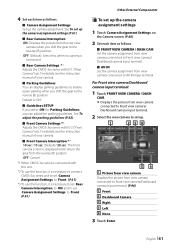
... set [Rear Camera Interruption] to [ON] and to set [Camera Assignment Settings] to the reverse (R) position. For details, see the instruction manual of your camera. ■■[Front Camera Interruption *]3 [10 sec]/[15 sec] (Default)/[20 sec]: The front camera screen is displayed when ...view camera when you shift the gear to [Front]. (P.61) Other External Components ÑÑTo set . For details, see the instruction manual of your camera. ■■[Parking Guidelines] You can adjust the parking guidelines. See To adjust the parking guidelines (P.62). ■■...
... set [Rear Camera Interruption] to [ON] and to set [Camera Assignment Settings] to the reverse (R) position. For details, see the instruction manual of your camera. ■■[Front Camera Interruption *]3 [10 sec]/[15 sec] (Default)/[20 sec]: The front camera screen is displayed when ...view camera when you shift the gear to [Front]. (P.61) Other External Components ÑÑTo set . For details, see the instruction manual of your camera. ■■[Parking Guidelines] You can adjust the parking guidelines. See To adjust the parking guidelines (P.62). ■■...

Instruction Manual
Page 62
... to set up. 1 23 4 56 1 [Picture from view camera] Displays the picture from moving. 1 Touch [Parking Guidelines] in the appropriate position according to the instruction manual supplied with the rear view camera. • When adjusting the parking guidelines, make sure to apply the parking brake to prevent the car from view...
... to set up. 1 23 4 56 1 [Picture from view camera] Displays the picture from moving. 1 Touch [Parking Guidelines] in the appropriate position according to the instruction manual supplied with the rear view camera. • When adjusting the parking guidelines, make sure to apply the parking brake to prevent the car from view...

Instruction Manual
Page 63
... Settings" to "Dashboard Camera". (P.61) ÑÑDisplay the dashboard camera screen 1 Press the [MENU] button. NOTE • To connect a dashboard camera, see the instruction manual of the Dashboard Camera DRV-N520 (optional accessory). Use Dashboard Camera A Dashboard Camera, DRV-N520 (optional accessory), connected to this unit lets you play video...
... Settings" to "Dashboard Camera". (P.61) ÑÑDisplay the dashboard camera screen 1 Press the [MENU] button. NOTE • To connect a dashboard camera, see the instruction manual of the Dashboard Camera DRV-N520 (optional accessory). Use Dashboard Camera A Dashboard Camera, DRV-N520 (optional accessory), connected to this unit lets you play video...
Instruction Manual
Page 66
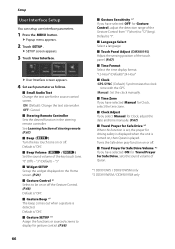
... is displayed when the unit is turned on or off. ■■ [Travel Prayer for Safe Drive Volume] *2 If you have selected [Manual] for Clock, select the time zone. ■■[Clock Adjust] If you have selected [ON] for [Travel Prayer for the source control ...when a gesture is played. Setup User Interface Setup You can setup user interface parameters. 1 Press the [MENU] button. See Learning function of Quran. *1 DDX919WS / DDX919WSM only *2 DDX919WSM / DDX9019SM only 66 "3" (Default) - hhUser Interface screen appears. 4 Set each parameter as follows. ■■[Small Audio...
... is displayed when the unit is turned on or off. ■■ [Travel Prayer for Safe Drive Volume] *2 If you have selected [Manual] for Clock, select the time zone. ■■[Clock Adjust] If you have selected [ON] for [Travel Prayer for the source control ...when a gesture is played. Setup User Interface Setup You can setup user interface parameters. 1 Press the [MENU] button. See Learning function of Quran. *1 DDX919WS / DDX919WSM only *2 DDX919WSM / DDX9019SM only 66 "3" (Default) - hhUser Interface screen appears. 4 Set each parameter as follows. ■■[Small Audio...

Instruction Manual
Page 67
... error message may appear. 1 Touch [Steering Remote Controller] in Steering Remote Controller Setting screen. ÑÑAdjust the date and time manually 1 Touch [Clock] on the User Interface screen. 2 Select [Manual]. 3 Touch [Time Zone] on the User Interface screen. 4 Select the time zone. 5 Touch [Clock Adjust] on the User Interface screen. 6 Adjust...
... error message may appear. 1 Touch [Steering Remote Controller] in Steering Remote Controller Setting screen. ÑÑAdjust the date and time manually 1 Touch [Clock] on the User Interface screen. 2 Select [Manual]. 3 Touch [Time Zone] on the User Interface screen. 4 Select the time zone. 5 Touch [Clock Adjust] on the User Interface screen. 6 Adjust...
Instruction Manual
Page 69
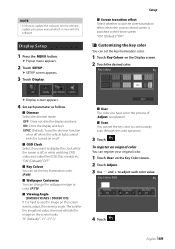
...;■[Screen transition effect] Select whether to use the screen transition effect when the source control screen is hard to see the relevant update procedure manual which comes with the software. To register an original color You can set in the process of [Adjust] is turned on the screen looks. hhDisplay...
...;■[Screen transition effect] Select whether to use the screen transition effect when the source control screen is hard to see the relevant update procedure manual which comes with the software. To register an original color You can set in the process of [Adjust] is turned on the screen looks. hhDisplay...


