

User Manual
Page 1
DDX6033BT DDX6033BTM DDX6033 DDX4033BT DDX4033BTM DDX4033 DDX4033M MONITOR WITH DVD RECEIVER INSTRUCTION MANUAL This instruction manual is used to describe models listed below. Model availability and features (functions) may differ depending on the country and sales area. • Region 2 (DVD Region Code 2 area) • Region 3 (DVD Region Code 3 area) • Region 4 (DVD Region Code 4 area) © 2012 JVC KENWOOD Corporation GET0908-001A (MN/M2N/XN)
DDX6033BT DDX6033BTM DDX6033 DDX4033BT DDX4033BTM DDX4033 DDX4033M MONITOR WITH DVD RECEIVER INSTRUCTION MANUAL This instruction manual is used to describe models listed below. Model availability and features (functions) may differ depending on the country and sales area. • Region 2 (DVD Region Code 2 area) • Region 3 (DVD Region Code 3 area) • Region 4 (DVD Region Code 4 area) © 2012 JVC KENWOOD Corporation GET0908-001A (MN/M2N/XN)

User Manual
Page 2
... remote controller 47 Setting menu items 48 Memorizing/recalling the settings 52 Locking the settings 52 Adjusting the touch position 52 BLUETOOTH OPERATIONS (Only for DDX6033BT/DDX6033BTM/ DDX4033BT/DDX4033BTM) Information for using Bluetooth® devices 53 Bluetooth operations 53 Connecting Bluetooth devices 54 Setting up Bluetooth 56 Using the Bluetooth mobile...
... remote controller 47 Setting menu items 48 Memorizing/recalling the settings 52 Locking the settings 52 Adjusting the touch position 52 BLUETOOTH OPERATIONS (Only for DDX6033BT/DDX6033BTM/ DDX4033BT/DDX4033BTM) Information for using Bluetooth® devices 53 Bluetooth operations 53 Connecting Bluetooth devices 54 Setting up Bluetooth 56 Using the Bluetooth mobile...
User Manual
Page 3
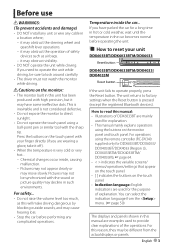
...using the buttons on the touch panel. • Indication language: English indications are wearing a glove, take it may have parked the car for DDX6033BT/DDX6033/ DDX4033BT/DDX4033 (Region 3), DDX6033BTM/DDX4033BTM/ DDX4033M), ☞ page 64. • < > indicates the variable screens/ menus/operations/settings that ... manual: • Illustrations of explanation. For operations using a ball-point pen or similar tool with your unit DDX6033BT/DDX6033BTM/DDX6033 Reset button DDX4033BT/DDX4033BTM/DDX4033/ DDX4033M Reset button If the unit fails to reset your finger directly (if you ...
...using the buttons on the touch panel. • Indication language: English indications are wearing a glove, take it may have parked the car for DDX6033BT/DDX6033/ DDX4033BT/DDX4033 (Region 3), DDX6033BTM/DDX4033BTM/ DDX4033M), ☞ page 64. • < > indicates the variable screens/ menus/operations/settings that ... manual: • Illustrations of explanation. For operations using a ball-point pen or similar tool with your unit DDX6033BT/DDX6033BTM/DDX6033 Reset button DDX4033BT/DDX4033BTM/DDX4033/ DDX4033M Reset button If the unit fails to reset your finger directly (if you ...

User Manual
Page 5
...unit, the initial setting screen appears. • You can also change the settings on the screen. (☞ page 48) 1 For DDX6033BT/DDX6033BTM/ DDX6033: *1 For DDX4033BT/DDX4033BTM/ DDX4033/DDX4033M: *1 Language Select the text language used for on-screen information. (☞ page 50) &#...Select the color of the buttons on the monitor panel. (☞ page 42) 2 Finish the procedure. *1 Only for DDX6033BT/DDX6033BTM/DDX4033BT/ DDX4033BTM. *2 Only for DDX6033BT/DDX6033BTM/DDX6033. English 5 Angle *2 Adjust the panel angle. (☞page 11) AV Input Select an external component to play - ...
...unit, the initial setting screen appears. • You can also change the settings on the screen. (☞ page 48) 1 For DDX6033BT/DDX6033BTM/ DDX6033: *1 For DDX4033BT/DDX4033BTM/ DDX4033/DDX4033M: *1 Language Select the text language used for on-screen information. (☞ page 50) &#...Select the color of the buttons on the monitor panel. (☞ page 42) 2 Finish the procedure. *1 Only for DDX6033BT/DDX6033BTM/DDX4033BT/ DDX4033BTM. *2 Only for DDX6033BT/DDX6033BTM/DDX6033. English 5 Angle *2 Adjust the panel angle. (☞page 11) AV Input Select an external component to play - ...
User Manual
Page 8
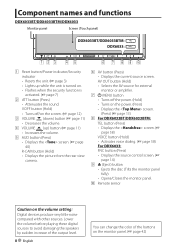
...of the buttons on the volume setting: Digital devices produce very little noise compared with other sources. Component names and functions DDX6033BT/DDX6033BTM/DDX6033 Monitor panel Screen (Touch panel) 1 Reset button/Power indicator/Security indicator • Resets the unit. (☞ page ...8226; Displays the screen. (Press) (☞ page 13) 8 For DDX6033BT/DDX6033BTM: TEL button (Press) • Displays the screen. (☞ page 58) VOICE button (Hold) • Activates voice dialing. (☞ page 58) For DDX6033: FNC button (Press) • Displays the source control screen. (☞...
...of the buttons on the volume setting: Digital devices produce very little noise compared with other sources. Component names and functions DDX6033BT/DDX6033BTM/DDX6033 Monitor panel Screen (Touch panel) 1 Reset button/Power indicator/Security indicator • Resets the unit. (☞ page ...8226; Displays the screen. (Press) (☞ page 13) 8 For DDX6033BT/DDX6033BTM: TEL button (Press) • Displays the screen. (☞ page 58) VOICE button (Hold) • Activates voice dialing. (☞ page 58) For DDX6033: FNC button (Press) • Displays the source control screen. (☞...
User Manual
Page 11
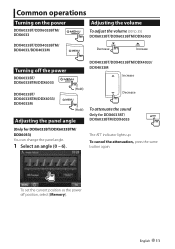
... cancel the attenuation, press the same button again. To set the current position as the power off the power DDX6033BT/ DDX6033BTM/DDX6033 DDX4033BT/ DDX4033BTM/DDX4033/ DDX4033M (Hold) (Hold) Adjusting the panel angle (Only for DDX6033BT/ DDX6033BTM/DDX6033 The ATT indicator lights up. DDX4033BT/DDX4033BTM/DDX4033/ DDX4033M Increase Decrease To attenuate the sound Only for...
... cancel the attenuation, press the same button again. To set the current position as the power off the power DDX6033BT/ DDX6033BTM/DDX6033 DDX4033BT/ DDX4033BTM/DDX4033/ DDX4033M (Hold) (Hold) Adjusting the panel angle (Only for DDX6033BT/ DDX6033BTM/DDX6033 The ATT indicator lights up. DDX4033BT/DDX4033BTM/DDX4033/ DDX4033M Increase Decrease To attenuate the sound Only for...
User Manual
Page 12
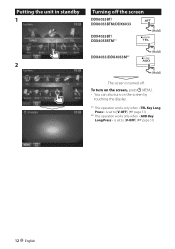
Putting the unit in standby 1 2 Turning off . To turn on the screen, press MENU. • You can also turn on the screen by touching the display. *1 This operation works only when is set to [V-OFF]. (☞ page 51) *2 This operation works only when is turned off the screen DDX6033BT/ DDX6033BTM/DDX6033 DDX4033BT/ DDX4033BTM*1 (Hold) DDX4033/DDX4033M*2 (Hold) (Hold) The screen is set to [V-OFF]. (☞ page 51) 12 English
Putting the unit in standby 1 2 Turning off . To turn on the screen, press MENU. • You can also turn on the screen by touching the display. *1 This operation works only when is set to [V-OFF]. (☞ page 51) *2 This operation works only when is turned off the screen DDX6033BT/ DDX6033BTM/DDX6033 DDX4033BT/ DDX4033BTM*1 (Hold) DDX4033/DDX4033M*2 (Hold) (Hold) The screen is set to [V-OFF]. (☞ page 51) 12 English

User Manual
Page 14
...NAV*1*2 (☞ page 39) Displays the navigation screen when a navigation unit is done for DDX6033BT/DDX6033BTM/DDX4033BT/DDX4033BTM. TUNER (☞ page 30) Switches to the Pandora broadcast. USB (☞...DDX6033: Pressing FNC hides the operation buttons. • The operation buttons disappear by touching the screen or when no navigation unit is connected, "No Navigation" appears. *2 Select an appropriate input setting on . (☞ page 50). *3 Only for DDX6033BT/DDX6033BTM/DDX4033BT/DDX4033BTM. *4 Select an appropriate input setting on . (☞ page 50) *5 Only for DDX6033BT...
...NAV*1*2 (☞ page 39) Displays the navigation screen when a navigation unit is done for DDX6033BT/DDX6033BTM/DDX4033BT/DDX4033BTM. TUNER (☞ page 30) Switches to the Pandora broadcast. USB (☞...DDX6033: Pressing FNC hides the operation buttons. • The operation buttons disappear by touching the screen or when no navigation unit is connected, "No Navigation" appears. *2 Select an appropriate input setting on . (☞ page 50). *3 Only for DDX6033BT/DDX6033BTM/DDX4033BT/DDX4033BTM. *4 Select an appropriate input setting on . (☞ page 50) *5 Only for DDX6033BT...
User Manual
Page 15
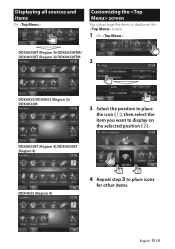
Displaying all sources and items On : Customizing the screen You can arrange the items to display on the screen. 1 On : DDX6033BT (Region 3)/DDX6033BTM/ DDX4033BT (Region 3)/DDX4033BTM 2 DDX6033/DDX4033 (Region 3)/ DDX4033M 3 Select the position to place the icon (1), then select the item you want to place icons for other items. English 15 DDX6033BT (Region 4)/DDX4033BT (Region 4) DDX4033 (Region 4) 4 Repeat step 3 to display on the selected position (2).
Displaying all sources and items On : Customizing the screen You can arrange the items to display on the screen. 1 On : DDX6033BT (Region 3)/DDX6033BTM/ DDX4033BT (Region 3)/DDX4033BTM 2 DDX6033/DDX4033 (Region 3)/ DDX4033M 3 Select the position to place the icon (1), then select the item you want to place icons for other items. English 15 DDX6033BT (Region 4)/DDX4033BT (Region 4) DDX4033 (Region 4) 4 Repeat step 3 to display on the selected position (2).
User Manual
Page 16
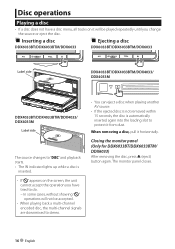
The monitor panel closes. 16 English Inserting a disc Ejecting a disc DDX6033BT/DDX6033BTM/DDX6033 DDX6033BT/DDX6033BTM/DDX6033 Label side DDX4033BT/DDX4033BTM/DDX4033/ DDX4033M DDX4033BT/DDX4033BTM/DDX4033/ DDX4033M Label side The source changes to "DISC" and ... removed within 15 seconds, the disc is automatically inserted again into the loading slot to protect it horizontally. Closing the monitor panel (Only for DDX6033BT/DDX6033BTM/ DDX6033) After removing the disc, press 0 (eject) button again. When removing a disc, pull it from dust. Disc operations Playing a disc...
The monitor panel closes. 16 English Inserting a disc Ejecting a disc DDX6033BT/DDX6033BTM/DDX6033 DDX6033BT/DDX6033BTM/DDX6033 Label side DDX4033BT/DDX4033BTM/DDX4033/ DDX4033M DDX4033BT/DDX4033BTM/DDX4033/ DDX4033M Label side The source changes to "DISC" and ... removed within 15 seconds, the disc is automatically inserted again into the loading slot to protect it horizontally. Closing the monitor panel (Only for DDX6033BT/DDX6033BTM/ DDX6033) After removing the disc, press 0 (eject) button again. When removing a disc, pull it from dust. Disc operations Playing a disc...
User Manual
Page 17
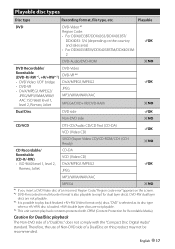
... side of an incorrect Region Code, "Region code error" appears on this product may not be recommended. Playable DVD DVD-Video *1 Region Code: • For DDX6033BT/DDX6033/DDX4033BT/ DDX4033: 3/4 (depending on the country and sales area) • For DDX6033BTM/DDX4033BTM/DDX4033M: 2 DVD-Audio/DVD-ROM DVD Recordable/ Rewritable (DVD-R/-RW *2, +R/+RW *3) •...
... side of an incorrect Region Code, "Region code error" appears on this product may not be recommended. Playable DVD DVD-Video *1 Region Code: • For DDX6033BT/DDX6033/DDX4033BT/ DDX4033: 3/4 (depending on the country and sales area) • For DDX6033BTM/DDX4033BTM/DDX4033M: 2 DVD-Audio/DVD-ROM DVD Recordable/ Rewritable (DVD-R/-RW *2, +R/+RW *3) •...

User Manual
Page 28
For compatible smartphones, visit the following website: http://kenwood.com/cs/ce/ • To use the specialized application in the compatible smartphone. • After connecting to a smartphone that is compatible with this unit, ...KCA-ML100). 2 On : A combination of your smartphone screen and control buttons appears as follows: Displays the home screen of your specialized application. Preparation: Select for DDX6033BT/DDX6033BTM/ DDX4033BT/DDX4033BTM) You can operate the applications on the touch panel screen as well as the source on (☞ page 50). Using the smartphone -
For compatible smartphones, visit the following website: http://kenwood.com/cs/ce/ • To use the specialized application in the compatible smartphone. • After connecting to a smartphone that is compatible with this unit, ...KCA-ML100). 2 On : A combination of your smartphone screen and control buttons appears as follows: Displays the home screen of your specialized application. Preparation: Select for DDX6033BT/DDX6033BTM/ DDX4033BT/DDX4033BTM) You can operate the applications on the touch panel screen as well as the source on (☞ page 50). Using the smartphone -

User Manual
Page 31
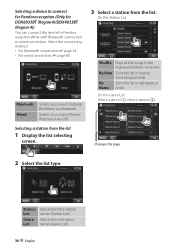
... Region 2/3 models. 1 2 ON Select this to store the antenna automatically. PS (station name) for FM Radio Data System when PS signal is not the tuner. DDX6033BT/DDX6033 ON Select this to keep the antenna extended even when the source is coming in FM stations only with sufficient signal strength.
... Region 2/3 models. 1 2 ON Select this to store the antenna automatically. PS (station name) for FM Radio Data System when PS signal is not the tuner. DDX6033BT/DDX6033 ON Select this to keep the antenna extended even when the source is coming in FM stations only with sufficient signal strength.
User Manual
Page 35
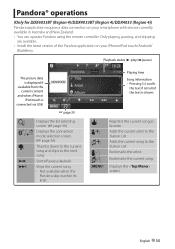
..., and skipping are available. • Install the latest version of the Pandora application on your iPhone/iPod touch/Android/ BlackBerry. Pandora® operations (Only for DDX6033BT (Region 4)/DDX4033BT (Region 4)/DDX4033 (Region 4)) Pandora application requires a data connection on your smartphone with service currently available in Australia and New Zealand. • You can...
..., and skipping are available. • Install the latest version of the Pandora application on your iPhone/iPod touch/Android/ BlackBerry. Pandora® operations (Only for DDX6033BT (Region 4)/DDX4033BT (Region 4)/DDX4033 (Region 4)) Pandora application requires a data connection on your smartphone with service currently available in Australia and New Zealand. • You can...
User Manual
Page 36
Selects to connect for Pandora reception (Only for DDX6033BT (Region4)/DDX4033BT (Region 4)) You can connect the device for Pandora reception either with Bluetooth connection or wired connection. Selects from the list. By Date Sorts ...
Selects to connect for Pandora reception (Only for DDX6033BT (Region4)/DDX4033BT (Region 4)) You can connect the device for Pandora reception either with Bluetooth connection or wired connection. Selects from the list. By Date Sorts ...

User Manual
Page 39
... the sound coming out of the setting (☞ page 45). See the instruction manual supplied for the navigation guidance. To cancel the navigation screen DDX6033BT/ DDX4033BT/ DDX6033BTM/ DDX4033BTM/ DDX6033 DDX4033/DDX4033M Settings for navigation unit 1 On : 3 Guidance Volume NAV Mute NAV Setup Select front speakers used for the navigation unit. To view...
... the sound coming out of the setting (☞ page 45). See the instruction manual supplied for the navigation guidance. To cancel the navigation screen DDX6033BT/ DDX4033BT/ DDX6033BTM/ DDX4033BTM/ DDX6033 DDX4033/DDX4033M Settings for navigation unit 1 On : 3 Guidance Volume NAV Mute NAV Setup Select front speakers used for the navigation unit. To view...

User Manual
Page 40
... screen by pressing AUD (only for each band (1), then select the subwoofer level* (2). Sound adjustment Using the sound equalization • The adjustment is memorized for DDX6033BT/ DDX6033BTM/DDX6033/DDX4033/ DDX4033M) on the monitor panel. * Adjustable only when the subwoofer is activated. (☞ page 48) 40 English If the source is a disc, the...
... screen by pressing AUD (only for each band (1), then select the subwoofer level* (2). Sound adjustment Using the sound equalization • The adjustment is memorized for DDX6033BT/ DDX6033BTM/DDX6033/DDX4033/ DDX4033M) on the monitor panel. * Adjustable only when the subwoofer is activated. (☞ page 48) 40 English If the source is a disc, the...

User Manual
Page 46
...; To use a rear view camera, the REVERSE lead connection is set to the reverse (R) position. When displaying the picture from the rear view camera manually DDX6033BT/ DDX6033BTM/DDX6033 DDX4033BT/ DDX4033BTM*1 (Hold) DDX4033/ DDX4033M*2 (Hold) (Hold) To deactivate, select [OFF]. For connecting a rear view camera, ☞ page 81.
...; To use a rear view camera, the REVERSE lead connection is set to the reverse (R) position. When displaying the picture from the rear view camera manually DDX6033BT/ DDX6033BTM/DDX6033 DDX4033BT/ DDX4033BTM*1 (Hold) DDX4033/ DDX4033M*2 (Hold) (Hold) To deactivate, select [OFF]. For connecting a rear view camera, ☞ page 81.
User Manual
Page 49
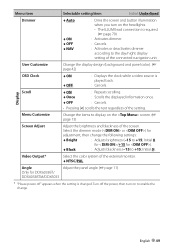
Menu item Selectable setting/item Initial: Underlined Dimmer ♦ Auto ♦ ON ♦ OFF ♦ NAV : Dims the screen and button illumination when you turn on the headlights. • The ILLUMI lead connection is played back. : Cancels. Display Scroll ♦ ON ♦ Once : Repeats scrolling. : Scrolls the displayed information once. ♦ OFF : Cancels. • Pressing [ User Customize Change the display design (background and panel color). (☞ page 42) OSD Clock ♦ ON ♦ OFF : Displays the clock while a video source is required. (☞ page...
Menu item Selectable setting/item Initial: Underlined Dimmer ♦ Auto ♦ ON ♦ OFF ♦ NAV : Dims the screen and button illumination when you turn on the headlights. • The ILLUMI lead connection is played back. : Cancels. Display Scroll ♦ ON ♦ Once : Repeats scrolling. : Scrolls the displayed information once. ♦ OFF : Cancels. • Pressing [ User Customize Change the display design (background and panel color). (☞ page 42) OSD Clock ♦ ON ♦ OFF : Displays the clock while a video source is required. (☞ page...

User Manual
Page 50
... no camera is connected. ♦ NAV : Enables to select "NAV" as the source. System Input Menu item AV Input R-CAM Interrupt NAV I/F Input*1 Only for DDX6033BT/ DDX6033BTM/ DDX4033BT/ DDX4033BTM NAV Mute*2 Navigation *3 Language *1 Selectable setting/item Initial: Underlined You can determine the use of speakers other than the front speakers during...
... no camera is connected. ♦ NAV : Enables to select "NAV" as the source. System Input Menu item AV Input R-CAM Interrupt NAV I/F Input*1 Only for DDX6033BT/ DDX6033BTM/ DDX4033BT/ DDX4033BTM NAV Mute*2 Navigation *3 Language *1 Selectable setting/item Initial: Underlined You can determine the use of speakers other than the front speakers during...