Instruction Manual
Page 2
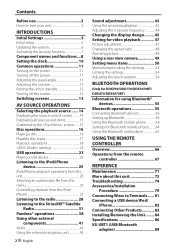
Contents Before use 3 How to reset your unit 3 INTRODUCTIONS Initial Settings 5 Initial setup 5 Updating the system 6 Activating the security function 7 Component names and functions....8 Setting the clock 10 Common operations 11... Setting menu items 50 Memorizing/recalling the settings 54 Locking the settings 54 Adjusting the touch position 54 BLUETOOTH OPERATIONS (Only for DDX790/DDX770/DDX7070BT/ DDX470/DDX4070BT) Information for using Bluetooth® devices 55 Bluetooth operations 55 Connecting Bluetooth devices 56 Setting up Bluetooth 58 Using the Bluetooth mobile phone 59...
Contents Before use 3 How to reset your unit 3 INTRODUCTIONS Initial Settings 5 Initial setup 5 Updating the system 6 Activating the security function 7 Component names and functions....8 Setting the clock 10 Common operations 11... Setting menu items 50 Memorizing/recalling the settings 54 Locking the settings 54 Adjusting the touch position 54 BLUETOOTH OPERATIONS (Only for DDX790/DDX770/DDX7070BT/ DDX470/DDX4070BT) Information for using Bluetooth® devices 55 Bluetooth operations 55 Connecting Bluetooth devices 56 Setting up Bluetooth 58 Using the Bluetooth mobile phone 59...
Instruction Manual
Page 3
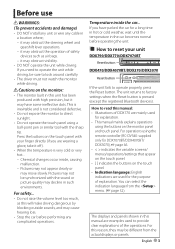
... For safety... • Do not raise the volume level too much, as air bags. - The unit returns to operate properly, press the Reset button. Cautions on the touch panel. • Indication language: English indications are wearing a glove, take it may obstruct the steering wheel and ... the operation of explanation. For this unit has been produced with your unit DDX790/DDX770/DDX7070BT Reset button DDX470/DDX4070BT/DDX370/DDX3070 Reset button If the unit fails to factory settings when the Reset button is very cold or very hot... - Pictures may not appear clearly or may obstruct ...
... For safety... • Do not raise the volume level too much, as air bags. - The unit returns to operate properly, press the Reset button. Cautions on the touch panel. • Indication language: English indications are wearing a glove, take it may obstruct the steering wheel and ... the operation of explanation. For this unit has been produced with your unit DDX790/DDX770/DDX7070BT Reset button DDX470/DDX4070BT/DDX370/DDX3070 Reset button If the unit fails to factory settings when the Reset button is very cold or very hot... - Pictures may not appear clearly or may obstruct ...
Instruction Manual
Page 5
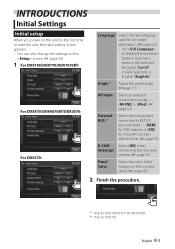
... Initial setup When you power on the unit for the first time or reset the unit, the initial setting screen appears. • You can also change the settings on the screen. (☞ page 50) 1 For DDX790/DDX770/DDX7070BT: For DDX470/DDX4070BT/DDX3070: For DDX370: Language Select the text language used for on...
... Initial setup When you power on the unit for the first time or reset the unit, the initial setting screen appears. • You can also change the settings on the screen. (☞ page 50) 1 For DDX790/DDX770/DDX7070BT: For DDX470/DDX4070BT/DDX3070: For DDX370: Language Select the text language used for on...
Instruction Manual
Page 6
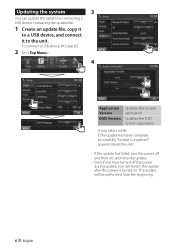
... System application. The update will be performed from the beginning. 6 English If the update has been complete successfully, "Update Completed" appears. It may take a while. Reset the unit. • If the update has failed, turn the power off the power during update, you can update the system by connecting a USB device...
... System application. The update will be performed from the beginning. 6 English If the update has been complete successfully, "Update Completed" appears. It may take a while. Reset the unit. • If the update has failed, turn the power off the power during update, you can update the system by connecting a USB device...
Instruction Manual
Page 8
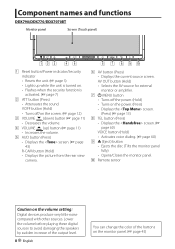
.... p Remote sensor Caution on the monitor panel. (☞ page 45) Component names and functions DDX790/DDX770/DDX7070BT Monitor panel Screen (Touch panel) 1 Reset button/Power indicator/Security indicator • Resets the unit. (☞ page 3) • Lights up ) button (☞ page 11) • Increases the volume. 5 AUD button (Press) • Displays the screen...
.... p Remote sensor Caution on the monitor panel. (☞ page 45) Component names and functions DDX790/DDX770/DDX7070BT Monitor panel Screen (Touch panel) 1 Reset button/Power indicator/Security indicator • Resets the unit. (☞ page 3) • Lights up ) button (☞ page 11) • Increases the volume. 5 AUD button (Press) • Displays the screen...
Instruction Manual
Page 9
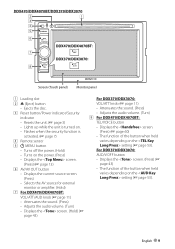
... when held varies depending on the setting (☞ page 53). DDX470/DDX4070BT/DDX370/DDX3070 Screen (Touch panel) Monitor panel 1 Loading slot 2 0 (Eject) button • Ejects the disc. 3 Reset button/Power indicator/Security indicator • Resets the unit. (☞ page 3) • Lights up while ...AV/AV OUT button • Displays the current source screen. (Press) • Selects the AV source for external monitor or amplifier. (Hold) 7 For DDX470/DDX4070BT: VOL/ATT/AUD knob (☞ page 11) • Attenuates the sound. (Press) • Adjusts the audio volume. (Turn) • ...
... when held varies depending on the setting (☞ page 53). DDX470/DDX4070BT/DDX370/DDX3070 Screen (Touch panel) Monitor panel 1 Loading slot 2 0 (Eject) button • Ejects the disc. 3 Reset button/Power indicator/Security indicator • Resets the unit. (☞ page 3) • Lights up while ...AV/AV OUT button • Displays the current source screen. (Press) • Selects the AV source for external monitor or amplifier. (Hold) 7 For DDX470/DDX4070BT: VOL/ATT/AUD knob (☞ page 11) • Attenuates the sound. (Press) • Adjusts the audio volume. (Turn) • ...
Instruction Manual
Page 10
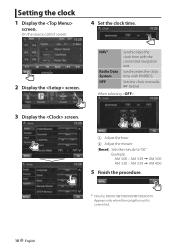
... screen: 4 Set the clock time. 2 Display the screen. Sets the clock manually. (☞ below) When selecting : 3 Display the screen. 1 Adjust the hour 2 Adjust the minute [Reset]: Sets the minute to "00." Example: AM 3:00 - NAV * Radio Data System OFF Synchronizes the clock time with FM RBDS.
... screen: 4 Set the clock time. 2 Display the screen. Sets the clock manually. (☞ below) When selecting : 3 Display the screen. 1 Adjust the hour 2 Adjust the minute [Reset]: Sets the minute to "00." Example: AM 3:00 - NAV * Radio Data System OFF Synchronizes the clock time with FM RBDS.
Instruction Manual
Page 23
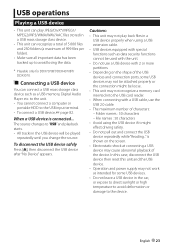
... might effect driving safety. • Do not pull out and connect the USB device repeatedly while "Reading..." In this case, disconnect the USB device then reset this unit and the USB device. • Operation and power supply may cause abnormal playback of the USB devices and connection ports, some USB devices...
... might effect driving safety. • Do not pull out and connect the USB device repeatedly while "Reading..." In this case, disconnect the USB device then reset this unit and the USB device. • Operation and power supply may cause abnormal playback of the USB devices and connection ports, some USB devices...
Instruction Manual
Page 26
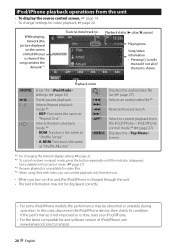
Playback status (3: play/8: pause) Playing time Song/video information • Pressing [ iPod/iPhone playback operations from the unit • To display the source control screen, ☞ page 14. • To change settings for video playback, ☞ page 20. While playing, Artwork (the picture displayed on the screen of iPod/iPhone) is shown if the song contains the Artwork.*1 Track no./total track no.
Playback status (3: play/8: pause) Playing time Song/video information • Pressing [ iPod/iPhone playback operations from the unit • To display the source control screen, ☞ page 14. • To change settings for video playback, ☞ page 20. While playing, Artwork (the picture displayed on the screen of iPod/iPhone) is shown if the song contains the Artwork.*1 Track no./total track no.
Instruction Manual
Page 54
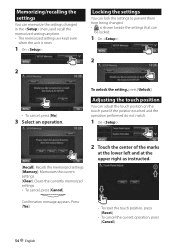
...be locked. 1 On : 2 • To cancel, press [No]. 3 Select an operation. Confirmation message appears. Press [Yes]. • To reset the touch position, press [Reset]. • To cancel the current operation, press [Cancel]. 54 English Memorizing/recalling the settings You can memorize the settings changed in the menu... and recall the memorized settings anytime. • The memorized settings are kept even when the unit is reset. 1 On : 2 Locking the settings You can lock the settings to prevent them from being changed. • is shown beside the...
...be locked. 1 On : 2 • To cancel, press [No]. 3 Select an operation. Confirmation message appears. Press [Yes]. • To reset the touch position, press [Reset]. • To cancel the current operation, press [Cancel]. 54 English Memorizing/recalling the settings You can memorize the settings changed in the menu... and recall the memorized settings anytime. • The memorized settings are kept even when the unit is reset. 1 On : 2 Locking the settings You can lock the settings to prevent them from being changed. • is shown beside the...
Instruction Manual
Page 56
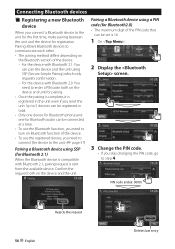
... first time, make pairing between the unit and the device for Bluetooth audio can be connected at a time. • To use the registered device, you reset the unit. Connecting Bluetooth devices Registering a new Bluetooth device When you skip changing the PIN code, go to step 4. PIN code (initial: 0000) Rejects the...
... first time, make pairing between the unit and the device for Bluetooth audio can be connected at a time. • To use the registered device, you reset the unit. Connecting Bluetooth devices Registering a new Bluetooth device When you skip changing the PIN code, go to step 4. PIN code (initial: 0000) Rejects the...

Instruction Manual
Page 74
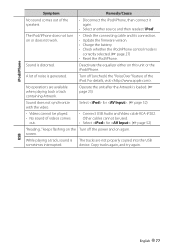
...the unit. • Connect another USB device. "Dial Error" Dialing has failed. Bluetooth (Only for the connections (as well as appropriate, then reset the unit (☞ pages 3 and 81). Connect the registered device. (☞ page 57) "Please Wait..." "No Data" No phonebook data is...No Signal" • Start the playback on the external component connected to the instructions supplied with the adapters used for DDX790/DDX770/DDX7070BT/DDX470/DDX4070BT) Message Remedy/Cause "No BT Dongle" The Bluetooth adapter (KS-UBT1) is registered but the connection has failed. If the...
...the unit. • Connect another USB device. "Dial Error" Dialing has failed. Bluetooth (Only for the connections (as well as appropriate, then reset the unit (☞ pages 3 and 81). Connect the registered device. (☞ page 57) "Please Wait..." "No Data" No phonebook data is...No Signal" • Start the playback on the external component connected to the instructions supplied with the adapters used for DDX790/DDX770/DDX7070BT/DDX470/DDX4070BT) Message Remedy/Cause "No BT Dongle" The Bluetooth adapter (KS-UBT1) is registered but the connection has failed. If the...

Instruction Manual
Page 76
... play. Connect the antenna firmly. • Recordable/Rewritable discs cannot be played back. • Tracks on the screen. (☞ page 12) Reset the unit. (☞ page 3) The remote controller* does not work . Disc cannot be played back. • Record the tracks using other ... is displayed on the appropriate discs. (☞ page 17) • Add appropriate extension codes to [AV-IN]. * For DDX790/DDX770/DDX470/DDX370, purchase KNA-RCDV331 separately. 76 English using a compliant application on the screen. The format of the speakers. Tracks are not played ...
... play. Connect the antenna firmly. • Recordable/Rewritable discs cannot be played back. • Tracks on the screen. (☞ page 12) Reset the unit. (☞ page 3) The remote controller* does not work . Disc cannot be played back. • Record the tracks using other ... is displayed on the appropriate discs. (☞ page 17) • Add appropriate extension codes to [AV-IN]. * For DDX790/DDX770/DDX470/DDX370, purchase KNA-RCDV331 separately. 76 English using a compliant application on the screen. The format of the speakers. Tracks are not played ...
Instruction Manual
Page 77
... comes out of noise is generated. The iPod/iPhone does not turn on again. While playing a track, sound is correctly selected. (☞ page 27) • Reset the iPod/iPhone. Select for . (☞ page 52) • Videos cannot be used. • Select for . (☞ page 52) "Reading..." Deactivate the equalizer either on...
... comes out of noise is generated. The iPod/iPhone does not turn on again. While playing a track, sound is correctly selected. (☞ page 27) • Reset the iPod/iPhone. Select for . (☞ page 52) • Videos cannot be used. • Select for . (☞ page 52) "Reading..." Deactivate the equalizer either on...
Instruction Manual
Page 79
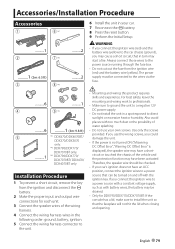
... DC power supply. • Do not install the unit in your car. 7 Reconnect the · battery. 8 Press the reset button. 9 Perform the Initial Setup. WARNING • If you connect the ignition wire (red) and the battery wire (yellow)...heat or humidity. Accessories/Installation Procedure Accessories 1 6 *1 ..........1 ..........2 2 7 *2 ..........1 (2m: 6.5 ft) 3 8 *2 ..........2 ..........6 ..........1 4 9 *3 ..........6 ..........1 (3m: 9.8 ft) 5 *1 DDX470/DDX4070BT/ DDX370/DDX3070 only. *2 DDX790/DDX770/ DDX7070BT only. ..........1 *3 DDX790/DDX770/ DDX7070BT...
... DC power supply. • Do not install the unit in your car. 7 Reconnect the · battery. 8 Press the reset button. 9 Perform the Initial Setup. WARNING • If you connect the ignition wire (red) and the battery wire (yellow)...heat or humidity. Accessories/Installation Procedure Accessories 1 6 *1 ..........1 ..........2 2 7 *2 ..........1 (2m: 6.5 ft) 3 8 *2 ..........2 ..........6 ..........1 4 9 *3 ..........6 ..........1 (3m: 9.8 ft) 5 *1 DDX470/DDX4070BT/ DDX370/DDX3070 only. *2 DDX790/DDX770/ DDX7070BT only. ..........1 *3 DDX790/DDX770/ DDX7070BT...


