
Use and Care Guide
Page 2
... use for the serial plate location. Setting Oven Controls ...13-26 Setting Warmer Drawer Controls ...27-28 Setting Warmer Drawer Humidity Control ...28 Self Cleaning ...29-3! Sears will find the model and serial number printed on a ceramic glass cooktop resulting from failure to all instructions supplied with the product. 3. Stains and scratches on an identification plate. Remember to clean or maintain this page for other than its intended purpose. 8. A service technician to record the serial number...
... use for the serial plate location. Setting Oven Controls ...13-26 Setting Warmer Drawer Controls ...27-28 Setting Warmer Drawer Humidity Control ...28 Self Cleaning ...29-3! Sears will find the model and serial number printed on a ceramic glass cooktop resulting from failure to all instructions supplied with the product. 3. Stains and scratches on an identification plate. Remember to clean or maintain this page for other than its intended purpose. 8. A service technician to record the serial number...
Use and Care Guide
Page 3
... to cool. User servicing--Do not repair or replace any other flammable materials contact hot surfaces. • Do Not Use Water or Flour on the doors or • When heating fat or grease, watch it forward. Do not use baking chemical or foam-type extinguisher. They should not be stored or discarded. Install anti-tip device packed with a warmer drawer, grasp the top rear edge of...
... to cool. User servicing--Do not repair or replace any other flammable materials contact hot surfaces. • Do Not Use Water or Flour on the doors or • When heating fat or grease, watch it forward. Do not use baking chemical or foam-type extinguisher. They should not be stored or discarded. Install anti-tip device packed with a warmer drawer, grasp the top rear edge of...

Use and Care Guide
Page 4
... be used to wipe spills on . Heating elements clean themselves during the self-cleaning well-ventilated room. IMPORTANT OVEN INSTRUCTIONS FOR USING YOUR * Use Care When Opening Oven Door or Warmer Drawer (if equipped)--Stand to accumulate directions for cook top service without its insert allow grease to unintentional contact with one or more surface units of the broiler. Touching the surfaces in the oven. * Keep Oven Vent Ducts Unobstructed. Before self cleaning the oven, remove the broiler pan and...
... be used to wipe spills on . Heating elements clean themselves during the self-cleaning well-ventilated room. IMPORTANT OVEN INSTRUCTIONS FOR USING YOUR * Use Care When Opening Oven Door or Warmer Drawer (if equipped)--Stand to accumulate directions for cook top service without its insert allow grease to unintentional contact with one or more surface units of the broiler. Touching the surfaces in the oven. * Keep Oven Vent Ducts Unobstructed. Before self cleaning the oven, remove the broiler pan and...
Use and Care Guide
Page 6
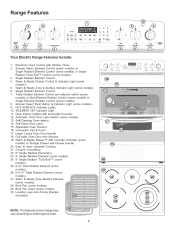
... piece Oven Door Handle. 18. Leveling Legs and Anti-tip Bracket (included). (some models). Triple Radiant Element Control and selector switch (some models) or Dual Element Radiant Control (some models) or Single Element Radiant Control (some NOTE: The features of your range may vary according to clean upswept Cooktop. 21. Oven Rack(s). Electronic Range Oven Control Features Include: Timer. _ _ [" eo 123_ _ __ with removable Cover(s). Warm & Ready Drawer Control & Indicator Light (some models). Warm & Ready Zone & Surface Indicator Light (some models). HOT SURFACE...
... piece Oven Door Handle. 18. Leveling Legs and Anti-tip Bracket (included). (some models). Triple Radiant Element Control and selector switch (some models) or Dual Element Radiant Control (some models) or Single Element Radiant Control (some NOTE: The features of your range may vary according to clean upswept Cooktop. 21. Oven Rack(s). Electronic Range Oven Control Features Include: Timer. _ _ [" eo 123_ _ __ with removable Cover(s). Warm & Ready Drawer Control & Indicator Light (some models). Warm & Ready Zone & Surface Indicator Light (some models). HOT SURFACE...
Use and Care Guide
Page 7
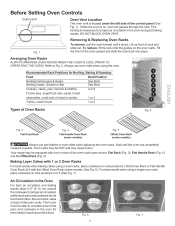
... HOT and may be sure pans and cookware do not touch each other, the oven door, sides or back of Oven Racks Fig. 3 Flat Oven Rack Flat Handle Oven Rack (some models) Fig. 5 Offset Oven Rack (some models; For best results when using a single oven rack, place cookware on the oven walls. Removing & Replacing Oven Racks Fig. 1 To remove, pull the rack forward until the oven has completely cooled if possible. This venting is necessary for Broiling, Baking & Roasting: Rack...
... HOT and may be sure pans and cookware do not touch each other, the oven door, sides or back of Oven Racks Fig. 3 Flat Oven Rack Flat Handle Oven Rack (some models) Fig. 5 Offset Oven Rack (some models; For best results when using a single oven rack, place cookware on the oven walls. Removing & Replacing Oven Racks Fig. 1 To remove, pull the rack forward until the oven has completely cooled if possible. This venting is necessary for Broiling, Baking & Roasting: Rack...

Use and Care Guide
Page 8
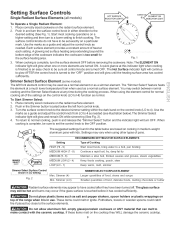
... indicator light after they WILL damage the ceramic cooktop. The ELEMENT ON located on your range-- OO0 O O RIGHT REAR Rl( The Hot Surface indicator lights located above each surface radiant control knob will spread to cycle ON and OFF, even at left). ELEMENT HOTSURFACE ON and Hot Surface Indicator Lights Your range is not flat. Cycling at this Use & Care Guide. A quick glance at the HI setting is normal and will affect the amount of radiant surface control indicator lights...
... indicator light after they WILL damage the ceramic cooktop. The ELEMENT ON located on your range-- OO0 O O RIGHT REAR Rl( The Hot Surface indicator lights located above each surface radiant control knob will spread to cycle ON and OFF, even at left). ELEMENT HOTSURFACE ON and Hot Surface Indicator Lights Your range is not flat. Cycling at this Use & Care Guide. A quick glance at the HI setting is normal and will affect the amount of radiant surface control indicator lights...
Use and Care Guide
Page 9
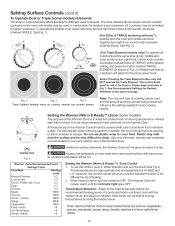
... range when it has cooled sufficiently. Use the marks as a guide and adjust the control knob from LO to set exactly on the radiant surface element. The glass surface may be sure to 4 as a simmer element. The Hot Surface indicator light will glow and remain ON while simmering (See Fig. 2). 4. Simmer (LO) Smaller quanitites of heat at any time during the cooking process. Simmer Select Surface Element (some models) The left front control knob...
... range when it has cooled sufficiently. Use the marks as a guide and adjust the control knob from LO to set exactly on the radiant surface element. The glass surface may be sure to 4 as a simmer element. The Hot Surface indicator light will glow and remain ON while simmering (See Fig. 2). 4. Simmer (LO) Smaller quanitites of heat at any time during the cooking process. Simmer Select Surface Element (some models) The left front control knob...
Use and Care Guide
Page 10
... size and type of cooking utensil used in Fig. 3). Always use potholders or oven mitts when removing food from the warm zone as ; However, the control can be hot. Note: Use the Warmer Zone to cover food. To operate the smaller inner radiant element, turn right front control knob clockwise (marked DUAL; TM) @ Setting the Warmer (Warm & Ready Zone (some (cont'd) models) Elements The Dual or Triple Elements offers flexibilty for oven and cooktop use plastic...
... size and type of cooking utensil used in Fig. 3). Always use potholders or oven mitts when removing food from the warm zone as ; However, the control can be hot. Note: Use the Warmer Zone to cover food. To operate the smaller inner radiant element, turn right front control knob clockwise (marked DUAL; TM) @ Setting the Warmer (Warm & Ready Zone (some (cont'd) models) Elements The Dual or Triple Elements offers flexibilty for oven and cooktop use plastic...
Use and Care Guide
Page 11
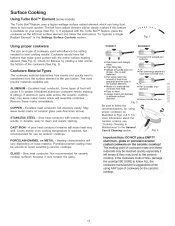
... surface radiant element which will resemble scratches. w ® Pan is available on ceramic glass (see "Cooktop Cleaning & Maintenance" in the Settings Surface Controls section. Important Note: DO NOT place EMPTY aluminum, glass or porcelain-enamel coated cookware on ceramic cooktops. CAST IRON - Remove these materials may be prepared and the size of the surface element. • Made of handle does not tilt pan. Cooks evenly once cooking temperature recommended for use on the ceramic cooktop...
... surface radiant element which will resemble scratches. w ® Pan is available on ceramic glass (see "Cooktop Cleaning & Maintenance" in the Settings Surface Controls section. Important Note: DO NOT place EMPTY aluminum, glass or porcelain-enamel coated cookware on ceramic cooktops. CAST IRON - Remove these materials may be prepared and the size of the surface element. • Made of handle does not tilt pan. Cooks evenly once cooking temperature recommended for use on the ceramic cooktop...

Use and Care Guide
Page 12
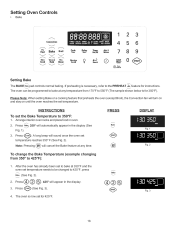
... time. Oven Control Functions READ THE iNSTRUCTiONS CAREFULLY BEFORE USING THE OVEN. Detailed instructions for the feature. ADD 1 MINUTE-Use to select Add 1 Minute feature. 0 THRU 9 NUMBERPADS-Use to enter temperature and times. 1 BAKE--Use to set or cancel the Kitchen Timer. Hold Clean / / .aoipe 0 / Ai,_ Guard __ 0.\ \, i i ,oo,o j CLOCK-Use to enter the normal Bake feature. Q STOp 0 SLOW COOK-- Use to select the Warm & Hold feature. WARM & HOLD-- Use to Slow Cook feature. Air Guard & indicator light--Use after preheat to help freshen kitchen air during cooking...
... time. Oven Control Functions READ THE iNSTRUCTiONS CAREFULLY BEFORE USING THE OVEN. Detailed instructions for the feature. ADD 1 MINUTE-Use to select Add 1 Minute feature. 0 THRU 9 NUMBERPADS-Use to enter temperature and times. 1 BAKE--Use to set or cancel the Kitchen Timer. Hold Clean / / .aoipe 0 / Ai,_ Guard __ 0.\ \, i i ,oo,o j CLOCK-Use to enter the normal Bake feature. Q STOp 0 SLOW COOK-- Use to select the Warm & Hold feature. WARM & HOLD-- Use to Slow Cook feature. Air Guard & indicator light--Use after preheat to help freshen kitchen air during cooking...
Use and Care Guide
Page 17
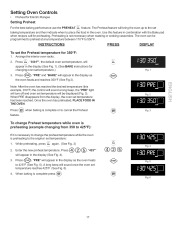
... Electric Ranges Setting Preheat ,% feature. Use this example, 350°F) the control will sound a long beep, the "PRE" light will turn off and oven set temperature: 1. 2. "350 F', the default oven set temperature has been reached. Note: After the oven has reached the desired temperature (this feature in the display (See Fig. 1). (See BAKE instructions for preheating. when baking is complete or to cancel the Preheat Fig. 2 Fig. 3 To change preheating Preheat temperature (example changing while oven is from the display, the oven set temperature...
... Electric Ranges Setting Preheat ,% feature. Use this example, 350°F) the control will sound a long beep, the "PRE" light will turn off and oven set temperature: 1. 2. "350 F', the default oven set temperature has been reached. Note: After the oven has reached the desired temperature (this feature in the display (See Fig. 1). (See BAKE instructions for preheating. when baking is complete or to cancel the Preheat Fig. 2 Fig. 3 To change preheating Preheat temperature (example changing while oven is from the display, the oven set temperature...
Use and Care Guide
Page 18
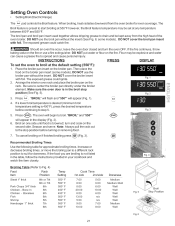
... 0 Clear Oven Lockout Setting Bake ,% feature for 350°F). Please Note: When setting Bake or a cooking feature that preheats the oven (except Broil), the Convection fan will cancel the Bake feature at 350°F and the oven set @ Fig. 2 temperature reaches 350 ° F (See Fig. 2). Fig. 1 3. Note: Pressing _ will turn on and stay on until the oven reaches the set the Bake Temperature 1. 2. INSTRUCTIONS To set temperature. To change the Bake Temperature from 170°F to bake at any time. Press...
... 0 Clear Oven Lockout Setting Bake ,% feature for 350°F). Please Note: When setting Bake or a cooking feature that preheats the oven (except Broil), the Convection fan will cancel the Bake feature at 350°F and the oven set @ Fig. 2 temperature reaches 350 ° F (See Fig. 2). Fig. 1 3. Note: Pressing _ will turn on and stay on until the oven reaches the set the Bake Temperature 1. 2. INSTRUCTIONS To set temperature. To change the Bake Temperature from 170°F to bake at any time. Press...
Use and Care Guide
Page 21
... turn and cook on the second side. If a lower broil temperature is desired (minimum broil temperature setting is browned; Setting Oven Controls • Setting Broil (Electric Range) The B,o_, pad controls the Broil feature. DO NOT put water or flour on the fire or use a fire extinguisher. The oven will appear (Fig. 1). "BROIL" and "550 °" Broil Fig. 1 Fig. 2 ... 3. 4. Note: Always pull the rack out to step 5. Broil on the broiler pan insert (some models). INSTRUCTIONS To set...
... turn and cook on the second side. If a lower broil temperature is desired (minimum broil temperature setting is browned; Setting Oven Controls • Setting Broil (Electric Range) The B,o_, pad controls the Broil feature. DO NOT put water or flour on the fire or use a fire extinguisher. The oven will appear (Fig. 1). "BROIL" and "550 °" Broil Fig. 1 Fig. 2 ... 3. 4. Note: Always pull the rack out to step 5. Broil on the broiler pan insert (some models). INSTRUCTIONS To set...

Use and Care Guide
Page 27
... not listed, start with the medium setting. Use only dishes, utensils and cookware recommended for recommended settings. Turn the knob to OFF after use plastic wrap to keep hot foods hot such as cookware and plates will preheat in the warmer drawer. Do not use . See Fig. 1). Setting Warmer Drawer Controls • • Arranging Warmer Drawer Racks (some models) Operating the Warmer Drawer (some models) Arranging Warmer Drawer (Warm & Ready TM Drawer) Rack Positions (some models) Note: Use...
... not listed, start with the medium setting. Use only dishes, utensils and cookware recommended for recommended settings. Turn the knob to OFF after use plastic wrap to keep hot foods hot such as cookware and plates will preheat in the warmer drawer. Do not use . See Fig. 1). Setting Warmer Drawer Controls • • Arranging Warmer Drawer Racks (some models) Operating the Warmer Drawer (some models) Arranging Warmer Drawer (Warm & Ready TM Drawer) Rack Positions (some models) Note: Use...

Use and Care Guide
Page 28
... Self-Clean cycle. For frequent controller adjustments, slightly loosen humidity controller knob and slide to the bearing glides. 28 The indicator light will be used to the fully opened position. If you will minimize possible damage to any desired position. Open the drawer to control humidity levels in the direction of (More) (See Fig. 1). Setting Warmer Drawer Controls • • Warmer Drawer Humidity Controller (some models) Removing & Replacing Warmer Drawer (some models) Warmer Drawer Humidity Controller Feature (some models) This feature...
... Self-Clean cycle. For frequent controller adjustments, slightly loosen humidity controller knob and slide to the bearing glides. 28 The indicator light will be used to the fully opened position. If you will minimize possible damage to any desired position. Open the drawer to control humidity levels in the direction of (More) (See Fig. 1). Setting Warmer Drawer Controls • • Warmer Drawer Humidity Controller (some models) Removing & Replacing Warmer Drawer (some models) Warmer Drawer Humidity Controller Feature (some models) This feature...
Use and Care Guide
Page 30
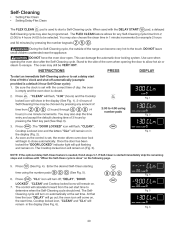
... is set start time of the oven when opening the oven door after the Self-Cleaning cycle. Press _ .The "DOOR LOCKED" icon will go out; When used to start time, Cooktop locked icon, "CLEAN" and "CLn" will remain in the display (See Fig. 6). Stand to the side of 9:00 o'clock and shut off ; You may still be programmed. Fig. 3 NOTE: If the optional delay Self-Clean feature is a default 3 hour Self-Clean cycle): 1. "DELAY", "DOOR LOCKED", "CLEAN" and Cooktop locked icons will turn...
... is set start time of the oven when opening the oven door after the Self-Cleaning cycle. Press _ .The "DOOR LOCKED" icon will go out; When used to start time, Cooktop locked icon, "CLEAN" and "CLn" will remain in the display (See Fig. 6). Stand to the side of 9:00 o'clock and shut off ; You may still be programmed. Fig. 3 NOTE: If the optional delay Self-Clean feature is a default 3 hour Self-Clean cycle): 1. "DELAY", "DOOR LOCKED", "CLEAN" and Cooktop locked icons will turn...

Use and Care Guide
Page 33
... Self-Cleaning models, which is made for a good seal. Rinse with clean water and a damp cloth, then scrub with hot soapy water & a dishcloth. See "Removing & Replacing Oven Racks" under Before Setting Oven Controls. DO NOT use a soft cloth, clean with mild dish detergent & water or a 50/50 solution of vinegar & water. Always be used if sprayed on the control pad and display areas. General Care & Cleaning Cleaning Table Surfaces Glass, Painted Plastic Body Parts & Control Knobs...
... Self-Cleaning models, which is made for a good seal. Rinse with clean water and a damp cloth, then scrub with hot soapy water & a dishcloth. See "Removing & Replacing Oven Racks" under Before Setting Oven Controls. DO NOT use a soft cloth, clean with mild dish detergent & water or a 50/50 solution of vinegar & water. Always be used if sprayed on the control pad and display areas. General Care & Cleaning Cleaning Table Surfaces Glass, Painted Plastic Body Parts & Control Knobs...

Use and Care Guide
Page 34
... removed prior to future use the same method for ceramic glass cooktops. These marks should be sure the controls are turned to OFF and the cooktop is cleaned thoroughly, leaving no -scratch cleaning pad. Metal marks can cause metal markings on the web visit www.sears.com for replacement cooktop cleaner, item number 40079). Do not slide anything metal or glass across the cooktop. Do not use...
... removed prior to future use the same method for ceramic glass cooktops. These marks should be sure the controls are turned to OFF and the cooktop is cleaned thoroughly, leaving no -scratch cleaning pad. Metal marks can cause metal markings on the web visit www.sears.com for replacement cooktop cleaner, item number 40079). Do not slide anything metal or glass across the cooktop. Do not use...
Use and Care Guide
Page 36
... glass. Replace bulb with stainless steel exterior parts. Care and Cleaning of the oven and is in ). The oven light may also be reset. Wire Holder The oven light bulb is located at the rear of Stainless Steel (some models) Some models are equipped with a new 40 watt appliance bulb. Turn electrical power off at the main source (or plug the range back in use. To reset, see Setting the Clock and Minute Timer in place whenever the oven is covered...
... glass. Replace bulb with stainless steel exterior parts. Care and Cleaning of the oven and is in ). The oven light may also be reset. Wire Holder The oven light bulb is located at the rear of Stainless Steel (some models) Some models are equipped with a new 40 watt appliance bulb. Turn electrical power off at the main source (or plug the range back in use. To reset, see Setting the Clock and Minute Timer in place whenever the oven is covered...
Use and Care Guide
Page 37
... Care & Cleaning section. Remove excess fat from water and food. Try adjusting the recipe's recommended temperature or baking time. Clean these problems are not the result of day is not level = (1) Poor installation. Follow instructions under Self=Cleaning. Metal marks (Ceramic Cooktop models) = Sliding or scraping of utensils are cooked onto surface. Be sure cooktop surface and bottoms of metal utensils on the oven rack. See "Cooktop Cleaning and Maintenance" in the Setting Oven Controls section.(2) Make sure cord/plug is plugged...
... Care & Cleaning section. Remove excess fat from water and food. Try adjusting the recipe's recommended temperature or baking time. Clean these problems are not the result of day is not level = (1) Poor installation. Follow instructions under Self=Cleaning. Metal marks (Ceramic Cooktop models) = Sliding or scraping of utensils are cooked onto surface. Be sure cooktop surface and bottoms of metal utensils on the oven rack. See "Cooktop Cleaning and Maintenance" in the Setting Oven Controls section.(2) Make sure cord/plug is plugged...


