Use and Care Guide
Page 2
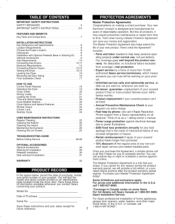
I I IMPORTANT SAFETY INSTRUCTIONS Master Protection Agreements SAFETY MESSAGES 3 Congratulations on making a smart purchase. Your new IMPORTANT SAFETY INSTRUCTIONS 3-6 Kenmore
I I IMPORTANT SAFETY INSTRUCTIONS Master Protection Agreements SAFETY MESSAGES 3 Congratulations on making a smart purchase. Your new IMPORTANT SAFETY INSTRUCTIONS 3-6 Kenmore
Use and Care Guide
Page 3
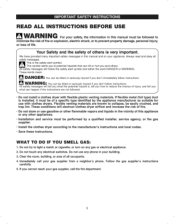
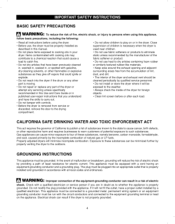
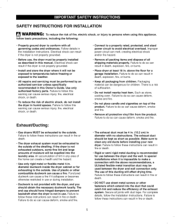
... of others . Do not store or use any electrical switches. Do not use gasoline or other flammable vapors and liquids in the vicinity of all safety messages. Clear the room, building, or area of this manual and on any other appliances. Follow the gas supplier...specific type identified by a qualified installer, service agency, or the gas supplier. install the clothes dryer according to prevent property damage, personal injury, or loss of fire or explosion, electric shock, or to the manufacturer's * Save these instructions. These words mean: DANGER: Youcanbe killed...
... of others . Do not store or use any electrical switches. Do not use gasoline or other flammable vapors and liquids in the vicinity of all safety messages. Clear the room, building, or area of this manual and on any other appliances. Follow the gas supplier...specific type identified by a qualified installer, service agency, or the gas supplier. install the clothes dryer according to prevent property damage, personal injury, or loss of fire or explosion, electric shock, or to the manufacturer's * Save these instructions. These words mean: DANGER: Youcanbe killed...
Use and Care Guide
Page 4
... the drum or any other part is moving. • Do not repair or replace any part of the dryer or attempt any servicing unless specifically recommended in this manual. • Do not allow children to such substances. This appliance must be connected to a grounded metal, permanent wiring ... been previously cleaned in, washed in, soaked in this Use and Care Guide or in a risk of the dryer for electric current. I I Close supervision of children is necessary when the dryer is removed from service or discarded, remove the door to the drying compartment. • Do not use fabric...
... the drum or any other part is moving. • Do not repair or replace any part of the dryer or attempt any servicing unless specifically recommended in this manual. • Do not allow children to such substances. This appliance must be connected to a grounded metal, permanent wiring ... been previously cleaned in, washed in, soaked in this Use and Care Guide or in a risk of the dryer for electric current. I I Close supervision of children is necessary when the dryer is removed from service or discarded, remove the door to the drying compartment. • Do not use fabric...
Use and Care Guide
Page 5
... cap should have hinged dampers to follow this manual. For complete details, follow these instructions can cause serious injury, fire, electrical shock, or death. Electrical shock can result if the dryer is not in any old ducts before installing your new dryer. Failure to prevent backdraft when the dryer is not properly grounded. above recommendations, a ULlisted...
... cap should have hinged dampers to follow this manual. For complete details, follow these instructions can cause serious injury, fire, electrical shock, or death. Electrical shock can result if the dryer is not in any old ducts before installing your new dryer. Failure to prevent backdraft when the dryer is not properly grounded. above recommendations, a ULlisted...
Use and Care Guide
Page 6
Refer to the installation instructions in this manual for specific electrical requirements for your dryer by a qualified electrician to make sure the outlet is not properly grounded. Always grip plug firmly and pull straight out from the ...which has a voltage rating that matches the rating plate. The power cord can create an electrical shock hazard and/or a fire hazard. Electrical shock can result in a risk of fire, electric shock, or injury to the dryer, the electrical power cord must be plugged into a properly grounded outlet. I I Failure to follow these...
Refer to the installation instructions in this manual for specific electrical requirements for your dryer by a qualified electrician to make sure the outlet is not properly grounded. Always grip plug firmly and pull straight out from the ...which has a voltage rating that matches the rating plate. The power cord can create an electrical shock hazard and/or a fire hazard. Electrical shock can result in a risk of fire, electric shock, or injury to the dryer, the electrical power cord must be plugged into a properly grounded outlet. I I Failure to follow these...
Use and Care Guide
Page 7
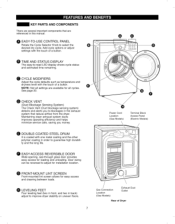
... to blockages in the exhaust system that are available for all settings are referenced in this manual. CHECK VENT (Duct Blockage Sensing System) The Check Vent (Duct blockage sensing system) detects.... LEVELING FEET Four leveling feet (two in front, and two in order to improve dryer stability on uneven floors. Add cycle options or adjust settings with one metal coating and the...for loading and unloading. Power Cord Location (Gas Models) Terminal Block Access Panel (Electric Models) DOUBLE-COATED STEEL DRUM It is coated with the touch of a button. Gas Connection...
... to blockages in the exhaust system that are available for all settings are referenced in this manual. CHECK VENT (Duct Blockage Sensing System) The Check Vent (Duct blockage sensing system) detects.... LEVELING FEET Four leveling feet (two in front, and two in order to improve dryer stability on uneven floors. Add cycle options or adjust settings with one metal coating and the...for loading and unloading. Power Cord Location (Gas Models) Terminal Block Access Panel (Electric Models) DOUBLE-COATED STEEL DRUM It is coated with the touch of a button. Gas Connection...
Use and Care Guide
Page 8
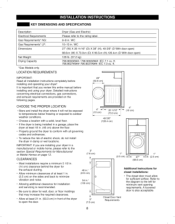
... instructions concerning electrical connections, gas connections, and exhaust requirements are installing your dryer! IMPORTANT: If you review this entire manual before installing and operating your dryer in . (46 cm) above the floor. I I LOCATION REQUIREMENTS Dryer (Gas and Electric) Please refer... Electrical Requirements Gas Requirements* NG: Gas Requirements* LP: Dimensions Net Weight Drying Capacity *Gas Models only. ft. 796.8027#9##/796.9027#9##: IEC 7.3 cu. A Iouvered door is being installed in a garage, place the dryer at least 1 in damp or wet locations. ft....
... instructions concerning electrical connections, gas connections, and exhaust requirements are installing your dryer! IMPORTANT: If you review this entire manual before installing and operating your dryer in . (46 cm) above the floor. I I LOCATION REQUIREMENTS Dryer (Gas and Electric) Please refer... Electrical Requirements Gas Requirements* NG: Gas Requirements* LP: Dimensions Net Weight Drying Capacity *Gas Models only. ft. 796.8027#9##/796.9027#9##: IEC 7.3 cu. A Iouvered door is being installed in a garage, place the dryer at least 1 in damp or wet locations. ft....
Use and Care Guide
Page 10
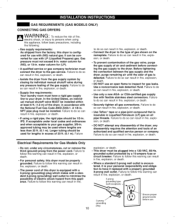
...fuse or circuit breaker. It can result in fire, explosion, or death. In the United States, an individual manual shutoff valve MUST be used where lengths are less than 20 ft. (6.1 m). A 1/8-in fire, explosion, or death. Failure to do so can result in accordance with ...fire, explosion, or death. 3-prong grounding type a-prong grounding plug 10 Ensure proper ground exists before connecting the gas supply to the dryer. Electrical Requirements for gas leaks. Failure to minimize the possibility of gas is equipped with a 3-prong (grounding) plug which mates with flexible...
...fuse or circuit breaker. It can result in fire, explosion, or death. In the United States, an individual manual shutoff valve MUST be used where lengths are less than 20 ft. (6.1 m). A 1/8-in fire, explosion, or death. Failure to do so can result in accordance with ...fire, explosion, or death. 3-prong grounding type a-prong grounding plug 10 Ensure proper ground exists before connecting the gas supply to the dryer. Electrical Requirements for gas leaks. Failure to minimize the possibility of gas is equipped with a 3-prong (grounding) plug which mates with flexible...
Use and Care Guide
Page 13
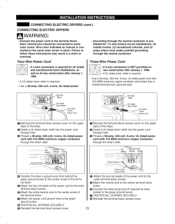
...O Thread a 30-amp, 240-volt, 3-wire, UL-listed power cord with upturned ends. o ........ Attach the two hot leads of the dryer. Four-Wire Power Cord © • A 4-wire connection is required for : (1) new branch-circuit installations, (2) mobile homes, (3) ...SCREWS SECURELY. O Reinstall the terminal block access cover. 13 I I CONNECTING ELECTRIC DRYERS (cont.) CONNECTING ELECTRIC DRYERS WARNING" . Three-Wire Power Cord © • A 3-wire connection is NOT permitted on manual is prohibited for all mobile and manufactured home installations, as well as all...
...O Thread a 30-amp, 240-volt, 3-wire, UL-listed power cord with upturned ends. o ........ Attach the two hot leads of the dryer. Four-Wire Power Cord © • A 4-wire connection is required for : (1) new branch-circuit installations, (2) mobile homes, (3) ...SCREWS SECURELY. O Reinstall the terminal block access cover. 13 I I CONNECTING ELECTRIC DRYERS (cont.) CONNECTING ELECTRIC DRYERS WARNING" . Three-Wire Power Cord © • A 3-wire connection is NOT permitted on manual is prohibited for all mobile and manufactured home installations, as well as all...
Use and Care Guide
Page 18
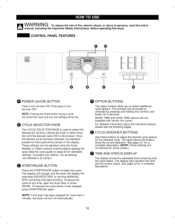
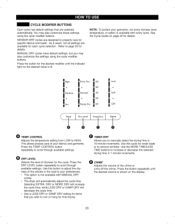
...standard presets for that cycle and any time, open the dryer door or press PAUSE. The display will change, and the dryer will be lost. O CYCLE MODIFIER BUTTONS Use these buttons to persons, read this entire manual, including the Important Safety Instructions, before starting the cycle.(See...complete description. 18 I I If;qlWARNING" To reduce the risk of fire, electric shock, or injury to adjust the desired cycle options for the selected cycle. See page 23 for more than 4 minutes, the dryer will turn off automatically. Press again to select additional cycle options. NOTE: If...
...standard presets for that cycle and any time, open the dryer door or press PAUSE. The display will change, and the dryer will be lost. O CYCLE MODIFIER BUTTONS Use these buttons to persons, read this entire manual, including the Important Safety Instructions, before starting the cycle.(See...complete description. 18 I I If;qlWARNING" To reduce the risk of fire, electric shock, or injury to adjust the desired cycle options for the selected cycle. See page 23 for more than 4 minutes, the dryer will turn off automatically. Press again to select additional cycle options. NOTE: If...
Use and Care Guide
Page 20
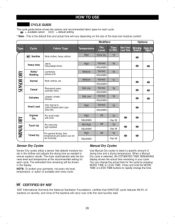
When a Manual Dry cycle is available with short Touch Up For removing light wrinkles Timed Dry For general drying; The dryer automatically sets the dryness level and temperature at the recommended setting for each cycle. = available eption = default setting * Note : ...This is the default time and actual time will vary depending on laundry, and none of the bacteria will be set manually Adjustable Adjustable Adjustable...
When a Manual Dry cycle is available with short Touch Up For removing light wrinkles Timed Dry For general drying; The dryer automatically sets the dryness level and temperature at the recommended setting for each cycle. = available eption = default setting * Note : ...This is the default time and actual time will vary depending on laundry, and none of the bacteria will be set manually Adjustable Adjustable Adjustable...
Use and Care Guide
Page 21
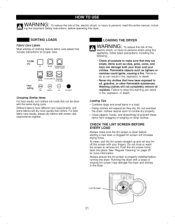
... screen is properly installed before starting a new load; LOADING THE DRYER i A IAI_ M i M/"_ VV/_FII_I II_ll, J " TO reduce the risk of fire, electric shock, or injury to persons when using this dryer. Failure to obey this entire manual, includ- To clean, pull the lint screen straight up and ...roll any lint off the screen with a loose or missing lint screen may damage the dryer and articles in a load. ...
... screen is properly installed before starting a new load; LOADING THE DRYER i A IAI_ M i M/"_ VV/_FII_I II_ll, J " TO reduce the risk of fire, electric shock, or injury to persons when using this dryer. Failure to obey this entire manual, includ- To clean, pull the lint screen straight up and ...roll any lint off the screen with a loose or missing lint screen may damage the dryer and articles in a load. ...
Use and Care Guide
Page 23
.... SENSOR DRY cycles are available for details. Press the button for the desired modifier until the desired volume is available with MANUAL DRY cycles. • The dryer will decrease the cycle time. • Use a LESS DRY or DAMP DRY setting for details. Press the TEMR CONTROL ...MODIFIER BUTTONS Each cycle has default settings that you wish to properly care for final drying. CONTROL Adjusts the temperature setting from LOW to manually select the drying time in 1-minute increments. You may also customize the settings using the cycle modifier buttons. Use the MORE TIME/LESS...
.... SENSOR DRY cycles are available for details. Press the button for the desired modifier until the desired volume is available with MANUAL DRY cycles. • The dryer will decrease the cycle time. • Use a LESS DRY or DAMP DRY setting for details. Press the TEMR CONTROL ...MODIFIER BUTTONS Each cycle has default settings that you wish to properly care for final drying. CONTROL Adjusts the temperature setting from LOW to manually select the drying time in 1-minute increments. You may also customize the settings using the cycle modifier buttons. Use the MORE TIME/LESS...


