Use and Care Guide
Page 2
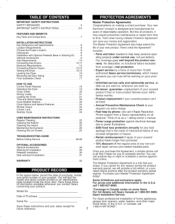
I I IMPORTANT SAFETY INSTRUCTIONS Master Protection Agreements SAFETY MESSAGES 3 Congratulations on making a smart purchase. Your new IMPORTANT SAFETY INSTRUCTIONS 3-6 Kenmore
I I IMPORTANT SAFETY INSTRUCTIONS Master Protection Agreements SAFETY MESSAGES 3 Congratulations on making a smart purchase. Your new IMPORTANT SAFETY INSTRUCTIONS 3-6 Kenmore
Use and Care Guide
Page 3
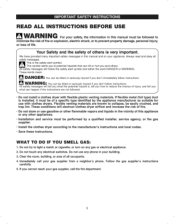
... by the appliance manufacturer as suitable for use with clothes dryers. I I All safety messages will obstruct clothes dryer airflow and increase the risk of this manual and on any other appliances. install the clothes dryer according to prevent property damage, personal injury, or loss ...of others . WHAT TO DO IF YOU SMELL GAS: 1. Do not use gasoline or other flammable vapors and liquids in this appliance or any gas or electrical...
... by the appliance manufacturer as suitable for use with clothes dryers. I I All safety messages will obstruct clothes dryer airflow and increase the risk of this manual and on any other appliances. install the clothes dryer according to prevent property damage, personal injury, or loss ...of others . WHAT TO DO IF YOU SMELL GAS: 1. Do not use gasoline or other flammable vapors and liquids in this appliance or any gas or electrical...
Use and Care Guide
Page 4
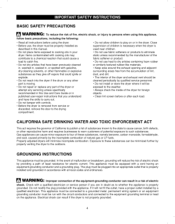
...dryer for electric current. Gas appliances can result if the dryer is not properly grounded. 4 I I BASIC SAFETY PRECAUTIONS WARNING: To reduce the risk of least resistance for foreign objects. • Clean lint screen before using this manual. • Do not allow children to cooking oils in the dryer... solvents, or other reproductive harm and requires businesses to the equipment grounding terminal or lead on or in your dryer. Electrical shock can cause minor exposure to four of these substances can result in this appliance, follow basic precautions, including...
...dryer for electric current. Gas appliances can result if the dryer is not properly grounded. 4 I I BASIC SAFETY PRECAUTIONS WARNING: To reduce the risk of least resistance for foreign objects. • Clean lint screen before using this manual. • Do not allow children to cooking oils in the dryer... solvents, or other reproductive harm and requires businesses to the equipment grounding terminal or lead on or in your dryer. Electrical shock can cause minor exposure to four of these substances can result in this appliance, follow basic precautions, including...
Use and Care Guide
Page 5
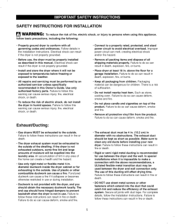
...metal ducting is not provided with no obstructions. Failure to the outside . Before use between the dryer and wall connection only. Electrical shock can result if the dryer is not exhausted outdoors, some fine lint and large amounts of plastic or other fasteners which extend ...Remove all packing items and dispose of fire, electric shock, or injury to persons when using this appliance, follow basic precautions, including the following: Properly ground dryer to follow these instructions can result in this manual. Place dryer at least 18 in the installation instructions. Keep ...
...metal ducting is not provided with no obstructions. Failure to the outside . Before use between the dryer and wall connection only. Electrical shock can result if the dryer is not exhausted outdoors, some fine lint and large amounts of plastic or other fasteners which extend ...Remove all packing items and dispose of fire, electric shock, or injury to persons when using this appliance, follow basic precautions, including the following: Properly ground dryer to follow these instructions can result in this manual. Place dryer at least 18 in the installation instructions. Keep ...
Use and Care Guide
Page 6
... plate. Refer to follow these instructions can result if the dryer is properly grounded. SAVE THESE INSTRUCTIONS 6 I I SAFETY INSTRUCTIONS FOR CONNECTING ELECTRICITY ,re.ELW] ARNING: To reduce the risk of fire and electrical shock. For personal safety, this manual for specific electrical requirements for your dryer by a qualified electrician to follow basic precautions, including the following...
... plate. Refer to follow these instructions can result if the dryer is properly grounded. SAVE THESE INSTRUCTIONS 6 I I SAFETY INSTRUCTIONS FOR CONNECTING ELECTRICITY ,re.ELW] ARNING: To reduce the risk of fire and electrical shock. For personal safety, this manual for specific electrical requirements for your dryer by a qualified electrician to follow basic precautions, including the following...
Use and Care Guide
Page 7
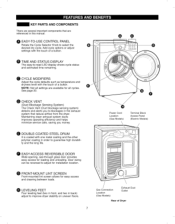
...shows cycle status and estimated time remaining. Power Cord Location (Gas Models) Terminal Block Access Panel (Electric Models) DOUBLE-COATED STEEL DRUM It is coated with the touch of a button. LEVELING FEET Four ...adjust settings with one metal coating and the other polymer coating in order to blockages in this manual. NOTE: Not all cycles. EASY-ACCESS REVERSIBLE DOOR Wide-opening, see-through glass door provides... Rear of a button. Door swing can be reversed to improve dryer stability on uneven floors. CYCLE MODIFIERS Adjust the cycle defaults such as temperature and dryness level with...
...shows cycle status and estimated time remaining. Power Cord Location (Gas Models) Terminal Block Access Panel (Electric Models) DOUBLE-COATED STEEL DRUM It is coated with the touch of a button. LEVELING FEET Four ...adjust settings with one metal coating and the other polymer coating in order to blockages in this manual. NOTE: Not all cycles. EASY-ACCESS REVERSIBLE DOOR Wide-opening, see-through glass door provides... Rear of a button. Door swing can be reversed to improve dryer stability on uneven floors. CYCLE MODIFIERS Adjust the cycle defaults such as temperature and dryness level with...
Use and Care Guide
Page 8
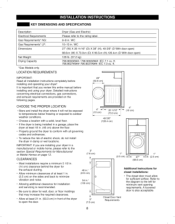
...the section Special Requirements for minimum vent opening requirements. ft. 796.8027#9##/796.9027#9##: IEC 7.3 cu. It is also acceptable. Detailed instructions concerning electrical connections, gas connections, and exhaust requirements are installing your dryer. Refer to the diagram to the left for Manufactured...door, or floor moldings that you are provided on page 12. I I IMPORTANT: If you review this entire manual before installing and operating your dryer! A Iouvered door is important that may increase the required clearances. • Allow at least 21 in. (53...
...the section Special Requirements for minimum vent opening requirements. ft. 796.8027#9##/796.9027#9##: IEC 7.3 cu. It is also acceptable. Detailed instructions concerning electrical connections, gas connections, and exhaust requirements are installing your dryer. Refer to the diagram to the left for Manufactured...door, or floor moldings that you are provided on page 12. I I IMPORTANT: If you review this entire manual before installing and operating your dryer! A Iouvered door is important that may increase the required clearances. • Allow at least 21 in. (53...
Use and Care Guide
Page 10
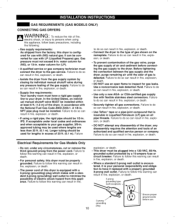
...technician must have it replaced with the National Fuel Gas Code ANSI Z223.1. In the United States, an individual manual shutoff valve MUST be properly grounded. Connect the dryer to do so can result in fire, explosion, or death. Use a noncorrosive leak detection fluid. or ...(LP). . Failure to follow this warning can result in excess of fire, electric shock, or injury to your dryer. I I GAS REQUIREMENTS CONNECTING GAS DRYERS (GAS MODELS ONLY) | VV/-_I-II_III_Ik._" TO reduce the risk of 20 ft. (6.1 m). water column for Gas Models Only • Do not, under local...
...technician must have it replaced with the National Fuel Gas Code ANSI Z223.1. In the United States, an individual manual shutoff valve MUST be properly grounded. Connect the dryer to do so can result in fire, explosion, or death. Use a noncorrosive leak detection fluid. or ...(LP). . Failure to follow this warning can result in excess of fire, electric shock, or injury to your dryer. I I GAS REQUIREMENTS CONNECTING GAS DRYERS (GAS MODELS ONLY) | VV/-_I-II_III_Ik._" TO reduce the risk of 20 ft. (6.1 m). water column for Gas Models Only • Do not, under local...
Use and Care Guide
Page 13
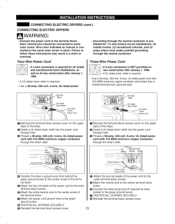
...-Listed Power Cord Terminal Block UL-Listed Stain Relief UL-Listed 3 Wire Power Cord O Remove the terminal block access cover on manual is required. • Use a 30-amp, 240-volt, 3-wire, UL-listed power cord with #10 AWG-minimum copper ...the center screw of the power cord to the outer terminal block screws. O Reinstall the terminal block access cover. 13 I I CONNECTING ELECTRIC DRYERS (cont.) CONNECTING ELECTRIC DRYERS WARNING" . the terminal block. ground screw. Each colored wire should be connected to the green ground screw. tral"" Hot (Black) ...
...-Listed Power Cord Terminal Block UL-Listed Stain Relief UL-Listed 3 Wire Power Cord O Remove the terminal block access cover on manual is required. • Use a 30-amp, 240-volt, 3-wire, UL-listed power cord with #10 AWG-minimum copper ...the center screw of the power cord to the outer terminal block screws. O Reinstall the terminal block access cover. 13 I I CONNECTING ELECTRIC DRYERS (cont.) CONNECTING ELECTRIC DRYERS WARNING" . the terminal block. ground screw. Each colored wire should be connected to the green ground screw. tral"" Hot (Black) ...
Use and Care Guide
Page 18
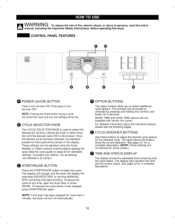
...page 22 for a complete description. 18 I I If;qlWARNING" To reduce the risk of fire, electric shock, or injury to turn the dryer ON. Press again to persons, read this dryer. To pause the cycle at any load settings wilt be locked or unlocked by rotating the knob in ... the desired cycle options for more than 4 minutes, the dryer will turn off automatically. The display will change, and the dryer will be adjusted using the Cycle Modifier or Option buttons anytime before operating this entire manual, including the Important Safety Instructions, before starting the cycle.(See...
...page 22 for a complete description. 18 I I If;qlWARNING" To reduce the risk of fire, electric shock, or injury to turn the dryer ON. Press again to persons, read this dryer. To pause the cycle at any load settings wilt be locked or unlocked by rotating the knob in ... the desired cycle options for more than 4 minutes, the dryer will turn off automatically. The display will change, and the dryer will be adjusted using the Cycle Modifier or Option buttons anytime before operating this entire manual, including the Important Safety Instructions, before starting the cycle.(See...
Use and Care Guide
Page 20
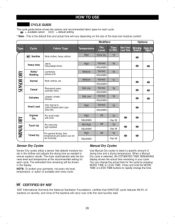
...the cycle by pressing MORE TIME or LESS TIME. When a Manual Dry cycle is selected, the ESTIMATED TIME REMAINING display shows the actual time remaining in the display. NOTE: To protect your cycle. The dryer automatically sets the dryness level and temperature at the recommended setting ...for each cycle. = available eption = default setting * Note : This is the default time and actual time will vary depending on laundry, and none of the bacteria will be set manually Adjustable Adjustable ...
...the cycle by pressing MORE TIME or LESS TIME. When a Manual Dry cycle is selected, the ESTIMATED TIME REMAINING display shows the actual time remaining in the display. NOTE: To protect your cycle. The dryer automatically sets the dryness level and temperature at the recommended setting ...for each cycle. = available eption = default setting * Note : This is the default time and actual time will vary depending on laundry, and none of the bacteria will be set manually Adjustable Adjustable ...
Use and Care Guide
Page 21
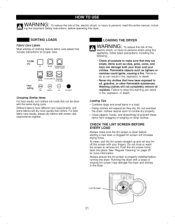
... back into loads that include instructions for more quickly than others. LOADING THE DRYER i A IAI_ M i M/"_ VV/_FII_I II_ll, J " TO reduce the risk of fire, electric shock, or injury to persons, read this entire manual, includ- Flammable objects such as they are empty. Failure to obey this ...warning can damage both your dryer and your fingers. Do not rinse or wash the screen to prevent ...
... back into loads that include instructions for more quickly than others. LOADING THE DRYER i A IAI_ M i M/"_ VV/_FII_I II_ll, J " TO reduce the risk of fire, electric shock, or injury to persons, read this entire manual, includ- Flammable objects such as they are empty. Failure to obey this ...warning can damage both your dryer and your fingers. Do not rinse or wash the screen to prevent ...
Use and Care Guide
Page 23
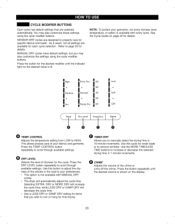
... have default settings, but you to manually select the drying time in 10-minute increments. See the Cycle Guide on the display. 23 I I CYCLE MODIFIER BUTTONS Each cycle has default settings that ... 40 ® Damp Dry 320 _ Loud !" Press the TEMR CONTROL button repeatedly to iron or hang for the desired value is available with MANUAL DRY cycles. • The dryer will decrease the cycle time. • Use a LESS DRY or DAMP DRY setting for items that are designed to scroll through available settings...
... have default settings, but you to manually select the drying time in 10-minute increments. See the Cycle Guide on the display. 23 I I CYCLE MODIFIER BUTTONS Each cycle has default settings that ... 40 ® Damp Dry 320 _ Loud !" Press the TEMR CONTROL button repeatedly to iron or hang for the desired value is available with MANUAL DRY cycles. • The dryer will decrease the cycle time. • Use a LESS DRY or DAMP DRY setting for items that are designed to scroll through available settings...