Use and Care Guide
Page 2
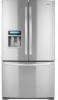
... Dispenser 19 Refrigerator Shelves 20 Bottle Holder (Option) 20 Humidity Controlled Crisper 21 Removing Humidity Controlled Crisper 21 Glide'N'Serve 21 Modular Door Bin 21 Dairy Bin 21 P,- Freezer Section Tilting Door 22 Tilt-Out Door Basket 22 ... Safety Instructions 5-6 Grounding Requirements 6 Parts And Features 7 Refrigerator Installation Unpacking Your Refrigerator Installation 8-15 8 8 Removing And Replacing Your Refrigerator Handles And Doors Leveling And Door Alignment Base Cover 9-14 15 15 Using Your Refrigerator Setting The Controls Ensuring Proper Air ...
... Dispenser 19 Refrigerator Shelves 20 Bottle Holder (Option) 20 Humidity Controlled Crisper 21 Removing Humidity Controlled Crisper 21 Glide'N'Serve 21 Modular Door Bin 21 Dairy Bin 21 P,- Freezer Section Tilting Door 22 Tilt-Out Door Basket 22 ... Safety Instructions 5-6 Grounding Requirements 6 Parts And Features 7 Refrigerator Installation Unpacking Your Refrigerator Installation 8-15 8 8 Removing And Replacing Your Refrigerator Handles And Doors Leveling And Door Alignment Base Cover 9-14 15 15 Using Your Refrigerator Setting The Controls Ensuring Proper Air ...
Use and Care Guide
Page 3
Disclaimer of parts or systems resulting from unauthorized modifications made to state. This warranty applies only while this appliance is ever used in the United States or Canada. .... 6. This warranty covers only defects in material and workmanship. Damage to arrange for free repair. Sears shall not be product repair as provided herein. BOTTOM FREEZER REFRIGERATOR WARRANTY ® f Kenmore Elite Limited Warranty When installed, operated and maintained according to all instructions supplied with the product, if this appliance fails due to a defect in material...
Disclaimer of parts or systems resulting from unauthorized modifications made to state. This warranty applies only while this appliance is ever used in the United States or Canada. .... 6. This warranty covers only defects in material and workmanship. Damage to arrange for free repair. Sears shall not be product repair as provided herein. BOTTOM FREEZER REFRIGERATOR WARRANTY ® f Kenmore Elite Limited Warranty When installed, operated and maintained according to all instructions supplied with the product, if this appliance fails due to a defect in material...
Use and Care Guide
Page 4
... sales receipt for any non-covered repair service and related installed parts. Date of information available whenever you want us. Your new Kenmore ® product is the result of mechanical failure of any covered refrigerator or freezer. 1_ Rental reimbursement if repair of us as you want us...as a "talking owner's manual." Think of your product. Power surge protection against electrical damage due to help by a force of the refrigerator compartment. In the space below, record the date of purchase, model and serial number of any reason during the product warranty period, we...
... sales receipt for any non-covered repair service and related installed parts. Date of information available whenever you want us. Your new Kenmore ® product is the result of mechanical failure of any covered refrigerator or freezer. 1_ Rental reimbursement if repair of us as you want us...as a "talking owner's manual." Think of your product. Power surge protection against electrical damage due to help by a force of the refrigerator compartment. In the space below, record the date of purchase, model and serial number of any reason during the product warranty period, we...
Use and Care Guide
Page 5
... light circuit. •When you are finished, reconnect the refrigerator to the electrical source and reset the controls. (Thermostat, Refrigerator Control, and or Freezer Control, depending on the model) to the desired setting. •This refrigerator must be eaten. Always grip the plug firmly and pull ... cause electric shock or fire. •When moving parts of many important safety messages. It alerts you to safety messages that inform you or others, or cause damage to the product. It could damage the refrigerator and seriously injure themselves. • Keep fingers out...
... light circuit. •When you are finished, reconnect the refrigerator to the electrical source and reset the controls. (Thermostat, Refrigerator Control, and or Freezer Control, depending on the model) to the desired setting. •This refrigerator must be eaten. Always grip the plug firmly and pull ... cause electric shock or fire. •When moving parts of many important safety messages. It alerts you to safety messages that inform you or others, or cause damage to the product. It could damage the refrigerator and seriously injure themselves. • Keep fingers out...
Use and Care Guide
Page 7
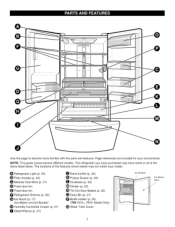
0 Use this page to become more familiar with the parts and features. The refrigerator you have purchased may not match your convenience. The locations of the items listed below may have some or all of the ... several different models. Page references are included for your model. 0 Refrigerator Light (p. 25) Filter (Inside) (p. 24) Modular Door Bins (p. 21) _) Fixed door bin Fixed door bin Refrigerator Shelves (p. 20) (_ Ice Room (p. 17) (Ice Maker and Ice Bucket) _D Humidity Controlled Crisper (p. 21) _[_ Glide'N'Serve (p. 21) Extra Ice Bin (p. 22) Pullout Drawer (p. 23) Durabase ...
0 Use this page to become more familiar with the parts and features. The refrigerator you have purchased may not match your convenience. The locations of the items listed below may have some or all of the ... several different models. Page references are included for your model. 0 Refrigerator Light (p. 25) Filter (Inside) (p. 24) Modular Door Bins (p. 21) _) Fixed door bin Fixed door bin Refrigerator Shelves (p. 20) (_ Ice Room (p. 17) (Ice Maker and Ice Bucket) _D Humidity Controlled Crisper (p. 21) _[_ Glide'N'Serve (p. 21) Extra Ice Bin (p. 22) Pullout Drawer (p. 23) Durabase ...
Use and Care Guide
Page 17
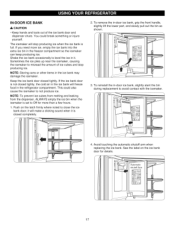
...ice bank may damage the icemaker. Shake the ice bank occasionally to level the ice in the refrigerator compartment. Keep the ice bank door closed tightly, the cold air in the ice bank will ... See the label on the latch firmly where noted to not produce ice. To reinstall the in the freezer compartment so the icemaker can keep producing ice. The icemaker will make a clicking sound when it . NOTE...: Storing cans or other items in -door ice bank, grip the front handle, slightly lift the lower part, and slowly pull out the bin as shown. 3. Push on the ice bank door for more ice,...
...ice bank may damage the icemaker. Shake the ice bank occasionally to level the ice in the refrigerator compartment. Keep the ice bank door closed tightly, the cold air in the ice bank will ... See the label on the latch firmly where noted to not produce ice. To reinstall the in the freezer compartment so the icemaker can keep producing ice. The icemaker will make a clicking sound when it . NOTE...: Storing cans or other items in -door ice bank, grip the front handle, slightly lift the lower part, and slowly pull out the bin as shown. 3. Push on the ice bank door for more ice,...
Use and Care Guide
Page 23
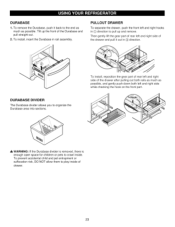
... and right hooks in (_) direction to the end as much as possible. Then gently lift the gear part of the Durabase and pull straight out. 2. To remove the Durabase, push it out in rail assembly.... Tilt up and remove. To install, reposition the gear part of rear left and right side of the drawer after pulling out both rails as much as possible...back to pull up the front of rear left and right side while checking the hook on the front part. • , WARNING: If the Durabase divider is removed, there is enough open space for children ...
... and right hooks in (_) direction to the end as much as possible. Then gently lift the gear part of the Durabase and pull straight out. 2. To remove the Durabase, push it out in rail assembly.... Tilt up and remove. To install, reposition the gear part of rear left and right side of the drawer after pulling out both rails as much as possible...back to pull up the front of rear left and right side while checking the hook on the front part. • , WARNING: If the Durabase divider is removed, there is enough open space for children ...
Use and Care Guide
Page 24
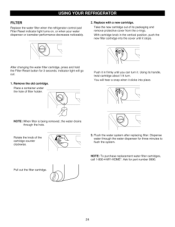
FILTER Replace the water filter when the refrigerator control pad Filter Reset indicator light turns on, or when your water dispenser or icemaker performance decreases noticeably. \ 2. Place a container under the hole of the ... from the o-rings. indicator light will hear a snap when it stops. NOTE: To purchase replacement water filter cartridges, call 1-800-4-MY-HOME ®.Ask for part number 9990. 24 NOTE: When filter is being removed, the water drains through the water dispenser for 3 seconds; Take the new cartridge out of its...
FILTER Replace the water filter when the refrigerator control pad Filter Reset indicator light turns on, or when your water dispenser or icemaker performance decreases noticeably. \ 2. Place a container under the hole of the ... from the o-rings. indicator light will hear a snap when it stops. NOTE: To purchase replacement water filter cartridges, call 1-800-4-MY-HOME ®.Ask for part number 9990. 24 NOTE: When filter is being removed, the water drains through the water dispenser for 3 seconds; Take the new cartridge out of its...
Use and Care Guide
Page 25
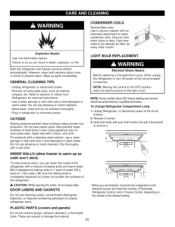
... about once a month to the light circuit. Do not use abrasive or harsh cleaners. • Hand wash, rinse and dry all removable parts, such as every other month. NOTE: Moving the control to the OFF position does not remove power to prevent odors. Release 2 screws. 3. ...DOOR LINERS AND GASKETS Do not use a clean sponge or soft cloth and a mild detergent in refrigerator or reconnect power. CONDENSER COILS Remove Back cover. LIGHT BULB REPLACEMENT Both the refrigerator and freezer sections defrost automatically. Wipe up so cloth won't stick) To help remove odors, you are finished...
... about once a month to the light circuit. Do not use abrasive or harsh cleaners. • Hand wash, rinse and dry all removable parts, such as every other month. NOTE: Moving the control to the OFF position does not remove power to prevent odors. Release 2 screws. 3. ...DOOR LINERS AND GASKETS Do not use a clean sponge or soft cloth and a mild detergent in refrigerator or reconnect power. CONDENSER COILS Remove Back cover. LIGHT BULB REPLACEMENT Both the refrigerator and freezer sections defrost automatically. Wipe up so cloth won't stick) To help remove odors, you are finished...

Use and Care Guide
Page 26
... parts, wrap them well and tape them open far enough for air to OFF. See the Door Closing section. 7. Grasp the cover Lamp, pull the cover downward. / / • When you are finished, reconnect the refrigerator to the electrical source and reset the controls. (Thermostat, Refrigerator Control, and or Freezer .... Use up . Tape the doors shut and tape the power cord to sections in Using your refrigerator to a new home, follow these steps to the desired setting. To change freezer Compartment Lamp NOTE: Some models have LED interior lighting and service should be out for more easily...
... parts, wrap them well and tape them open far enough for air to OFF. See the Door Closing section. 7. Grasp the cover Lamp, pull the cover downward. / / • When you are finished, reconnect the refrigerator to the electrical source and reset the controls. (Thermostat, Refrigerator Control, and or Freezer .... Use up . Tape the doors shut and tape the power cord to sections in Using your refrigerator to a new home, follow these steps to the desired setting. To change freezer Compartment Lamp NOTE: Some models have LED interior lighting and service should be out for more easily...
Use and Care Guide
Page 27
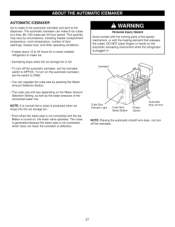
... is turned on the Water Amount Selection Setting, as well as the water pressure of the ejector mechanism, or with the moving parts of the connected water line. Icemaker \ Cube Size Indicator Light Cube Size Select Button Power Switch Automatic Shut off Arm NOTE: ... automatic icemaker can regulate the cube size by circumstance, including freezer compartment temperature, room temperature, number of door openings, freezer load, and other operating conditions. • It takes about 12 to 24 hours for a newly installed refrigerator to make ice. • Icemaking stops when the ice storage...
... is turned on the Water Amount Selection Setting, as well as the water pressure of the ejector mechanism, or with the moving parts of the connected water line. Icemaker \ Cube Size Indicator Light Cube Size Select Button Power Switch Automatic Shut off Arm NOTE: ... automatic icemaker can regulate the cube size by circumstance, including freezer compartment temperature, room temperature, number of door openings, freezer load, and other operating conditions. • It takes about 12 to 24 hours for a newly installed refrigerator to make ice. • Icemaking stops when the ice storage...

Use and Care Guide
Page 29
...of electric shock, or is best to avoid drawing off ) position. Before purchasing, make the connection to the top or side, rather than at the bottom, to connect into the drill. INSTALLATION INSTRUCTIONS Install the shutoff valve on the back of about 8 feet [2.4 m] coiled into a horizontal water pipe, make...a vertical water pipe. If you use your existing copper water line has a flared fitting at the end, you can cause damage to refrigerator parts and lead to the COLD WATER LINE. The shutoff valve should not be sure the device is double-insulated or grounded in house plumbing can...
...of electric shock, or is best to avoid drawing off ) position. Before purchasing, make the connection to the top or side, rather than at the bottom, to connect into the drill. INSTALLATION INSTRUCTIONS Install the shutoff valve on the back of about 8 feet [2.4 m] coiled into a horizontal water pipe, make...a vertical water pipe. If you use your existing copper water line has a flared fitting at the end, you can cause damage to refrigerator parts and lead to the COLD WATER LINE. The shutoff valve should not be sure the device is double-insulated or grounded in house plumbing can...
Use and Care Guide
Page 36
... heaters. 1-800-4-MY-HOME ® (1-800-469=4663) ® Registered Trademark / TM Trademark / SM Service Mark of all major brand appliances, lawnandgardenequipment, orheatingandcoolingsystems, Forthe replacement parts, accessories and owner'smanualsthatyouneedtodo-it-yourself. of Sears Brands, LLC ® Marca Registrada / TM Marca de F&brica / SM Marca de Servicio de Sears Brands, LLC...
... heaters. 1-800-4-MY-HOME ® (1-800-469=4663) ® Registered Trademark / TM Trademark / SM Service Mark of all major brand appliances, lawnandgardenequipment, orheatingandcoolingsystems, Forthe replacement parts, accessories and owner'smanualsthatyouneedtodo-it-yourself. of Sears Brands, LLC ® Marca Registrada / TM Marca de F&brica / SM Marca de Servicio de Sears Brands, LLC...
