Use and Care Guide
Page 2
...Base Cover 9-14 15 15 Using Your Refrigerator Setting The Controls Ensuring Proper Air Circulation In-Door Ice Bank 16-24 16 16 17 Adjusting Control Settings 18 Food Storage Guide 18 Storing Frozen Food 19 P,- Freezer Section Tilting Door 22 Tilt-Out Door ...26 About The Automatic Icemaker 27-28 Connecting The Water Line Troubleshooting Guide 29-31 32-35 Refrigerator Section Water Dispenser 19 Refrigerator Shelves 20 Bottle Holder (Option) 20 Humidity Controlled Crisper 21 Removing Humidity Controlled Crisper 21 Glide'N'Serve 21 Modular Door Bin 21 Dairy Bin...
...Base Cover 9-14 15 15 Using Your Refrigerator Setting The Controls Ensuring Proper Air Circulation In-Door Ice Bank 16-24 16 16 17 Adjusting Control Settings 18 Food Storage Guide 18 Storing Frozen Food 19 P,- Freezer Section Tilting Door 22 Tilt-Out Door ...26 About The Automatic Icemaker 27-28 Connecting The Water Line Troubleshooting Guide 29-31 32-35 Refrigerator Section Water Dispenser 19 Refrigerator Shelves 20 Bottle Holder (Option) 20 Humidity Controlled Crisper 21 Removing Humidity Controlled Crisper 21 Glide'N'Serve 21 Modular Door Bin 21 Dairy Bin...
Use and Care Guide
Page 3
... product. 7. A service technician to this product. Damage to arrange for incidental or consequential damages. If the sealed refrigerant system is not installed, operated or maintained according to state. Sears will NOT pay for free repair. Disclaimer of remedies... repair as provided herein. This warranty applies only while this appliance is ever used in material and workmanship. BOTTOM FREEZER REFRIGERATOR WARRANTY ® f Kenmore Elite Limited Warranty When installed, operated and maintained according to all instructions supplied with the product, if this appliance ...
... product. 7. A service technician to this product. Damage to arrange for incidental or consequential damages. If the sealed refrigerant system is not installed, operated or maintained according to state. Sears will NOT pay for free repair. Disclaimer of remedies... repair as provided herein. This warranty applies only while this appliance is ever used in material and workmanship. BOTTOM FREEZER REFRIGERATOR WARRANTY ® f Kenmore Elite Limited Warranty When installed, operated and maintained according to all instructions supplied with the product, if this appliance ...
Use and Care Guide
Page 4
... products. For prices and additional information in Canada varies on some items. For full details call it takes for any covered refrigerator or freezer. 1_ Rental reimbursement if repair of your product. Sears Installation Service For Sears professional installation of information available whenever you purchase the... can trust will find the model and serial number printed on an identification label located on making a smart purchase. Your new Kenmore ® product is a risk free purchase. The Master Protection Agreement also helps extend the life of your covered product takes...
... products. For prices and additional information in Canada varies on some items. For full details call it takes for any covered refrigerator or freezer. 1_ Rental reimbursement if repair of your product. Sears Installation Service For Sears professional installation of information available whenever you purchase the... can trust will find the model and serial number printed on an identification label located on making a smart purchase. Your new Kenmore ® product is a risk free purchase. The Master Protection Agreement also helps extend the life of your covered product takes...
Use and Care Guide
Page 5
... remove power to the light circuit. •When you are finished, reconnect the refrigerator to the electrical source and reset the controls. (Thermostat, Refrigerator Control, and or Freezer Control, depending on the model) to the desired setting. •This refrigerator must be killed or seriously injured if you don't follow instructions. All safety messages...
... remove power to the light circuit. •When you are finished, reconnect the refrigerator to the electrical source and reset the controls. (Thermostat, Refrigerator Control, and or Freezer Control, depending on the model) to the desired setting. •This refrigerator must be killed or seriously injured if you don't follow instructions. All safety messages...
Use and Care Guide
Page 6
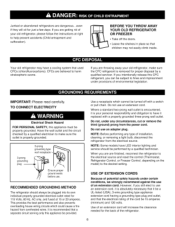
BEFORE YOU THROW AWAY YOUR OLD REFRIGERATOR OR FREEZER • Take off with a properly grounded three-prong wall outlet. Have the wall outlet and the circuit checked by a qualified technician. NOTE: Before performing any ... off the doors. • Leave the shelves in place so that a separate circuit serving only this CFC refrigerant, you are are finished, reconnect the refrigerator to the electrical source and reset the control (Thermostat, Refrigerator Control, or Freezer Control, depending on the model) to have it replaced with a switch or pull chain. Use a receptacle...
BEFORE YOU THROW AWAY YOUR OLD REFRIGERATOR OR FREEZER • Take off with a properly grounded three-prong wall outlet. Have the wall outlet and the circuit checked by a qualified technician. NOTE: Before performing any ... off the doors. • Leave the shelves in place so that a separate circuit serving only this CFC refrigerant, you are are finished, reconnect the refrigerator to the electrical source and reset the control (Thermostat, Refrigerator Control, or Freezer Control, depending on the model) to have it replaced with a switch or pull chain. Use a receptacle...
Use and Care Guide
Page 7
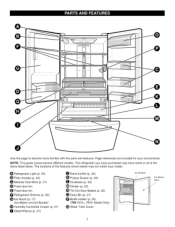
... match your convenience. Page references are included for your model. 0 Refrigerator Light (p. 25) Filter (Inside) (p. 24) Modular Door Bins (p. 21) _) Fixed door bin Fixed door bin Refrigerator Shelves (p. 20) (_ Ice Room (p. 17) (Ice Maker and Ice Bucket) _D Humidity Controlled Crisper (p. 21) _[_ Glide'N'Serve (p. 21) Extra Ice Bin (p. 22) Pullout Drawer (p. 23) Durabase (p. 23) (_) Divider...
... match your convenience. Page references are included for your model. 0 Refrigerator Light (p. 25) Filter (Inside) (p. 24) Modular Door Bins (p. 21) _) Fixed door bin Fixed door bin Refrigerator Shelves (p. 20) (_ Ice Room (p. 17) (Ice Maker and Ice Bucket) _D Humidity Controlled Crisper (p. 21) _[_ Glide'N'Serve (p. 21) Extra Ice Bin (p. 22) Pullout Drawer (p. 23) Durabase (p. 23) (_) Divider...

Use and Care Guide
Page 8
... out when moving the refrigerator for use sharp instruments, rubbing alcohol, flammable fluids, or abrasive cleaners to ensure proper cooling. Explosion Hazard Keep flammable materials and vapors, such as ice cube bin, drawers, shelves, etc., in the freezer compartment to remove tape ... remove any remaining tape or glue, rub the area briskly with warm water and dry. Wipe with your refrigerator. Too small a distance from refrigerator. Refrigerator shelves are packed together to aid in lowered freezing capability and increased electricity consumption charges. If required, adjust ...
... out when moving the refrigerator for use sharp instruments, rubbing alcohol, flammable fluids, or abrasive cleaners to ensure proper cooling. Explosion Hazard Keep flammable materials and vapors, such as ice cube bin, drawers, shelves, etc., in the freezer compartment to remove tape ... remove any remaining tape or glue, rub the area briskly with warm water and dry. Wipe with your refrigerator. Too small a distance from refrigerator. Refrigerator shelves are packed together to aid in lowered freezing capability and increased electricity consumption charges. If required, adjust ...
Use and Care Guide
Page 9
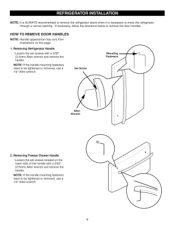
...: Handle appearance may vary from illustrations on the lower side of the handle with a 3/32" (2.5mm) Allen wrench and remove the handle. Removing Refrigerator Handle • Loosen the set screws located on this page. 1. Removing Freezer Drawer Handle • Loosen the set screws with a 3/32" (2.5mm) Allen wrench and remove the handle.
...: Handle appearance may vary from illustrations on the lower side of the handle with a 3/32" (2.5mm) Allen wrench and remove the handle. Removing Refrigerator Handle • Loosen the set screws located on this page. 1. Removing Freezer Drawer Handle • Loosen the set screws with a 3/32" (2.5mm) Allen wrench and remove the handle.
Use and Care Guide
Page 10
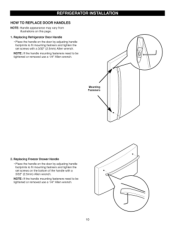
... wrench. Mounting Fasteners 2. HOW TO REPLACE DOOR HANDLES NOTE: Handle appearance may vary from illustrations on the bottom of the handle with a 3/32" (2.5mm) Allen wrench. Replacing Freezer Drawer Handle • Place the handle on the door by adjusting handle footprints to be tightened or removed... use a 1/4" Allen wrench. 10 NOTE: If the handle mounting fasteners need to fit mounting fastners and tighten the set screws on this page. 1. Replacing Refrigerator...
... wrench. Mounting Fasteners 2. HOW TO REPLACE DOOR HANDLES NOTE: Handle appearance may vary from illustrations on the bottom of the handle with a 3/32" (2.5mm) Allen wrench. Replacing Freezer Drawer Handle • Place the handle on the door by adjusting handle footprints to be tightened or removed... use a 1/4" Allen wrench. 10 NOTE: If the handle mounting fasteners need to fit mounting fastners and tighten the set screws on this page. 1. Replacing Refrigerator...
Use and Care Guide
Page 11
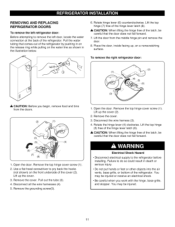
...(8). & CAUTION: When lifting the hinge free of the latch, be careful that the door does not fall forward. / j.--J (7) (8/ ) 1. To remove the right refrigerator door: _'_"_ _ j (2) _, CAUTION: Before you work with the hinge, base grille, and stopper. Open the door. Remove the cover. 3. Remove the cover. ...injury. • Do not put hands or feet or other objects into the air vents, base grille, or bottom of the refrigerator. Disconnect all the wire harnesses (4). 5. REMOVING AND REPLACING REFRIGERATOR DOORS To remove the left door, locate the water connection at the back of the...
...(8). & CAUTION: When lifting the hinge free of the latch, be careful that the door does not fall forward. / j.--J (7) (8/ ) 1. To remove the right refrigerator door: _'_"_ _ j (2) _, CAUTION: Before you work with the hinge, base grille, and stopper. Open the door. Remove the cover. 3. Remove the cover. ...injury. • Do not put hands or feet or other objects into the air vents, base grille, or bottom of the refrigerator. Disconnect all the wire harnesses (4). 5. REMOVING AND REPLACING REFRIGERATOR DOORS To remove the left door, locate the water connection at the back of the...
Use and Care Guide
Page 12
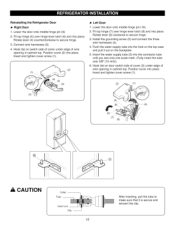
Reinstalling the Refrigerator Door I_ Right Door 1. Rotate lever (6) clockwise to secure hinge. 3. Push the water supply tube into the hole on the top case and pull it ...
Reinstalling the Refrigerator Door I_ Right Door 1. Rotate lever (6) clockwise to secure hinge. 3. Push the water supply tube into the hole on the top case and pull it ...
Use and Care Guide
Page 15
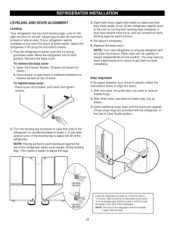
...the doors are aligned. (Three snap rings are provided with two fresh food doors. NOTE: Having someone push backward against the top of the refrigerator. Remove the base cover. Re-adjust if necessary. 5. Replace the base cover. You may take several more to -side. If your doors...it easier to lower the height of the front of the refrigerator takes some weight off the leveling legs. If not, tilt the refrigerator slightly more turns, and you should be opened or closed independently of the refrigerator. Open the Freezer Drawer. (Drawer not shown for clarity.) 2. With other hand...
...the doors are aligned. (Three snap rings are provided with two fresh food doors. NOTE: Having someone push backward against the top of the refrigerator. Remove the base cover. Re-adjust if necessary. 5. Replace the base cover. You may take several more to -side. If your doors...it easier to lower the height of the front of the refrigerator takes some weight off the leveling legs. If not, tilt the refrigerator slightly more turns, and you should be opened or closed independently of the refrigerator. Open the Freezer Drawer. (Drawer not shown for clarity.) 2. With other hand...
Use and Care Guide
Page 16
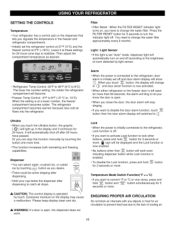
...keep display clean and dry. You need to -13°C) When the setting is initially set the refrigerator control at 37°F (3°C) and the freezer control at a lower number, the freezer compartment becomes colder. Light / Light Sensor • If the light is set "Auto" mode,...select water, crushed ice, or cubed ice by light sensor. • Refrigerator Temp Control: 33°F to 46°F (0°C to 8°C) The lower the number setting, the colder the refrigerator compartment will become. • Freezer Temp Control: -6°F to 8°F (-21°C to change the water filter.
...keep display clean and dry. You need to -13°C) When the setting is initially set the refrigerator control at 37°F (3°C) and the freezer control at a lower number, the freezer compartment becomes colder. Light / Light Sensor • If the light is set "Auto" mode,...select water, crushed ice, or cubed ice by light sensor. • Refrigerator Temp Control: 33°F to 46°F (0°C to 8°C) The lower the number setting, the colder the refrigerator compartment will become. • Freezer Temp Control: -6°F to 8°F (-21°C to change the water filter.
Use and Care Guide
Page 17
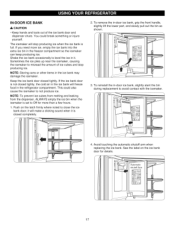
Keep the ice bank door closed completely. 2. If the ice bank door is not closed tightly, the cold air in the freezer compartment so the icemaker can keep producing ice. This could break something or injure yourself. NOTE: To prevent ice cubes from melting and leaking from ... to close the ice bank door; To reinstall the in-door ice bank, slightly slant the bin during replacement to level the ice in the refrigerator compartment. If you need more than a few hours. 1. it will freeze food in it is closed tightly.
Keep the ice bank door closed completely. 2. If the ice bank door is not closed tightly, the cold air in the freezer compartment so the icemaker can keep producing ice. This could break something or injure yourself. NOTE: To prevent ice cubes from melting and leaking from ... to close the ice bank door; To reinstall the in-door ice bank, slightly slant the bin during replacement to level the ice in the refrigerator compartment. If you need more than a few hours. 1. it will freeze food in it is closed tightly.
Use and Care Guide
Page 18
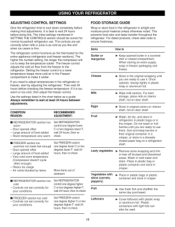
...cycle often enough) - Controls not set correctly for normal household refrigerator use. For dated products, check date code to the refrigerator. When storing an extra supply, wrap in the refrigerator or freezer, start by items Set FREEZER control one degree higher C or two degrees higher F, wait... with plastic wrap or aluminum foil. ADJUSTING CONTROL SETTINGS Give the refrigerator time to cool down completely before checking the freezer temperature. The freezer control adjusts the cold air flow from the freezer to ensure freshness. Door opened often - Heavy ice usage - Controls...
...cycle often enough) - Controls not set correctly for normal household refrigerator use. For dated products, check date code to the refrigerator. When storing an extra supply, wrap in the refrigerator or freezer, start by items Set FREEZER control one degree higher C or two degrees higher F, wait... with plastic wrap or aluminum foil. ADJUSTING CONTROL SETTINGS Give the refrigerator time to cool down completely before checking the freezer temperature. The freezer control adjusts the cold air flow from the freezer to ensure freshness. Door opened often - Heavy ice usage - Controls...
Use and Care Guide
Page 19
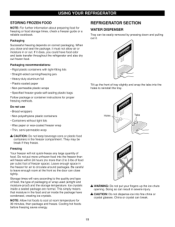
...injury. _, CAUTION: Do not dispense ice into the freezer than 2 to leave enough room at room temperature for 30 minutes, then package and freeze. Ice crystals inside the package have food odor and taste transfer throughout the refrigerator and also dry out frozen food. Do not use... • Bread wrappers • Non-polyethylene plastic containers • Containers without tight lids • Wax paper or wax-coated freezer wrap • Thin, semi-permeable wrap • ...
...injury. _, CAUTION: Do not dispense ice into the freezer than 2 to leave enough room at room temperature for 30 minutes, then package and freeze. Ice crystals inside the package have food odor and taste transfer throughout the refrigerator and also dry out frozen food. Do not use... • Bread wrappers • Non-polyethylene plastic containers • Containers without tight lids • Wax paper or wax-coated freezer wrap • Thin, semi-permeable wrap • ...
Use and Care Guide
Page 20
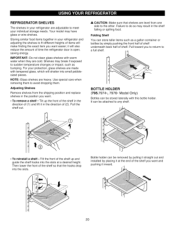
... replace shelves in the position you want and pushing it at a desired height. Storing similar food items together in your refrigerator and adjusting the shelves to fit different heights of time the refrigerator door is open, saving energy. it in the direction of (2). For your protection, glass shelves are made with tempered... of (1) and lift it will shatter into the slots. Shelves may have glass or wire shelves. Your model may break if exposed to any shelf. REFRIGERATOR SHELVES The shelves in your refrigerator are adjustable to the other.
... replace shelves in the position you want and pushing it at a desired height. Storing similar food items together in your refrigerator and adjusting the shelves to fit different heights of time the refrigerator door is open, saving energy. it in the direction of (2). For your protection, glass shelves are made with tempered... of (1) and lift it will shatter into the slots. Shelves may have glass or wire shelves. Your model may break if exposed to any shelf. REFRIGERATOR SHELVES The shelves in your refrigerator are adjustable to the other.
Use and Care Guide
Page 21
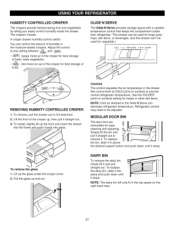
...Glide'N'Serve provides storage space with a variable temperature control that keeps the compartment colder than refrigerator. Controls The control regulates the air temperature in the top space on the right-hand door. 21 Use the COLDER (print on surface) to remove it and pull straight out. Adjust the... until it stops. This drawer can be adjusted. DAIRY BIN To remove the dairy bin, simply lift it . To remove the glass 1. Refrigerator control may need to full extension. 2. To replace the bin, slide it in the moisture-sealed crispers. To install, slightly tilt up and...
...Glide'N'Serve provides storage space with a variable temperature control that keeps the compartment colder than refrigerator. Controls The control regulates the air temperature in the top space on the right-hand door. 21 Use the COLDER (print on surface) to remove it and pull straight out. Adjust the... until it stops. This drawer can be adjusted. DAIRY BIN To remove the dairy bin, simply lift it . To remove the glass 1. Refrigerator control may need to full extension. 2. To replace the bin, slide it in the moisture-sealed crispers. To install, slightly tilt up and...
Use and Care Guide
Page 24
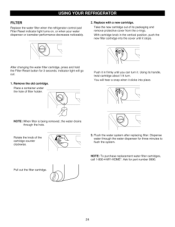
... filter is being removed, the water drains through the water dispenser for three minutes to flush the system. FILTER Replace the water filter when the refrigerator control pad Filter Reset indicator light turns on, or when your water dispenser or icemaker performance decreases noticeably. \ 2. indicator light will hear a snap when it...
... filter is being removed, the water drains through the water dispenser for three minutes to flush the system. FILTER Replace the water filter when the refrigerator control pad Filter Reset indicator light turns on, or when your water dispenser or icemaker performance decreases noticeably. \ 2. indicator light will hear a snap when it...
Use and Care Guide
Page 25
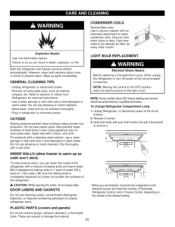
...to the light circuit. Electrical Shock Hazard Before replacing a Compartment Lamp, either unplug the refrigerator or turn off power at the circuit breaker. 2. INSIDE WALLS (allow freezer to warm up spills immediately. Explosion Hazard Use non-flammable cleaner. However, clean both ...To help remove odors, you are finished, reconnect the refrigerator to the electrical source and reset the controls. (Thermostat, Refrigerator Control, and or Freezer Control, depending on the model) to clean condenser coils. Unplug Refrigerator, or disconnect power at the circuit breaker or fuse ...
...to the light circuit. Electrical Shock Hazard Before replacing a Compartment Lamp, either unplug the refrigerator or turn off power at the circuit breaker. 2. INSIDE WALLS (allow freezer to warm up spills immediately. Explosion Hazard Use non-flammable cleaner. However, clean both ...To help remove odors, you are finished, reconnect the refrigerator to the electrical source and reset the controls. (Thermostat, Refrigerator Control, and or Freezer Control, depending on the model) to clean condenser coils. Unplug Refrigerator, or disconnect power at the circuit breaker or fuse ...


