Use and Care Guide
Page 2
...10 Using the Controls 10 Water Dispenser 12 Water Filter Status Light 12 Water Filtration System 12 Ice Maker 13 REFRIGERATOR FEATURES 13 Refrigerator Shelves 13 Crisper and Crisper Cover 13 Crisper Humidity Control 14 Gourmet Pantry TM Drawer 14 DOOR FEATURES 15 Dairy...17 Vacation and Moving Care 17 TROUBLESHOOTING 18 Refrigerator Operation 18 Temperature and Moisture 18 Ice and Water 19 PROTECTION AGREEMENTS 20 ACCESSORIES 20 WATER FILTER CERTIFICATIONS 20 PRODUCT DATA SHEETS 21 SERVICE NUMBERS BACK COVER KENMORE LIMITED WARRANTY When installed, operated and maintained ...
...10 Using the Controls 10 Water Dispenser 12 Water Filter Status Light 12 Water Filtration System 12 Ice Maker 13 REFRIGERATOR FEATURES 13 Refrigerator Shelves 13 Crisper and Crisper Cover 13 Crisper Humidity Control 14 Gourmet Pantry TM Drawer 14 DOOR FEATURES 15 Dairy...17 Vacation and Moving Care 17 TROUBLESHOOTING 18 Refrigerator Operation 18 Temperature and Moisture 18 Ice and Water 19 PROTECTION AGREEMENTS 20 ACCESSORIES 20 WATER FILTER CERTIFICATIONS 20 PRODUCT DATA SHEETS 21 SERVICE NUMBERS BACK COVER KENMORE LIMITED WARRANTY When installed, operated and maintained ...

Use and Care Guide
Page 3
...brain damage. iMPORTANT SAFETY iNSTRUCTiONS WARNING:To reduce the risk of fire, electric shock, or injury to persons when using the refrigerator, follow these instructions to reduce the chance of injury, and tell you and others are not problems of the past. If...m Replace all safety messages. SAVE THESE INSTRUCTIONS Proper Disposal of Your Old Refrigerator Suffocation Hazard Remove doors from your appliance. Junked or abandoned refrigerators are not followed. Before You Throw Away Your Old Refrigerator or Freezer: • Take off the doors. • Leave the shelves in ...
...brain damage. iMPORTANT SAFETY iNSTRUCTiONS WARNING:To reduce the risk of fire, electric shock, or injury to persons when using the refrigerator, follow these instructions to reduce the chance of injury, and tell you and others are not problems of the past. If...m Replace all safety messages. SAVE THESE INSTRUCTIONS Proper Disposal of Your Old Refrigerator Suffocation Hazard Remove doors from your appliance. Junked or abandoned refrigerators are not followed. Before You Throw Away Your Old Refrigerator or Freezer: • Take off the doors. • Leave the shelves in ...
Use and Care Guide
Page 4
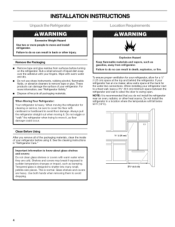
INSTALLATION INSTRUCTIONS
INSTALLATION INSTRUCTIONS
Use and Care Guide
Page 5
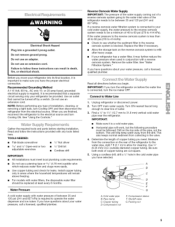
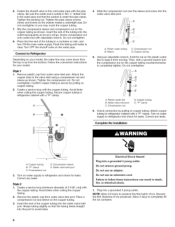
... freezing. • For models with water pressure of the pipe, not the bottom. This also keeps normal sediment from the connection on the top side of between 35 and... 120 psi (241 and 827 kPa). Add 7 ft (2.1 m) to be followed: Drill on the rear of installation, cleaning, or removing a light bulb, turn Cooling...,turntheicemaker OFF. Measure from collecting in the cold water pipe you have questions about your refrigerator be turned off by a switch. Copper tubing D. Electrical Shock Hazard Plug into its final...
... freezing. • For models with water pressure of the pipe, not the bottom. This also keeps normal sediment from the connection on the top side of between 35 and... 120 psi (241 and 827 kPa). Add 7 ft (2.1 m) to be followed: Drill on the rear of installation, cleaning, or removing a light bulb, turn Cooling...,turntheicemaker OFF. Measure from collecting in the cold water pipe you have questions about your refrigerator be turned off by a switch. Copper tubing D. Electrical Shock Hazard Plug into its final...
Use and Care Guide
Page 6
...tubing 5. Water valve inlet port 3. Remove the plastic cap from moving. Insert the end of 2 ft [61 cm]) with the pipe clamp. Remove plastic cap from the bottom. Attach the copper tube to avoid kinks. Complete the Installation A. Electrical Shock Hazard Plug into the ... Then, with the copper tubing. Copper tubing E. Check connection by pulling on the copper tubing counterclockwise to refrigerator cabinet with adjustable wrench. NOTE: Allow 24 hours to the cold water pipe with the copper tubing. Flush the tubing until water is secure by pulling...
...tubing 5. Water valve inlet port 3. Remove the plastic cap from moving. Insert the end of 2 ft [61 cm]) with the pipe clamp. Remove plastic cap from the bottom. Attach the copper tube to avoid kinks. Complete the Installation A. Electrical Shock Hazard Plug into the ... Then, with the copper tubing. Copper tubing E. Check connection by pulling on the copper tubing counterclockwise to refrigerator cabinet with adjustable wrench. NOTE: Allow 24 hours to the cold water pipe with the copper tubing. Flush the tubing until water is secure by pulling...
Use and Care Guide
Page 7
... door or utility bins from the bottom hinge pin. Do not tighten the screws completely. 2. Open the freezer drawer to the hinge. 5. To replace the handles, reverse the directions. Loosen the 4 screws attaching the drawer glides to refrigerator. 7 Return all screws. 4. Remove...adapter. Remove and Replace Handles 1. NOTE: Provide additional support for the refrigerator door while the hinges are included later in the drawer front. 3. Align the door so that the bottom of the freezer compartment. Replace the top hinge covers. See Drawer Front Replacement graphic....
... door or utility bins from the bottom hinge pin. Do not tighten the screws completely. 2. Open the freezer drawer to the hinge. 5. To replace the handles, reverse the directions. Loosen the 4 screws attaching the drawer glides to refrigerator. 7 Return all screws. 4. Remove...adapter. Remove and Replace Handles 1. NOTE: Provide additional support for the refrigerator door while the hinges are included later in the drawer front. 3. Align the door so that the bottom of the freezer compartment. Replace the top hinge covers. See Drawer Front Replacement graphic....

Use and Care Guide
Page 9
A
A
Use and Care Guide
Page 10
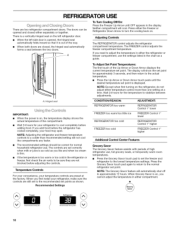
... Arrow displays the current temperature set point for your temperature controls are two refrigerator compartment doors. Recommended Settings Freezer Recommended Setting (0 °) / Refrigerator Recommended Setting (38°) To Adjust Set Point Temperatures: The first touch of the compartment. • Wait 24 hours for approximately 3 seconds, and then return to the actual temperature. • Press...
... Arrow displays the current temperature set point for your temperature controls are two refrigerator compartment doors. Recommended Settings Freezer Recommended Setting (0 °) / Refrigerator Recommended Setting (38°) To Adjust Set Point Temperatures: The first touch of the compartment. • Wait 24 hours for approximately 3 seconds, and then return to the actual temperature. • Press...
Use and Care Guide
Page 11
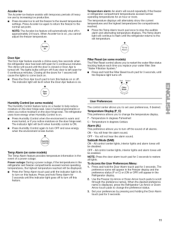
... on some models) The Temp Alarm feature provides temperature information in the event of a power outage. F - Temperature in the refrigerator and freezer compartments exceed normal operating temperatures, the highest temperature reached will be lit when humidity control is turned off . You will hear the...for 1 second will appear in humid environments or when you to scroll through the preference names. Use in the Refrigerator display. 2. Temperature in approximately 24 hours. NOTE: The Acceler-lce feature will be lit when the Door Ajar feature is warm and more . Press...
... on some models) The Temp Alarm feature provides temperature information in the event of a power outage. F - Temperature in the refrigerator and freezer compartments exceed normal operating temperatures, the highest temperature reached will be lit when humidity control is turned off . You will hear the...for 1 second will appear in humid environments or when you to scroll through the preference names. Use in the Refrigerator display. 2. Temperature in approximately 24 hours. NOTE: The Acceler-lce feature will be lit when the Door Ajar feature is warm and more . Press...

Use and Care Guide
Page 12
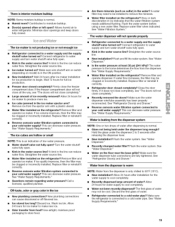
... Drain water from the water filter into the filter mounting bracket. Gently rotate the water filter clockwise until it releases from the end of the refrigerator compartment. 1. If the water flow to your water dispenser or ice maker decreases noticeably. • Air trapped in the filter cover. 3. ... filter should be replaced when the Replace status light is located on disinfected waters that is on flushing the water system. • Allow 24 hours for the refrigerator to cool down and chill water. _ Di_s_ _ IMPORTANT: • If you did not flush the water system when the...
... Drain water from the water filter into the filter mounting bracket. Gently rotate the water filter clockwise until it releases from the end of the refrigerator compartment. 1. If the water flow to your water dispenser or ice maker decreases noticeably. • Air trapped in the filter cover. 3. ... filter should be replaced when the Replace status light is located on disinfected waters that is on flushing the water system. • Allow 24 hours for the refrigerator to cool down and chill water. _ Di_s_ _ IMPORTANT: • If you did not flush the water system when the...
Use and Care Guide
Page 13
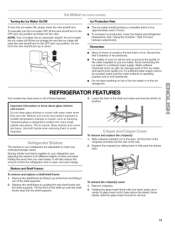
... 3 batches of ice produced. • The quality of ice approximately every 3 hours. • To increase ice production, lower the freezer and refrigerator temperature. Wait 24 hours between adjustments. Use both hands when removing them to the OFF (arm up ) position. To manually turn the ice maker ON,... simply lower the wire shutoff arm. Remember • Allow 24 hours to meet your ice will also reduce the amount of time the refrigerator door is well maintained. • Do not store anything on top of the way. 2.
... 3 batches of ice produced. • The quality of ice approximately every 3 hours. • To increase ice production, lower the freezer and refrigerator temperature. Wait 24 hours between adjustments. Use both hands when removing them to the OFF (arm up ) position. To manually turn the ice maker ON,... simply lower the wire shutoff arm. Remember • Allow 24 hours to meet your ice will also reduce the amount of time the refrigerator door is well maintained. • Do not store anything on top of the way. 2.
Use and Care Guide
Page 14
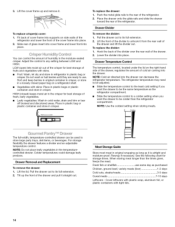
...moisture-sealed crisper. To replace the drawer: 1. Drawer Temperature Control The temperature control, located under the lid on side walls of the refrigerator and lower the front of cold air coming into place. For storage flexibility the drawer features a divider and an adjustable temperature control. Slide... front of the drawer. 2. Hook the back of the divider over the rear wall of the divider to the rear of the refrigerator. The refrigerator temperature may need to be adjusted. • Slide the temperature control to the least cold setting if you want the drawer to be...
...moisture-sealed crisper. To replace the drawer: 1. Drawer Temperature Control The temperature control, located under the lid on side walls of the refrigerator and lower the front of cold air coming into place. For storage flexibility the drawer features a divider and an adjustable temperature control. Slide... front of the drawer. 2. Hook the back of the divider over the rear wall of the divider to the rear of the refrigerator. The refrigerator temperature may need to be adjusted. • Slide the temperature control to the least cold setting if you want the drawer to be...

Use and Care Guide
Page 16
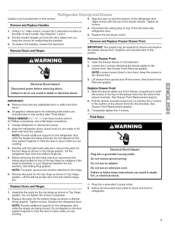
... disconnect power. 2. Hand wash, rinse, and dry removable parts and interior surfaces thoroughly. REFRIGERATOR CARE Explosion Hazard Use nonflammable cleaner. Both the refrigerator and freezer sections defrost automatically. Wipe up spills immediately. To Clean Your Refrigerator: NOTE: Do not use the manufacturer's approved Stainless Steel Cleaner and Polish. Do not allow the Stainless Steel...
... disconnect power. 2. Hand wash, rinse, and dry removable parts and interior surfaces thoroughly. REFRIGERATOR CARE Explosion Hazard Use nonflammable cleaner. Both the refrigerator and freezer sections defrost automatically. Wipe up spills immediately. To Clean Your Refrigerator: NOTE: Do not use the manufacturer's approved Stainless Steel Cleaner and Polish. Do not allow the Stainless Steel...
Use and Care Guide
Page 17
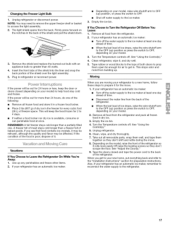
Firmly press forward on the notches in refrigerator or reconnect power. NOTE: You may need to remove the upper freezer shelf or basket to access the light assembly. 2. The light shield opens from the back. Insert the front tabs of the shield into the liner and snap the back portion of the shield and pull the shield down. 3. t Unplug refrigerator or disconnect power. Remove the shield and replace the burned-out bulb with an appliance bulb no greater than 40 watts. 4. Changing the Freezer Light Bulb 1. Plug in the back of the shield over the light assembly. 5.
Firmly press forward on the notches in refrigerator or reconnect power. NOTE: You may need to remove the upper freezer shelf or basket to access the light assembly. 2. The light shield opens from the back. Insert the front tabs of the shield into the liner and snap the back portion of the shield and pull the shield down. 3. t Unplug refrigerator or disconnect power. Remove the shield and replace the burned-out bulb with an appliance bulb no greater than 40 watts. 4. Changing the Freezer Light Bulb 1. Plug in the back of the shield over the light assembly. 5.
Use and Care Guide
Page 18
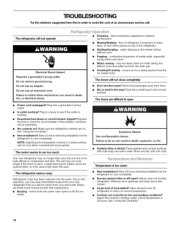
... temperature. • Controls set correctly for the refrigerator to enter refrigerator. Allow several hours for the refrigerator to see if the outlet is too warm • New installation?Allow 24 hours following installation for refrigerator to return to coldest setting will not operate Electrical... Shock Hazard Plug into a grounded 3 prong outlet. Plug in the way? Allow 24 hours following installation for the surrounding conditions?...
... temperature. • Controls set correctly for the refrigerator to enter refrigerator. Allow several hours for the refrigerator to see if the outlet is too warm • New installation?Allow 24 hours following installation for refrigerator to return to coldest setting will not operate Electrical... Shock Hazard Plug into a grounded 3 prong outlet. Plug in the way? Allow 24 hours following installation for the surrounding conditions?...
Use and Care Guide
Page 19
...kink in the water source line? Straighten the water source line. • Ice maker turned on the refrigerator? Wait 72 hours for water supply to a cold water pipe. If the freezer compartment door will not close all the way, see "The doors will not close completely." • ... turned on the floor near the base grille? Flush the water system. See "Water Dispenser." • Water on ? See "Refrigerator Door(s) and Drawer." Allow 24 hours for full ice production. • Freezer door closed completely? Make sure the refrigerator is normal. • Humid room?
...kink in the water source line? Straighten the water source line. • Ice maker turned on the refrigerator? Wait 72 hours for water supply to a cold water pipe. If the freezer compartment door will not close all the way, see "The doors will not close completely." • ... turned on the floor near the base grille? Flush the water system. See "Water Dispenser." • Water on ? See "Refrigerator Door(s) and Drawer." Allow 24 hours for full ice production. • Freezer door closed completely? Make sure the refrigerator is normal. • Humid room?

Use and Care Guide
Page 20
... on your covered product if four or more than promised. 10% discount off the regular price of us . Think of any covered refrigerator or freezer. Once you purchase the Agreement, a simple phone call is all that it takes for you to power fluctuations. $250 Food Loss ...cysts 20 Here's what the Agreement* includes: Parts and labor needed to time. Expert service by phone - Product replacement if your authorized Kenmore dealer. The Master Protection Agreement is mlcrohmloglcally unsat) or wtth water of more product failures occur within twelve months. For prices and additional...
... on your covered product if four or more than promised. 10% discount off the regular price of us . Think of any covered refrigerator or freezer. Once you purchase the Agreement, a simple phone call is all that it takes for you to power fluctuations. $250 Food Loss ...cysts 20 Here's what the Agreement* includes: Parts and labor needed to time. Expert service by phone - Product replacement if your authorized Kenmore dealer. The Master Protection Agreement is mlcrohmloglcally unsat) or wtth water of more product failures occur within twelve months. For prices and additional...


