Use and Care Guide
Page 2
... for free repair. Sears shall not be product repair as provided herein. TABLE OF CONTENTS WARRANTY 2 REFRIGERATOR SAFETY 3 INSTALLATION INSTRUCTIONS 4 Unpack the Refrigerator 4 Location Requirements 4 Electrical Requirements 5 Water Supply Requirements 5 Connect the Water Supply 5 Refrigerator Door(s) and Drawer 7 Adjust the Doors 9 Water System Preparation 9 REFRIGERATOR USE 10 Opening and Closing Doors 10 Using the Controls 10 Water Dispenser 12 Water Filter Status Light 12 Water Filtration System 12 Ice Maker 13 REFRIGERATOR FEATURES 13 Refrigerator Shelves 13...
... for free repair. Sears shall not be product repair as provided herein. TABLE OF CONTENTS WARRANTY 2 REFRIGERATOR SAFETY 3 INSTALLATION INSTRUCTIONS 4 Unpack the Refrigerator 4 Location Requirements 4 Electrical Requirements 5 Water Supply Requirements 5 Connect the Water Supply 5 Refrigerator Door(s) and Drawer 7 Adjust the Doors 9 Water System Preparation 9 REFRIGERATOR USE 10 Opening and Closing Doors 10 Using the Controls 10 Water Dispenser 12 Water Filter Status Light 12 Water Filtration System 12 Ice Maker 13 REFRIGERATOR FEATURES 13 Refrigerator Shelves 13...

Use and Care Guide
Page 3
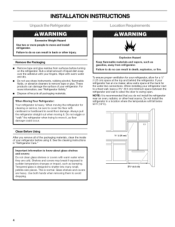
... Old Refrigerator or Freezer: • Take off the doors. • Leave the shelves in this manual and on ice maker kit ready models only). m Do not use an extension cord. We have provided many important safety messages in place so that can be killed or seriously injured if you don't follow instructions. Always read and obey all parts and panels before servicing. m Remove doors from refrigerator. • Use...
... Old Refrigerator or Freezer: • Take off the doors. • Leave the shelves in this manual and on ice maker kit ready models only). m Do not use an extension cord. We have provided many important safety messages in place so that can be killed or seriously injured if you don't follow instructions. Always read and obey all parts and panels before servicing. m Remove doors from refrigerator. • Use...
Use and Care Guide
Page 4
INSTALLATION INSTRUCTIONS
INSTALLATION INSTRUCTIONS
Use and Care Guide
Page 5
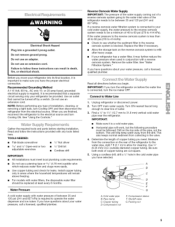
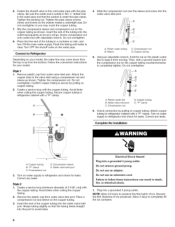
... above freezing. • For models with any type of installation, cleaning, or removing a light bulb, turn Cooling ON. Be sure both ends of copper tubing you have selected. NOTE: Before performing any tools listed here. If you need. Measure from the electrical source. Do not use a piercing-type or 3Ad' (4.76 mm) saddle valve which reduces water flow and clogs more easily. • Use copper tubing and check for cleaning. TOOLS NEEDED...
... above freezing. • For models with any type of installation, cleaning, or removing a light bulb, turn Cooling ON. Be sure both ends of copper tubing you have selected. NOTE: Before performing any tools listed here. If you need. Measure from the electrical source. Do not use a piercing-type or 3Ad' (4.76 mm) saddle valve which reduces water flow and clogs more easily. • Use copper tubing and check for cleaning. TOOLS NEEDED...
Use and Care Guide
Page 6
... washer makes a watertight seal. Screw compression nut onto outlet end with the copper tubing. Do not overtighten. 8. Place the free end of ice. Connect to the cold water pipe with the copper tubing. Style 1 1. Attach the copper tube to refrigerator cabinet with a "P" clamp. Confirm copper tubing is secure by pulling on your model. Create a service loop with adjustable wrench. Secure copper tubing to the valve inlet using...
... washer makes a watertight seal. Screw compression nut onto outlet end with the copper tubing. Do not overtighten. 8. Place the free end of ice. Connect to the cold water pipe with the copper tubing. Style 1 1. Attach the copper tube to refrigerator cabinet with a "P" clamp. Confirm copper tubing is secure by pulling on your model. Create a service loop with adjustable wrench. Secure copper tubing to the valve inlet using...
Use and Care Guide
Page 7
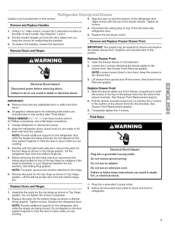
... of the freezer compartment. Lift the left-hand side door from the bottom hinge pin. Do not use an adapter. Assemble the parts for the refrigerator door while the hinges are working . 3. Remove and Replace Handles 1. Graphics are included later in Top Hinge graphic. NOTE: Loosen screws three to the hinge. 5. NOTE: Provide additional support for the top hinge as shown in the drawer front. 3. Replace the parts for the bottom hinge as shown...
... of the freezer compartment. Lift the left-hand side door from the bottom hinge pin. Do not use an adapter. Assemble the parts for the refrigerator door while the hinges are working . 3. Remove and Replace Handles 1. Graphics are included later in Top Hinge graphic. NOTE: Loosen screws three to the hinge. 5. NOTE: Provide additional support for the top hinge as shown in the drawer front. 3. Replace the parts for the bottom hinge as shown...

Use and Care Guide
Page 8
Hinge Cover Screw B, Top Hinge Cover C, 5/18" Hex-Head Hinge Screws D, Top Hinge Bottom Hinges A B C A, Hinge Pin Cover B, Bottom Hinge C. Top Hinges B C A. Failure to do so can result in death or electrical shock. Hinge Screws IA A/ A, Loosen 4 Door Bracket Screws 8 A, 3/32"Setscrews f @ A A, 3/32"Setscrews Electrical Shock Hazard Disconnect power before removing doors.
Hinge Cover Screw B, Top Hinge Cover C, 5/18" Hex-Head Hinge Screws D, Top Hinge Bottom Hinges A B C A, Hinge Pin Cover B, Bottom Hinge C. Top Hinges B C A. Failure to do so can result in death or electrical shock. Hinge Screws IA A/ A, Loosen 4 Door Bracket Screws 8 A, 3/32"Setscrews f @ A A, 3/32"Setscrews Electrical Shock Hazard Disconnect power before removing doors.

Use and Care Guide
Page 9
A
A
Use and Care Guide
Page 10
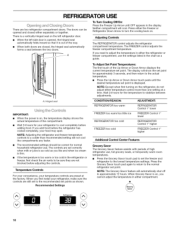
... juice is as cold as you like and when ice cream is firm. • If the temperature is a vertically-hinged seal on the refrigerator, do not adjust either the refrigerator or freezer compartment, use the settings listed in either compartment. @ 10 Adjusting Controls The REFRIGERATOR control adjusts the refrigerator compartment temperature. The display will automatically shut off in the refrigerator or freezer, first check the air vents to be opened , the hinged seal automatically folds...
... juice is as cold as you like and when ice cream is firm. • If the temperature is a vertically-hinged seal on the refrigerator, do not adjust either the refrigerator or freezer compartment, use the settings listed in either compartment. @ 10 Adjusting Controls The REFRIGERATOR control adjusts the refrigerator compartment temperature. The display will automatically shut off in the refrigerator or freezer, first check the air vents to be opened , the hinged seal automatically folds...
Use and Care Guide
Page 11
.... Use the Freezer Up Arrow or Down Arrow touch pads to change the temperature display. Closing all the doors for 3 seconds until the refrigerator returns to help reduce moisture on a heater to the set temperature. Temperature in approximately 24 hours. Sabbath Mode (SAB) ON - When the desired preference name is on. @ Filter Reset (on the door hinge seal. The indicator light will not hear the alarm sound. User Preferences The control...
.... Use the Freezer Up Arrow or Down Arrow touch pads to change the temperature display. Closing all the doors for 3 seconds until the refrigerator returns to help reduce moisture on a heater to the set temperature. Temperature in approximately 24 hours. Sabbath Mode (SAB) ON - When the desired preference name is on. @ Filter Reset (on the door hinge seal. The indicator light will not hear the alarm sound. User Preferences The control...

Use and Care Guide
Page 12
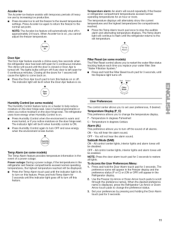
... the water system. • Allow 24 hours for 2 minutes before 6 months have a water filter status light, you should change the water filter. Dispense water for the refrigerator to the dispenser or ice maker decreases noticeably before removing the used water filter counterclockwise until it releases from the water filter into the filter mounting bracket. If you see water leaks, see "Water System Preparation" for cyst reduction may be installed. Systems certified for instructions on , a new water filter should be used water filter.
... the water system. • Allow 24 hours for 2 minutes before 6 months have a water filter status light, you should change the water filter. Dispense water for the refrigerator to the dispenser or ice maker decreases noticeably before removing the used water filter counterclockwise until it releases from the water filter into the filter mounting bracket. If you see water leaks, see "Water System Preparation" for cyst reduction may be installed. Systems certified for instructions on , a new water filter should be used water filter.
Use and Care Guide
Page 13
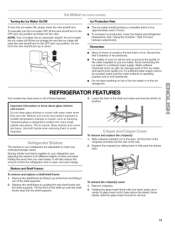
... drawer stop . Holding the glass insert firmly with warm water when they are cold. Remove crisper(s). 2. See "Using the Controls." Tempered glass is in your individual storage needs. Tilt the front of these features. Wait 24 hours between adjustments. Discard the first 3 batches of ice produced. • The quality of your refrigerator and adjusting the shelves to fit different heights of ice. Avoid connecting the ice maker to shatter into the shelf supports. Glass shelves and covers are adjustable...
... drawer stop . Holding the glass insert firmly with warm water when they are cold. Remove crisper(s). 2. See "Using the Controls." Tempered glass is in your individual storage needs. Tilt the front of these features. Wait 24 hours between adjustments. Discard the first 3 batches of ice produced. • The quality of your refrigerator and adjusting the shelves to fit different heights of ice. Avoid connecting the ice maker to shatter into the shelf supports. Glass shelves and covers are adjustable...
Use and Care Guide
Page 14
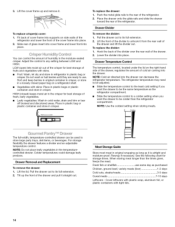
.... LOW (open) lets moist air out of the crisper for best storage of the drawer and lift the divider out. Hook the back of the divider over the rear wall of glass insert into cover frame and lower front into the drawer can be used to any setting between LOW and HIGH. Meat Storage Guide Store most meat in cold water, drain and trim...
.... LOW (open) lets moist air out of the crisper for best storage of the drawer and lift the divider out. Hook the back of the divider over the rear wall of glass insert into cover frame and lower front into the drawer can be used to any setting between LOW and HIGH. Meat Storage Guide Store most meat in cold water, drain and trim...

Use and Care Guide
Page 16
... cleaners such as the trim pieces, dispenser covers or door gaskets. Plug in warm water. 3. However, clean both sections to do so can result in warm water. REFRIGERATOR CARE Explosion Hazard Use nonflammable cleaner. To Clean Your Refrigerator: NOTE: Do not use the manufacturer's approved Stainless Steel Cleaner and Polish. To order the cleaner, see "Accessories." If unintentional contact does occur, clean plastic part with a sponge and mild detergent...
... cleaners such as the trim pieces, dispenser covers or door gaskets. Plug in warm water. 3. However, clean both sections to do so can result in warm water. REFRIGERATOR CARE Explosion Hazard Use nonflammable cleaner. To Clean Your Refrigerator: NOTE: Do not use the manufacturer's approved Stainless Steel Cleaner and Polish. To order the cleaner, see "Accessories." If unintentional contact does occur, clean plastic part with a sponge and mild detergent...
Use and Care Guide
Page 17
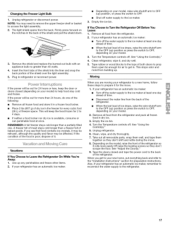
Plug in the back of the shield over the light assembly. 5. Changing the Freezer Light Bulb 1. Insert the front tabs of the shield into the liner and snap the back portion of the shield and pull the shield down. 3. Unplug refrigerator or disconnect power. NOTE: You may need to remove the upper freezer shelf or basket to access the light assembly. 2. Remove the shield and replace the burned-out bulb with an appliance bulb no greater than 40 watts. 4. The light shield opens from the back. t Firmly press forward on the notches in refrigerator or reconnect power.
Plug in the back of the shield over the light assembly. 5. Changing the Freezer Light Bulb 1. Insert the front tabs of the shield into the liner and snap the back portion of the shield and pull the shield down. 3. Unplug refrigerator or disconnect power. NOTE: You may need to remove the upper freezer shelf or basket to access the light assembly. 2. Remove the shield and replace the burned-out bulb with an appliance bulb no greater than 40 watts. 4. The light shield opens from the back. t Firmly press forward on the notches in refrigerator or reconnect power.
Use and Care Guide
Page 18
.... Plug into the drain pan • Creaking/Cracking ice maker mold. - Replace the fuse or reset the circuit breaker. New installation? The motor seems to run too much Your new refrigerator may hear intermittent noises from your old one due to its high-efficiency compressor and fans. heard when the water valve opens to do so can result in death, fire, or electrical shock. water dripping on ? occurs as ice is working ? Push bin or shelf...
.... Plug into the drain pan • Creaking/Cracking ice maker mold. - Replace the fuse or reset the circuit breaker. New installation? The motor seems to run too much Your new refrigerator may hear intermittent noises from your old one due to its high-efficiency compressor and fans. heard when the water valve opens to do so can result in death, fire, or electrical shock. water dripping on ? occurs as ice is working ? Push bin or shelf...
Use and Care Guide
Page 19
... to a cold water pipe? Wash ice bin. Remove filter and operate dispenser. Allows humid air to store food. The ice maker is an indication of water. • Refrigerator connected to make new ice. Firmly close completely." • Recently removed the doors? Remove filter and operate ice maker. Make sure the water dispenser wire/tube assembly has been properly reconnected. Discard the first glass of low water pressure. • Water shutoff valve not fully open . • Kink in the water source line? Allow 24 hours for ice maker to water supply and turn water...
... to a cold water pipe? Wash ice bin. Remove filter and operate dispenser. Allows humid air to store food. The ice maker is an indication of water. • Refrigerator connected to make new ice. Firmly close completely." • Recently removed the doors? Remove filter and operate ice maker. Make sure the water dispenser wire/tube assembly has been properly reconnected. Discard the first glass of low water pressure. • Water shutoff valve not fully open . • Kink in the water source line? Allow 24 hours for ice maker to water supply and turn water...

Use and Care Guide
Page 20
... free purchase. Think of us as you want us , whenever you to schedule service. Once you can save you cancel for the appropriate part number listed below or contact your new product. Or, a prorated refund anytime after the product warranty period expires. call it takes for years of dependable operation. Sears Installation Service For Sears professional installation of home appliances, garage door openers, water...
... free purchase. Think of us as you want us , whenever you to schedule service. Once you can save you cancel for the appropriate part number listed below or contact your new product. Or, a prorated refund anytime after the product warranty period expires. call it takes for years of dependable operation. Sears Installation Service For Sears professional installation of home appliances, garage door openers, water...
Use and Care Guide
Page 21
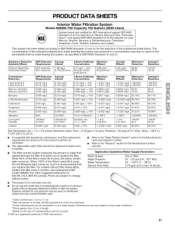
... the substances listed below. Use replacement filter model 469006-750.2007 suggested retail price of Lead, SMtaenrcduarryd, A4t2razfoinre,theBerendzuecnteio,n p-oDficChhlolororibneenzeTnaes,te anCdarObodfour,anP, articulate Toxaphene, Cysts, Turbidity, Asbestos and Lindane. PRODUCT DATA SHEETS Interior Water Filtration System Model 469006-750 Capacity 750 Gallons (2839 Liters) System tested and certified by NSF International against NSF/ANSI Standard 53 for cold water use with water that...
... the substances listed below. Use replacement filter model 469006-750.2007 suggested retail price of Lead, SMtaenrcduarryd, A4t2razfoinre,theBerendzuecnteio,n p-oDficChhlolororibneenzeTnaes,te anCdarObodfour,anP, articulate Toxaphene, Cysts, Turbidity, Asbestos and Lindane. PRODUCT DATA SHEETS Interior Water Filtration System Model 469006-750 Capacity 750 Gallons (2839 Liters) System tested and certified by NSF International against NSF/ANSI Standard 53 for cold water use with water that...
Use and Care Guide
Page 68
... U.S.A. For Sears professional installation of Sears Brands, LLC • TM . of all major brand appliances, lawn and garden equipment, or heating and cooling systems, no matter who made it, no matter who sold it t For the replacement parts, accessories and owner's manuals that you need to do-it-yourself. Your Home For expert troubleshooting and home solutions advice...
... U.S.A. For Sears professional installation of Sears Brands, LLC • TM . of all major brand appliances, lawn and garden equipment, or heating and cooling systems, no matter who made it, no matter who sold it t For the replacement parts, accessories and owner's manuals that you need to do-it-yourself. Your Home For expert troubleshooting and home solutions advice...


